MAIN SPECIFICATIONS
INSTALL THE MOTOR
CONNECT THE CLUTCH LEVER WITH THE PEDAL
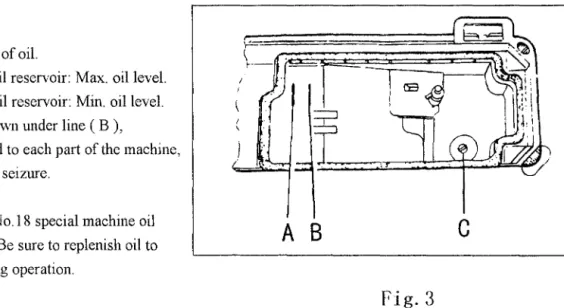
PREPARATION AND LUBRICATION
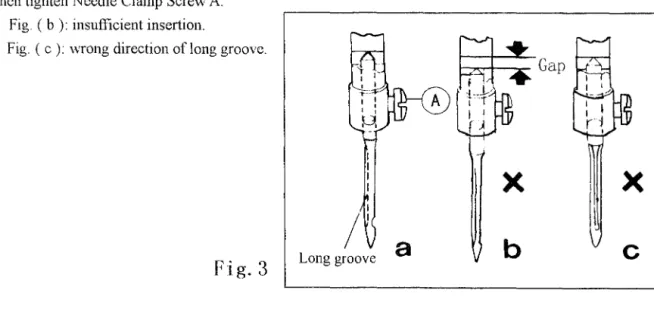
REPLACE NEEDLES
After one month of operation, during which the working speed is gradually increased and the machine works well enough, a high speed of 5000 spm can be adopted according to the nature of the work. To thread the needle, raise the needle bar to the upper end of its travel, take the thread from the spool and thread as shown in Figure 6. To take out the bobbin thread, grasp the end of the thread and turn the leveling wheel to lower the needle bar and then lift to the highest position.
ADJUSTMENT OF USE (Fig.7) . l) The wound bobbin thread should be neat and tight, if not, adjust the winding tension by turning the Tension Nut (A) of the bobbin winder tension holder. Note: the nylon or polyester thread must be wound with little tension, otherwise the bobbin (D) may break or dcfom1. 2) When the wound thread layer does not present a cylindrical shape as shown in Fig.7 (a. SET THE STITCH LENGTH AND THREAD RESISTANCE (Fig.8). l) The stitch length can be set by turning the knob (A) .
For heavy materials turn the pressure control thumbscrew as shown in Fig.l 0 (a) to increase the pressure, while for light materials turn the pressure control thumbscrew as shown in Fig.l 0 (b) to decrease the pressure . Basically, the thread tension should be adjusted according to the material, thread and other factors. It is common practice to test the bobbin thread tension as shown in Fig.12.
The position of the thread guide affects the tightness of the stitch and must therefore be adjusted according to the sewing materials and sewing conditions. When the abnormal stitches cause the thread to fray and break, the tension of the needle thread and needle thread should be adjusted accordingly. In case the needle thread tension is too strong or the needle thread tension is too weak, as shown in Fig.l5 (b), turn the needle nut counterclockwise to decrease the needle thread tension. needle thread or tighten the needle case tension spring adjusting screw to increase the bobbin thread tension (See Fig.l6.
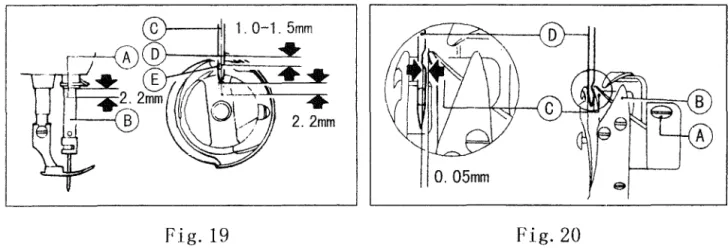
If needle thread tension is too weak or bobbin thread tension is too strong, as shown in Fig.l5 (c), turn the thumb nut clockwise to increase the needle thread tension, or loosen the tension spring adjusting screw of the bobbin case to decrease the bobbin thread tension.. 3 ) In case of the stitch forms as separated in Fig.l5 (d) and (e), adjustments can be made with reference to the above means. The standard needle timing (See Fig.l8) is to align Timing Mark (B) on the needle bar and the bottom of needle bar bushing (A) and meanwhile align the inner surface (E) of the hook and the center of the needle eye . (D) when the needle bar descends to its lowest position. The standard hook point timing (Sec. Fig.l9) is to align Hook Point (D) and Needle Centerline (C) when Needle Bar (B) is raised 2.2mm from the bottom of its stroke.
ADJUST THE HEIGHT OF THE FED DOG (Fig.22,23). l) Belly balancing wheel until the food dog is raised to its highest position from the surface of the throat plate. The standard feed dog height is that the tip of the feed dog is 0.8 mm above the surface of the throat plate (B). The standard position of the food dog is that the space between the front edge of the throat plate opening and the first tooth of the fully advanced food dog is 1 mm, as shown in Fig.24.
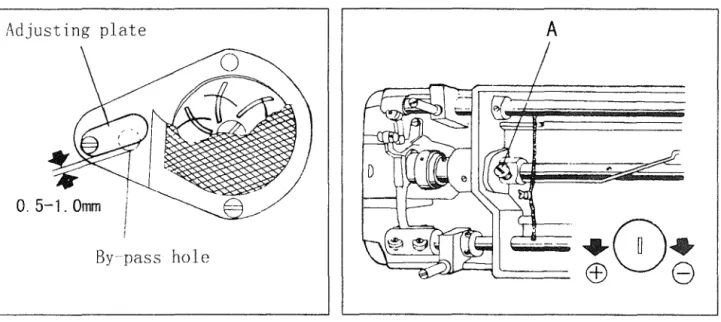
If oil splashes do not appear in the oil check window. \When the machine runs at a lmv, speed (about 2000 rpm), the clearance of the bypass hole decreases.

NEEDLE, THREAD AND MATERIAL TO BE SEWN
RUN-IN OPERATION
Break-in operation is required for a new sewing machine, or one that has been out of service for an extended period of time. 1) Remove the red rubber plugs (A) on the top of the machine and add sufficient oil .
THREADING
WINDING ADJUSTMENT
SET STITCH LENGTH AND REVERSE FEEDING
Tum the spring tension adjustment screw ( A ) of the bobbin case clockwise for more tension, or turn the screw counterclockwise for less tension. Loosen the set screw (A), turn the tension pin (B) clockwise to increase the spring tension, or turn the pin counterclockwise to decrease the spring tension. First loosen the set screw (A), turn the tension pin (B) counterclockwise to reduce the tension of the thread lift spring (C) to zero, then turn the tension knob (B) to clockwise until the spring ( C ) comes to the point of the thread tension adjustment spool, and turn the Tension Pin (B) half way back (counter-clockwise) After adjustment. 2) Adjustment of the spring stroke of the thread take-up.
Loosen the adjustment screw ( B ), turn the plug ( C ) clockwise to increase the stroke, or turn the plug ( C ) counterclockwise to decrease the stroke. Turn the leveling wheel by hand to place the needle (C) in the lowest position of its travel. The standard feed and needle movement time is that the tip of the feed (C) is flush with the surface of the throat plate (B) when the tip of the needle (A) reaches the surface of the throat plate (B). If the feed movement is not synchronized with the needle movement.
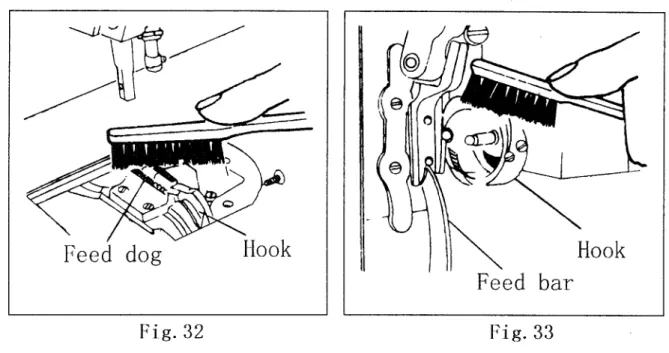
Remove the throat plate and clean the dust and lint between the feed teeth slots.
POSITION PRESSER BAR
ADJUST THE PRESSURE OF PRESSER EOOT
The presser foot pressure must be adjusted according to the thickness of the material you want to sew. It is recommended that the presser foot pressure be less as long as normal feeding is ensured.
ADJUST THREAD TENSION
ADJUST THREAD TAKE-UP SPRING
ADJUST THREAD GUIDE AND THREAD TENSION
TIME NEEDLE TO ROTAING HOOK
REPLACE ROTATING HOOK
ADJUST THE HEIGHT OF FEED DOG
ADJUST THE POSITION OF FEED DOG
TIME FEED MOTION TO NEEDLE MOTION
ADJUST OPENING TIME OF THE TENSION DISCS
LUBRICATION ADJUSTMENT
REGULAR CLEANING
NEEDLE BAR & THREAD TAKE-UP LEVER MECHANISM
ARM SHAFT MECHANISM
Cl3 HA14IIDII2 Feed and feed lift eccentric I CI3 HA341IDIOS Feed and feed lift eccentric I.
LOWER SHAFT MECHANISM
STITCH REGULATOR MECHANISM
FEEDING MECHANISM
PRESSER FOOT MECHANISM
OIL LUBRICATION MECHANISM
BOBBIN WINDER MECHANISM
ACCESSORIES