André Filipe Rainho Pereira
Licenciatura em Ciências de Engenharia Electrotécnica e de Computadores
Rail Corrugation: A Software Tool for
Detection and Analysis Using Wavelets
Dissertação para obtenção do Grau de Mestre em
Engenharia Electrotécnica e de Computadores
Supervisor: Arnaldo Guimarães Batista, FCT-UNL
Março 2018
iii
Copyright
Copyright©2018 – Todos os direitos reservados. André Filipe Rainho Pereira. Faculdade de Ciências e Tecnologia. Universidade Nova de Lisboa.
A Faculdade de Ciências e Tecnologia e a Universidade Nova de Lisboa têm o direito, perpétuo e sem limites geográficos, de arquivar e publicar esta dissertação através de exemplares impressos reproduzidos em papel ou de forma digital, ou por qualquer outro meio conhecido ou que venha a ser inventado, e de a divulgar através de repositórios científicos e de admitir a sua cópia e distribuição com objetivos educacionais ou de investigação, não comerciais, desde que seja dado crédito ao autor e editor.
v
Acknowledgments
To Professor Arnaldo Batista, for all the support given and his dedication to this project and all the knowledge he shared with me.
To Professor Manuel Ortigueira for all his advice in signal processing. To Professor José Varandas for helping with corrugation data.
To my parents, a special thanks for all the support in this stage of my life and especially my mother for always pushing me to work and study.
To my friends for being a part of my life and without them it would have been more difficult to accomplish this stage of my life.
vii
Abstract
Corrugation is an oscillatory wear of the rail and it is a consequence of the interaction between wheel and rail [1].
Rail corrugation usually appears in curves, but it may also arise in linear tracks. It usually appears in curves because of the friction between the rail and wheel due to curving [2].
The main objective of this master thesis is to develop new methods that can detect if there is corrugation in the rail and quantify it according to the frequency and amplitude of the signal.
A program has been already developed at FCT-UNL enabling the detection of rail corrugation, RailScan V2.1. However, this application is outdated, so the aim is to update it and make it more efficient, building a brand-new RailScan V3.0.
The implementation of the function Corrugram, a patent developed in FCT-UNL, was a huge evolution in RailScan. Corrugram is a new way to represent where and if corrugation is present in the rail.
Another implementation was the norm EN 13231-3:2012, another method to analyze if rail corrugation is present. This norm was incorporated within RailScan V3.0, and it ensured compliance against the best international practice among rail corporations [3].
The remaining part of this thesis was to create a database with robust data, allowing the validation of both RailScan and Corrugram as powerful tools to quantify rail corrugation.
The results proved that RailScan is a powerful tool to detect and locate rail corrugation and that the Corrugram is very simple, effective and useful in signal analysis.
Keywords: Corrugation, Wavelet Transform, Corrugram, One Third Octave Spectrum, EN
ix
Resumo
O desgaste ondulatório aparece nas linhas férreas e é uma consequência da interação entre a roda e o carril [1].
O desgaste ondulatório nas linhas férreas aparece geralmente nas curvas, mas é possível aparecer em linhas retas. Aparece geralmente em curvas devido à fricção entre o carril e a roda devido ao estar a curvar [2].
O principal objetivo desta tese de mestrado é desenvolver um método que seja capaz de detetar se existe desgaste ondulatório na linha férrea e qualificar de acordo com a frequência e amplitude do sinal.
Já foi desenvolvido um programa na FCT-UNL, que era capaz de detetar, o RailScan V2.1, mas este programa já estava desatualizado e o meu objetivo era de o atualizar e tornar mais eficiente, criando assim o RailScan V3.0.
A implementação da função Corrugrama, uma patente desenvolvida na FCT-UNL foi também uma evolução no RailScan. O Corrugrama é uma nova maneira de representar e localizar desgaste ondulatório.
Outra implementação foi a norma EN 13231-3:2012, uma norma que também deteta se existe desgaste ondulatório. Esta norma é uma inovação do RailScan V3.0 e fez todo o sentido ser implementada porque é a norma geralmente utilizada pelas empresas ferroviárias [3].
A outra parte desta tese era criar uma base de dados com dados suficientes para ser possível validar o RailScan, como uma poderosa ferramenta na análise de desgaste ondulatório nas linhas férreas.
Os resultados provaram que o RailScan é uma ferramenta útil na deteção e localização do desgaste ondulatório e que o Corrugrama é um programa simples, eficaz e benéfico na análise de sinais.
Palavras-Chave: Desgaste ondulatório, Transformada de ondulas, Corrugrama, Espectro
xi
Contents
Introduction ... 1
1.1 Introduction ... 1
1.2 Methods to Detect Rail Corrugation ... 3
1.2.1 CAT (Corrugation Analysis Trolley) ... 3
1.2.2 BI-CAT ... 4
1.2.3 RCA (Rail Corrugation Analyzer) ... 4
1.2.4 HSRCA (High Speed Rail Corrugation Analyzer) ... 5
1.2.5 TriTops ... 5
1.3 Thesis organization ... 6
Description of the time frequency analysis used in RailScan ... 7
2.1 Short-Time Fourier Transform (STFT) ... 7
2.2 Wavelet analysis ... 8
2.2.1 CWT (Continuous Wavelet Transform) ... 9
2.2.2 DWT (Discrete Wavelet transform) ... 11
2.2.3 Wavelet Reconstruction ... 13
2.2.4 Wavelet Packet Decomposition ... 14
Norms used to analyze Rail Corrugation ... 15
3.1 DIN ISO 3095:2013 and EN 13231-3:2012 ... 15
3.2 DIN ISO 3095:2013... 15
3.2.1 Implementation of the norm ISO 3095:2013 ... 18
3.3 EN 13231-3:2012 ... 20
3.3.1 Implementation EN 13231-3:2012 ... 21
3.4 Corrugram... 23
RailScan... 27
4.1 Data organization and RailScan V3.0 ... 27
4.2 Synthetic signal ... 29
xii 4.4 Wavelet Marginal ... 32 4.5 Wavelet Selection ... 32 Results ... 34 5.1 Results ... 34 5.1.1 Metrosystem ... 34 5.1.2 Curva Pragal ... 46 5.1.3 CinturaVAS ... 57 5.1.4 SintraVDE ... 65 5.1.5 Inverse CWT ... 75
Conclusion and Future Work ... 77
Conclusion ... 77
Future work ... 78
xiv
List of figures
Figure 1.1 – Example of a corrugated rail [2] ... 1
Figure 1.2 – CAT being used to detect any signs of corrugation on the track [10] ... 3
Figure 1.3 – BI-CAT being used to detect any signs of corrugation on the track [11] ... 4
Figure 1.4 – RCA being used to detect any signs of corrugation on the track [12] ... 4
Figure 1.5 – HSRCA being used to detect any signs of corrugation on the track [13] ... 5
Figure 1.6 – TriTops being used to detect any signs of corrugation on the track [14] ... 5
Figure 2.1 – Apllication of a STFT on a signal [17] ... 7
Figure 2.2 – Examples of mother wavelets [19] ... 9
Figure 2.3 – Wavelet changing in scale and position [20] ... 10
Figure 2.4 – Relation between scale and frequency. [20] ... 10
Figure 2.5 – Shifting a wavelet [20]. ... 11
Figure 2.6 – Filtering process for the DWT [22] ... 11
Figure 2.7 – Down sampling a signal [22]... 12
Figure 2.8 – 3 level decomposition tree [15] ... 12
Figure 2.9 –Wavelet reconstruction example [20] ... 13
Figure 2.10 – 3-level decomposition tree [20] ... 13
Figure 2.11 – Wavelet Packet 3-level decomposition tree [16] ... 14
Figure 3.1 – One-third octave spectrum used to measure rail roughness [23] ... 16
Figure 3.2 – Flow chart of the implementation of the one third spectrum function ... 19
Figure 3.3 – Flow chart of the EN13231 function ... 22
Figure 3.4 – Roughness level comparison between the ISO 3095:2012 and EN 13231-3 [3] ... 23
Figure 3.5 – Ilustration of the Corrugram patent document [26] ... 24
Figure 3.6 – Corrugram example of a random signal using the norm DIN ISO 3095:2013 ... 25
Figure 3.7 – Corrugram example of a random signal using the norm EN 13231-3:2012 ... 25
Figure 4.1 – Information shown in the help button ... 29
Figure 4.2 – Spectrogram of the synthetic signal ... 30
Figure 4.3 – CWT representation of the synthetic signal ... 31
Figure 4.4 – Example of a Morlet Wavelet ... 32
Figure 5.1 – Representation of the Metrosystem signal in RailScan. 1 and 2 represent the dominant level in the scalogram due to low frequency components, which are mainly due to terrain irregularities. ... 34
Figure 5.2 – Spectral analysis of the original Metrosystem signal. Identifications “a” show that both rails have significant power in lower frequencies. ... 35
Figure 5.3 – STFT representation of Metrosystem rails. Numbers 3 and 4 indicate that in this representation both rails have greater power in lower frequencies ... 35
Figure 5.4 – Representation of the filtered Metrosystem signal in RailScan. 5 and 6 are the critical corrugation points identified in the left rail. 7 and 8 are the critical corrugation points identified in the right rail. ... 36
Figure 5.5 – Spectral analysis of the filtered Metrosystem signal. 9 and 10 are identifications of power in the frequency band for the right rail ... 37
xv
Figure 5.6 - STFT representation of the filtered Metrosystem signal ... 40
Figure 5.7 – One third octave spectrum using ISO 3095:2013 for the Metrosystem signal. The red dotted lines are the divisions into groups for a better analysis ... 40
Figure 5.8 – One third octave spectrum using EN 13231:2012 for the Metrosystem signal ... 41
Figure 5.9 – EN 13231:2012 application in the left rail for the Metrosystem signal. The red dotted lines in the plots are the peak to peak limits. ... 42
Figure 5.10 – EN 13231:2012 application in the right rail for the Metrosystem signal. The red dotted lines in the plots are the peak to peak limits. ... 43
Figure 5.11 – Corrugram application using norm ISO 3095:2013 for the Metrosystem signal. 5,6,7 and 8 are identifications of spots in the rail that have a great amount of corrugation ... 44
Figure 5.12 – Corrugram using the norm EN 13231:2012 for the Metrosystem signal. 5 and 8 are the places identified with corrugation ... 45
Figure 5.13 – CWT Marginal for both Rails in Metrosystem signal ... 46
Figure 5.14 - Filtered Marginal of the CWT for both rails ... 47
Figure 5.15 – Representation of the signal Curva Pragal in RailScan. 1 and 2 represent the dominant level in the scalogram due to low frequency components, which are mainly due to terrain irregularities. 48 Figure 5.16 – Spectral analysis of Curva Pragal signal ... 49
Figure 5.17 – STFT representation of Curva Pragal signal ... 49
Figure 5.18 – Representation of the filtered Curva Pragal signal in RailScan... 50
Figure 5.19 – Spectral analysis of the filtered Curva Pragal signal ... 51
Figure 5.20 – STFT representation of the filtered Curva Pragal signal ... 51
Figure 5.21 – One third octave spectrum using ISO 3095:2013 for the signal Curva Pragal. The red dotted lines are the divisions into groups for a better analysis ... 52
Figure 5.22 – One third octave spectrum using EN 13231:2012 for the signal Curva Pragal ... 53
Figure 5.23 – EN 13231:2012 application to the left rail for Curva Pragal signal. 7 and 8 are indicating parts of the signal that pass the limit. The red dotted lines in the plots are the peak to peak limits. ... 54
Figure 5.24 - EN 13231:2012 application to the right rail for Curva Pragal signal. The red dotted lines in the plots are the peak to peak limits. ... 55
Figure 5.25 – Corrugram using the norm ISO 3095:2013 for Curva Pragal signal. 3 and 4 are the spots Corrugram identified as most corrugated ... 56
Figure 5.26 – Corrugram using the norm EN 13231:2012 ... 57
Figure 5.27 – Marginal of the CWT for both Rails. 3 is the demosntration that the power in the left rail is much higher than the right rail ... 58
Figure 5.28 – Representation of the filtered CinturaVAS signal in RailScan. Identifications 1 and 2 are the critical corrugation poins of the left rail. Identifications 3 and 4 are the critical points of the rigt rail 59 Figure 5.29 – Spectral analysis of the filtered Cintura VAS signal. 5 and 6 in both plots are the identification of the higher power frequencies in both rails. ... 60
Figure 5.30 –STFT representation of the filtered Cintura VAS signal. Numbers 7 and 8 represent the areas where the identification of the higher power frequencies was possible. ... 60
xvi
Figure 5.31 – One third octave spectrum using ISO 3095:2013 for signal Cintura VAS. 9 and 10 identify
the highest acoustic roughness values for both rails. The red dotted line is the divisions into groups for a better analysis ... 61
Figure 5.32 – One third octave spectrum using EN 13231:2012 for signal Cintura VAS ... 62 Figure 5.33 – EN 13231:2012 application to the left rail of signal Cintura VAS. 11 is identifying parts
of the signal that are passing the estableshid limit. The red dotted lines in the plots are the peak to peak limits. ... 63
Figure 5.34 – EN 13231:2012 application to the right rail for the signal Cintura VAS. 12 is the
identification of parts of the signal that is passing the established limit. The red rectangule is used to display the information output of the third plot. ... 64
Figure 5.35 – Corrugram using norm ISO 3095:2013 for the signal Cintura VAS. Numbers 1 and 12 are
identifications of critical corrugation parts in the left rail. Numbers 3 and 4 are the identification of critical corrugation parts in the right rail. ... 65
Figure 5.36 – Corrugram using the norm EN 13231:2012 for the signal Cintura VAS. 1 and 3 are the
corrugation points in both rails. ... 66
Figure 5.37 – Marginal of the CWT for both Rails. 19 displays the highest power of the CWT for the
frequencies chosen ... 67
Figure 5.38 – Representation of the filtered signal SintraVDE in RailScan. 1 and 2 are the corrugation
identified in the left rail. 3 is the corrugation identified in the right rail. ... 68
Figure 5.39 – Spectral analysis of the filtered Sintra VDE signal. 3 and 4 are the maximum frequency
power for each rail. ... 69
Figure 5.40 – STFT representation of the filtered Sintra VDE signal ... 69 Figure 5.41 – One third octave spectrum using EN ISO 3095:2013 for the signal SintraVDE. Numbers
5 and 6 identify the highest acoustic roughness values for both rails. The red dotted line is the divisions into groups for a better analysis ... 70
Figure 5.42 – One third octave spectrum using EN 13231:2012 for SintraVDE signal ... 71 Figure 5.43 – EN 13231:2012 application to the left rail of the SintraVDE signal. The red dotted lines
in the plots are the peak to peak limits. ... 72
Figure 5.44 – EN 13231:2012 application to the right rail for the SintraVDE signal. The third and fourth
plot have a red rectangule indicating that the rails is corrugated. ... 73
Figure 5.45 – Corrugram using the norm ISO 3095:2013 for the signal SintraVDE. 1and 2 are the critical
corrugation points of the left rail. 3 is the critical corrugation point of the right rail ... 74
Figure 5.46 – Corrugram using the norm EN 13231:2012 for the signal SintraVDE. 2 and 3 are the only
parts identified with corrugation in both rails. ... 75
Figure 5.47 – Marginal of the CWT for both Rails. The power of the right rail is so much higher than
the left rail that the left rail becomes almost invisible. ... 76
Figure 5.48 – Representation of a signal with the new CWT. A black arrow is pointing to the part of the
signal that will be inverted. 1 is the part of the signal being analyzed. ... 77
xviii
List of Tables
Table 2.1 – Comparing the wavelet scale with frequency [18] ... 10
Table 3.1– One third octave band frequencies [16] ... 17
Table 3.2 – Acceptance criteria of allowable percentage of exceeding [24]... 20
Table 3.3 – Acceptance criteria of peak to peak limits [24] ... 20
Table 3.4 – One third octave band [16] ... 21
xx
Acronyms
mm Millimeter cm Centimeter m Meter µm Micrometer FT Fourier TransformFFT Fast Fourier Transform
STFT Short Time Fourier Transform
CWT Continuous Wavelet Transform
DWT Discrete Wavelet Transform
WPT Wavelet Packet Transform
λ Wavelength
ν Speed
EN European Norm
1
Introduction
1.1 Introduction
Rail corrugation is one of the most common types of wear in the railroad industry. It is generally considered that there are six types of rail corrugation, according to damage and wavelength. Once present, corrugation can affect the wheel-rail and vehicle-track interaction, leading to an unpleasant ride and a deterioration of the system [4], [5].
Rail corrugation (figure 1.1) displays wavelengths between 3cm and 100cm and it is divided in two groups: short wavelength rail corrugation (3cm to 10cm) and long wavelength rail corrugation (10cm to 100cm) [6].
About 40% of all tracks are prone to develop corrugation, so this is a very considerable problem in the railroad industry [2].
Figure 1.1 – Example of a corrugated rail [2]
Rail corrugation is one of the most serious and expensive problems that railways suffer. This phenomenon results in reduced rail and wheel lifetime and it can lead the transport company to prematurely replace the rail, meaning higher costs.
The noise emitted can be painful to the passengers and the community that lives nearby the rails. Most of the European cities are adopting environmental noise policies, making public transportation networks reduce their noise emission even on existing lines, a process that is very expensive [2], [7].
There are various ways to detect rail corrugation. These methods can be divided into two classes, direct and indirect measurement.
In the direct measurement, the rail is directly examined. The advantage of using this method is that the irregularities of the wheel do not interfere with the measurement. The disadvantage of
2 this method is that for long-distance rails it becomes ineffective as it can only measure the rail at low speeds [4].
In the indirect measurement, the rail is examined through the vibrations and sounds the train emits. With this method, long-distance rails are no longer a problem because the measurement can be done in two ways. The first one is to use sensors on the rail and measure its vibration. The second way is to put sensors on the train and measure its acceleration [4].
The indirect measurement also has disadvantages, as irregularities of the wheel affect the data, so a rail without corrugation could be still erroneously considered damaged, leading to inconclusive results and an incorrect analysis.
In this master thesis, the data analyzed was acquired with the “RMF” model of Vogel & Plotscher, a direct measurement method. This equipment can measure corrugation from wavelengths of 10 mm to 3000 mm and is an approved measuring device for EN 13231:2012 [8],[34].
The data analyzed was also acquired using an indirect method, using a sensor to measure the acceleration of the train. The equipment used was not disclosed.
Having data acquired from two different methods leads a more robust analysis.
The main objective of this master thesis is to develop a method that can detect if there is corrugation in a rail and quantify it according to the frequency and amplitude of the signal.
The software used to detect corrugation has been developed in Matlab.
This work aims to develop a program that can detect and analyze corrugation using wavelets because they are the most powerful form to scrutinize non stationary signals and to implement new ways to detect if there is corrugation in the rail, such as the European Norm 13231-3:2012 and the Corrugram.
A previous program (RailScanV2.1) was developed at FCT-UNL [15]. Using this software, it was possible to detect and quantify rail corrugation using wavelet packets. RailScanV2.1 can also analyze the one-third-octave bands to verify if the wavelengths are compliant with DIN ISO 3095 requirements, which specify the noise emission level [9].
RailScanV2.1 was initially developed in 2009/2010. Since then, no further updates were implemented, leaving existing functions outdated after ISO 3095 revision in 2013, such as the wavelet filter and the one third-octave spectrum. The new version of the program named RailScanV3.0, will include all the previous version features and add some major changes in the layout in order to become more user friendly. The parameters of the data are no longer requested to the user. To analyze signals with RailScan, file selection is sufficient. In addition, it can now evaluate both rails simultaneously, making differences clearly comparable.
One of the biggest changes in RailScan will be the addiction of a function called Corrugram. The patent for this function was recently approved and it is a new way to represent if and where corrugation is present in the rail [26].
3 Another development is the inclusion of EN 13231-3, because it is the norm most commonly used by railway transportations [3]. This norm aims to tighten allowed limits in the irregularities of the rail.
1.2 Methods to Detect Rail Corrugation
There are companies that develop some instruments to detect if there is corrugation on the rail. A brief explanation of this instruments will be given in the next chapter.
1.2.1 CAT (Corrugation Analysis Trolley)
CAT (RailMeasurement Ltd) is an instrument that can be operated and carried by one person. It can only analyze one rail. While is analyzing the longitudinal profile of the surface of the rail it can also measure its acoustic roughness. For high speed rails this is not a very good method because it analyzes the rail at the speed of the person walking (approximately 1 m/s) [9], [10].
4
1.2.2 BI-CAT
BI-CAT (RailMeasurement Ltd) can measure both rails simultaneously with the same precision of the CAT.
The BI-CAT uses the same technology as the CAT and the same software to analyze the rail longitudinal profile and measure acoustic roughness on both rails at the speed of the person walking (approximately 1 m/s) [11],[27].
Figure 1.3 – BI-CAT being used to detect any signs of corrugation on the track [11]
1.2.3 RCA (Rail Corrugation Analyzer)
The RCA (RailMeasurement Ltd) measures irregularities, in particular rail corrugation.Using this analyzer brings the advantage that it can measure irregularities from a vehicle and can analyze both rails at the same time. The RCA works at a speed range of 0.5 km/h to 50 km/h, but the precision of the data collected is better if the speed is closer to the minimum range [12].
5
1.2.4 HSRCA (High Speed Rail Corrugation Analyzer)
The HSRCA (RailMeasurement Ltd) is designed to measure the longitudinal irregularities in rails at line speeds (approximately 120 km/h). The main irregularities measured are corrugation and acoustic roughness. The hardware of the HSRCA is accelerometers on both axle boxes. This instrument can measure both rails at the same time [13].
Figure 1.5 – HSRCA being used to detect any signs of corrugation on the track [13]
1.2.5 TriTops
TriTops is an instrument designed to measure irregularities on a railway wheel. It can measure displacement, corrugation and acoustic roughness present on the rail.
The Tritops can be carried by one person and it can measure 4 wheels at the same time [14].
6
1.3 Thesis organization
The thesis will be organized the following way:
Chapter 1 – Introduction of rail corrugation, methods to detect it and the thesis structure. Chapter 2 – Describes the theoretical aspects of the time-frequency analysis used in
RailScan.
Chapter 3 – A detailed description of the functions used to detect rail corrugation. Chapter 4 – RailScan and methodology.
Chapter 5 – Results.
7
Description of the time frequency analysis used in RailScan
2.1 Short-Time Fourier Transform (STFT)
Fourier transform (FT) reveals the frequency composition of a signal by transforming the signal from time domain into the frequency domain. [17]
FT presents a problem, it cannot represent time and frequency localization and if the signal being analyzed is non-stationary the analysis will be limited. The data obtained to analyze rail corrugation is generally non-stationary, so it is necessary to use a different technique. [17]
To overcome this limitation of the FT, it was created the short-time Fourier transform (STFT).
The STFT has a sliding window function that is centered at a specific time τ. For each τ, a time-localized FT is performed on the signal. After that, the window is moved by τ and another FT is performed on the signal. This process is done until there is no more signal to analyze. This is the method used to analyze non-stationary signals using FT, because if the signal is divided by time-windows, in each window the signal is considered stationary. This method reduces the number of computations made [17], [28].
As it is show in figure 2.1, The STFT decomposes the signal into a time-frequency representation.
Figure 2.1 – Apllication of a STFT on a signal [17]
8 STFT (τ, ƒ) = ∫ 𝑥(𝑡) 𝑔∗𝑡,𝑓(t) dt = ∫ 𝑥(𝑡)g(t- τ)𝑒−𝑗2𝜋𝑓𝑡 dt (2.1)
In equation 3.1,𝑥(𝑡) is the signal being analyzed, g (t- τ) the sliding window function, f the frequency of the signal and τ the time of the signal.
Basically, the STFT provides information about when and what frequencies a signal has in certain events.
Having a sliding window means that a longer window produces a different result than having a smaller window. In this case, a shorter window gives a good time resolution and a longer window gives a good frequency resolution. It is impossible to have both [29].
Once the window length is defined, that length will be the same for all frequencies but for almost all vibrating signals, higher frequencies do not need to have the same resolution as the lower frequencies. To overcome this window length problem, it is necessary to use a different method.
2.2 Wavelet analysis
The FT is a powerful tool in data analysis, however it does not represent abrupt changes efficiently.
FT represents data decomposed in sine waves, which oscillate theoretically forever. Therefore, to analyze data with abrupt changes, we need to use functions that are localized in time and frequency. [18]
A Wavelet is a waveform of limited duration that has an average value of zero. They differ from sine waves because they are asymmetric and irregular. The wavelet transform can modify the resolution for different frequency ranges unlike the FFT [19].
Wavelets come in different sizes and shapes, known as mother wavelets. Figure 2.2 shows various examples of mother wavelets.
9
Figure 2.2 – Examples of mother wavelets [19]
The choice of which wavelets to use depends only on what features of the signal are trying to be detected, for instance to detect abrupt changes in a signal we can choose one wavelet but if we are trying to detect oscillations we can choose another. [19]
The two major transforms in wavelet analysis are Continuous Wavelet Transform (CWT) and Discrete Wavelet Transform (DWT).
The CWT and DWT differ in how they discretize the scale and shifting parameters. [19]
2.2.1 CWT (Continuous Wavelet Transform)
The CWT is used in RailScan because it allows a time-scale analysis of the signals, it decomposes them considering their frequency components [30].
The CWT is defined as the sum over the time of the signal, multiplied by the scale and shifted versions of the mother wavelet ᴪ(τ).
CWTᴪx (τ, s) = 1
√|𝑠|∫ 𝑥(𝑡) ᴪ * 𝑡− τ
𝑠 dt (2.2)
CWT is a function defined by two variables, s is the scale and τ is the location of the wavelet as it passes through the signal. [20]
10 In figure 2.3, it will be shown how the CWT is calculated.
Figure 2.3 – Wavelet changing in scale and position [20]
In figure 2.3 it is possible to see how the CWT affects the signal. The figure must be divided in 3 parts for a better understanding. The first part is the definition of which wavelet to use, following the calculation of the first coefficient. In the second part, the scale is the same, but the position of the wavelet changed to be able to calculate all coefficients. All windows are versions of the mother-wavelet. After calculating all coefficients, the signal returns to the initial position but the scale is different and the process to determine the coefficients initiates again [32].
After all the coefficients of the wavelet are calculated they must be multiplied by the appropriately scaled and shifted wavelet [18]. The scale parameter is somewhat equal to the scale of a map, if the scale is larger it is possible to observe more information, but with no detail and if the scale is smaller it shows the detailed information. [15]
Scaling is the process of stretching and shrinking the signal in time and it is inversely proportional with the frequency. Table 3.1 shows how the wavelet scale influences the frequency, the higher the scale the smaller the frequency.
Table 2.1 – Comparing the wavelet scale with frequency [18]
Wavelet Scale 2 4 8 16 Frequency (F) 𝐹 2 𝐹 4 𝐹 8 𝐹 16
Figure 2.4 – Relation between scale and frequency. [20]
The relation between scale and frequency is represented in figure 2.4. With a small scale factor, we obtain a compressed wavelet to help capture the abrupt changes in the signal and the wavelet has high frequency. With a high scale factor, we obtain a stretched wavelet that helps capture slow changes in a signal and the wavelet has low frequency.
11 Shifting the wavelet means delaying its onset (figure 2.5).
Figure 2.5 – Shifting a wavelet [20].
The CWT is a representation with a high degree of redundancy, because there is an overlap between wavelets at each scale and between scales. It can operate at every scale, but that requires a high level of computation. [21]
In the CWT, we can analyze the signal in intermediary scales, known as scales per octave. The larger the number of scales per octave, the finer the scale discretization.
Calculating the wavelet coefficients at every scale brings redundancy when trying to reconstruct a signal, a different form of wavelet transform is used, the DWT.
The scales of the DWT are based on power of two. [21]
2.2.2 DWT (Discrete Wavelet transform)
The DWT is the equivalent of comparing the signal with discrete multirate filter banks. The filtering process is explained in the next figure (figure 2.6)
Figure 2.6 – Filtering process for the DWT [22]
The signal S passes through a low-pass and high-pass filter, dividing the signal into two coefficients, coefficient A and coefficient D. The coefficients are approximation (A) and detail (D). The approximation coefficient A is the high scale, low-frequency part of the signal [33].
12 The detail coefficient D is the low scale, high-frequency part of the signal.
If the process of figure 2.6 happened, the number of coefficients will double. To correct this, a down sample must occur. The filter output is down sampled by two, throwing away every second coefficient and with that now the number of coefficients is half the original signal [22].
In figure 2.7 it is explained how this process works.
Figure 2.7 – Down sampling a signal [22]
The decomposition process can be iterated, decomposing the generated approximation into many lower resolution components. This process is called the wavelet decomposition tree.
Theoretically this process can be done until on sample is left.
In practice, the number of decomposition levels depends on the signal we are trying to analyze.
In figure 2.8 is represented an example of a 3-level decomposition tree.
13
2.2.3 Wavelet Reconstruction
The DWT can be used to decompose signals, but the process of decomposition can be reversed without loss of information. The wavelet reconstruction process consists in up sampling and filtering. Up sampling is the process of lengthening a signal by inserting zeros between samples [20].
The decomposition and reconstruction filters form a system that is called quadrature mirror filters (figure 2.9) [20].
Figure 2.9 –Wavelet reconstruction example[20]
Figure 2.10 is an example of how a signal is reconstructed using wavelets. The signal is decomposed into a 3-level tree and coefficient A is being decomposed as it was shown in figure 2.8. To reconstruct the filtered signal into the original, different equations can be used, as it is explained in figure 2.10. To reconstruct the filtered signal into the original signal, there are 3 different ways in this case. If the decomposition tree was bigger, the number of cases that could be used to reconstruct the signal would be higher [33].
Figure 2.10 – 3-level decomposition tree[20]
It is possible to reconstruct the approximation and detail coefficients. That can be done by passing the approximation and detail coefficient vectors with a vector of zeroes.
14
2.2.4 Wavelet Packet Decomposition
In the DWT, the signal is split into an approximation and a detail. The approximation is split again generating a sub level approximation and detail.
In the wavelet packet both details and approximation can be split, generating more ways to reconstruct the signal. Figure 2.11 represents the wavelet packet decomposition tree.
Figure 2.11 – Wavelet Packet 3-level decomposition tree [16]
Wavelet packet analysis allows the signal S to be represented for example as A1+AAD3+DAD3+DD2, which is not possible in ordinary wavelet reconstruction.
15
Norms used to analyze Rail Corrugation
3.1 DIN ISO 3095:2013 and EN 13231-3:2012
To monitor if there is corrugation, two different methods can be used. One method measures the acoustic roughness of the rail and the other if rail irregularities surpassed a certain limit.
The first method considers the acoustic roughness criteria of DIN ISO 3095:2013 related to corrugation and the second method the wavelength limit criteria EN 13231-3:2013.
Basically, these two methods could work together to achieve the best result of a rail without corrugation. Using DIN ISO 3095 to monitor the roughness level is a very effective method and when the roughness level passes the upper limit accepted, a process called rail grinding is used to re-profile the rail. After re-profiling the rail, EN 13231-3 criteria is used because DIN IS0 3095 does not specify how much irregularities a rail can have.
In this thesis, both norms will be implemented even though ISO 3095 is more complete, EN 13231-3 is the most used by all railway companies. [3]
3.2 DIN ISO 3095:2013
DIN ISO 3095, shows a spectrum (figure 3.1) where for each wavelength there is a limit for the acoustic roughness it can have, meaning that if the roughness level is above the wavelength limit, there is corrugation on the rail.
The one-third octave spectrum is originally used to analyze acoustic signals. This spectrum can be used to measure the acoustic roughness of the signal because it can measure the power in each frequency band. [23]
If the one-third spectrum can measure acoustic roughness it can be used to measure corrugation.
16
Figure 3.1 – One-third octave spectrum used to measure rail roughness [23]
Using equation (3.1) the pre-defined ISO wavelengths (v = 1m/s) were converted to frequencies and the following table (table 3.1) was obtained. [16]
17
18 The 𝑓𝑙𝑐𝑢𝑡 and 𝑓ℎ𝑐𝑢𝑡 frequencies are calculated by the following expressions:
𝑓𝑙𝑐𝑢𝑡 = 𝑓𝑐 10 1 20 (3.2) 𝑓ℎ𝑐𝑢𝑡 = 𝑓𝑐∗ 10 1 20 (3.3)
Equations 3.2 and 3.3 are used to calculate the superior and inferior limit of the central frequency.
For frequencies close to the Nyquist value or zero an interpolation factor is applied to the data to improve the stability of the filter. [16]
3.2.1 Implementation of the norm ISO 3095:2013
To implement this norm, a Matlab function was implemented, a function that considers the signal we want to analyze, the distance travelled and the average speed of the measuring equipment.
In this function, the wavelength limits defined by the norm were considered, as it is referred in table 3.1.
Using a Butterworth filter of order 8, the signal is filtered using the superior and inferior limits of the central frequency (equations 3.2 and 3.3).
After filtering the signal, it is necessary to calculate its roughness level in db. To calculate the roughness level for each wavelength, the following expression must be used.
𝐿𝑟 = 10 log( 𝑟 𝑟0)
2 (3.4)
Where,
𝐿𝑟 is the roughness level in dB 𝑟 is the RMS roughness in µm 𝑟0 the reference roughness; 𝑟0 = 1 µm
After calculating 𝐿𝑟, a comparison between the roughness level calculated and the maximum roughness level allowed must be done, and if it passes the maximum allowed, the rail is considered corrugated in that specific wavelength.
19
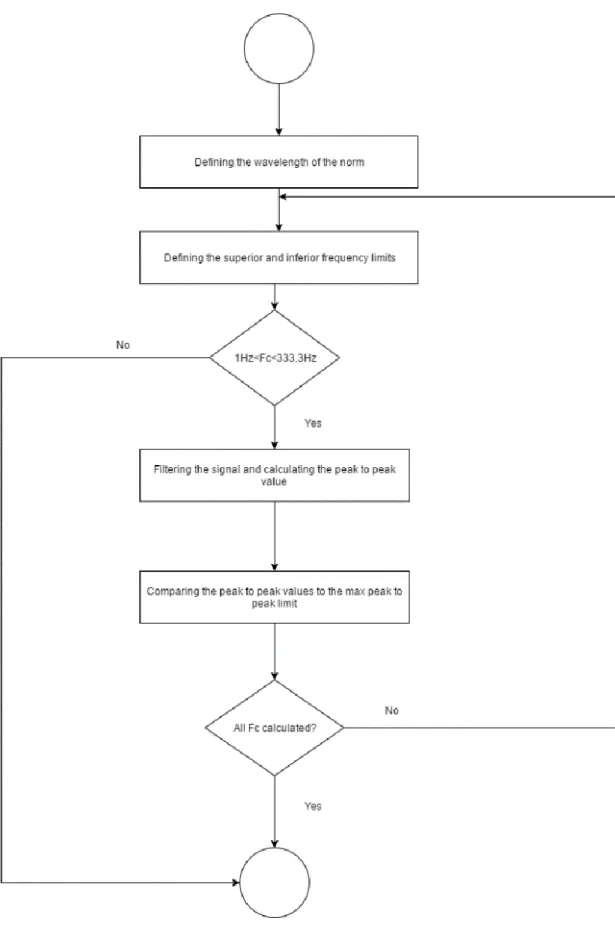
Figure 3.2 – Flow chart of the implementation of the one third spectrum function
Figure 3.2 explains how the process of implementing the EN ISO 3095 was done. First, the wavelength to filter the signal must be defined (table 4.1). After that, equations 3.2 and 3.3 are
20 used to calculate the upper and lower limits of the filter. After filtering the signal, equation 3.4 is used to calculate the roughness level of the signal for that specific wavelength and that value is compared to the maximum value defined in ISO 3095. This process is done until there are not more wavelengths to use.
3.3 EN 13231-3:2012
The European norm EN 13231-3 presents two tables in its published document. Table 3.2, shows the acceptance criteria in terms of allowable percentage of exceeding and table 3.3 shows the acceptance criteria to peak to peak limits.
Table 3.2 – Acceptance criteria of allowable percentage of exceeding [24]
In table 3.2 it is possible to notice that wavelengths are divided into four groups, implicating that the implementation of this norm will have to ensure that these wavelengths are considered. In all wavelength ranges, the percentage of exceeding is 5%, meaning that all signal being measured cannot surpass more that 5% of the established limit.
Class 2 will not be used in this program, it is a very specific class and does not represent what it is trying to be proved by using this norm. Class 2 only contemplates two groups of wavelengths and using it will not bring any added value to RailScan.
Table 3.3 – Acceptance criteria of peak to peak limits [24]
Table 3.3 is where the wavelength maximum peak to peak value is defined. Table 3.2 shows the percentage of exceeding. However, does not mention the limit and table 3.3 demonstrates it. For each wavelength group there is a different restriction and that restriction is specified in peak-to-peak values.
If the peak-to-peak values of a signal exceed the established limit and it represents more than 5% of all signal than it is possible to infer that there is corrugation in the rail for those wavelengths.
21 Using equation (3.5) the pre-defined wavelengths (v = 1m/s) were converted to frequencies and the following table was obtained.
𝑓 = 𝑣
𝜆 (3.5)
Table 3.4 – One third octave band [16]
Wavelength (mm) Frequency (Hz)
𝒇
𝒍𝒄𝒖𝒕-
𝒇
𝒉𝒄𝒖𝒕 10-30 33.33-100 30-100 10-33.33 100-300 3.33-10 300-1000 1-3.33For frequencies close to the Nyquist value or zero an interpolation factor is applied to the data to improve the stability of the filter. [16]
3.3.1 Implementation EN 13231-3:2012
To apply this norm, a Matlab function was implemented, a function that considers the signal we want to analyze, the distance travelled by the signal and the average speed.
In this function the wavelength limits defined by the norm were considered, as it is referred in table 3.4.
Using a Butterworth filter of order 8, the signal is filtered using the superior and inferior limits of the wavelengths (table 3.4).
EN 13231 maximum is in peak to peak value, meaning that after filtering the signal, the peak to peak value must be calculated.
After this calculation, we must compare the peak to peak values to the max peak to peak allowed and if it passes the 5% criteria, the rail is considered corrugated.
22
Figure 3.3 – Flow chart of the EN13231 function
Figure 3.3 explains how the norm EN 13231 was implemented. This implementation is not very different from the EN ISO 3095 because both implementations select a range of wavelengths to filter the signal. After filtering, the peak to peak value must be calculated and compared to the
23 maximum peak to peak value allowed. This process is done until there are not more wavelengths to use.
Even thought, EN 13231-3 is a different norm than ISO 3095 it can also be applied to the one third octave spectrum (figure 3.4).
Figure 3.4 – Roughness levelcomparison between the ISO 3095:2012 and EN 13231-3 [3]
Although the representation of figure 3.4 is not according to the norms, because EN 13231-3 does not use the one third octave spectrum, figure 13231-3.4 represents how exigent both norms are, the roughness level is much higher in EN 13231-3. Figure 3.4 displays that two different results will be achieved if both norms are used simultaneously.
3.4 Corrugram
Corrugram is a program developed by Arnaldo Batista Nuno Barrento, Manuel Ortigueira and Fernando Coito, in FCT-UNL. The main objective of this program is to find a new representation of rail corrugation. Corrugram will help to visually detect if there is any corrugation exceeding the norms.
It is very useful to identify sections of the rail that have corrugation and to provide a differential indicator of rail corrugation amplitude for each wavelength and for each rail section. Corrugram can be applied to have smarter and simple preventive action and to learn which section of the rail needs intervention. It contemplates the power spectrum associated with the vibrations in each section of the rail. This innovation also presents a differential analysis of the power spectrum for all wavelengths and that analysis will be compared to values that are considered
24 adequate for the safety of the rail. Additionally it presents the sections of the rail that need maintenance.
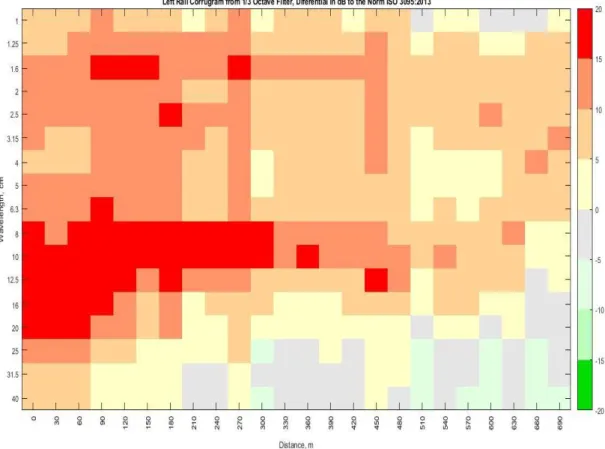
Corrugram works directly with the norm DIN ISO 3095, it depends on roughness level values, as it is demonstrated in the one third octave spectrum (figure 3.1). Basically, if a 2 cm wavelength has a greater value than 0 dB, the Corrugram will show a yellow color and the greater the value of rail roughness the color will become red.
Figure 3.5 – Ilustration of the Corrugram patent document [26]
Figure 3.5 is an example presented in the patent [26]. In the x axis, represented by number 5, it shows the distance traveled by the train. The x axis is divided by parts of 36 m, though that value can be altered. The x axis can be divided by any distance, if that distance is inferior to the distance travelled by the train. The y axis, represented by number 6, represents all the wavelengths of the one third octave spectrum. Number 7 is a colorbar, that if Corrugram has values above 0 dB it will show yellow and if the value increases it will become red. The same equivalent is applied to values below 0 dB, it begins with a grey color, but if the value decreases a green color will appear. Figures 4.6 and 4.7, show an example of Corrugram being applied to a signal using RailScan v3.0 where norms ISO 3095 and EN 13231 were added to the Corrugram algorithm.
25
Figure 3.6 – Corrugram example of a random signal using the norm DIN ISO 3095:2013
26 One of the biggest changes made was to implement the Corrugram to work with EN 13231-3:2012. The implementation of this new norm in the Corrugram, made all sense because the Corrugram is a very flexible program, it can always adapt to different situations. EN 13231-3:2012, uses different wavelengths and has different rail roughness levels when compared to DIN ISO 3095.
Comparing figures 3.6 and 3.7 it is possible to see that even though the signal is the same, the results are very different. Figures 3.6 and 3.7 are in agreement with the one third octave spectrum that displayed both norms (figure 3.4), ISO 3095 is more exigent than EN 13231.
27
RailScan
4.1 Data organization and RailScan V3.0
Wavelet analysis has been used for vibration signals analysis and proved to be the most efficient tool for non-stationary signal analysis. [16]
Other methods can be used to analyze non-stationary signals, like the classic Fourier Transform analysis, but this analysis proved to be incomplete. Later in this thesis it will be explained why the Fourier analysis has proven to be incomplete.
RailScan uses the Continuous Wavelet Transform (CWT) and the Wavelet Packet Transform (WPT) to analyze data and also compares the signal (using the norm ISO 3095 parameters) with the one third octave spectrum [15].
An older version of RailScan was already implemented, so the following table represents the main differences between RailScan then and now.
Table 4.1 – Comparative table between RailScan V2.1 and RailScan V3.0
The first column refers to the CWT implementation. In RailScan V2.1, the CWT was integrated by its developers and the representation of the signal was easier because the y axis was linear and for that reason it would not use to much graphic memory. In RailScan V3.0 the CWT used is the CWT function of Matlab, a function already implemented, but in the graphic representation of the new CWT, the y axis is represented in log2 scales. Y axis must be represented linearly or the analysis will be inconclusive and to do that a function that uses more
Comparative table RailScan V2.1 RailScan V3.0
Inverse CWT
Wavelet Packet
DIN ISO 3095:2013
EN 13231-3:2012
Corrugram
28 memory needs to be applied, which represents a problem because bigger signals take too long to be represented.
Using the CWT function of Matlab it is possible to invert the CWT representation of the signal into the original signal, in any part chosen by the user.
Although the implementation of the new CWT is better and allows the possibility to invert the signal in any part, its representation is not time efficient, so it was necessary to revert to the previous representation because RailScan needs to be an agile application.
Since previous CWT representation does not provide a feature to invert the signal, this implementation was extended in order to apply that feature to the signal being analyzed. In this case, the inverse CWT becomes the marginal CWT, making it possible to measure the CWT power for any pair of chosen frequencies. With this extended feature we have another way to detect rail corrugation.
The Wavelet Packet function also suffered some innovations in RailScan V3.0. It can analyze both rails at the same time.
In RailScan V2.1 the one third octave spectrum used the norm DIN ISO 3095:2005, but the norm was updated in 2013 leaving RailScan outdated. The use of the renewed norm and the representation of both rails in that norm are innovations. RailScan V2.1 also assumed that the unit of measurement was micrometer (µm), and now all signals must be in the universal unit of measurement, meter (m).
RailScan V3.0 uses a new feature that can also detect if corrugation is present in the rail, the EN:13231-3:2012, a European norm that uses peak to peak values of the signal and if those values pass the max peak to peak value allowed for more than 5%, it is specified that corrugation is exceeding in the rail. This function did not exist in RailScan V2.1, so a comparison between both programs is not possible.
Corrugram was also implemented, this function is a new way to represent where and if corrugation is present in the rail and it was also implemented for the first time in RailScan V3.0. The last main difference, is the capability of analyzing both rails at the same time. RailScan V2.1 could only analyze a rail and that was not practical, so the adjustment was necessary.
As stated before, this new version of RailScan no longer loads the displacement of the rail, it now loads a file with a structure that must be followed, or the program will not run correctly.
To choose what must be considered in the structure is important to know about the signal characteristics RailScan will analyze. The displacement of the rail is the most important part, so it is the first value to enter the structure. The name that should be in the structure is LeftRail_RightRail_m, and this variable must have data from both rails, otherwise it will not work.
29 The other variable that needs to be in the structure is the distance travelled by the train. With this distance, we can find the space between samples that are important to obtain the sampling frequency. The distance variable must be named distance_m and the space between measures ds_m.
The speed of the equipment to measure rail corrugation is also essential, because the sampling frequency is calculated using speed. The name of the variable is speed_m_s.
The sampling frequency variable name is fs_hz.
Some data acquired do not come in meter units, some of it are acquired in the form of acceleration (indirect measurement), so a variable that accounts for it must be created. If the data is already in meters, that variable is null.
To help the user with these specifications, it was created a help button that describes how RailScan variables must be, so it can work perfectly.
Figure 4.1 – Information shown in the help button
The loaded structure also comes with another part, the information about the signal. The information is provided by the data acquisition team. For example, it can have the name of the file, the distance travelled and how the data was acquired.
A button info was created, so the user can have a clear information about the signal.
4.2 Synthetic signal
As it was mention before, the CWT implementation was different in RailScan V3.0, so to verify if it was correctly implemented, a synthetic signal was created to simulate corrugation. To make the synthetic signal, it was used a chirp. A chirp is a signal in which the frequency increases
30 or decreases consistently. The chirp created was linear, with variable frequency from the highest wavelength to the lowest wavelength meaning that the frequency increases.
The highest wavelength a rail with corrugation can have is 1 m and the lowest is 0.003 m, so to use this values in the chirp signal, they must be passed to frequency, using equation (4.1).
ƒ = 𝜈
𝜆 (4.1)
ƒ is the frequency of the signal, 𝜈 is the velocity and 𝜆 the wavelength.
Assuming a velocity of 1 m/s, the frequency is easily calculated. So, the chirp will increase its frequency from 1 Hz to 333.3 Hz.
The next step is to define were in time, the frequency 333.3 Hz will be reached. The time defined was 125 s. With 𝜈 being 1 m/s, using the equation (4.2), it is possible to calculate the value of the distance travelled.
δ= ν*τ (4.2)
With these specifications, the chirp was implemented. The spectrogram plot (figure 4.2) will demonstrate the linear rate of change in frequency as a function of time, in this case from 1 to 333.3 Hz.
Figure 4.2 – Spectrogram of the synthetic signal
Using the new CWT, the graphic representation is expected to be very similar. CWT will construct a time-frequency representation of the synthetic signal. The synthetic signal is a linear signal that is increasing its frequency over time and that is why the CWT is expected to be equal to the spectrogram.
31 The CWT must have certain specifications to be implemented, the first one is to choose the mother wavelet, in this case the wavelet used was the Morlet Wavelet. The other spec is the number of voices per octave, this specification determines the resolution of the representation.
Figure 4.3 – CWT representation of the synthetic signal
As it is represented figure 4.3, the time-frequency representation is accurate. The representation is linear and varies from 1 Hz to 333.3 Hz. Other frequencies that are present in the signal are represented by colors that are less intensive than yellow.
With figures 4.2 and 4.3, it is possible to conclude that the implementation of the CWT was correct.
4.3 Inverse CWT
The new RailScan has an innovation, it can perform the inverse CWT in order to reconstruct the signal in a selected waveband.
Before using the inverse function, it was defined that the user could choose which part of the signal they would want to be reconstructed. Using ginput, a Matlab function that gives the x- and y-coordinates it is possible to determine exactly which parts of the CWT representation were selected.
After selecting the area, RailScan must reconstruct the new signal.
In the RailScan scalograms and spectograms, the x axis is the distance travelled and the y axis the frequency. With that values identified it is possible to invert the CWT to obtain the signal in a desired frequency band.
32 Obtaining the wavelet marginal (explained in the next section) was also possible in this representation.
4.4 Wavelet Marginal
The new version of RailScan grants the possibility to invert the CWT representation into the signal in user selected frequency band. It is also possible to obtain the CWT marginal.
It is computational efficient to obtain the wavelet marginal in the older CWT representation, not being however possible to reconstruct the signal in a desired waveband. This is due to the CWT representation being redundant. Redundancy has the advantage of improving the visualization of signal features in the scalogram.
The marginal will provide an analysis of the wavelet power in between any pair of frequencies selected by the user. This way, the corrugation power of the signal can be obtained in a shorter band and identify points on the rail where the rail is most corrugated. Basically, by selecting the frequencies the user could see where in the rail the corrugation is most critical.
4.5 Wavelet Selection
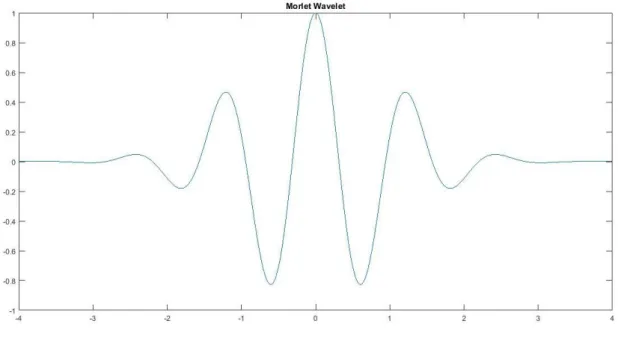
To implement the CWT, a mother wavelet, a bandwidth (Fb) and a center frequency (Fc) need to be selected. We have chosen the Morlet wavelet. Figure 4.4 is the representation of the Morlet Wavelet.
Figure 4.4 – Example of a Morlet Wavelet
The Morlet Wavelet was chosen due to its similarity to corrugation signals, because it has some features like the abrupt changes in small time that are similar to corrugation signals.
33 Fc must be selected near the frequency we want to examine, and the Fb must be calculated using equation 4.3 [25].
𝜎=√𝑇𝑝
2 (4.3)
In 4.3 𝜎 is the standard deviation and 𝑇𝑝 is the period parameter.
Finding the value of 𝑇𝑝 is important because it is directly related with the bandwidth desired. [25]
In all signals being analyzed, the Fc will be 1Hz given they all have a speed of 1 m/s. The velocity being 1 m/s represents a wavelength of 1 m, the maximum wavelength a corrugated rail can have. The Fb depends on what details of the signal are trying to be detected. Wavelets are zero-mean functions, so function 4.3 is used to calculate the standard deviation of the mother wavelet duration. In this case, for the signal analysis the standard deviation selected will be of 50, so to have a standard deviation of 50, the 𝑇𝑝 must be 5000 and if 𝑇𝑝 is directly linked with Fb, Fb assumes that value.
34
Results
5.1 Results
In this chapter, some signals will be analyzed using RailScan V3.0 to try to validate the functions implemented.
5.1.1 Metrosystem
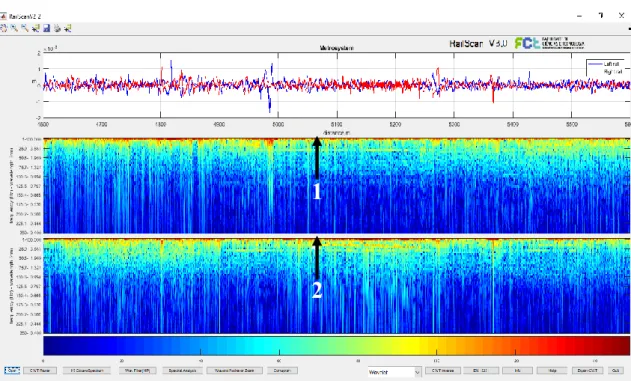
Figure 5.1 – Representation of the Metrosystem signal in RailScan. 1 and 2 represent the
dominant level in the scalogram due to low frequency components, which are mainly due to terrain irregularities.
Figure 5.1 is the first image shown in RailScan. The first plot represents the original signal, in blue is the left rail and in red the right rail.
The CWT representation in the second and third plot is using the previous CWT representation (RailScan V2.1) and using Morlet wavelet (cmor5000-1).
The second plot represents the continuous wavelet transform (CWT) representation of the left rail. As displayed by number 1, the signal has higher energy bands in the lower frequencies, this is due mainly to terrain irregularities which are always present.
The third plot represents the CWT representation of the right rail. The right rail also has higher energy bands in lower frequencies as indicated by number 2. Figure 5.2 shows the spectral analysis of the original signal. With this analysis it is likely to observe that both rails have higher energy in frequencies around 0 Hz.
1
35
Figure 5.2 – Spectral analysis of the original Metrosystem signal. Identifications “a”
show that both rails have significant power in lower frequencies.
The first plot of figure 5.2 (FFT Metrosystem) gives the FFT power of the signal and the results are what was expected, both signals have more power for frequencies near 0 Hz because they are not filtered (indicated by arrow “a”). With this information, it is necessary to filter the original signal for frequencies lower than 1 Hz, because corrugation is in frequencies higher than 1 Hz.
Figure 5.3 – STFT representation of Metrosystem rails. Numbers 3 and 4 indicate that in
this representation both rails have greater power in lower frequencies
3
4
a
a
a
36 In figure 5.3 we can observe the difference between both CWT and STFT representations. Likewise, the CWT case (figure 5.1), in figure 5.3 low frequency components are detected (arrows 3 and 4). In 1 and 2 of figure 5.1 both rails have substantial power for low frequencies and that power decreases if the frequency increases, however in 3 and 4 that simple visualization disappears. In chapter 3 it was explained the reason why STFT is not as effective to represent corrugation signals as the CWT and in figure 5.3 that is proved.
Figure 5.4 – Representation of the filtered Metrosystem signal in RailScan. 5 and 6 are
the critical corrugation points identified in the left rail. 7 and 8 are the critical corrugation points identified in the right rail.
With the information obtained by the spectral analysis (Figure 5.2), a filter had to be applied to the original signal to remove frequencies that are not considered in corrugation analysis. In chapter 1, it was referred that the maximum rail corrugation wavelength was 100 cm. Using equation 5.1, it is possible to calculate the cut frequency of the filter. In the Metrosystem signal the equipment used to measure the signal had a speed of 1m/s and the maximum corrugation wavelength is 1 meter, so the cut frequency using expression 5.1 is 1 Hz [6].
f = v
λ (5.1)
The CWT representation (figure 5.4) shows that for frequencies around 1 Hz and 25 Hz both signals have substantial power. Filtering the signal allowed a clear vision of where it is most
5
6
37 corrugated (numbers 5,6,7 and 8). The maximum power of the left rail appears to be between 4900 m and 5000 m (number 5) and between 5400 m and 5600 m (number 6). In the right rail the CWT the maximums appear between 4600 m and 4900 m (number 7) and between 5100 m and 5200 m (number 8). In both rails it is possible to see that various sets of wavelengths have corrugation in the same distance. Area number 8 appears to have more corrugation in lower wavelengths than areas 5 and 7. Area 6 is similar to area 8, but corrugation is higher in area 8. Later in this signal analysis these conclusions will be compared to the implementations of RailScan that are used to quantify and detect corrugation.
To verify if the filter was done correctly, a spectral analysis of the filtered signal was done (figure 5.5). The first plot of figure 5.5 shows that for frequencies near 0 Hz, there is not any power. With this observation, we can conclude that the filter was applied correctly.
In the first plot it is also possible to see that the left rail has more power in the lower frequencies than the right rail.
In the second plot of figure 5.5, an observation can be made about that higher value that the right rail had (identified as number 9). This value is consistent with the identifications made in figure 5.4 (number 7 and 8) where for a frequency around 5 Hz, the signal showed signals of corrugation. Number 10 is explained because of the identification made in figure 5.4 (number 8), for higher frequencies the right rail has more corrugation than the left rail.
Figure 5.5 – Spectral analysis of the filtered Metrosystem signal. 9 and 10 are
identifications of power in the frequency band for the right rail
9
10
38
Figure 5.6 - STFT representation of the filtered Metrosystem signal
Figure 5.6 shows the STFT representation of the filtered signal. What was mention before in the STFT analysis of the original signal applies to this representation. This representation is not as illustrative as the CWT represention. The power differences in each frequency is not as visible as it is in the CWT representation. With the observations of figure 5.3 and figure 5.6 it is possible to conclude that the CWT is a better form of representing corrugation signals.
This analysis is visual, however is necessary to quantify how much corrugation is in the rail.
After this first analysis, it is necessary to use the pre-established norms to verify corrugation levels.
The first plot (figure 5.7) shows the one third octave spectrum of the signal.
Figure 5.7 – One third octave spectrum using ISO 3095:2013 for the Metrosystem signal.
39 The black line is the limit defined in the norm ISO 3095, which means that if any part of the signal passes that line the rail is corrugated.
To do a better analysis of the signal of where corrugation is present, the signal will be divided in 3 groups of wavelengths (0.3 cm to 0.6 cm; 0.8 cm to 20 cm; 25 cm to 40 cm) between the red lines.
In the first group, all wavelengths are below the black line, thus implying that the corrugation does not exceed the norm.
In the second group, all wavelengths are above the limit line. The acoustic roughness of the left rail reached 10 dB in wavelength 2.5 cm and it was higher than the right rail, but between 3.15 cm and 8 cm, the roughness level of the right rail is bigger than the left rail, with the right rail reaching a peak of 17 dB. In wavelength 10 cm, the acoustic roughness of the left rail passed the roughness of the right rail again. In wavelength 20 cm the left rail reaches a maximum peak of 15 dB.
In the third group all wavelengths are below the limit, meaning corrugation is below the limits in the rail for those wavelengths (25 cm to 40 cm).
Figure 5.8 – One third octave spectrum using EN 13231:2012 for the Metrosystem signal
We proceed to compare the EN 13231 norm with ISO 3095 norm.
Figure 5.8 shows the one third octave spectrum as figure 5.7, but the difference is the values the black line assumes (figure 3.4).
By analyzing figure 5.8 it is possible to observe that none wavelength bypasses the black line, meaning corrugation levels are below using this norm. This conclusion makes sense with what was explained in chapter 4, the norm ISO 3095 is much more exigent.
40
Figure 5.9 – EN 13231:2012 application in the left rail for the Metrosystem signal. The
red dotted lines in the plots are the peak to peak limits.
In figure 5.9 the norm EN 13231 was applied using the rules explained in chapter 4 (tables 4.2 and 4.3). To be in accordance with the norm, the signal must be filtered into 4 different wavelengths as shown in the titles of the plots (figure 5.9). The first plot is the original signal. The second plot is the first filtered signal, it shows a signal with wavelengths between 10 mm and 30 mm. The peak to peak values (red dotted line) of this signal must not pass the 0.010 mm peak to peak limit. If we analyze the plot of the second plot we can see that almost none of the filtered signal is above the limit, so we can conclude that corrugation between these wavelengths is not concerning. An information output is also displayed, showing that for these wavelengths the signal is ok.
Signal ok means that corrugation is not exceeding the norms.
In the third plot, the information output says that the filtered signal is ok for wavelengths between 30 and 100 mm, which means that in those wavelengths the rail is not corrugated. Analyzing the plot, we can see that the signal passes the limit in some parts of the rail but that does not represent 5% of the total signal.
![Figure 1.1 – Example of a corrugated rail [2]](https://thumb-eu.123doks.com/thumbv2/123dok_br/15613507.1053988/22.892.184.707.523.760/figure-example-corrugated-rail.webp)
![Figure 1.2 – CAT being used to detect any signs of corrugation on the track [10]](https://thumb-eu.123doks.com/thumbv2/123dok_br/15613507.1053988/24.892.268.622.545.885/figure-cat-used-detect-signs-corrugation-track.webp)
![Figure 1.3 – BI-CAT being used to detect any signs of corrugation on the track [11]](https://thumb-eu.123doks.com/thumbv2/123dok_br/15613507.1053988/25.892.294.596.317.589/figure-bi-cat-used-detect-signs-corrugation-track.webp)
![Figure 1.5 – HSRCA being used to detect any signs of corrugation on the track [13]](https://thumb-eu.123doks.com/thumbv2/123dok_br/15613507.1053988/26.892.210.685.287.549/figure-hsrca-used-detect-signs-corrugation-track.webp)

![Figure 3.5 – Ilustration of the Corrugram patent document [26]](https://thumb-eu.123doks.com/thumbv2/123dok_br/15613507.1053988/45.892.128.772.326.756/figure-ilustration-corrugram-patent-document.webp)