Internship Report
Master’s Degree in Computer Engineering – Mobile Computing
Prototype and proof of concept for a
display system in retail stores
David Matos
Internship Report
Master’s Degree in Computer Engineering – Mobile Computing
Prototype and proof of concept for a
display system in retail stores
David Matos
Master’s degree internship report elaborated under Dr. Carlos Manuel da Silva Rabadão supervision, Teacher at Escola Superior de Tecnologia e Gestão of Instituto Politécnico de
Leiria.
Acknowledgements
To my internship supervisor at WIT Software, António Ribeiro. To my internship supervisor at ESTG, Carlos Rabadão. To the coordinator of the Master’s Degree in Computer Engineering – Mobile Computing, Carlos Grilo. Finally, to everyone that helped me with technical advice at WIT Software.
Abstract
Selling devices on retail stores comes with the big challenge of grabbing the customer’s attention. Nowadays people have a lot of offers at their disposal and new marketing techniques must emerge to differentiate the products. When it comes to smartphones and tablets, those devices can make the difference by themselves, if we use their computing power and capabilities to create something unique and interactive. With that in mind, three prototypes were developed during an internship: a face recognition based Customer Detection, a face tracking solution with an Avatar and interactive cross-app Guides. All three revealed to have potential to be differentiating solutions in a retail store, not only raising the chance of a customer taking notice of the device but also of interacting with them to learn more about their features. The results were meant to be only proof of concepts and therefore were not tested in the real world.
Table of figures
Figure 1 – Customer detection architecture overview ... 6
Figure 2 – Customer detection Retail App overview ... 7
Figure 3- Customer detection data model ... 11
Figure 4 - Avatar architecture ... 23
Figure 5- Continente's mobile app tutorial overlay ... 30
Figure 6- Material design feature discovery example ... 31
Figure 7 - Step highlighting rectangle coordinates ... 33
Figure 8 - An info view and a hint text view ... 34
Figure 9 - A touch view and a hint text view ... 34
Figure 10 - Architecture of the guides feature ... 36
Figure 11 - Entity-relationship diagram... 37
Figure 12 - Main menu screenshot ... 38
Figure 13 - Accessibility services options ... 39
Figure 14 - Guide details screenshot ... 39
Figure 15 - Colored rectangle on top left and right quadrants, hint on bottom ... 42
Figure 16 - Quadrants of the screen ... 42
Figure 17 - Colored rectangle on bottom left and right quadrants, hint on top ... 42
Figure 18 - Colored rectangle on top right quadrant, hint on bottom left ... 42
Figure 19 - Example of a touch view (green) and hint text view (white with red border) ... 44
Figure 20 - Placement of the invisible (here colored) top delimiter (red) and bottom delimiter (blue) ... 44
Figure 21 - Placement of the invisible (here colored) left delimiter (red), right delimiter (blue) and status bar blocker (green) ... 44
List of abbreviations
API: Application Programming Interface FPS: Frames Per Second GUI: Graphical User Interface REST: Representational State Transfer
SOAP: Simple Object Access Protocol XML: eXtensible Markup Language
Index
ACKNOWLEDGEMENTS ... I ABSTRACT ... III TABLE OF FIGURES ... V LIST OF ABBREVIATIONS ... VII INDEX ... IX
INTRODUCTION ... 1
1 – CUSTOMER DETECTION ... 3
1.1 – Introduction ... 3
1.2 – State Of The Art ... 4
1.2.1 – Web Services ... 4 1.2.2 – Freeware libraries ... 4 1.2.3 – Commercial solutions ... 5 1.3 – Architecture ... 5 1.3.1 – Environment ... 7 1.3.2 – Elements ... 7 1.4 - Implementation ... 10 1.4.1 - Data Model ... 10 1.4.2 - Server ... 11 1.4.3 - Retail App ... 12 1.5 - Results ... 17 1.6 - Discussion ... 18 2 - AVATAR ... 21 2.1 – Introduction ... 21
2.2 – State Of The Art ... 22
2.3 – Architecture ... 22 2.4 – Implementation ... 23 2.4.1 – OpenGL Avatar ... 23 2.4.2 – Customer Detector ... 25 2.4.3 – Customer Tracking ... 25 2.5 – Results ... 26 2.6 – Discussion ... 27
3 – GUIDES ... 29
3.1 – Introduction ... 29
3.2 – State Of The Art ... 30
3.2.1 – In-app guides ... 30 3.2.2 – Marketing guides ... 31 3.3 - Architecture ... 32 3.3.1 - Environment ... 32 3.3.2 - Elements ... 32 3.4 - Implementation ... 36 3.4.1 - Data Model ... 36 3.4.2 - Guides ... 37 3.4.3 - Screens ... 37 3.4.4 - Views ... 39 3.4.5 - Services ... 40 3.4.6 - Auxiliary functions ... 48 3.5 - Results ... 48 3.6 - Discussion ... 49 CONCLUSION ... 51 BIBLIOGRAPHY ... 53
Introduction
Smart devices have taken over the world of technology and are used daily by millions of people worldwide. With a vast number of options in retail stores, selling those devices comes with the big challenge of grabbing the customer’s attention, which want to feel connected to them.
Nowadays people have a lot of offers at their disposal and new marketing techniques must emerge to differentiate the products. When it comes to smartphones and tablets, those devices can make the difference by themselves, if we use their computing power and capabilities to create something unique and interactive.
With that in mind, three prototypes were developed during an internship at WIT Software, a Portuguese software company born in 2001 in Coimbra that nowadays has over 300 employees and customers all over the world, including multiple multinational telecommunication companies.
This internship was part of the second year of the Master’s Degree in Computer Engineering – Mobile Computing at the Superior School of Technology and Management of the Polytechnic Institute of Leiria.
During this internship, no specific software development methodology was followed, since it was only a proof of concept developed by a single person.
The three prototypes developed were: a face recognition based Customer Detection, that detects when a customer is looking at a device; a face tracking solution with an animated Avatar, that follows a customer’s face in a store with its eyes; finally, interactive cross-app Guides, that allow the customer to directly use the device to experiment some of its features.
raising the chance of a customer taking notice of the device but also of interacting with them to learn more about their features. The results were meant to be only proof of concepts and therefore were not tested in the real world.
Despite being integrated into a single commercial solution, WIT Software’s product Retail, all three prototypes are different from each other and therefore are described separately in this report, each with its own Introduction, State of the Art, details of the Architecture and Implementation, Results and their Discussion.
1 – Customer Detection
In the current section, it will be covered the Customer Detection feature. It has an introduction, the state of the art, the architecture of the solution, the details of the implementation, the results achieved and their discussion.
1.1 – Introduction
Every time we go to an electronics retail store, we are presented with a booming number of smart devices. Those stores try to sell us the products with marketing techniques that we are used to see, therefore raising the need of new ways of grabbing the customer's attention and eventually lead them to buy those products.
Smart devices require smart thinking when it comes to sell them; simply having them on a display is not enough to differentiate them. If they are able to achieve so many things with their increasing computing power, why not use their capabilities to create something unique and interactive to please the customers?
That thought was the inception of the customer detection feature, which is able to detect when a customer is looking at a smartphone or a tablet. When it does, it triggers something to grab his attention, like a video, an animation or a sound.
The feature is integrated on WIT Software's product Retail, an interactive app which turns a normal device into a retail product to display on stores. To detect customers, it uses Google's facial recognition API Mobile Vision.
The results achieved by this proof of concept led to the idea for the third and final feature developed during the internship, the Avatar, which will be detailed later in this report. The next chapters will cover the initial research, the creation of the solution and the discussion of what it can do and where it needs improvement.
1.2 – State Of The Art
Face tracking emerged from the advancements in the real-time analysis of a camera’s footage and it is being widely studied worldwide, both for academic and marketing purposes.
Webcams and smart devices cameras are getting better resolutions every year; adding up to that, computing power is also growing fast, allowing for faster and more accurate results when it comes to detect not only the presence of a human face, but also infer something about the person’s race, age and mood.
The available systems to detect a face can be divided in three groups: web services, for solutions that do not require real-time feedback; freeware libraries, mostly used in the academic world and by developers; finally, the commercial solutions, which are more stable and reliable than most of the free options.
1.2.1 – Web Services
BioID [1] and Microsoft Cognition Services [2] Face API are two examples of face tracking web services. The first can recognize a human face and also has voice recognition. It is available through a SOAP and a RESTful web API.
Microsoft’s Face API has more capabilities. Not only it detects faces but it can also group them by similarities, identify a specific user or find similar faces. The face attribute features include guessing the age, gender, pose, smile and facial hair, as well as 27 face landmarks.
1.2.2 – Freeware libraries
There are many freeware libraries with face tracking capabilities, but two of them are more widely known: OpenCV [3] and Google’s Mobile Vision Face API [4].
OpenCV is an open source C++ library initially developed by Intel. Face detection is only one of its multiple features, which also include object identification, tracking actions and movements, 3D modeling and image matching.
To recognize faces in an image or video, it converts the face into its geometric parts and analyzes the distance between the multiple facial landmarks. It has different algorithms that try to detect a face with varying approaches.
Google’s Mobile Vision Face API is one of the three Mobile Vision APIs, which also include an API for barcode scanning and another for text recognition. It was developed with mobile development in mind and it’s part of Android’s core.
It can detect faces, facial landmarks like the eyes, nose and mouth and information about whether the person is smiling or not and if their eyes are open. It is both fast and accurate, allowing for real-time face tracking with ease.
1.2.3 – Commercial solutions
Finally we have the commercial solutions. One of them is Visage [5], whose SDK has four main features: face and head tracking and face detection and analysis. Compared to the free solutions mentioned above, it uses a lot more precision points around the face’s landmarks in order to track them more accurately, including knowing where a person is looking at.
Another alternative is KeyLemon’s Oasis Face [6]. This solution is more focused on biometric authentication using a person’ face into applications that require extra security, like a bank’s app. It can be integrated in a mobile app or in a server. Compared to Visage, it doesn’t provide face tracking, but it more accurately depicts a face standing still.
1.3 – Architecture
In this chapter, it will be described the architecture of the implemented solution, including the environment, the different elements and the interaction between them.
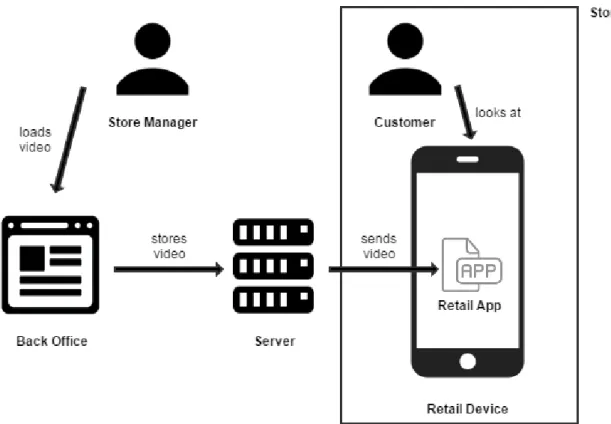
Here is a general description of the architecture. The store manager loads into the back office the video that he wants to play upon customer detection. The back office stores the video in the server. The server sends the video to the retail app installed in the device in the store,
which stores it locally. When a customer looks at that device with the screensaver on, the video starts to play.
Figure 1 – Customer detection architecture overview
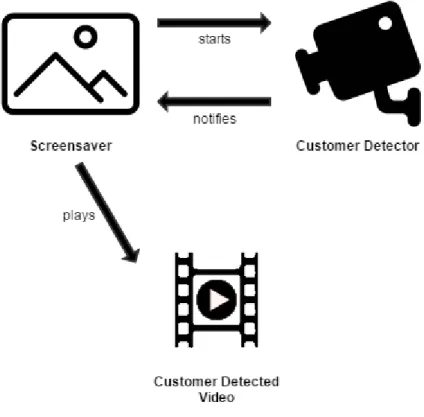
The Retail App has a screensaver and a customer detector. When the screensaver kicks in, it starts the customer detector. When a customer is detected looking at the device, the customer detector notifies the screensaver, which plays the customer detected video.
Figure 2 – Customer detection Retail App overview
1.3.1 – Environment
The solution uses the Android operating system and part of its Mobile Vision API, the Face API. It runs on Android smartphones and tablets with API 17 or higher (it has only been tested up to API 22). The device needs to have a front camera.
The solution is integrated in WIT Software's project Retail, complementing the Android app and sharing its back office. The back office was created using the open-source web application framework for Java EE Apache Struts 2.
1.3.2 – Elements
This subchapter includes the description of the elements of the architecture, including the Retail App, the server, the screensaver and the customer detector. It also explains how all the elements interact with each other.
1.3.2.1 – Server
The server is the entity that feeds the Retail App with its data. For the customer detection feature, it is used to store and send the videos that should play when a customer is detected looking at the device.
There is a backend where a store manager can upload the videos and set them as being of type "customer detected". When the devices are live on a store and receive updates from the server, the videos are downloaded and kept on the device's storage, to display upon customer detection.
The videos can be specified for different markets, regions, stores and devices.
1.3.2.2 - Retail App
This app is installed on the retail devices and it allows the customer to see promo videos, check the device's specifications, compare price plans and look for accessories.
When it detects customer inactivity, it launches the screensaver, which works together with the customer detector and displays the videos set in the server for when a customer is looking at the device.
1.3.2.3 - Screensaver
The screensaver is launched when there are no touches on the device for a given amount of time and there are promo videos to display. When there is a customer looking at the device, the promo video currently playing is replaced by the customer detected video.
Additionally, it is also possible to play an animation on the screen or to play a sound. All these actions happening in the screensaver are meant to make the customer looking at the device to try it.
1.3.2.4 - Customer Detector
The customer detector is the mechanism responsible for detecting when a customer is looking at the device on a retail store. It uses the device's front camera, a face tracker and an algorithm that decides whether the customer is looking at the device or not. These three elements will be described next.
1.3.2.4.1 - Camera
The device's front camera is a hardware requisite for the solution to work. When the screensaver kicks in, the camera is started and captures footage at 30 frames per second of what is going on in front of the device, sending it to the face tracker. There's no storage of the footage captured.
1.3.2.4.2 - Face Tracker
The face detector receives input from the camera and analyzes it, looking for human faces. It can be set to look for facial landmarks on the detected face, such as the eyes and the nose. After detecting a face, it can follow it until it disappears from the camera's sight. It provides the customer looking algorithm with information about the detected faces.
1.3.2.4.3 - Customer Looking Algorithm
This algorithm receives data from the face tracker and decides whether the customer is looking or not at the device. To do that, it analyzes three factors:
The probability of both eyes being open; The orientation of the face;
The position of the nose.
In order to successfully classify a face as being looking at the device, the algorithm must detect at least one eye open, a face between two angles on the X axis and a nose between a given interval on the Y axis of the screen.
1.4 - Implementation
The implementation of the architecture described in the previous chapter will be detailed here.
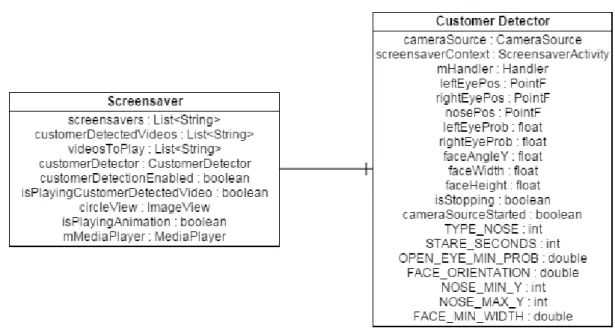
1.4.1 - Data Model
Since this solution was implemented on an already existing project, not only the data model is property of WIT Software, it would also be too big to detail here, with most of it being irrelevant to the customer detection feature. Therefore, it will only be given focus to the relevant entities that were created/edited: the screensaver and the customer detector.
The screensaver is the object that stores and processes all the data necessary to display something on the screen after the device is idle for some time. It includes a list of screensaver videos, a list of customer detected videos, a list of videos to play (which will include either the screensaver videos or the customer detected videos) and some control variables. It also has a view that will hold an animation, a reference to the media player to play the sound and a reference to the customer detector.
The customer detector object holds everything needed to detect a customer looking at the device. It has a camera source, a reference to the screensaver context, three positions (left eye, right eye and nose) and multiple settings and control variables. There is also a handler to communicate with the screensaver.
There can only be one instance of the screensaver and one instance of the customer detector.
Figure 3- Customer detection data model
1.4.2 - Server
Some modifications to the existing Retail server and back office were done in order to accommodate the customer detected videos. This included modifications to the database, the server's data model and actions and the front end design.
In the database, the field customer_detected was added to the table content which, among other things, stores the videos. This extra field works like a boolean flag, that states whether the video is meant to be played upon customer detection or not.
Then, the database java object was edited to reflect the database change, adding the field to all the necessary queries. The Content object also had to include the customer detected property, with a getter and a setter for it.
Finally, the back office was modified by adding the field to the JSP and updating the post-submit callback to reflect the new property changes. Visually, the back office gained a new check box labeled "Customer detected video" when adding content.
1.4.3 - Retail App
The existing Retail app was also modified. Most changes were made in the screensaver activity and the customer detector. However, some other minor but necessary changes took place in other activities.
The API responsible for the communication between the server and the app had to be changed, in order to be able to receive and store the new content property, customer detected. This included methods to add and remove customer detected videos from the device, stored in a newly created folder FOLDER_CUSTOMER_DETECTED. The communication between server and app is made through XML, therefore the parser was also updated.
Like in the server, the local app's database was modified to store the new property, updating all the relevant queries. Furthermore, other classes responsible for managing the device's content (add content, update content, check if content exists, delete content) were updated with the extra customer detected videos to check.
1.4.3.1 - Screensaver
The screensaver activity is the class responsible for the screensaver that appears when the device is idle. Here, several changes were made to manage the new behavior upon customer detection.
In the onCreate() method, the list of paths to the customer detected videos stored on the device is retrieved from the demonstration API. If this list isn't empty, the customerDetectionEnabled control variable is set to true, an instance of the customer detector is created. This triggers the start of the customer detection, which will be explained in the next subchapter.
The onPause(), onResume() and onDestroy() methods were also updated, so that the customer detection could be stopped and resumed when needed, using the customer detector public methods startFaceDetection() and stopFaceDetection(). The onResume() method also needs to check if the camera source wasn't destroyed,
recreating it if it was.
The screensaver has three public method that can be called by the customer detector. When it detects a customer looking at the device, it can either call the playCustomerDetectedVideo() to replace the current video, the playAnimation() to start the animation on the screen or the playSound() to play a sound.
The playCustomerDetectedVideo() method replaces the current list of videos to play with the list of videos that are meant to be played upon customer detection. It also stops the face detection, which is only resumed after that video or videos are played.
The playAnimation() method makes the animation of a moving finger simulating a touch on the device to play. This animation is defined in an Android animation list and plays for 3 seconds, during which face detection is paused.
The playSound() method uses the media player to get a sound hardcoded in the project resources to play. Since this option was not very relevant, there is no mechanism implemented to stop and restart the face detection before and after playing the sound.
The decision of which action or actions to take is made in the customer detector, which will be described next.
1.4.3.2 - Customer Detector
The customer detector is the entity that manages the entire process of capturing footage, finding faces, evaluate their parameters and notify the screensaver to take appropriate action. It is a single class that could be adapted to any project, since it has public methods to start and stop the face detection; the only thing that needs customization is the way it will notify the app.
1.4.3.2.1 - Initial setup
To be able to detect faces, the first thing the customer detector needs is to set up Face API and access the front camera of the device. When the detector is instantiated in the screensaver, it receives the context and calls the createCameraSource() function. This
function checks if the camera source was not already defined; if that is the case, it first creates an instance of a FaceDetector and sets its initial configuration, which includes the image processor it will use; only then it gets an instance of the camera and starts the process of finding faces.
The initial configuration of the FaceDetector object includes four parameters:
Classification type (ALL_LANDMARKS): this sets the face detector to look for all the face landmarks, like the eyes and the nose, as opposed to the option to start the face detector just to scan for faces and ignore those landmarks; Detection mode (ACCURATE_MODE): this forces the face detector to be
slower but more precise, instead of being faster but losing the faces more easily (the fast mode is almost exclusive to find faces in pictures and not in video); Prominent face only (TRUE): when the detector finds more than one face, it
chooses to analyze only the most prominent one (for example, the person on the center);
Tracking enabled (TRUE): after finding a face, the detector tracks its movement until losing it.
After starting the detector, it needs a MultiProcessor to process the footage. This processor is created with a new FaceTrackerFactory as a parameter. This factory creates a Tracker for a Face object, which has four methods:
onNewItem(): called when a new face is found;
onUpdate(): called when the face currently being tracked moves;
onMissing(): called when the current face is lost briefly, but it can still recapture it;
onDone(): called when the face that was being tracked is lost.
What is done on each of those functions will be specified on the next subchapter. To finish the initial setup, the customer detector still needs to create the camera source. It uses the CameraSource builder with the context from the screensaver and the detector created above. It then sets two parameters: the facing of the camera,
CAMERA_FACING_FRONT, to get the front camera, and the requested frames per second, set for 30 FPS.
After this initial setup is complete, the method startFaceDetection() is called, which starts the camera source and allows the process of looking for faces to begin.
1.4.3.2.2 - Handling faces
When the customer detector is running, the face tracker receives information about faces being found or lost or when their position is updated. This is handled on the four methods named above.
The onNewItem() method receives a new face that was captured by the detector. Here, the function isLookingAtDevice(), that checks if the customer is looking or not at the device, is called. If that is true, the variable that stores the time at which the user started looking at the device, faceLookingTime, is set to the current time in milliseconds. This information will later be used to only start the video, animation or sound after the customer is looking at the device for a given number of seconds.
After detecting a new face and every time it moves, the onUpdate() method is called. Here it is checked if the customer is still looking at the device. If he is, the current time in milliseconds is compared to the time he was first detected looking. When the difference between those two times is equal or bigger than the number of seconds defined in the variable STARE_SECONDS, the method notifyScreensaver() is called, to tell the screensaver that a customer is looking at the device and it should display something to grab his attention.
The notifyScreensaver() method has a switch that checks the mode the app is set to run, which includes four options: PLAY_VIDEO, PLAY_ANIMATION, PLAY_SOUND or PLAY_EVERYTHING. Depending on the mode, it will call the respective public function or functions in the screensaver.
1.4.3.2.3 - Evaluating face parameters
To know if the customer is looking at the device, the function isLookingAtDevice() is used. It receives the probability of the left and right eyes being open, the face orientation and the position of the nose.
The probability of the eyes being open, calculated by the Face API, is a number between 0 (closed eyes) and 1 (open eyes). This solution defines that the probability needed to tell a customer is looking at the device is 0.5 or higher. There is no need for both eyes to have that probability; sometimes, the camera image will not be clear and the API will return lower values for the eye that is further away from the center of the image.
The face orientation is used to know if the face is looking left, right or at the center. This value is returned by the Face API as an angle between 0 (looking at the center) and 60 (looking left) or -60 (looking right). To know the customer is looking at the device, the angle must be between -20 and 20. Anything above that probably means the customer is in front of the device but looking at something right next to it and not directly at it.
Since the Face API does not provide information about whether the face is looking up or down, this solution uses the position of the nose to infer that. It has been defined that the position of the nose on the y axis must be between 300 and 650. This number came from using the app and looking at the device from multiple angles to try to get the best guideline possible.
If the face matches all the parameters above, it is considered that the customer is looking at the device, and the notifyScreensaver() method is called.
1.5 - Results
The resulting solution can successfully identify a customer looking at the device, by using the camera to capture footage, the face tracker to find faces in that footage and the customer looking algorithm to analyze the eyes, the angle of the face and the position of the nose.
When it detects a customer looking at the device, it takes proper action to grab his attention, playing a video, an animation or a sound. The videos can be set on a back office by a store manager, while the animation and sound are hardcoded just as a proof of concept. This detection only occurs if the screensaver is being displayed.
The detection is better if the light conditions are good and the face is not on the edges of the camera's footage. The app is fast to switch between videos or play the animation/sound upon detection. The video, animation and sound can be played separately or at the same time.
To know if the customer is looking at the device, this solution gets information about the eyes being open from the Face API, as well as whether the face is looking left or right. To infer if the customer is looking up or down, it uses the position of the nose.
Some results could be better. The Face API loses the face if there are sudden movements or if the angle is not the best. If there is a background with too much light, the face tracker will not be able to find faces, because they will be very dark. The direction of the eyes cannot be measured, therefore a customer looking at something close to the device but not directly at it will be classified as being looking at the device. Because of the constant use of the camera, the device will quickly heat.
1.6 - Discussion
Initially, the idea behind this feature was to improve the Retail app by simply playing a different video in the screensaver when a customer was detected looking at the device. This was successfully achieved; however, the goal of catching the customer's attention was not fully met with just changing the video. Because of the need to play it without sound and the fact that a video was already playing, changing the video to a different one could not be understood by the customer as something triggered by his action of looking at the device.
To improve the solution, it was added the option to play an animation. Something appearing on the screen telling the user to try the device is more efficient than simply changing the video. To prove that it was also possible, the solution included the option to play a sound. This would not be an advantage on a store in most cases, because multiple devices playing the sound would be chaotic. However, it could be used if the store manager wanted to highlight a single device.
It was hard to optimize the algorithm based on the values returned by the Face API. First the configurations had to be understood and set to get optimal results, like the option to only focus one face, understand how the face landmarks were detected and what could be done with those values.
For example, the Face API analyzes the footage from the camera and gives a probability of the eyes being open or not. It is not really relevant if the customer has the eyes open or not; he will not be wandering through the store with his eyes closed. However, those values are important because they tell us that if the API can find at least an eye open, it means they are on the device’s camera focus, therefore the customer is (probably) looking at the device.
The Face API is good at telling whether the face is looking left or right; however, it does not know if the face is looking up or down. At some point it was decided this was ok. However, the idea of using the position of the nose came along and it proved to be a good indicator that enhanced the accuracy of knowing if the customer was looking at the device.
By the time this report was written, the Face API was not working for new projects. According to Google, a serious bug was preventing proper operation of the API and it was
disabled until a fix was found. The implemented solution however still works, since it already had the source code imported into it.
The proof of concept was successfully demonstrated and could be used in retail stores, but it was not as interactive as it could be. The things learned during the development of this feature, namely what could and what could not be done with the Face API, eventually led to the idea of the animated Avatar, the feature that will be described on the next section.
2 - Avatar
This section will cover the Avatar feature. It contains a small introduction, the state of the art, the solution's architecture, the implementation details, the achieved results and their discussion.
2.1 – Introduction
As technology progresses, smart devices integrate better with society by trying to replicate human actions. Intelligent personal assistants like Google Now and Siri enable us to do actions on a smartphone or tablet with voice commands and talk back to us. Search engines and social networks try to understand our preferences and show us what we would like to see. Animated emoticons allow us to express our emotions in a graphic way we can relate to.
All these ways of trying to humanize smart devices make people feel a closer connection to them. Nowadays, customers expect their devices not only to perform their tasks, but also to give them a feeling of carrying around an assistant that, in a way, understands him. However, we do not see this in retail devices. They are usually standing in a display with no way to interact with the customers. In a store, the devices look just like the machines they are, which is not a good way to grab the customer's attention to them.
With this in mind, the Avatar feature was created. The Avatar is an animated 2D character that can detect customers looking at the device and follows their movement with its eyes. It was created using OpenGL ES for Android and it requires the Face API to track the customer’s face movements.
The resulting avatar only has animated eyes, but it can be improved to animate the mouth, the eyebrows or the hands to look more natural. Like the Customer Detection feature, it is integrated in WIT Software’s project Retail.
The next chapters will talk about the initial research, the solution found and its implementation and the discussion of the results obtained.
2.2 – State Of The Art
There are not yet many real time eye tracking software that would allow to replicate a person’s eye movements with an animated avatar.
One of those is the academic project EyeCVE [7], which tracks the gaze of a person with mobile eye-trackers and replicates them in a virtual avatar. Another example is AltspaceVR [8], which also tracks the movement of the eyes but with a virtual reality headset.
Also, there are some apps in the market with great eye animation, like the game Talking Tom. However, they are not interactive in any way with the user.
This state of the art section will not be further extended, because most of the research was initially done in the previous feature, Customer Detection.
2.3 – Architecture
The architecture of the solution of the Avatar is very similar to the one used in Customer Detection and therefore will not be fully detailed here; only the differences will be explained.
Instead of communicating with a server to retrieve a video, the interaction with the user is done through the animated avatar, therefore there is no need to fetch additional resources and no communication with the back end is ever done.
The Avatar now serves as a screensaver and starts the customer detector. The customer detector, upon detecting a face, constantly feeds the Avatar with information about the position of eyes, which in turns animates his own eyes to follow the customer’s gaze.
Figure 4 - Avatar architecture
2.4 – Implementation
The implementation of the Avatar feature will be described in this chapter.
2.4.1 – OpenGL Avatar
2.4.1.1 – GLSurface
The GLSurface class extends a GLSurfaceView, which in turns extends a SurfaceView. In Android, a SurfaceView is a dedicated drawing surface, optimized for fast GUI updates and rendering. A GLSurfaceView is its OpenGL ES counterpart, specialized in drawing OpenGL objects.
This solution's GLSurface is created on the Screensaver activity. Upon instantiation, it does three actions: setting the OpenGL ES version to use, setting the background and creating the renderer.
First, the method setEGLContextClientVersion() is called to set the OpenGL ES version to 2.0, which is the minimum required version for the 2D avatar.
Then, the PixelFormat is set to OPAQUE; it is also possible to have a transparent background by using the TRASLUCENT option. The color scheme is set to ARGB8888 with the method setEGLConfigChooser(), instead of the default RGB888; this is only needed for the transparent background, since it needs the Alpha channel to be able to set the transparency of the background color.
Finally, the renderer GLRenderer is created and associated with the surface. The customer detector also receives a copy of the instance. The GLSurface initialization ends by using the method setRenderMode() to set the render mode to RENDERMODE_CONTINUOUSLY, which will provide smoother animations.
Upon creation, the GLSurface is ready to draw what the GLRenderer renders. There is also an override of the onTouchEvent() method that will display or hide the options menu when the customer touches the screen, which will be explained later.
2.4.1.2 – Avatar Object
An AvatarObject is an object that is part of the Avatar, like the body, the face and the eyes. It holds information about its name, its center coordinates, the width and height and the eight vertices that the renderer will need to set up the object.
When creating an AvatarObject, its constructor receives the name, the center x and y coordinates and the original width and height. The final width and height is then calculated based on the scale defined in AVATAR.SCALE in the Constants class. This way, it is possible to adjust the size of the Avatar by simply changing the scale.
The method setVertices() uses the x and y center coordinates and the width and height that resulted from scaling the object to defined the top left, top right, bottom left and bottom right x and y vertices of the square which will contain the image of the AvatarObject in the renderer. The vertices need to be updated every time the object moves and therefore its center x and y coordinates change.
2.4.1.3 – GLRenderer
The GLRenderer is where the Avatar is drawn and animated. It gets the properties of the AvatarObject and draws it on the GLSurface. It loads all the necessary resources, namely the images every AvatarObject, and stores them in buffers for reuse.
On each iteration, the renderer will move the eyes of the Avatar towards the position given by the face tracker. It uses the current position of each eye and calculates the
direction on which they need to be moved towards by using a wind rose with 16 different directions.
Knowing the right direction, it then proceeds to move the eyes towards the exact coordinate. On every iteration, it moves at a fixed rated of pixels defined in the constant WIND_ROSE_DISTANCE, which was found to be optimal at 3 pixels per iteration. This allows for a smooth transaction and prevents the eyes from jumping from one point to another.
The speed of the movement is not always the same. The fixed distance is multiplied by an intensity. The further the eyes are from the point they should be in, the faster they move. If the difference is very small, the eyes move more slowly.
If during this iteration the position of the eyes changes, the new direction is calculated and the movement starts at whatever current position the eyes are in and starts moving against the new, updated coordinates.
2.4.2 – Customer Detector
The customer detector used here is the same used in the Customer Detection feature.
2.4.3 – Customer Tracking
The customer’s eyes are tracked by receiving the input of the position of the eyes from the customer detector. This information is then translated to a coordinate and given to the GLRenderer, which takes care of all the necessary actions to move the eyes to the right place.
2.5 – Results
The avatar feature was successfully implemented and resulted in an animated avatar that can track the face of a customer with its eyes. It is launched with the screensaver of the Retail app and starts looking for faces; once it founds one, it tracks it until losing it. When a face is being tracked for some time, three buttons are animated into the avatar to allow the customer to learn more about the device and its accessories, to search price plans or simply to try the device. The first two options lead to their respective screen on the Retail app, while the last sends the user to the home screen of the device.
OpenGL managed to make the animations smooth and fast, as well as less demanding of the device’s processing power when compared to the other methods tried, like creating native shapes or using sprite sheets, both very laggy.
The adjustments made to the positioning and movement speed of the eyes made it seem more natural. However, in some rare cases, the eyes still bounce very fast. The position of the eyes is reset to the center when a face being tracked is lost for some seconds. There are no other animated parts on the avatar other than the eyes, which are divided in three moving parts: sclera, iris and pupil.
There is the possibility to turn the avatar’s background transparent, making it appear over other apps. The avatar’s size can easily be adjusted by changing its initial settings.
2.6 – Discussion
The Avatar feature was difficult to optimize but the end result is very satisfactory. The avatar looks good, feels human and most of the times the movement is smooth, except for some minor bugs.
There is a lot of room for improvement. The avatar can have other animated body parts to feel more genuine. One of those parts that would be interesting to animate is the mouth, which could also integrate speech. However, this would not be a good idea for a retail store, because we do not want to have dozens of devices speaking at the same time.
Another improvement that can be made is moving the Avatar between multiple devices in a row, to follow the customer in a store as he walks by. This would require some kind of mobile agents’ implementation.
Overall, the Avatar prototype is a good starting point for something that, properly optimized, can bring more life and interactivity to retail stores.
3 – Guides
In this section, the Guides feature will be covered. It includes an introduction, the state of the art, the architecture of the solution, the implementation details, the final results and the discussion of those results.
3.1 – Introduction
Along with the increasing number of Android devices on the market and apps on the store, comes the need to guide the users on how to perform some tasks. People who are less in touch with new technologies need to know how to perform basic phone functions on different devices, while others might want to explore new cutting edge features.
Some guides can be found currently on the market, either using screenshots or explanatory videos, usually for new features and only for a small number of devices. There is a lack of a universal guides’ app that could be adapted to any Android device, interacting directly with the apps. With that in mind, the guides feature was created.
The guides feature allows a customer to follow a number of steps in the device in order to perform a task. He can learn how to perform it on that specific device and also receives additional input along the way, with relevant info about the screen he is viewing. While doing so, the app makes sure he gets the best user experience possible, minimizing errors in following the guide.
This feature was initially aimed at less tech-savvy customers, showing them how to perform an ordinary task on a smartphone, like adding a contact or making a call, but it can be adapted to any app and to any customer. Instead of clicking through a sequence of images or watching a video, like the solutions on the market, the customer interacts directly with the apps.
In the next chapters we’ll cover the initial research, how the app came to life, what can be achieved and what can be improved.
3.2 – State Of The Art
Looking into the current state of the market and the technology surrounding smartphones, one can already find some guides that try to help the user to either use an app or to experience some new features of the device.
These already existing solutions can be divided in two distinct approaches: the in-app guides and the device marketing guides.
3.2.1 – In-app guides
These are the guides that can be found in some apps, usually in their first launch. They take advantage of dedicated Android design elements to draw overlays on top of the screen, which highlight a button or another element and give a brief explanation of what the user should do or can do.
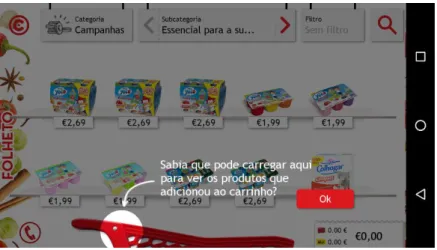
An example of this is the app of the Portuguese supermarket chain Continente, which on its first launch shows the user how to navigate between the products and add them to the virtual cart with an animated overlay.
Figure 5- Continente's mobile app tutorial overlay
Google has some Material Design guidelines under the “Feature discovery” section [9] that describe how these overlays should look like. The image below exemplifies how most Android apps guides look like.
Figure 6- Material design feature discovery example
These in-app guides are good looking, fluid and useful, but they’re limited to the app they were created for, since they must be coded into it. The guide cannot be used in any other app and it must be changed if the app layout or functionalities change, which results in more effort for the developer.
3.2.2 – Marketing guides
In the big retail stores, some new devices already come with a dedicated app that allows the user the explore its new features. An example of this is the Samsung S6, that came with some promotional guides when it came out. Some stores, like Media Markt and Worten, even have their own, custom application in the foreground that allow the user to see the specifications of the device and the description of the features. However, these guides are currently very limited. In some cases, they’re just videos that play, explaining the user some new feature and how he can use it, but not allowing him to interact. Sometimes there’s interaction, but all that could be found were based on screenshots.
During the research for this feature, multiple stores in the cities of Leiria and Lisbon in Portugal and Lousville in the United States of America were visited in January 2016, but no guides interacting directly with the device’s app were found.
3.3 - Architecture
In this chapter, the software architecture of the implemented solution will be described, namely the environment, its constituent elements and how they interact with each other.
3.3.1 - Environment
The solution uses the Android operating system and its APIs. It runs on Android smartphones and tablets with API 8 or higher and it takes advantage of android views and services.
3.3.2 - Elements
Here each element of the architecture will be described, namely the guides, its steps, the views, the services, the handlers and how all these elements interact with each other.
3.3.2.1 - Guides
The guides are the main element of the architecture. They contain all the initial setup needed and can be run by the user on the main screen. Every guide contains multiple steps and is unique to a device and Android version.
3.3.2.2 - Steps
The steps are the setup of the path the user must follow in order to complete a guide. They have information about their own type, the package and activity they relate to, the position of the element on the screen and the instructions/information for the user.
Info (blue): a step that briefly highlights part of the screen, to display additional information to the user but with no interaction needed from him. It is dismissed automatically after 5 seconds;
Interactive (green): a step that needs the user to touch the highlighted area in order to continue the guide;
Long interactive (green): similar to the interactive step, but it needs a long touch instead of a normal touch.
The package and activity define what should be displayed in the device's foreground for each step. Multiple steps can have the same package and activity. A single step can only have one package and activity assigned.
The position of the element on the screen tells where the step highlighting color should be painted. It is defined using four coordinates: xStart, yStart, xEnd, yEnd.
Figure 7 - Step highlighting rectangle coordinates
Finally, the instructions or information for the user is a small text, preferably with no more than 10 words, that indicates what the user should do or that gives him some general information related to the screen he's on.
3.3.2.3 - Views
The views are the core visual element of the guide's mechanism: they show the user where he should touch, display the step instructions or information on the screen and prevent touching in the wrong place. The designed solution includes five types of views, which can be placed anywhere on the screen:
Touch views: these views are a touch-through green rectangle and they tell the user where he should touch next to follow the guide;
Info views: the info views are a touch-blocking blue rectangle and they highlight an area to draw the customer's attention to some information about an element on the screen;
Delimiter views: these views are touch-blocking transparent rectangles that surround both touch and info views, preventing touches anywhere else; Status bar blocker views: a touch-blocking rectangle that covers the
device's status bar;
Hint text views: this is where each step's instructions or information are displayed. This view always appears near the touch or info view, with black text, a white background and a red rectangle with rounded corners as border.
In both images above, the delimiter views are invisible and placed all around the colored rectangles. The status bar blocker view is also invisible and placed above the status bar.
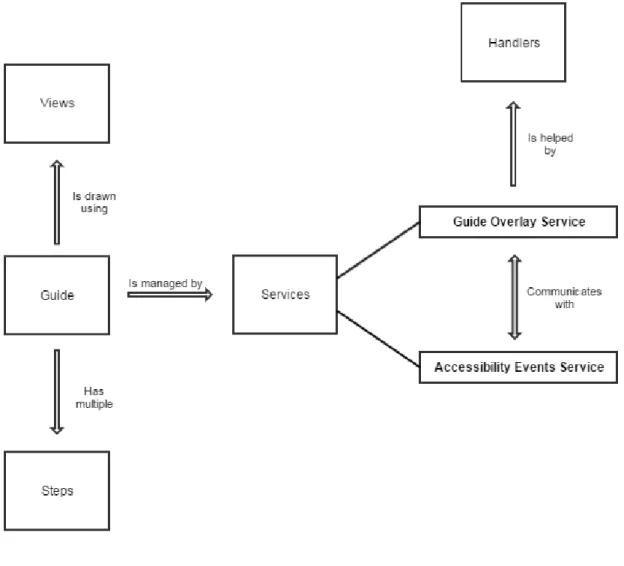
3.3.2.4 - Services
An Android service is an application component that can perform operations in the background. The implemented solution uses two Android services to run the guides: a normal service (Guide Overlay Service) and an accessibility service (Accessibility Events Service).
The Guide Overlay Service is responsible for managing the entire guide's lifecycle. It gathers and processes all the required information for the guide to be followed properly by the user, therefore knowing when to draw the views, when to move through the steps and when to start or finish the guide.
The Accessibility Events Service helps the Guide Overlay Service to perform tasks that need Android's accessibility features, like detecting long touches, changes in the foreground activity and the appearance of dialogs on the screen.
The services are bound to each other and they both need to be running for a guide to be started.
3.3.2.5 - Handlers
The handlers are android objects that allow us to schedule an action to happen sometime in the future. In this solution, there are three main handlers inside the Guide Overlay Service:
Inactivity handler: this handler uses a timer and is triggered when there are no touches on the screen for a certain period of time. It makes sure that when inactivity is detected, the guide is cancelled and the screen is reset to display the main guide's screen;
Foreground activity handler: the solution needs this handler to make sure the guide is restored to a valid state if the foreground activity on the device doesn't match the current guide step configuration;
Info step handler: info steps require no customer interaction and therefore the guide must continue on its own after this type of step is shown. This handler forces the guide to move to the next step.
3.3.2.6 – Interaction between elements
Below there's an image explaining how the different elements interact with each other.
Figure 10 - Architecture of the guides feature
3.4 - Implementation
On this chapter it'll be described the implementation of the architecture described above.
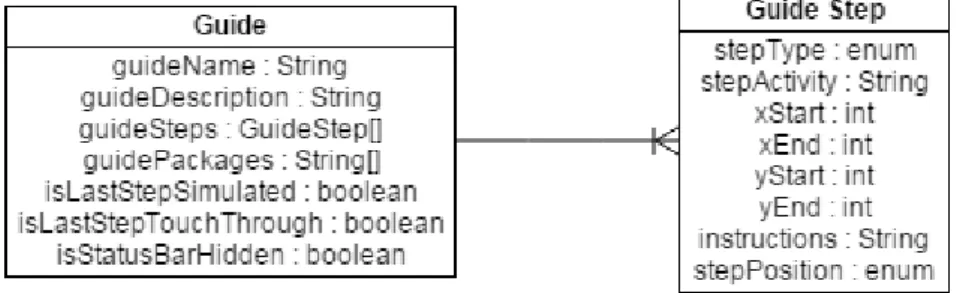
3.4.1 - Data Model
The data model is very small, consisting only of two entities: the guides and the steps.
The guides are objects that have a name, a description, a list of steps and a list of packages. They also have information about whether the guide has a simulated last
step, a touch-through last step and if the app runs or not in full screen.
Each guide contains numerous steps. These objects have a type, an activity assigned, four coordinates and the instructions/information to be displayed to the user. Upon initialization of the guide, they also store information about the proper positioning of the hint text view.
Figure 11 - Entity-relationship diagram
3.4.2 - Guides
The implemented solution offers four guides for basic smartphone functionalities. These will instruct the user on how to:
Send an SMS; Make a call; Add a contact; Use the camera.
The guides were created for a LG G4c device running Android 5.0.2.
3.4.3 - Screens
Before starting a guide, the user is presented with two screens.
First there's the main screen. Here the user is welcomed to the app and learns what he can do. He's also presented a list of the available guides for the device. This list implements a touch listener that detects which guide the user has chosen and redirects him to the next screen.
Figure 12 - Main menu screenshot
The guide details screen tells the user what task he'll learn to perform on the device. Besides that description, there's also an image button with the icon of the app that the user would touch on the device, were he to perform the task without help. To make sure the icon is the correct one on any device (the same package can have different icons on different Android versions), the method getApplicationIcon() of the PackageManager is used, which receives a package and returns the icon Drawable.
When the user touches the icon, the guide is started, by sending an intent to the app on which it'll begin. It's also called an intent to the Guide Overlay Service, that'll draw the guide views to help the user.
There's an exception: the guide won't be started if the Accessibility Events Service isn't running. If that's the case, the user will be prompted to enable it in the settings screen that appears.
Figure 14 - Guide details screenshot
For the Add Contact guide, there's also an extra background step. Since the guide uses a sample name and number for the contact, if that information already exists on the device, the contact is deleted. This prevents the “Contact already exists” warning dialog to show.
3.4.4 - Views
The guide views are instances of the GuideView object, which stores information about the desired width and height, the view type and the clip bounds for the touch and info views.
In order to set the proper dimensions for each view, the onMeasure() method is overrode. There, the width and height of the view is reset with the setMeasuredDimension() method.
The touch and info views have the same width and height of the screen. To be able to only draw the colored rectangle on the specified coordinates, the clip bounds must be
set. To allow the use of the method setClipBounds() from API 8 to API 17 (this method is only supported after API 18), this solution overrides it.
The specific settings for each view type are set in the Guide Overlay Service, whose implementation will be described next.
3.4.5 - Services
Here both the Guide Overlay Service and the Accessibility Events Service implementations will be detailed.
3.4.5.1 - Guide Overlay Service
The Guide Overlay Service is an Android Service that's responsible for setting the guide's initial setup, managing its steps and knowing when to stop it. It’s launched after the intent for it from the guide details screen is received.
3.4.5.1.1 - Initial setup
The Guide Overlay Service starts by resetting all the guide's control variables that may have information from the previously run guide, using the resetVariables() method.
Then the setupGuide() method is called. Here, the service gets an instance of the main activity, from which it knows the guide that was chosen by the user. The service also gets the running instance of Accessibility Events Service.
Using the guide object received from the main activity, the service stores in separate variables all of that object's properties, which will be needed multiple times during the guide. It's also calculated the number of steps in the guide by using the length property of the steps' array. The service only proceeds if the number of steps is greater than zero.
After that it's called the setupScreen() method, which uses the DisplayMetrics to get the width and height of the screen in pixels. With this information, the list of
steps is iterated and the setStepPosition() is called on each one.
3.4.5.1.1.1 - Hint text view placement
The setStepPosition() method is implemented on the GuideStep class and sets the hint text view position, with the help of the calculateStepPosition() method. Here, one out of nine possible positions for the hint is chosen, based on the position of the touch or info colored rectangle. The positions are, based on the quadrant of the screen the rectangle is:
Top left, if the colored rectangle is on the bottom right quadrant; Top right, if the colored rectangle is on the bottom left;
Bottom left, if the colored rectangle is on the top right quadrant; Bottom right, if the colored rectangle is on the top left quadrant; Top, if the colored rectangle is both on the bottom right and bottom left
quadrants;
Bottom, if the colored rectangle is both on the top right and top left quadrants;
Left, if the colored rectangle is both on the top right and bottom right quadrants;
Right, if the colored rectangle is both on the top left and bottom left quadrants;
Center, if the colored rectangle is on all quadrants of the screen.
On this last possible position, the hint text view can be placed at the top, left, right or bottom of the colored rectangle, which is decided by calculating where there's more free space for it.
After setting the placement of the hint text view, the service proceeds with the creation of the views, calling the createViews() method.
Figure 16 - Quadrants of the screen Figure 15 - Colored rectangle on top left and right quadrants, hint on bottom
Figure 18 - Colored rectangle on top right quadrant, hint on bottom left
Figure 17 - Colored rectangle on bottom left and right quadrants, hint on top
3.4.5.1.1.2 - Creating the views
For every guide, seven instances of GuideView are created: touch area view, info area view, left delimiter view, top delimiter view, right delimiter view, bottom delimiter view and status bar blocker view. Then, for each of these views, the setView() method is called to set up its properties.
This method starts by setting the layout parameters, needed to control the behavior of the views regarding what to do when they receive a touch, with the help of the setLayoutParams() method.
The setLayoutParams() method receives information about whether the view should send the touches to the foreground activity or capture them and if the view is a status bar blocker. Then, it sets the LayoutParams of the view based on the type of behavior needed.
All of the views receive the parameter TYPE_SYSTEM_ERROR in order to be drawn above everything else on the screen. They also receive other generic parameters.
The status bar blocker view additionally receives the parameter FLAG_LAYOUT_IN_SCREEN, so that the WindowManager places the view within the entire screen, ignoring the status bar. Without this flag, a view set to be drawn on top would be placed below the status bar and not on top of it.
The touch area view needs to let the touches pass through to the foreground activity, therefore receiving the parameter FLAG_NOT_TOUCHABLE, which prevents it from receiving any touch events.
These parameters are returned to the setView() method, that continues to set the properties of the views, like the gravity. The touch area and info area views are also given a background color (green for the touch area, blue for the info area) and the clip bounds are set. A touch listener is also set for both views types, to know if the user touches the colored rectangle area.
Finally, the method gets an instance of the WindowManager and the addView() method is called, adding the view to the screen.
The creation of the views is now complete, unless the guide has a simulated last step. This happens for example in the call guide: the last step is to touch the call button, but the call shouldn't be made. In order to achieve this, another view type is needed, the highlight area view. It behaves like the info area view, not letting the touch pass to the foreground activity, but it has a green colored rectangle like the touch area view.
After creating the views, the last step of the initial setup is to start the info step handler, the foreground activity handler and the inactivity handler. The implementation of these three handlers will be described in the step management and guide management sections.
Figure 20 - Placement of the invisible (here colored) top delimiter (red) and
bottom delimiter (blue)
Figure 21 - Placement of the invisible (here colored) left delimiter (red), right
delimiter (blue) and status bar blocker (green)
Figure 19 - Example of a touch view (green) and hint text view (white with red
3.4.5.1.2 - Step management
After the initial setup, the views are in place and the guide starts. Therefore, it's time to manage the steps of the guide. Every step can either need user interaction (interactive and long interactive steps) or not (info step).
3.4.5.1.2.1 - Managing interactive and long interactive steps
Both interactive and long interactive steps need the user to touch the screen to move to the next step. The onTouchListener associated with the views in the initial setup will call the onTouch() method whenever the screen is touched.
The first thing that this method does is to reset the inactivity timer. This timer is started when an interactive/long interactive step is shown and it's needed to know if there's no interaction from the user for a long time. The timer is used by the inactivity handler, which schedules the end of the guide when it reaches the specified amount of time. If that happens, it means the user isn't doing anything; all the handlers are stopped, the views are removed and the app's main screen is displayed, ready for another user.
After resetting the inactivity timer, the onTouch() method checks where the user touched. If the guide is on its last step, the view touched was a highlight area view and the touch was within the clip bounds, the guide is complete.
On the other hand, if the guide is not on its last step, it needs to be checked if the touch area view was touched on the right place (the green colored rectangle). This view was set on the initial setup not to receive any touches, however they are captured on the onTouch() method anyway because of the parameter WATCH_OUTSIDE_TOUCH. That outside touch received comes with coordinates (0, 0). That means the user touched the right place, because the green rectangle is surrounded by the delimiter views and these can receive touches, therefore returning coordinates different than (0, 0).
After knowing the user touched where he should, one of two actions take place: the updateStepWhenReady() method is called for interactive steps, moving the
guide to the next step, or the service starts listening for long touch events for long interactive steps.
The updateStepWhenReady() method is responsible for calling the updateGuideStep() method at the right time and with the proper step number. It starts by getting information about the activity that should be in the foreground for the next step and compares it with the current foreground activity. If they're not the same, it means the device is still processing the touch and it tries again after a short delay.
When the activity finally matches, the updateGuideStep() method is called with the current step number incremented by one. This increment may not happen if the guide has a touch through last step. This type of last step means the user can touch an infinite number of times on a specified area and it needs to touch a different place to finish the guide. This is used for example in the SMS guide. On the last step, the user can touch on the keyboard as many times as he wants to write the SMS; the guide is only finished when he clicks another highlighted area, the send SMS button.
The guide is now finally ready to move to the next step with the updateGuideStep() method. Here, based on the type of step, the views are redrawn with updated properties, the clip bounds are reset and the hint text view text is updated.
3.4.5.1.2.1 - Managing info steps
Info steps don't need user interaction. They highlight an area of the screen with a blue rectangle for a short period and then the guide automatically proceeds to the next step. There can be more than one info steps in a row.
To achieve this, the info step handler is used. This handler schedules the guide to move to the next step after the given amount of type, calling the updateGuideStep() method and resetting the inactivity timer.