The goal of the thesis was to show how shaders can be used in a 2D game environment using the SFML multimedia library. Shader effects were successfully implemented in the practical part of the thesis and a simple lighting effect was created without relying on examples.
Where is OpenGL used
Screen space is the space where data is presented in pixel coordinates of the screen. Rasterization trims the data to be displayed, which means that processing data that extends beyond the screen space can be avoided.
OpenGL and other graphics libraries
Programmable shaders allowed developers to create their own graphical effects using different types of shader programs in the rendering pipeline. The vertex shader receives its data from the application in which it is used, and subsequent shaders receive their data from their previous shaders in the rendering pipeline.
GLSL language
Vertex processor
Fragment processor
Graphics performance
To display shadow effects, an application that uses OpenGL to display graphics is required. The application must be able to load graphics, update game objects, display game state in a window, and handle user input. In this project, the SFML library is used together with the integrated development environment Microsoft Visual Studio 2010 to create an environment in which various graphical effects can be presented.
SFML is used for opening a window, graphical rendering and user input and Visual Studio for programming the game application with C++ as the programming language.
Visual Studio 2010
SFML
Setting up the development environment
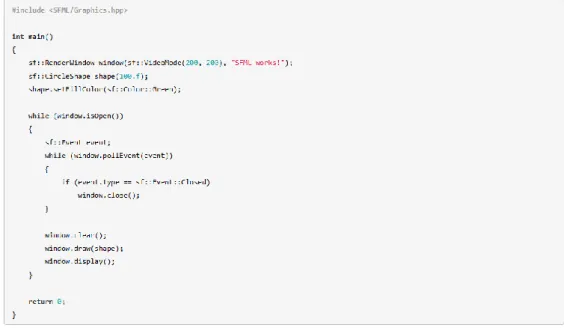
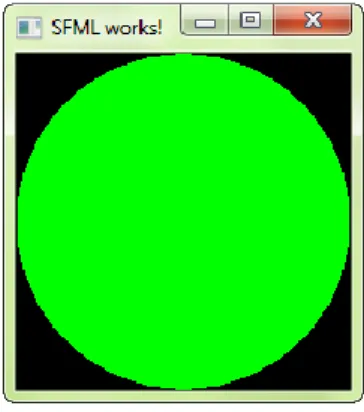
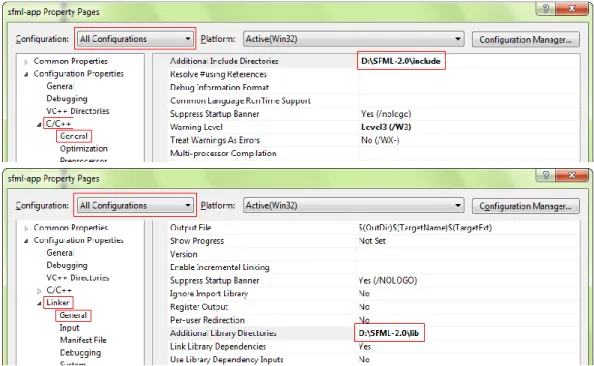
SFML Include and Configure Library Directories (a. SFML Tutorials) A simple way to test whether the setup was successful is to try the minimal code example of opening an SFML window and drawing a circle to the screen, as shown in Figure 4. If everything was connected correctly using the code snippet in Figure 4, a small window titled “SFML Works!” rendering a green circle should appear when the application is launched, as shown in Figure 5.
Creating the game
Loads several fragment shaders used in creating the bloom effect and handles everything needed to use the effect in game. Game creates and initializes a single BloomEffect object when the application starts and uses it when rendering the game scene when the Game's draw state is bloom enabled. A Bullet is an object created by the Game class that spawns from the player's turret at short intervals when the left mouse button is clicked.
It has a hitbox like the enemy and bullets can only collide with the boxes falling from the sky and the game class controls if that happens or if the bullets go out of the screen destroying them. Game automatically applies the created lights to the game scene if the character state has lighting enabled. It also takes care of loading the player's graphic assets for the turret, as the player's textures only need to be loaded once, unlike other assets.
Game objects can also be grouped by adding their vertex and texture information to a single vertex array, provided they use the same texture and shader effect. Even when drawing hundreds of objects separately, there should be no visible performance issues on 2D applications or games, even on low-end hardware, so optimization through batching all game objects using SFML's VertexArrays may not be required, but it is supported in the Renderer class. In the project, most of the rendering is done by rendering objects to sf::RenderTextures and further applying shader effects to the textures and finally drawing them in a sf::RenderWindow and displaying them.
Graphics rendering
They use SFML's built-in sf::Shader class for loading the shader programs, but also implement their own rendering functions and sf::RenderStates for using different types of OpenGL blending states. An object of type RenderWindow must be created to open a graphical rendering window. To render objects to a window, it must first be erased with some color to fill the display surface with pixels.
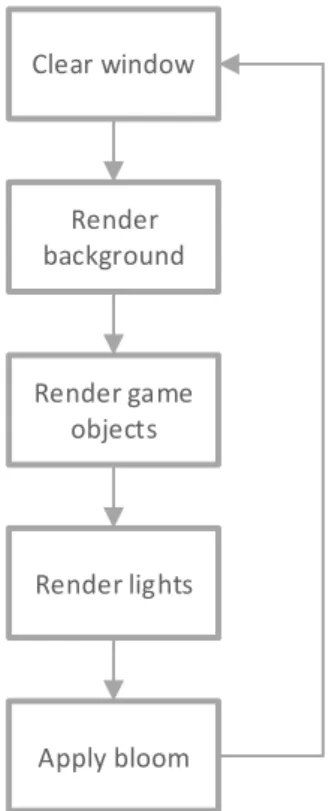
If the window is not cleared for each rendered frame and contains space where objects are not drawn, pixels from previous frames remain where nothing else is rendered. But a game window is usually fully covered with a background and game objects, and there would be no need to clear the window. Once the window is cleared, objects such as sprites, texts, shapes, and custom vertex arrays can be drawn to it by calling the window's draw function, which takes drawable objects as parameters.
To show what has been rendered to the window, it is necessary to call the display function of the window object. SFML also has a way to render objects to a texture instead of drawing directly to a window. Instead of using an object of type sf::RenderWindow for rendering, sf::RenderTexture can be used to first render objects to a render texture and then draw the RenderTexture into the RenderWindow.
Loading and applying shaders
In 2D games, sometimes just a different kind of mixing of drawable objects is all that is needed to e.g.
Lighting
The farther a point in the texture is from the center of light, the darker it will be. In the shader, this distance variable is called dist, and the function used to calculate it is built into GLSL called length() which calculates the distance between two vectors. The effect is completed by multiplying the color of the fragment, the intensity of the light and the color of the light.
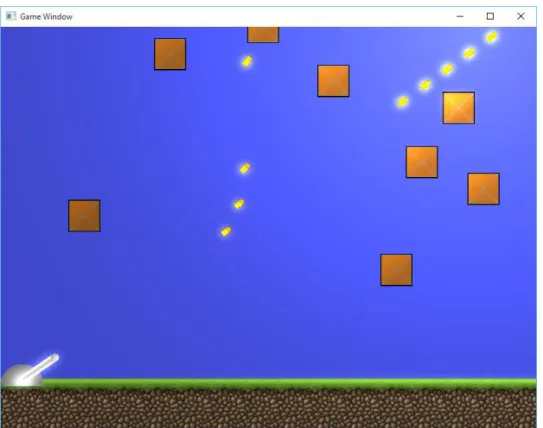
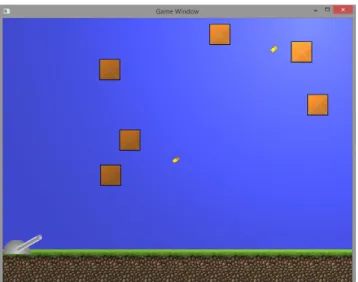
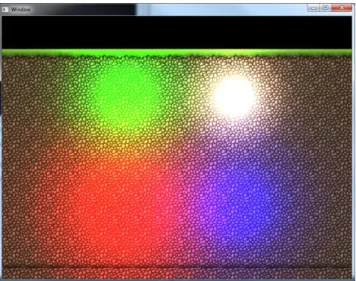
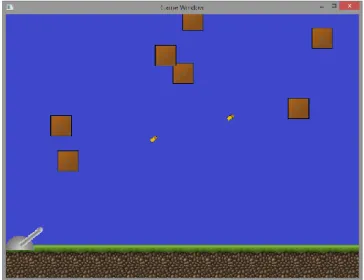
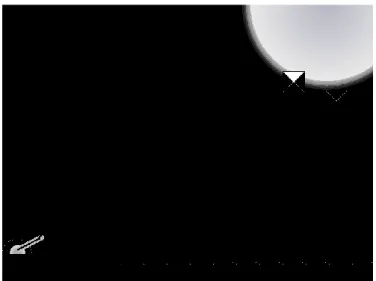
By rendering the game scene using only the default SFML shaders, the game objects in the scene look like their texture files, some with rotation applied (Figure 7). The lighting effect demonstrated in Figure 8 is achieved by adding a single white light to the game scene and using the lights render state. To add multiple lights as shown in Figure 9, first the game objects in the scene are rendered in a texture without any additional effects.
Then, for each light defined in the application code, the light's position, radius, and color variables contained in the light objects are set to the lighting shader before each rendering pass. After setting the parameters, the scene is rendered to the texture again with the shader effect applied and the additional blending mode enabled. Without changing the blend mode, the lights would not blend properly and the scene would become too dark.
Bloom
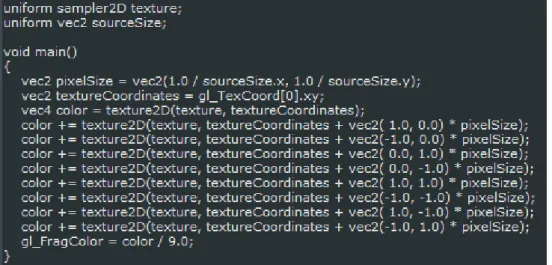
If the resulting texture from this pass were to be applied to the game scene, it would just make the already bright objects very bright or completely white instead of the desired effect of making the bright areas diffuse the brightness around them. This luminance-filtered texture is then blurred by rendering the texture at a lower than original resolution and blending the pixels of a texture with their adjacent color values. The fragment shader used to downsample the brightness filtered texture is shown in Figure 12.
After capturing each processed texture, the textures are then blurred using a fragment shader called Gaussian blur which uses a Gaussian function to reduce detail in an image. Downsampling of the luminance filtered texture actually happens twice, as does the blurring done after each downsampling. By making the source textures smaller and blurring them, the desired effect of spreading the light around bright objects is achieved when the newly created processed textures are combined with the original rendered game scene using an additive blending of fragment shading which is shown in Figure 14.
A total of four filtered textures are passed to the fragment shader with additive blending, which first combines the processed textures and finally blends them with the game scene waiting to be rendered. This is also done twice as the downsampling and blur transitions, as two separate textures are created for them from the brightness transition with 2 different amounts of downsampling. Once all the processed textures have merged with the game scene, the effect is complete.
Combining shader effects
In Figure 16, the combined effect of lighting and blooming is shown on the game screen. The player's turret is not affected by the light to increase the blooming effect on the turret since it is too far away from the turret. The light in the game scene has an effect on the bullets and boxes on the screen, and objects closer to the light are noticeably brighter.
The blooming effect is stronger the brighter the object on the screen, so the light also makes the blooming more visible. The grass on the right side of the scene is also lit and has a lower glow as it is further away from the light than most objects. Only the background part on the left side of the screen remains completely unchanged due to light and blooming and does not change when you switch the rendering mode.
The shader effects you need for your game project are mostly already created and available somewhere, so most of the time you don't need to worry about writing your own shader programs, maybe just modify them for your own purposes. Creating a project to show off the shaders could have gone better, but it was enough to show how existing and newly created shaders can improve the look of the game. Making the bloom effect work was the most challenging and time-consuming part of the game project, as several different shading programs had to be used in a specific order.