HAL Id: hal-00794028
https://hal.inria.fr/hal-00794028
Submitted on 25 Feb 2013
HAL
is a multi-disciplinary open access archive for the deposit and dissemination of sci- entific research documents, whether they are pub- lished or not. The documents may come from
L’archive ouverte pluridisciplinaire
HAL, estdestinée au dépôt et à la diffusion de documents scientifiques de niveau recherche, publiés ou non, émanant des établissements d’enseignement et de
HOCL Installation Guide
Chen Wang, Thierry Priol
To cite this version:
Chen Wang, Thierry Priol. HOCL Installation Guide. [Technical Report] Inria. 2009. �hal-00794028�
HOCL Installation Guide
Author
Chen WANG, Thierry PRIOL
Contact
chen.wang@irisa.fr, thierry.priol@inria.fr PARIS Project-team
INRIA Rennes 01/2010
Abstract
HOCL (Higher Order Chemical Language) is a chemical programming language. Compu- tations can be seen as chemical reactions which are controlled by a set of chemical rules. We have an HOCL compiler developed in JAVA. This manual aims at presenting how to install and then use this compiler to compile and execute the HOCL programs. The following part of this document is organized as following:
Section 1: This section helps readers accomplish all the necessary preparations for the installation, such as download the source codes of the HOCL compiler and set up Java envi- ronment.
section 2: After all the preparations have been done, in this section, we talk about how to install the HOCL compiler and then use it to compile and run HOCL programs step by step.
Section 3: Different programmers have different preferences. It is pleasant for some pro- grammers to use an integrated development environment (IDE) since it is easy to learn and get start. But other users still get used to some classical tools for programming, such as using a text editor. It saves a lot of time for small programs. As a result, we will introduce how to create HOCL projects and write HOCL programs using both manners.
This manual aims at introducing how to install and use HOCL compiler, but the above- mentioned three sections is not sufficient. Readers might meet a lot of problems during the installation and the usage of this compiler. In order that all the reader can master professionally this compiler, several supplementary sections are added in the appendix.
Appendix A: This section shows you how to install Java SDK in your machine. HOCL compiler is developed under Java platform, so this is the basic preparation for installing and using it.
Appendix B: Once executing a program, you will enter a chemical shell where you can use several commands to interact with a local or remote multi-set. In this section, we introduce each command in detail.
Appendix C: No matter how well we have described in detail, you will definitively meet different kinds of problems during the compilation and execution. Those problems may be cause by different reasons. We cannot include all of them in this manual but we list most normal errors that you have a great chance to meet and give out the solution. If you have encountered some problems beyond the scope of this manual, you can send us the feedback by email (chen.wang@irisa.fr). We are pleased to receive your feedbacks.
Appendix D: Because of the limits of time, there are still some small bugs in HOCL compiler. These issues do not affect normal use. We are going to fix them in the near future. Of course, we would appreciate to receive your report for new bugs (by email: chen.wang@irisa.fr).
Once you have well installed the HOCL compiler, mastered the techniques in this manual and picked your development tools, you are ready to pass on reading “HOCL Programming Guide”, where you will begin exploring this chemical programming language.
Table of Contents
1 Preparation 3
1.1 Get Source Code of HOCL Compiler . . . 3
1.2 Environment Set Up . . . 5
2 The Installation and Use of HOCL compiler 8 2.1 Install HOCL Compiler . . . 8
2.2 Use HOCL Compiler . . . 8
3 Chemical Program Development 12 3.1 Create New HOCL Project . . . 12
3.2 Using an Integrated Development Environment . . . 16
3.2.1 Import HOCL Compiler & Programs into ECLIPSE . . . 16
3.2.2 Create HOCL Programs in ECLIPSE . . . 20
A Installing the Java Development Kit 26 A.1 Downloading the JDK . . . 26
A.2 Setting the Execution Path . . . 27
B How to Use Chemical Shell to Interact with Local and Remote Multi-set 30 B.1 Local Operations . . . 30
B.2 Remote Operations . . . 43
C Solutions for Problems during Installation 50 C.1 System Java Compiler Version Error . . . 50
C.2 Eclipse Java Compiler Version Error . . . 50
C.3 Remote I/O multiset failed . . . 53
C.4 Block during register to RMI server . . . 54
C.5 java.lang.ClassNotFoundException . . . 55
D Bugs in HOCL compiler 57
1 Preparation
Before getting start, some preparation are necessary. First of all, you have to download the source code of HOCL compiler. This compiler is developed in Java, so that the files you have downloaded are Java source codes. In fact, this package of source codes is a Java project. To install the HOCL compiler is equal to build this Java project. As a result, a Java environment is needed. This section shows you all the necessary preparations for the installation of the HOCL compiler.
1.1 Get Source Code of HOCL Compiler
Firstly, you have to download the source codes of the HOCL compiler for its installation. Those source codes are available atINRIA GFORGE via the following address:
https://gforge.inria.fr/projects/hocl/1
Make sure that you are already a registered user to INRIA GForge and logged in (maybe, you have also to subscribe to this project). And then, click the “CVS/SVN” tab, you can get the information of HOCL source codes. All the instructions for getting the source code are listed on the left, you can follow these instructions to download the source code. For example, open a terminal and simply to use the following command:
svn checkout –username your user name https://scm.gforge.inria.fr/svn/hocl
Replace “your user name” part in the above command by your log-in name. Your password will be asked to verify your identity during this process. If you give the right password, the source codes of the HOCL compiler will be downloaded automatically. You can get the following display as shown inFigure 1in your terminal window.
Figure 1: Get the source code from INRIA Gforge
1Later on, the source code package in aZIPfile will be available on the website of “PARIS Project-team”, you can visit this website via the following address:http://www.irisa.fr/paris/web/
After this operation, you can check your /home/ directory2 in your computer, there is an
“hocl” folder created as shown in Figure 2. Expand this directory, there is a folder (named as
“src”) and an XML file (“build.xml”) presented. src contains the complete Java source code of the HOCL compiler as well as some HOCL demo programs. build.xml is anAnt buildfile specifying a list ofJavac tasks, which is used to build the HOCL compiler. And now, open src folder, you can see there are five sub-folders included: hocli,hoclc2j,tests,exercise,example.
Figure 2: The new folder“hocl” is created
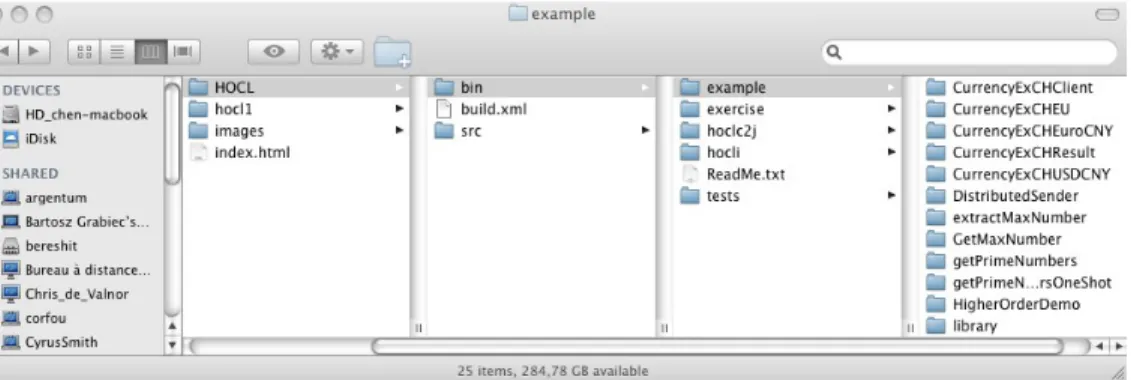
hocli is the HOCL interpreter, the Java classes inside it define how to represent chemical computing in Java, such as how to express a chemical rule and multi-set etc.; Java classes inhoclc2j are used to transform HOCL source codes to Java source codes;testsincludes all the HOCL demo programs developed by the developer of HOCL compiler; example contains the complete source codes for all the chemical programs that you will find in “HOCL Programming Guide”, readers can check these codes as long as you read that document; furthermore, after each section of “HOCL Programming Guide”, there are some exercises left for reader as practices, all the source codes for those exercises are given inexercise folder.
To program in HOCL, first of all, you have to create an HOCL project. As you can see from Figure 3, under /src/example/ directory, there are a lot of sub-folders, such as demoIn- teraction. Each sub-folder represents an HOCL project and the folder’s name is the project name. An HOCL project has to include at least three files: an HOCL program with the extension
”.hocl”, which has the same name as the project name and aMakefile which is used to compile that HOCL program. Apart from that, aserver.policy file is necessary, which defines the access permission to an HOCL project. In addition, for the beginners, it is a good manner to create an
“expectedResult.hocl” file which is an inert HOCL program 3 showing the final results after the reaction.
2In fact, all the source code will be downloaded into the directory where you were when you executed the above- mentioned command, if you open a terminal window and then run that command directly, all the source code will be downloaded into your/home/directory.
3Refer to “HOCL Programming Guide” to see what is an inert HOCL program
Figure 3: Enter the folder of an example: GetMaxNumber
After reviewing these folders, if you want only develop local applications, you can move these source files to any directory you like. BUT IF YOU WANT YOUR PROGRAM TO COMMUNICATE WITH A REMOTE ONE IN THE DIFFERENT MACHINE, YOU HAVE TO MOVE IT TO A DIRECTORY THAT CAN BE ACCESSED FROM WEB.
Here, we move it to /Sites/HOCL/ directory, which is the default root directory for the Web server in a MAC machine. So that we have the following command executed as shown inFigure 4.
Figure 4: Move the source code to ECLIPSE workspace
1.2 Environment Set Up
Having downloaded the source code of HOCL compiler, in this section, we are going to show you how to check and set up the necessary environment for installing the HOCL compiler and compiling and running HOCL programs.
• Step 1: Check JDK Version
Firstly, ensure that you have already installed the most complete and up-to-date version of theJava Development Kit (JDK). To check the version of your installed JDK, start a shell window, type the following line
java -version
and press theENTERkey. You will get a display as shown inFigure 5.
Figure 5: Check the JDK Version
To the moment that this manual was written, the latest version of JDK is1.6.0, theupdate 17 has been released. If you get a display of an older version of JDK, for example, JDK Version 1.5.0 or even older, you need to download and install the latest release of JDK (In fact, the HOCL compiler is developed under JDK 1.5, so to compile the source codes of this compiler,JDK version 1.5.0 is enough, but it is better to keep your development tools up-to- date in case that other developers add some new features which are developed under a more updated version of JDK). As for how to install Java on your machine, refer to Appendix A for a detailed guide. After its installation, you MUST carry out one additional step: add thejdk/bin directory to the execution path, the list of directories that the operating system traverses to locate executable files (you can also find how to do this inAppendix A).
Restart your computer to get your system updated and redostep 1, verifying the JDK version is the latest one. If not, you have to redo this step, follow Appendix Ato re-install JDK on your machine.
• Step 2: Check Java Compiler Version
And then, you have to check Java compiler’s version, type the following command line in a shell window and pressENTERkey.
javac -version
Normally, you will get the same version number as JDK.Figure 6displays the expected result.
Figure 6: Check the Java Compiler Version
However, sometimes you can get other results caused by some installation conflicts. For example, you have a great chance to get the following display inFigure 7.
Figure 7: Lower Version of Java Compiler
This problem is caused by ECLIPSE. The installation of ECLIPSE changes the system Java compiler as its built-in one. This compiler is an old one so that it may cause a lot of problems
when compiling the HOCL compiler and HOCL programs later. To solve this problem, you have to update Java compiler, refer toAppendix Cfor solutions.
• Step 3: Check ANT version
The HOCL compiler can be easily installed in a terminal window. So you must make sure that you have ANT installed in your machine, type the following command in the shell window to verify its installation:
ant -version
If you have ANT installed, you can get its version information as shown inFigure 8.
Figure 8: Check the ANT Version
At this point, all the preparations are well done. You can start your installation and write HOCL programs by following the instructions in the next sections.
2 The Installation and Use of HOCL compiler
If you pass the first section without any problems, all the preparation works have been done. In this section, we introduce how to install the HOCL compiler and then compile and execute HOCL programs.
2.1 Install HOCL Compiler
• Step 1: Enter the source code folder
The installation of the HOCL compiler is simple and quick in a shell window. The first step is to open a terminal, enter the directory of the HOCL compiler source code, using “cd ...”
command. Here, our target directory is/Sites/HOCL/, as shown inFigure 9:
Figure 9: Entering the Source Code Directory
After entering the source code directory, as we have introduced before, you should see an XML file (build.xml) presented as well as a folder (“src”) containing all the source codes.
Using “ls” command to display its content, as shown in the figure above, verifying that you are in the right directory.
• Step 2: Start installation
And then, you can get the HOCL compiler installed simply by typing “ant” in the terminal window and then press ENTER key. The installation will be launched automatically as shown in Figure 10. Finally, you will get a sign indicating that the installation has been successfully performed.
• Step 3: Check newly produced files
At this point, you can check your file system, either in the graphic file manager or in the terminal window. You can see that a new folder (“bin”) has been created. Expand this directory and your will find that all Java source files have been compiled and the relative .class files are generated and stored here, as shown inFigure 11.
Up to now, the HOCL compiler has been perfectly installed, you can test it by running an existing example or creating your own, follow next sections to play with it.
2.2 Use HOCL Compiler
There are a great deal of examples included in the source code package. In this section, we pick a simple example, to calculate the maximun number of a set of integers, to show you how to compile
Figure 10: Installation of HOCL Compiler
Figure 11: Check “bin” Directory
and run an HOCL program in a shell window. For other examples, use the same way.
• Step 1: Enter the target directory
EnterGetMaxNumber folder, here we give out its relative path:
/src/example/GetMaxNumber/
We use relative path since readers may install their HOCL compiler in different directory.
Use “ls” command to check its contents, as shown inFigure 12.
Figure 12: EnterGetMaxNumberFolder
• Step 2: Compile the HOCL programs
As other language, before running an HOCL program, you have to compile the source code.
The compilation is quite simple using a terminal window, you just need to type the following line:
make
and then, press ENTERkey. The compilation will be performed automatically. SeeFigure 13.
Figure 13: Compile HOCL program
At this point, check your file system, either in graphic file manager or using “ls” command in a shell window, you can see new Java source files are created as shown in Figure 14.
Figure 14: New Java source code is generated
• Step 3: Start RMI Server
Before executing the programs, you should start RMI server. The RMI registry is a simple server-side bootstrap naming facility that enables remote clients to obtain a reference to an initial remote object. It can be started with the “rmiregistry &” command, as shown inFigure 15. Before you execute rmiregistry, you must make sure that the terminal in which you will run rmiregistry either has no CLASSPATH environment variable set or has a CLASSPATH environment variable that does not include the path to any classes that you want downloaded to clients of your remote objects.
Figure 15: Start the RMI Server
• Step 4: Run the HOCL program
Once the registry is started, you can start the program. Now, you can execute the HOCL program simply by using:
make run
command in a terminal window. And you will enter a chemical shell as shown in Figure 16. This shell provides you a lot of commands to manage the multi-set, such as add/remove elements to/from a multi-set, display the content of a multi-set or even connect to a remote multi-set to make some remote operations in the same way as local ones. As for how to use chemical shell to manage and operate on the multi-set, refer toAppendix Bfor details.
Figure 16: Run the Example
3 Chemical Program Development
3.1 Create New HOCL Project
In this section, we will show how to create an HOCL project and then compile and run it in a terminal window.
Theoretically, your project can be put in anywhere; But weSTRONGLY RECOMMEND you to put it under /src/example/ directory. In this way, you need not write or modify the Makefile for compiling your HOCL programs. You can copy it from another existing project. We are going to create a project “getMinNumber” which calculates the minimum value of a set of integers.
• Step 1: Create HOCL project
To create a project, first of all, use a terminal and enter/src/example/ directory, as shown inFigure 17.
Figure 17: Entering “test” folder
And then, create a folder for your project under this directory. As mentioned, we are going to set up an HOCL project named as “getMinNumber”. As a result, we have to create a folder with the same name, as shown inFigure 18.
Figure 18: CreategetMinNumberproject
• Step 2: Create all necessary files
After the creation of the project folder, we have to create all the necessary files. In the same terminal, enter that project folder that you have just created in the first step, as shown in Figure 19.
Figure 19: Enter project folder
As introduced, for each project, there are three necessary files: an HOCL program which has the same name as the project name (project name.hocl), aMakefile file which compiles
HOCL source files and generates Java source code and a server.policy defining the access permission for this HOCL project. For the beginners, you can create another HOCL file containing the expected result (this file is not obligatory but we recommend to create it).
As a result, we have to create these four files manually in the terminal window, as shown in Figure 20.
Figure 20: Create new files
And then, use “ls” command to check the contents of this project folder. As shown inFigure 21, we can see that four files are created but they are all blank/empty ones. We will edit these files in the following steps.
Figure 21: Check the Newly Created Files
• Step 3: EditMakefile
The most simple one is Makefile. All the projects contained in /src/example/ direc- tory contain a Makefile. Their contents are ABSOLUTELY the same (Notice that the Makefilesin/src/tests/,/src/exampleand/src/exercise/ directory are different from each other). As a result, we need only to copy a Makefile from any one of projects in /src/example/ directory. Here we copy it from getMaxNumber project, as shown in Figure 22.
Figure 22: EditMakefile
• Step 4: Editserver.policy
server.policy file is in the same case as Makefile, all the project create in /HOCL/
directory have the sameserver.policy file. So we can easily copy it from other projects to avoid editing it ourselves. As shown inFigure 23, we also copy it also fromgetMaxNumber project.
Figure 23: Edit server.policy
• Step 5: Edit the main HOCL program
Next, we have to edit getMinNumber.hocl. Use a text editor to open it, you can choose any one you prefer. Here, we usevi, as shown in Figure 24.
Figure 24: Open HOCL source file
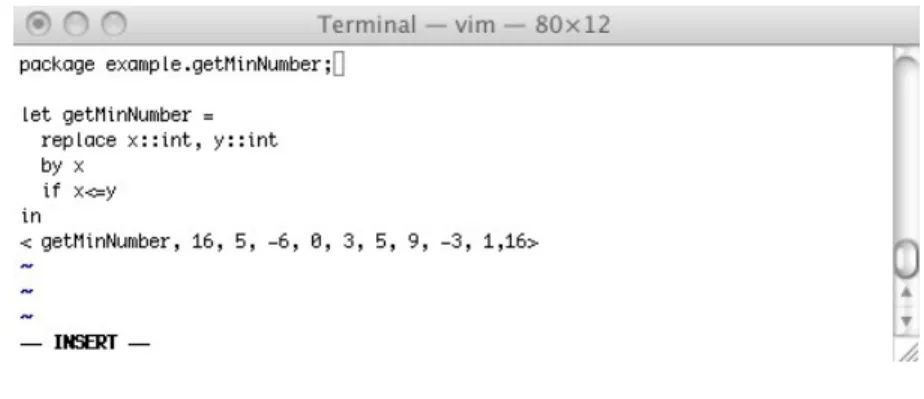
And then, edit it with the following contents shown inFigure 25. As how to write an HOCL program, refer to “HOCL Programming Guide” for more information.
Figure 25: Edit getMinNumber.hocl
• Step 6: EditexpectedResult.hocl
Afterwards, open theexpectedResult.hocl file in the same way, as shown inFigure 26:
Figure 26: OpenexpectedResult.hocl
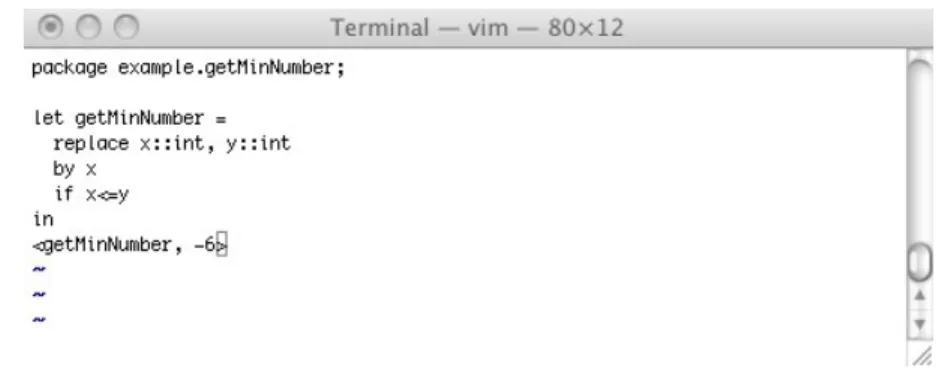
Edit it with the lines in Figure 27. Leave the rule definition part unchanged and give the expected result in the multi-set, which is implemented by a pair of “<>”.
• Step 7: Compile & Run program
Figure 27: EditexpectedResult.hocl
After all the four files are well created and edited, we can now compile the HOCL program.
Using the same way as we have introduced in Section 2.2. Type “make” in the teminal window, as shown inFigure 28.
Figure 28: Compile HOCL source code
And then, start RMI server, as shown inFigure 29
Figure 29: Start RMI Server
And finally execute it by using “make run” command, you will enter the chemical shell, as shown inFigure 30.
Figure 30: Execute program
To start the chemical reaction, you can use “run (r)” command, as shown in Figure 31. For more advanced operations on the multi-set, referAppendix B for the introduction of how to useChemical Shell to manage multi-set.
Figure 31: Execute program
3.2 Using an Integrated Development Environment
4However, many programmers prefer the comfort of an Integrated Development Environment (IDE).
In this section, we will talk about how to use ECLIPSE, a freely available development environment to write HOCL programs.
3.2.1 Import HOCL Compiler & Programs into ECLIPSE
In this section, we will present you how to import the HOCL compiler into ECLIPSE. You have downloaded all the source codes of the HOCL compiler inSection 1.1. In fact, the HOCL compiler is a Java project so that we can use ECLIPSE to build it.
First of all, open ECLIPSE and create a new project: right click in the “Package Explorer”
view and choose “New”->“Project”, or in the main menu, click “File->New->Project” (as shown inFigure 32).
4This chapter is written in September 2009, all the screenshot were captured in a LINUX machine; as a result, you will find that the HOCL compiler is installed in/home/chen/workspace/hocl/ instead of/Sites/HOCL/
Figure 32: Create New Project in ECLIPSE from Menu
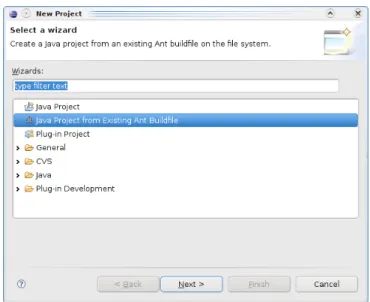
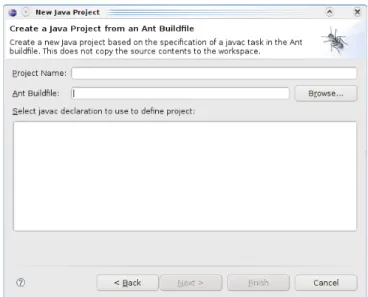
And then, the following dialog box (shown in Figure 33) will appear. Select “Java Project from Existing Ant Buildfile”. By this means, a new Java project can be created based on the specification of a javac task in the Ant buildfile. If there is no such choice, replace “type filter text” line by “Ant” and then this choice will appear. Click “Next”
Figure 33: Create a Java Project from existing Ant buildfile
You will afterwards meet the following window inFigure 34, it asks you all the information for building a new Java project.
Figure 34: Dialog Box for Locating the Ant Buildfile
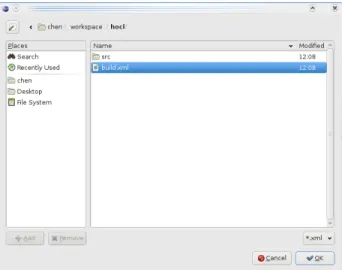
Click “Browse” button to locate the Ant buildfile. This file is included in the “hocl” folder
that we have downloaded in the first section. Remember that we have moved this folder to
“/home/chen/workspace/hocl/” directory. This process is shown inFigure 35.
Figure 35: Locate the Ant Buildfile
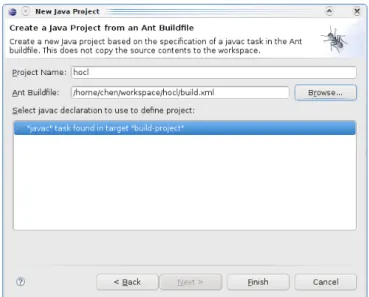
Click “OK” button when you have located yourAnt buildfile. And then, you will get a dialog box as shown inFigure 36 for displaying and confirming all the information.
Figure 36: Dialog Box for Confirmation
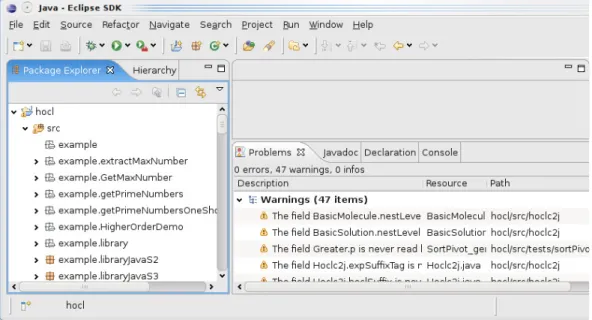
Click “Finish” button, you are lead back to ECLIPSE main frame. From the “Package Ex- plorer” view, as shown in Figure 37, you can see that the project “hocl” has been well created (with all source codes imported). ECLIPSE will build this Java project automatically. If you get some errors in “Problems” view, refer toAppendix Cto fix them; if not, your HOCL compiler has been perfectly imported.
Figure 37: Enter the name of the project
In the following sections, we will show you how to create new HOCL projects in ECLIPSE.
3.2.2 Create HOCL Programs in ECLIPSE
• Step 1: Create a Package
To create your own HOCL project, Firstly is to create a package for all the project files.
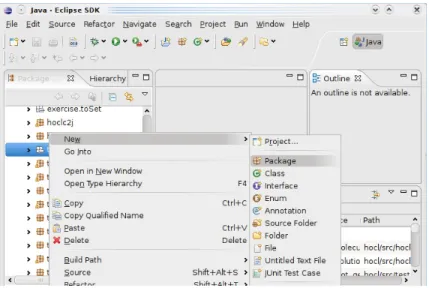
As we have introduced, it is strongly recommended to put all user defined HOCL project in /src/tests/ directory (as well as /src/example/ and /src/exercise/ directory). Using ECLIPSE, in the “Package Explorer” view, right click on “test” package and then click on
“New” ->“Package”, as shown inFigure 38.
Figure 38: Create a Package in ECLIPSE
And then, the following dialog box will appear, give this new package a name “tests.getMinNumber”, as shown inFigure 39and then click on “Finish”
Figure 39: Name the package “getMinNumber”
Afterwards, go back to ECLIPSE main frame, you can see that a new package has been create, as shown inFigure 40. This package is used to contain all the source files of “getMinNumber”
HOCL project.
Figure 40: Check newly created package
• Step 2: Create Project files
And then, we need to create all necessary project files. As stated in former section, aMakefile andserver.policy file as well as an HOCL program with the same name as the project name are obligatory.
To create the HOCL program in ECLIPSE, right click on the newly created package in the
“Package Explore” view, choose “New” -> “File”, as shown inFigure 41.
Figure 41: Create New File
And then, you will meet the following dialog box in Figure 42, give the file with the name
“getMinNumber.hocl”, which is an HOCL program having the same name as this HOCL
project.
Figure 42: Give a Name to This New File
You can see from the “Package Explorer” view that there is an blank/empty HOCL program created. In the following, we have to create theMakefile andserver.policy file.
As stated in the previous section, we need not to write these files ourselves; instead, we can copy it from other projects in “tests” package. We expand “max” HOCL project, right click itsMakefileand then select “Copy”, as shown inFigure 43.
Figure 43: Copy a Makefile
In “Package Explorer” view, right click on “tests.getMinNumber” package, select “Paste”, as shown inFigure 44.
Figure 44: Paste theMakefile
Use the same way to copy “server.policy” file from another HOCL project (ex. “max” HOCL project).
• Step 3: Write your HOCL program
And then, open the empty HOCL file, edit it in the integrated editor in ECLIPSE, as shown in Figure 45. As for how to write an HOCL program to calculate minimum number of a set of integers, refer to “HOCL Programming Guide” for details.
Figure 45: Edit the HOCL file
• Step 4: Compile & run this HOCL program
Now, you can compile and execute an HOCL program using a terminal window. These processes are introduced in the previous section.
A Installing the Java Development Kit
5A.1 Downloading the JDK
The most complete and up-to-date versions of theJava Development Kit(JDK) are available from Sun Microsystems for Solaris, Linux, and Windows. Versions in various states of development exist for the Macintosh and many other platforms, but those versions are licensed and distributed by the vendors of those platforms.
To download the Java Development Kit, you will need to navigate the Sun web site and decipher an amazing amount of jargon before you can get the software that you need. SeeFigure 46for a summary.
Figure 46: Java Jargon
You already saw the abbreviation JDK for Java Development Kit. Somewhat confusingly, versions 1.2 through 1.4 of the kit were known as the Java SDK (Software Development Kit). You will still find occasional references to the old term. There is also a Java Runtime Environment (JRE) that contains the virtual machine but not the compiler. That is not what you want as a developer. It is intended for end users who have no need for the compiler.
Next, you will see the term Java SE everywhere. That is the Java Standard Edition, in contrast to Java EE (Enterprise Edition) and Java ME (Micro Edition).
You will occasionally run into the term Java 2 that was coined in 1998 when the marketing
5This section is copied form “Core Java. Volume I, Fundamentals / Cay S. Horstmann, Gary Cornell. 8th ed.
Chapter 2: The Java Programming Environment. p16-p19”
folks at Sun felt that a fractional version number increment did not properly communicate the momentous advances of JDK 1.2. However, because they had that insight only after the release, they decided to keep the version number 1.2 for the development kit. Subsequent releases were numbered 1.3, 1.4, and 5.0. The platform, however, was renamed from Java to Java 2. Thus, we had Java 2 Standard Edition Software Development Kit Version 5.0, or J2SE SDK 5.0.
For engineers, all of this was a bit confusing, but that is why we never made it into marketing.
Mercifully, in 2006, sanity prevailed. The useless Java 2 moniker was dropped and the current version of the Java Standard Edition was called Java SE 6. You will still see occasional references to versions 1.5 and 1.6 - these are just synonyms for versions 5.0 and 6.
Finally, when Sun makes a minor version change to fix urgent issues, it refers to the change as an update. For example, the first update of the development kit for Java SE 6 is officially called JDK 6u1 and has the internal version number 1.6.0 01. If you use Solaris, Linux, or Windows, point your browser to http://java.sun.com/javase to download the JDK. Look for version 6 or later and pick your platform. Don’t worry if the software is called an “update”. The update bundles contain the most current version of the whole JDK.
Sometimes, Sun makes available bundles that contain both the Java Development Kit and an integrated development environment. That integrated environment has, at different times of its life, been named Forte, Sun ONE Studio, Sun Java Studio, and Netbeans. We do not know what the eager beavers in marketing will call it when you approach the Sun web site. We suggest that you install only the Java Development Kit at this time. If you later decide to use Sun’s integrated development environment, simply download it from http://netbeans.org.
After downloading the JDK, follow the platform-dependent installation directions. At the time of this writing, they are available at
http://java.sun.com/javase/6/webnotes/install/index.html.
Only the installation and compilation instructions for Java are system dependent. Once you get Java up and running, everything else in this book should apply to you. System independence is a major benefit of Java.
A.2 Setting the Execution Path
After you are done installing the JDK, you need to carry out one additional step: Add the jdk/bin directory to the execution path, the list of directories that the operating system traverses to locate executable files. Directions for this step also vary among operating systems.
• In UNIX (including Solaris and Linux), the procedure for editing the execution path depends on the shell that you are using. If you use the C shell (which is the Solaris default), then add a line such as the following to the end of your /.cshrc file:
set path=(/usr/local/jdk/bin $path)
If you use the Bourne Again shell (which is the Linux default), then add a line such as the following to the end of your /.bashrc or /.bash profile file:
export PATH=/usr/local/jdk/bin:$PATH
• Under Windows, log in as administrator. Start the Control Panel, switch to Classic View, and select the System icon. In Windows NT/2000/XP, you immediately get the system properties dialog. In Vista, you need to select Advanced System Settings (seeFigure 47). In the system properties dialog, click the Advanced tab, then click on the Environment button.
Scroll through the System Variables window until you find a variable named Path. Click the Edit button (seeFigure 48). Add the jdk\bin directory to the beginning of the path, using a semicolon to separate the new entry, like this:
c:\jdk\bin;other stuff
Save your settings. Any new console windows that you start have the correct path.
Figure 47: Launching the system properties dialog in Windows Vista
Figure 48: Setting the Path environment variable in Windows Vista
Here is how you test whether you did it right: Start a shell window. Type the line java -version
and press the ENTER key. You should get a display such as this one:
java version “1.6.0 01”
Java(TM) SE Runtime Environment (build 1.6.0 01-b06)
Java HotSpot(TM) Client VM (build 1.6.0 01-b06, mixed mode, sharing)
If instead you get a message such as “java: command not found” or “The name specified is not recognized as an internal or external command, operable program or batch file”, then you need to go back and double-check your installation.
B How to Use Chemical Shell to Interact with Local and Remote Multi-set
Once we have an HOCL program compiled, we can run it simply by using “make run” command in a terminal. When executing a program, the chemical reactions will not be triggered directly;
instead, you will meet an “Chemical Shell”. This shell is used to manage the multi-set. In this section, we will introduce how to use chemical commands in thischemical shell to interact with the multi-set of an HOCL program.
B.1 Local Operations
An HOCL program can either operate on its local multi-set or a remote one. In this part, we are going to talk about how to interact with its local multi-set; while in the next part, we will introduce how to connect to a remote multi-set which is created by another HOCL program, and interact with it.
First of all, open a terminal window, get into the directory of an HOCL project. Here we take HOCL project “demoInteraction” for example. Type “make” to have HOCL program compiled, your command window will more or less look like the one shown inFigure 49.
Figure 49: make- Compile the source codes
If you pass the compilation without any error, you can execute the program. Before execution, you have to start “rmi registry”. Use the command “rmiregistry &”, as shown inFigure 50.
Figure 50: rmiregistry & - Start the rmiregistry
The rmiregistry command creates and starts a remote object registry on the specified port on the current host. If port is omitted, the registry is started on port 1099. The rmiregistry command produces no output and is typically run in the background. A remote object registry is
a bootstrap naming service that is used by RMI servers on the same host to bind remote objects to names. Clients on local and remote hosts can then look up remote objects and make remote method invocations. This step is necessary if you want your program to connect to a remote multi-set and make remote operation. If you only want to execute HOCL programs locally, you can pass this step.
At this point, we can run a program by using “make run” command, then you will enter a chemical shell, which is shown inFigure 51. You should have met all these steps insection 2.2.
Figure 51: make run - Run the program
In the chemical shell, we can use commands to operate on the local multi-set. If you do not know any of a command, use “help” command to get a short description of each command. Figure 52 shows you all the supported commands. Using these commands, we can either start chemical reactions in the multi-set, or add/remove elements into/from the multi-set, or even get access to a remote multi-set. We will introduce all these HOCL commands in the remaining part of this section.
Figure 52: help (h) - Display discription of all the commands
“display (dp)” is used to print out the content of a multi-set, as shown inFigure 53. As we have introduced, the multi-set is inert at the very beginning, it keeps it original contents.
Next, we can use “run (r)” command to start chemical reactions. The reactions will be triggered and the computation starts. Finally, the multi-set reaches a stable state, its content will be printed out, as shown inFigure 54.
Figure 53: display (dp)- Display the content of multi-set
Figure 54: run (r)- launch the chemical reactions
“check (cht)” command is used to check all the supported types of element in the multi-set (as shown inFigure 55). It is necessary because when add or remove an element, the user must indicate the type of the element that he wants to add/remove.
Figure 55: check (cht) - check all the supported types
One of the best characteristics of chemical computing is dynamicity. Once the multi-set becomes inert, we can add new elements or new rules to trigger new chemical reactions. And now, We are going to introduce how to interact with local multi-set.
We can add an element in the root of a multi-set (which we call “container”) by using “put”
command. When you use this command, you will be asked what type of element that you want to add, as shown inFigure 56. It will list all the supported types.
Figure 56: put (p) - put an element in the container
To choose a certain type,PAY ATTENTIONhere, you have to input theINTEGERnumber marked in front of a certain item. Here we want to add anString element so that we input “10”, as shown inFigure 57.
Figure 57: Select the type of element the you want to add
And then, we have to give the parameters to construct that element. In this example, we enter a String “THIS IS THE CONTAINER”. And then, we can use “display (dp)” command to check the content of the multi-set. FromFigure 58, we can see clearly that there is a String “THIS IS THE CONTAINER” presented in the container.
Figure 58: Enter the paramaters for constructing that type of element
Of course, we can do the opposite operation in the same way, using “get” command. When a user want to remove elements from the container, he will be asked which type of elements he wants to remove, as shown inFigure 59.
Figure 59: get (g) - delete certain elements in the container
It is absolutely the same case as when we use “put” command to add an element in the container.
All the types of element are listed for user to choose, you have to input an integer number that marked in front of a certain item. In this example, we want to remove the String “THIS IS THE CONTAINER” that we have added in the previous step, so we input “10”, as shownin Figure 60.
Figure 60: Indicate the type of the element to remove
And then, a String parameter has to be given, we enter : “THIS IS THE CONTAINER” and pressENTER key to confirm the delete. To check the result of this action, simply use “display (dp)” command. As shown in Figure 61, we can find that the String element “THIS IS THE CONTAINER!” has been removed from the container.
Apart from adding/removing elements in/from the container, we can also add/remove elements in/from the sub-solutions using “put + dir” command. This time, “put” command is followed by a space and then a String “dir” as the parameter. We regard a multi-set as a file system, a multi-set can contain many sub-multi-sets. Multi-sets are represented by tuples. These tuples have two fields, the first one is a String which represents the name of the multi-set that stored in the second field of this tuple (A solution is represented by a tuple like: “name”:<multi-set>). Each level of multi-set
Figure 61: Give the element that you want to remove and display the content
can be seen as a directory of a file system. The multi-set in the same directory cannot have the same name.
For a dir String, “.” means the root directory which can be seen as the conainer, the first level of the multi-set. If you want to put the elements in the sub-multi-set of the container, take
“calculateMaxLength” for example , just simply use the command put ./calculateMaxLength, as shown inFigure 62.
Figure 62: put dir - put certain elements in a certain sub-solution
And then, a solution is created to contain all the elements that you want to add. If you want to put some elements of certain types, enter ”yes (y)”. And then, all supported types are listed for you to choose, as shown inFigure 63.
Figure 63: Construct a solution to contain all the elements you want to put
This time, we want to add a String element in that sub-solution, so enter “String” in the chemical shell, as you can see in Figure 64. PAY ATTENTION here, different from putting elements in the container, this time, if you want to add an element of a certain type, youMUST input aString INSTEAD OF A NUMBERwhich indicates the type of that element. (Ex. as shown in Figure 63, if you want to put an integer in the container, you have to input “6”, but if you want to put an integer in a sub-multi-set, you must input “Integer”, the first letter should in upper case)
Figure 64: Indicate the type of the element
In the same way as putting elements in the container, we will then give the parameters for constructing this String: “This is a sub-solution!”, as shown inFigure 65.
Figure 65: Give the parameters for constructing that element
The chemical shell will ask you if you want to put more elements in that sub-solution. If you do not want to put any more, enter “no”, as shown inFigure 66.
Figure 66: Continue add element or not
At this point, we can use “display (dp)” command to check the contents of the multi-set, as shown inFigure 67, there is an “INSERT” tuple created in the container.
Figure 67: A “INSERT” tuple generated
Now, we can use “run (r)” command to trigger the chemical reactions. Certain chemical rules will pass the parameters in the “INSERT” tuple to the target sub-multi-set. After the execution, the contents of multi-set will be print out. FromFigure 68, we can see that the maximum String length has been updated to 23 (which is the length of “This is a sub-solution!” string).
Figure 68: All elements are passed into the target sub-solution by chemical rules
Using the same way, we can also remove certain elements in a sub-solution. For example, we want to remove the integer number 16 in “calculateMaxNumber” sub-solution. As shown in Figure 69, we use “get ./calculateMaxNumber” command. This command has the same usage as “put dir”.
Figure 69: get dir - Delete a certain element from a certain sub-solution
And then, a solution will be created to hold all the elements that a user want to remove, as shown inFigure 70, we add an integer number “16” into that solution.
Figure 70: Construct a solution containing all the elements to remove
Using “display (dp)” command to check the content of the multi-set. From the Figure 71, we can see that a “REMOVE” tuple has been added in the container.
Figure 71: A remove tuple generated in the container
Start the reaction by typing “run (r)” command, we can see in Figure 72 that 16 has been removed from the “calculateMaxNumber” sub-solution.
Figure 72: Elements are removed by chemical rules
Generally, in chemical computing, there are two grand types of elements: one is data, such as some JAVA objects as String, Integer or some user defined data types; the other one is chemical rule.
A chemical rule is a specially JAVA object which rewrites the multi-set. In previous introduction, we have introduced how to operate on data; in fact, we have the same operations on chemical rules.
A new rule can be created by using ”newrule (nr)” command. As shown inFigure 73, to create a new rule, you are asked to give a name.
Figure 73: create new rule
Just for example, we want to create a new rule to calculate the sum of a set of integers, so we enter ”sum” as the rule name, as shown inFigure 74
Figure 74: Give the name of the new rule
And then, you should also give the definition of the rule, followingFigure 75. As how to define chemical rules, refer to ”HOCL Programming Guide” for the details.
Figure 75: Give the name of the new rule
After the creation of the new rule, you can check the supported types by this local multi-set using ”check” command. Figure 76 lists all the supported types, compare it withFigure 55, you can see a new type of chemical rule is created. Then, you can put rule “sum” in the solutions in either local multi-set or remote multi-set using “put *” command, which we have introduced before.
In the next section, you will see how to add a “sum” rule to a remote multi-set.
Figure 76: Check again the supported type
B.2 Remote Operations
We have demonstrated how to interact with local multi-set. In this chapter, we are going to talk about how to connect to a remote multi-set and interact with it.
Every multi-set can act either as a server or as a client. Once an HOCL program acts as a server, it will open its local multi-set to all other HOCL programs so that they can interact with it (such as add/remove elements). We call those latter programs who operate on a server’s multi-set as ”client”. A server can act as a client as well. On one side, it receives commands from its clients, on the other side, it can pass its commands to another server.
Now, we are going to start another HOCL program acting as a server, while the HOCL program
”demoInteraction” that we showed you in the last section will act as client. Leave the previous terminal window unclosed, open a new terminal window. This time, we start an HOCL program
”demoServer” as a server, enter the target directory in that new terminal window, as shown in Figure 77.
Figure 77: Server - Find another program
Use “make run” command to start the execution.6 Once you entered the chemical shell of
“demoServer” program, use “server” command to let it act as a server, as shown inFigure 78.
6Pay attention here, we need not to start RMI registry server this time because when we did “demoInteraction”
example in the last section, the RMI registry server has been already started, and we did not stop it. (stop or quit the “demoInteraction” program)
Figure 78: Server - Start the server program
Now, we can use “display (dp)” command to print out the contents of local multi-set in the server machine, as shown inFigure 79. Here you can see it has an empty multi-set. In the following, we are going to add some data and chemical rules remotely from a client program.
Figure 79: Server - Display the content of local multi-set
To get access to a remote multi-set, a program has to firstly act as a client. Using “client (clt)”
command7, as shown inFigure 80. And now, we have entered into a “client sub-shell” (start with
“>>”). This sub-shell supports some parts of local operations (such as put/get/dp). We can use these commands in the same way as local operations to interact with remote multi-sets.
Figure 80: Client- Connect to a remote multi-set
For example, in this client sub-shell, we can use “display (dp)” command to check the contents of a remote multi-set, as shown inFigure 81, we can see that its contents is different from the one shown inFigure 72, which is its local multi-set. But it is the same as the one shown inFigure 79.
7In fact we can use “clientIP Addr Prog name” to specify which machine to connect. If you want to connect to a program in the local machine, you need not to specify IP address here.
Figure 81: Client - display the content of remote multi-set
While on the server side, once a client has checked the contents of its local multi-set, there is a line of information printed, as shown inFigure 82.
Figure 82: Server - print out this action
And now, let us come back to the client side. This time, we want to put some integers into the remote multi-set. We use the same command as local ones, as shown inFigure 83. As this remote operation is ABSOLUTELY the same as local one, I will not explain each step in detail as in the previous section.
Figure 83: Client - put elements into the remote multi-set
Then, we create an integer “1”, as shown in Figure 84. After this step, integer 1 has been created and added in the remote multi-set (“demoServer” program).
Figure 84: Client - construct the elements
In the following, we create the integers 2 and 3 in the same way. After each creation, you will get a line of information about this operation in the client terminal window. Using “dp” command to check the content of the remote multi-set (server side); as shown inFigure 85, you will see integer number 1, 2, 3 have been added in the remote multi-set.
Figure 85: Client - Display the remote multi-set
On the other side, server will print a line of information about this newly received element. And then, it will print out the contents of multi-set. FromFigure 86, we can see that the server’s local view of its local multi-set is the same as a client’s remote view, which is shown inFigure 85
Figure 86: Server - print out this operation
After adding some integer numbers, we also want to put a chemical rule into the remote solution in order to start the chemical reaction. As promised, we are going to put a new chemical rule “sum”
which we created in the last section into the remote multi-set, as shown inFigure 87.
Figure 87: client- Add a chemical rule to the remote multi-set
On receiving this chemical rule, the server will print out this information as well as the content of its local multi-set, as shown inFigure 88
Figure 88: server- Receive a rule
On the client’s side, you can also print out the contents of remote multi-set by using “display (dp)” command. It will get the same view as the local one of the server side (rf. Figure 89).
Figure 89: Client - check the contents of the remote multi-set
Having got both the data and chemical rule, the server can start chemical reactions at present.
As shown inFigure 90, use “run (r)” command in “server” side.
Figure 90: Server - launch the chemical reactions
Then, the client can check the content of remote multi-set again. As shown in Figure 91, use
“display (dp)” command in the client shell. You can see that after the chemical reactions, there leaves only the chemical rules “sum” and an integer “6”, which is the sum of integers 1, 2, 3.
Figure 91: Client - check the multi-set after the chemical reactions
We can stop a connection to a remote multi-set by using ”quit” command in the client shell, as shown inFigure 92.
Figure 92: Client - Quit the client shell
In this way, the client program stop the connection to the server program and can use local commands to interact with it local multi-set again.
We have shown you the communication between two multi-sets which are implemented in the same machine; in fact, a multi-set can also communicate with a remote multi-set which is im- plemented in another machine. Before doing this, you have to install your HOCL compiler in a directory that is accessible from Web (such as/Sites/ cwang/hocl/ which is the default Web root directory for Mac machine).
And then, you should modify a little theserver.policyfile. ReferAppendix C.3for the solution, if you do not modify this file, you will get the an error which blocks any access to your HOCL programs. In certain cases, you also have to modifyMakefileto specify codebase and host name.
Refer toAppendix C.4 & C.5for detailed solutions.
C Solutions for Problems during Installation
During building the HOCL compiler, there might be some problems encountered. In the follow- ing, we will list the solutions for two problems which are most frequently encountered during the installation.
C.1 System Java Compiler Version Error
When you check the version of your system Java compiler, type javac -version
in a shell window and press ENTERkey, if you get the following display as shown in Figure 93, you need to update your Java compiler.
Figure 93: Get a Lower Version of Java Compiler
This problem is caused by the conflict of software installation. The installation of ECLIPSE changes the system Java compiler as its built-in one. This compiler might be an old one so that it may cause a lot of errors when compiling your HOCL compiler and HOCL project later.
If you use UBUNTU operating system, you can solve this problem simply by typing:
sudo update-java-alternatives -s java-6-sun
in your shell window. And then, the system will update its Java compiler as the indicated one (in this command, we indicate java-6-sun as the default Java compiler).
C.2 Eclipse Java Compiler Version Error
When you choose some IDE tools to build the HOCL compiler, after the creation of the project, the workspace may be built automatically (if not, you can build it manually). Then, you might get some errors such as “acess cannot be resolved”, likeFigure 94 shows.
Figure 94: Errors after building the HOCL compiler
This problem is caused by ELIPSE, it uses its build-in java compiler to build source codes.
The HOCL compiler uses some syntax such as “enum” which has been implemented sinceversion 5.0. So that if this default compiler is a lower edition, such asversion 1.4 or even older, it cannot identify these syntax.
To solve this problem, we have to specifier a Java compiler for the compilation from all compilers that we have installed on our machine. Firstly choosehocl project in Package Explorer view, and then clickProject->Properties->Java Compiler, you will receive a dialog box as shown inFigure 95.
Figure 95: Default Java compiler in eclipse
Select “Enable project specific settings” option; afterwards, set “Compiler compliance level” to 6.0 (the most advanced JDK version installed in your machine) as shown inFigure 96;
and finally click on “OK”.
Figure 96: Select a more advanced jdk for compiling
You will see the following window for your confirmation, as shown inFigure 97. Click on “Yes”,
Figure 97: Confirm the settings
And now, go back to ECLIPSE main frame, as shown inFigure 98, you can notice that all the errors have been solved. There are still some warnings left, we do not care them since it is normal
in Java project.
Figure 98: All errors have been eliminated
C.3 Remote I/O multiset failed
In the chemical shell, when you use “server” command to register to a RMI server, you may get the following error: “Remote I/O multiset failed: java.security.AccessControlException: access denied (java.net.SocketPermission 127.0.0.1:1099 connect,resolve)”, as shown inFigure 99.
Figure 99: All errors have been eliminated
This problem is caused byserver.policyfile. May be the path of code is not fit for your installa- tion path. As shown inFigure 100, the defaultserver.policy file downloaded from INRIA Geforge server define all the permission to the following path: /Users/cwang/Documents/workspace/hocl/bin/, while a user may install HOCL in any directory according to the different system and personal pref- erence. This discrepancy produces this error.
grant codeBase "file:/Users/cwang/Documents/workspace/hocl/bin/" { permission java.security.AllPermission;
};
Figure 100: Error path inserver.policy file
To solve this problem, just replace the path by your installation path; as shown inFigure 101, if you have installed your HOCL compiler in /Sites/hocl/ directory, you have to specify this path inserver.policy file.
grant codeBase "file:/Users/cwang/Sites/hocl/bin/" { permission java.security.AllPermission;
};
Figure 101: Specify the installation path inserver.policy file
C.4 Block during register to RMI server
When you use “server” command to register to a RMI server, you may get blocked, that is to say, this is no response and you cannot do any operations, as shown inFigure refA2-10.
Figure 102: All errors have been eliminated
This problem may be caused byMakefile. OpenMakefilein a text editor (or in eclipse), find the following lines:
run: $(BIN_DIR)/Run$(CLASS_BASENAME).class java -cp $(CLASSPATH)
-Djava.rmi.server.codebase=http://131.254.14.42/~cwang/hocl/bin/
-Djava.rmi.server.hostname=131.254.14.42 -Djava.security.policy=server.policy
$(PACKAGE_PATH).Run$(CLASS_BASENAME)
Note that it specifies the host by IP address such as 131.254.14.42. This IP address is the IP address of HOCL compiler developer’s machine. So when you run your own program, you have to specify your own IP inMakefile. Replace the above lines by the following ones:
run: $(BIN_DIR)/Run$(CLASS_BASENAME).class
java -cp $(CLASSPATH)
-Djava.rmi.server.codebase=http://131.254.13.161/~cwang/hocl/bin/
-Djava.rmi.server.hostname=131.254.13.161 -Djava.security.policy=server.policy
$(PACKAGE_PATH).Run$(CLASS_BASENAME)
Pay attention, some times you have also to change codebase specification (the third line) with your own path.
C.5 java.lang.ClassNotFoundException
This is the most normal exception that you will meet in RMI applications. If this problem come from the execution of “server” command in the chemical shell, like in Figure 103, that means you have problems in yourMakefile.
Figure 103: All errors have been eliminated
Open yourMakefile and find the following lines:
run: $(BIN_DIR)/Run$(CLASS_BASENAME).class java -cp $(CLASSPATH)
-Djava.rmi.server.codebase=http://131.254.14.42/~cwang/hocl/bin/
-Djava.rmi.server.hostname=131.254.14.42 -Djava.security.policy=server.policy
$(PACKAGE_PATH).Run$(CLASS_BASENAME)
The third line defines the codebase, it tells RMI server how to find registered Java classes. As we can see, it codebase is a URL address that we can visit from internet. This URL address is fit for my personal machine so you have to modify it to yours. As introduced, the HOCL compiler is recommended to install in a Web-accessiable directory so that we can give its path as a URL address here (If your HOCL compiler is not installed in a Web-accessiable directory, you should define codebase here in the following way: file:/home/workspace/...). To solve this problem, replace the above lines by:
run: $(BIN_DIR)/Run$(CLASS_BASENAME).class
java -cp $(CLASSPATH)
-Djava.rmi.server.codebase=http://131.254.13.161//hocl/bin/
-Djava.rmi.server.hostname=131.254.13.161 -Djava.security.policy=server.policy
$(PACKAGE_PATH).Run$(CLASS_BASENAME)
D Bugs in HOCL compiler
Here, we list some bugs in HOCL programs, we are going to solve all of them in the near future. If you find some bugs beyond the scope of this section, please send us email (chen.wang@irisa.fr) to report the problems. My best regards for your participating.
• When we use “put” command, we suppose that each multi-set support as least four types:
“int”, “String” as well as “Solution” and “Tuple”. If the multi-set contains no integer or string, then, we choose to create an element of integer type, an exception is thrown. You will meet the same problem for putting a string element. But for “Solution” and “Tuple elements”, it works well.