Techniques of radioautography for
medical and biological research
Department of Anatomy and Cell Biology,
Shinshu University School of Medicine, Matsumoto, Japan T. Nagata
Abstract
Standard techniques for radioautography used in biological and medi-cal research can be classified into three categories, i.e., macroscopic radioautography, light microscopic radioautography and electron mi-croscopic radioautography. The routine techniques used in these three procedures are described. With regard to macroscopic radioautogra-phy, whole body radioautography is a standard technique which employs freezing and cryosectioning and can demonstrate organ distributions of both soluble and insoluble compounds. In contrast, in light and electron microscopic radioautography, soluble and insoluble techniques are separated. In order to demonstrate insoluble labeled compounds, conventional chemical fixations such as formalin for light microscopy or buffered glutaraldehyde and osmium tetroxide for both light and electron microscopy followed by dehydration, embed-ding and wet-mounting applications of radioautographic emulsions can be used. For the demonstration of soluble labeled compounds, however, cryotechniques such as cryofixation, cryosectioning, freeze-drying, freeze-substitution followed by dry-sectioning and dry-mount-ing radioautography should be employed both for light and electron microscopy. The outlines of these techniques, which should be uti-lized in various fields of biological and medical research, are de-scribed in detail.
Correspondence
T. Nagata
Department of Anatomy and Cell Biology
Shinshu University School of Medicine
Matsumoto 390 Japan
Fax: +81-263-33-6458
Presented at the 5th International Symposium on Radioautography, São Paulo, SP, Brasil, August 24-26, 1997.
Received September 5, 1997 Accepted September 29, 1997
Key words
•Macroscopic radioautography
•Light microscopic radioautography
•Electron microscopic radioautography
•Methodology
Principles of radioautography
Radioautography (RAG) is the technique used to demonstrate the pattern of localiza-tion of various compounds labeled with ra-dioactive isotopes (RI) in specimens (1). The specimens studied in natural sciences include animals, plants and minerals. In bio-logical and medical research, however, the specimens are usually cells and tissues which contain radioactive substances. They are fixed, sectioned and placed in contact with the radioautographic emulsions, which are exposed and developed to produce metallic
which are observed with the naked eye. Macroscopic radioautography (MRAG) can be classified into two levels, whole-body radioautography and organ radioautography. In contrast, small samples such as small pieces of tissues or cells are observed under the light (LM) or electron (EM) microscope, and the procedure is denoted microscopic radioautography and is classified into light microscopic radioautography (LMRAG) and electron microscopic radioautography (EMRAG). In addition, they are divided into two categories, soluble compound tography and insoluble compound radioau-tography from the viewpoint of solubility of the radioactive compounds (3). Thus, all radioautographs can be classified into 8 cat-egories.
In general, macroscopic radioautography employs freezing, cryosectioning, freeze-dry-ing and application of films, which demon-strate both soluble and insoluble compounds, and was first developed by Ullberg (4) to demonstrate the localization of penicillin. In contrast, light and electron microscopic ra-dioautography usually employs chemical fixation and application of wet emulsions which demonstrate only insoluble com-pounds. This paper deals with standard tech-niques which can be used for biological and medical research.
Macroscopic radioautography
Macroscopic radioautography is a tech-nique developed by Ullberg (4,5) to demon-strate the localization of penicillin in the rat body and has been widely used to survey the incorporation of RI-labeled drugs in all ma-jor organs and tissues. It has been the basis for evaluating the distribution of new drugs in pharmacological research when new drugs are developed. The technique is simpler than microscopic radioautography.
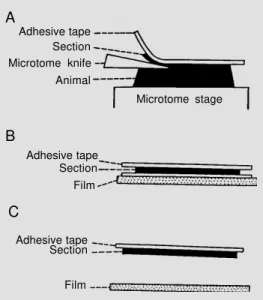
Small animals such as mice and rats which received injections of RI-labeled drugs are frozen in a block of carboxymethylcellulose (CMC) gel. The whole-body cryosections (around 20-30 µm) are cut at -20oC sagittally through the animal using a heavy sledge cryomicrotome such as LKB2250 (LKB, Bromma, Sweden). The cryosections are transferred to adhesive tape (Scotch tape), freeze-dried in a cryostat at -20oC and at-tached to X-ray films or tritium films for exposure. After an adequate exposure time, the films and the sections are separated and the films are developed. For staining of sec-tions or extraction of soluble compounds from sections, it is better to use soft Japanese paper between the sections and the adhesive tape (6). Routine techniques for MRAG are summarized below and in Figure 1.
1) Place the anesthetized animal on the cryomicrotome stage and pack CMC gel around it.
2) Immerse the stage and animal into hexane cooled with dry ice (-70oC). It may take about 20-30 min to freeze the whole body. Alternatively, the animals can be quickly frozen in liquid nitrogen (-169oC) and mounted into a viscous mixture of 6% (w/v) CMC.
3) Place the frozen animal and stage on the cryomicrotome and allow to equilibrate with the temperature of the cryostat around -20oC.
4) Cut the body longitudinally until the plane of the sectioning reaches those organs
Section Microtome knife Animal
Microtome stage
Adhesive tape Section Film
Adhesive tape Section
Film A
B
C Figure 1 - Diagrams showing the procedures for whole body ra-dioautography. A, A frozen ani-mal is fixed on the microtome stage and sectioned longitudi-nally and adhesive tape is at-tached to the section. B, After the cryosection is dried, the sec-tion is placed in contact with an X-ray film or tritium film (Kodak) in the darkroom and exposed. C, After exposure, the film and the section are separated and the film is developed.
of interest. Then, stick a wide strip of trans-parent adhesive tape (3M, Minnesota Min-ing, MN, or any other) to the surface of the block. For the purpose of further staining or extraction, Japanese paper can be used (6). Insert a strip of soft Japanese paper made of mulberry paper between the frozen block and the adhesive tape before sectioning.
5) Cut a cryosection (20 µm) for whole body radioautography slowly and steadily, attaching the tape to the section (Figure 1A). 6) Attach the cryosection with adhesive tape to a frame made of wire or plastic and freeze-dry at -20oC overnight. When Japa-nese paper is used, press the section with paper and tape onto a glass slide coated with an egg-albumin and glycerine mixture. After drying, soak the section in water or solvent for extraction, if necessary.
7) Place the dry section in contact with X-ray film or tritium film (Kodak) in the darkroom and store in a refrigerator for ex-posure (Figure 1B).
8) Separate the film and the section after exposure (Figure 1C) and develop the film with a recommended developer. Stain the section with either H-E or any other stain.
The above standard technique can be modified in various ways for particular pur-poses. To study glucose metabolism, for ex-ample, some freeze-dried sections on glass slides transferred using Japanese paper can be washed in cold 6% perchloric acid for extraction before and after radioautography to compare the soluble compounds (6).
Light microscopic radioautography
As standard techniques for LMRAG, tis-sues are fixed in chemical fixatives such as 10% formalin for LM only or phosphate buffered 2.5% glutaraldehyde and 1% os-mium tetroxide for both LM and EM, fol-lowed by dehydration and embedding in ei-ther paraffin or epoxy resin. After section-ing, thick paraffin sections (3-5 µm) or semithin Epon sections (1-2 µm) are picked
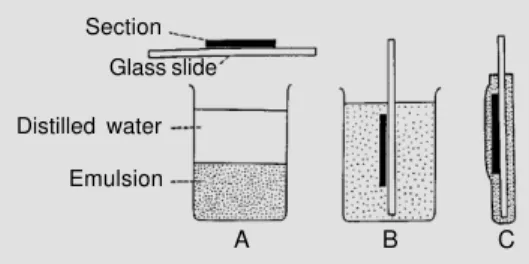
up on glass slides using water for expansion. Radioautographic emulsion can be placed over the sections by the stripping film or dipping method (Figure 2). Initially, after diluting bulk emulsion with distilled water (Figure 2A), we dip glass slides one by one (Figure 2B) and let them dry (Figure 2C). It takes much time to complete many slides. Then, many slide holders, each holding 15 slides, are dipped into melted emulsion, dried, exposed, developed and stained simulta-neously (7). In order to produce many radioautograms at once and also to compare them quantitatively under the same condi-tions, the following procedures are recom-mended (8).
1) Prepare glass slides, each carrying sev-eral paraffin sections or Epon semithin sec-tions. Hold 15 glass slides in a stainless steel slide holder (Figure 3A), or any other similar type. Deparaffinize paraffin sections.
2) Melt a bottle of bulk emulsion (Konica NR-M2 emulsion, Konica Ltd., Tokyo, Ja-pan) in a water bath at 45oC for about 10 min. Add an equal amount of distilled water and mix with a glass slide to remove all air bubbles.
3) Dip the slide holder into the melted emulsion for several seconds, then pull it up vertically for about 3 s to assure a coating of equal thickness (3-4 µm) over the sections (Figure 3B).
4) Wipe the bottom of the slide holder with a paper towel to remove excess emul-sion (Figure 3C) and place the slide holder in an electric incubator at 28oC with 80% hu-midity, containing a wet sponge at the bot-tom. Dry them for 1 h in the incubator.
5) Store the slides in a light-tight slide
Section Glass slide
Distilled water Emulsion
A B C
box containing a desiccant (silica gel). Seal the box with black tape and keep in a refrig-erator at 4oC for exposure (Figure 3D).
6) Develop some glass slides for testing after 2-4-week exposure, placing them in a staining jar containing developer. When the exposure time is adequate, develop all the slides at once. If the exposure time is not enough, wait for another 2-4 weeks for more exposure. We use Konica KD-X1 developer for Konica NR-M2 emulsion. Kodak D-19 may be used for any type of emulsion. The recipes are listed in Table 1. Dissolve the gradients according to the order of this list. Otherwise, precipitation will occur.
7) Develop all the slides at once by pour-ing the developer into the slide box (Figure 3E) after an adequate exposure time.
8) Rinse the slides in a stop bath (2% aqueous acetic acid solution), fix in a fixer for 3 min twice, wash gently in running tap water for 10 min, and dry.
9) Stain Epon sections in 1% toluidine blue solution for light microscopy and paraf-fin sections with hematoxylin and eosin.
Electron microscopic radioautography
As standard techniques for EMRAG, ul-trathin 100-nm sections should be used in general and examined with a conventional transmission electron microscope with the accelerating voltage at 100 kV. If any inter-mediate high voltage electron microscope is available, high accelerating voltages such as 200, 300 or 400 kV, and thicker 200- or 300-nm sections can be used. We prefer to use semithin 200-nm sections in order to shorten the exposure time. Semithin sections are cut
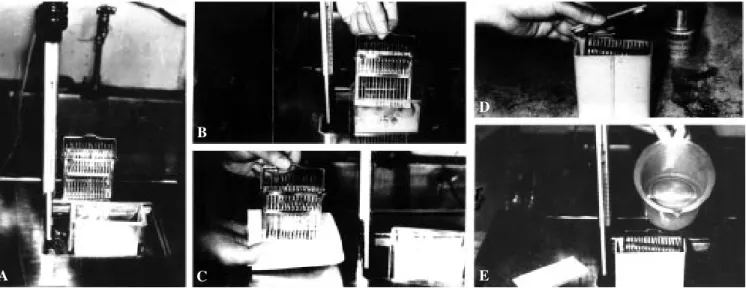
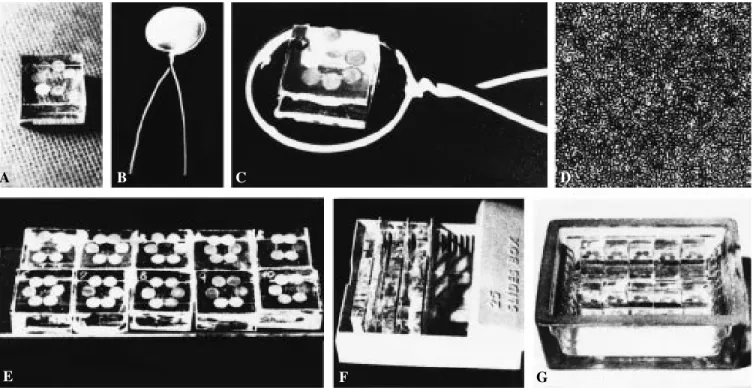
Figure 3 - Photographs showing the standard procedure for preparing LMRAG by the dipping method. A, Fifteen glass slides carrying sections are placed on a stainless steel slide holder, while bulk emulsion is melted and diluted with distilled water in a staining jar. B, The slide holder is dipped into the melted emulsion and pulled up vertically. C, Excess emulsion is wiped off with paper towels or tissue paper. D, The slide holder is stored in a light-tight slide box for exposure. E, After an appropriate exposure time, the developer is poured into the slide box and all the slides are developed at once.
Table 1 - MQ developers routinely used for both light and electron microscopy.
Reagent Kodak D-19 Konica KD-X1
Methol 0.20 g 0.35 g Anhydrous 9.00 g 6.00 g sodium sulfite
Hydroquinone 0.80 g 0.90 g Anhydrous 5.25 g 5.30 g sodium carbonate
Potassium bromide 0.50 g 0.25 g Distilled water 100.00 ml 100.00 ml
A C
D
B
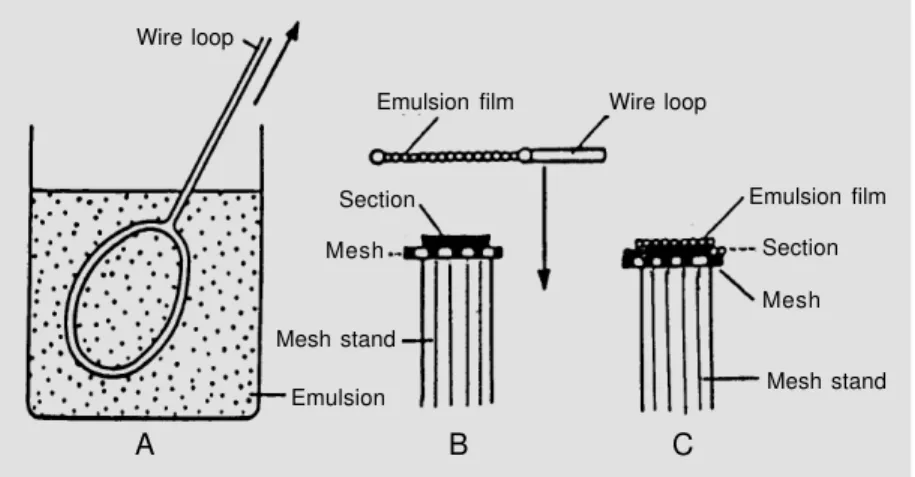
on a Porter-Blum MT-2B ultramicrotome. Ultramicrotomes of the mechanical feeding type are preferable to the thermal feeding type because of the accuracy of the section thickness, which affects the number of silver grains after radioautography. To obtain thin monolayers of silver bromide crystals, two techniques, dipping and the wire-loop method (Figure 4), are now in general use. We prefer the wire-loop method which was developed in our laboratory (9). The routine procedure in our laboratory is as follows (9-11).
1) Prepare a regular square glass block with 1.25-cm sides from a glass strip No. 4890-40 for the LKB knife maker (LKB-Produkter AB, Bromma, Sweden). Stick a square piece of double-coated Scotch tape, 4 mm in length, to the surface of each glass block. Place six grids around the tape like a rosette, arranged clockwise to identify each grid (Figure 5A). Coat the grids with a 10-nm thick carbon layer under vacuum.
2) Dilute the radioautographic emulsion with an equal part of distilled water at 45oC. We use Konica NR-H2 emulsion. Any other emulsion such as Kodak can alternatively be used. Add to 10 ml of the diluted emulsion 0.2 ml 2% aqueous solution of dioctyl so-dium sulfosuccinate (a surfactant) in order to prevent the emulsion film from bursting (12).
3) Dip a platinum wire or vinyl-coated iron wire loop, 2.5 cm in diameter, into the diluted emulsion and pull out in order to obtain a thin film (Figure 5B).
4) Hold the wire loop horizontally in the air for 1 min and dry the emulsion.
5) Apply the emulsion film to the grids on the glass block horizontally like a quoit, while the emulsion film is gelled but still wet (Figure 5C).
6) Warm the glass block at 28oC for 1 h to dry the emulsion.
7) Check some of the emulsion films by electron microscopy before exposure to as-sure homogeneity of the film (Figure 5D).
8) Attach several glass blocks to one side
Emulsion film Section Mesh
Mesh stand Wire loop
Mesh stand
Emulsion Section Mesh
Emulsion film Wire loop
A B C
Figure 4 - Diagrams showing the procedures of the wire-loop method for EMRAG. A, A wire loop is dipped into melted and diluted emulsion and pulled up. B, A grid mesh carrying sections is placed on a mesh stand and sections are coated one by one with the emulsion film using a wire loop. C, The coated mesh is dried, exposed and developed.
of a microscopic slide with double-coated Scotch tape (Figure 5E).
9) Place several glass slides carrying sev-eral glass blocks in a black light-tight plastic slide box containing desiccant (silica gel), and seal the top with black tape (Figure 5F). Keep the slide box in a refrigerator at 4oC for exposure.
10) Soak the glass slides carrying glass blocks with grid meshes for development in a staining jar (Figure 5G), stop in a stop bath, fix in a fixer and stain with electron staining. When a conventional MQ-developer such as D-19 is used, long spiral silver grains are formed. In order to obtain smaller silver grains, Elon-ascorbic acid developer or phenidon developer after gold latensifica-tion (G-L) is recommended (Table 2). We prefer the following procedure (13).
1) Soak the glass slides carrying grid meshes in distilled water in a staining jar for 10 s.
2) Soak in G-L solution (Table 2) in a water bath at 16oC for 30 s.
3) Rinse in distilled water for 10 s. 4) Develop in phenidon developer (Table 2) in a water bath at 16oC for 60 s.
filter paper in a Petri dish.
12) Dry in an incubator at 37oC for 1 h. 13) Coat the grids with a 10-nm thick carbon layer under vacuum.
Electron microscopy is carried out with
Table 2 - Fine grain developers for electron mi-croscopy.
Reagent Gold Phenidon latensification developer
solution
2% Gold chloride solution 0.20 ml Potassium thiocyanate 0.05 g
Ascorbic acid 1.50 g Phenidon 0.25 g Potassium bromide 0.06 g 0.60 g Potassium carbonate 1.30 g Anhydrous sodium sulfite 20.00 g Potassium thiocyanate 6.00 g Distilled water 100.00 ml 100.00 ml
Figure 5 - Photographs showing the standard procedure for preparing EMRAG by the wire-loop method. A, Six meshes carrying sections are placed on a square glass block. B, A large wire loop is dipped into the melted emulsion and a thin film of emulsion is obtained. C, The emulsion film with the wire loop is applied horizontally to a glass block on which 6 meshes are placed. D, The emulsion film is checked by transmission electron microscopy before development. Note the monolayer arrangement of silver bromide crystals in Konica NR-H2 emulsion. X6,000. E, Ten glass blocks carrying 6 meshes each are attached to a glass slide with Scotch tape. F, Several glass slides, each carrying 10 glass blocks, are stored in a slide box for exposure. G, All the meshes on glass blocks are developed, fixed and stained simultaneously.
6) Fix in a fixer (30% aqueous sodium thiosulfate solution) for 5 min with 2 changes. 7) Rinse in distilled water for 5 min with 3 changes.
8) Stain in lead citrate solution for 3 min and process with the stopper, fixer and sev-eral rinses in distilled water.
9) Stain the grids in a lead citrate solution for 3 min both for staining and removing the gelatin of the emulsion. We use a lead citrate solution consisting of 10 ml distilled water and 30 mg lead citrate, adjusted to pH 12 with a few drops of 10 N NaOH solution (9). The lead citrate solution proposed by Reynolds (14) can also be used. Uranyl stain-ing is usually not necessary.
10) Rinse in distilled water for a few minutes.
11) Carefully remove the grids from the glass blocks with a forceps and place on
A B C D
G
electron microscopes equipped with accel-erating voltages at 200, 300 or 400 kV, when semithin sections are used to shorten the exposure time as well as to obtain better contrast for the observation of silver grains (9). We use either a Hitachi H-700 electron microscope at 200 kV or a JEOL JEM-4000EX electron microscope at 300 or 400 kV.
Microscopic dry-mounting radioautography for soluble compounds
In order to demonstrate soluble labeled compounds at the light and electron micros-copy levels, cryotechniques, including cryofixation, cryosectioning, freeze-drying, freeze-substitution followed by dry-section-ing and dry-mountdry-section-ing radioautography should be employed (15-17). When MRAG is used, cryofixation on dry ice, cryosection-ing in a cryostat and dry-mountcryosection-ing with X-ray films are the techniques routinely em-ployed as described previously (4,5). In con-trast, in both light and electron microscopic radioautography, chemical fixation wet-sec-tioning and wet-mounting radioautography are the routine techniques, which demon-strate only insoluble compounds incorpo-rated into macromolecules. In order to dem-onstrate soluble compounds at LM and EM levels, dry-mounting radioautography is nec-essary. The basic techniques for dry-mount-ing radioautography are summarized here.
For cryofixation, isopentane or propane as quenching fluid and liquid nitrogen (-196oC) as cooling agent are commonly used. Instead of quenching fluids, a pure copper block is sometimes used in direct contact with the tissues. Cryoinstruments such as RF-2 (Eiko, Tokyo, Japan), JFD-RFA (JEOL, Tokyo, Japan), cryoblock or cryovacublock (Reichert-Jung, Germany) are now commercially available.
Liquid nitrogen (200-300 ml) is carefully poured into a Dewer flask and a 50-ml
beak-er is placed in the liquid nitrogen, then 20-30 ml of isopentane or propane is poured into the beaker. We prefer isopentane to propane. Within a few minutes the liquid isopentane begins to solidify at its melting point of -160oC as it is cooled by the liquid nitrogen at -196oC. The tissue blocks or free cells adhering to a small piece of aluminum foil are plunged quickly into the isopentane with a pair of forceps. The frozen tissues are then removed from the isopentane, using a small cup made with a piece of aluminum foil 3 cm x 3 cm in size, molded with a No. 00 gelatin capsule in order to prevent ice crystal forma-tion, transferred to liquid nitrogen in a Dewer flask, and stored in liquid nitrogen until pro-cessing. In this process, if the tissues are exposed to the air, ice crystals will grow larger, and the fine structure will be dam-aged. The frozen tissues are then processed by cryosectioning, drying or freeze-substitution procedures. When the metal con-tact method is employed using cryoinstru-ments, we use JEOL JFD-RFA, and frozen tissues are removed from the copper blocks and stored in liquid nitrogen as well.
onto glass slides and either air-dried at room temperature or freeze-dried at -30oC for a few hours. The procedure for coating the slides with dry emulsion film by the large wire-loop method will be described later.
For electron microscopic cryosectioning, we use LKB ultramicrotomes 4800 equipped with an LKB cryokit 14800 or LKB-NOVA (LKB, Bromma, Sweden). Another type of ultramicrotome such as DuPont-Sorvall or Reichert-Jung with cryokits can also be used. The temperature of the specimens is usually set from -100oC to -120oC and that of the glass knives at -80oC to -100oC. The optimal temperature depends on the kind of tissues used. Dry sections are picked up with dry eyelash probes onto grids, covered with an-other grid as a sandwich and pressed with copper rods (9,17). Grids used for this pur-pose are coated with collodion applied by soaking copper grids in 1% collodion solu-tion and dried at 37oC for 1 h. As controls, wet sections are picked up with sucrose drop-lets (18). Grids carrying dry sections are freeze-dried at -50oC for 24 h, using the same freeze-drying procedure as for the tis-sue blocks. Among the drying procedures tested, i.e., freeze-drying, freeze-substitution, and air-drying, the freeze-drying procedure was the best from the viewpoint of preserva-tion of both cell structure and radioisotopes (12). In order to freeze-dry cryosections, we use a rotary cryotransfer apparatus (12). The rotary disc, which carries 5 grids with cryosections, is changed every 5 grids and transferred to a carrier which consists of a tube and a cylinder containing 5 discs in its shelves, for a total of 25 grids (12). The carrier is transferred to the desiccator of the freeze-drying apparatus, which is operated for 3 h at -80oC. After the cryosections are dried, they are coated with carbon and pro-cessed by the dry-mounting radioautographic procedure. Recently, cryotransfer appara-tuses are commercially available as part of cryokit-equipped ultramicrotomes such as LKB, Sorvall or Reichert.
For freeze-substitution of frozen tissue blocks, we use a freeze-substitution instru-ment named CS-auto (Reichert-Jung) which can be controlled automatically. Before we purchased this apparatus, we used the fol-lowing manual procedure:
1) Mix dry ice and acetone in a Dewer flask.
2) Put a small test tube or sample tube containing 20-30 ml of absolute acetone in the Dewer flask and cool to -78oC.
3) Transfer the frozen tissue blocks with aluminum foil cups to the test tube contain-ing absolute acetone (15).
4) Keep the transferred tissues in the substituting fluid for 72 h to substitute the ice with the solvent. We use a deep freezer (Tabai, Tokyo, Japan) in which the Dewer flask is stored and the temperature is kept at -80oC.
5) Raise the temperature gradually to 20oC for several hours.
6) Transfer the tissues to an Epon/ac-etone mixture, then process and polymerize. For dry sectioning of freeze-dried or freeze-substituted material, after freeze-dry-ing or freeze-substitution the embedded tis-sues should be cut dry without using any water. We usually cut dry sections from epoxy resin-embedded tissues for both light and electron microscopy using ethylene gly-col instead of water. We use glass slides or grids which are previously coated with col-lodion by dipping them into 1% colcol-lodion solution and drying them at 37oC for 1 h. Both cryosectioned and freeze-dried speci-mens and freeze-dried or freeze-substituted and embedded specimens should be coated with dry radioautographic emulsions with-out using any water. The procedure is desig-nated dry-mounting radioautography. Two procedures are used for dry-mounting radio-autography, one for light microscopy and the other for electron microscopy procedures.
For the light microscopy dry-mounting procedure, several methods have been em-ployed in the literature (18). However, those
procedures are very complicated for the treat-ment of both specimens and emulsions. We use dry films produced with a large wire loop which is air-dried and applied to cryostat sections placed on glass slides (12). We believe that this method is the most conve-nient one. The procedure is as follows.
1) Pick up cryostat sections onto glass slides and dry. Dry epoxy resin sections are expanded over the slides with a drop of ethylene glycol without using any water.
2) Dilute the radioautographic emulsion with an equal part of distilled water at 45oC. We use Konica NR-M2 emulsion (Tokyo, Japan). Any other emulsion such as Kodak can alternatively be used. Add to 10 ml of diluted emulsion 0.2 ml 2% aqueous solu-tion of dioctyl sodium sulfosuccinate (a sur-factant) in order to prevent the emulsion film from bursting (12).
3) Dip a large wire loop, 2.5 cm in diam-eter, which is made of platinum wire or vinyl-coated iron wire, and set with a piece of Scotch tape on a glass slide as a handle to obtain a thin film of emulsion.
4) Set the handle horizontally on a flat desk for air-drying.
5) Apply the film to the slide horizontally (Figure 6A) after air-drying for 1-2 min, when the center of the emulsion film is gelled and dried and transparent but the peripheral zone is still wet, appearing opaque.
6) Keep the glass slide on a Petri dish and warm at 28oC in an incubator for 1 h to dry the emulsion.
7) Place several glass slides in a black light-tight plastic slide box which contains desiccant (silica gel), and seal the top with black tape. Keep the slide in a refrigerator at 4oC for exposure.
8) Process the glass slides for develop-ment after an appropriate exposure time, then stop in a stop bath, fix in a fixer and stain with toluidine blue solution.
conven-tional dipping procedures.
For the electron microscopic dry-mount-ing procedure, grids carrydry-mount-ing dry sections (either freeze-dried or freeze-substituted Epon-embedded sections or freeze-sectioned and freeze-dried sections) are coated with a 5-10-nm thick carbon layer. They are placed on a grid holder made of a glass slide (25 mm x 75 mm) and 3 glass rods (3 mm in diameter and 10 mm in length) (Figure 6B). The rou-tine procedures are as follows.
1) Dilute the radioautographic emulsion (Konica NR-H2) 1:10 with distilled water at 45oC in the darkroom.
2) Add to 10 ml of the diluted emulsion 0.2 ml 2% aqueous solution of dioctyl so-dium sulfosuccinate at 45oC in a thermobath and mix for several minutes. Dioctyl sodium sulfosuccinate, a surface-activating agent, is used to prevent the emulsion films from bursting while they are being dried in the air (12,16). We use Konica NR-H2 emulsion. Other emulsions for electron microscopic radioautography such as Kodak NOB or Alfred L4 can be used in a similar way.
3) Dip a small platinum wire loop, about 1 cm in diameter (Figure 6B), into the emulsion to obtain a thin film of the emulsion (16).
4) Set the handle of the wire loop on a flat surface for air-drying (for 1-2 min). The best condition for applying the film to the grid is in such a way that the peripheral zone of the
Figure 6 - Photographs showing the special procedure for preparing LMRAG and EMRAG by the dry-mounting method. A, A large wire loop, 2.5 cm in diameter for LM, is dipped into the melted emulsion and air-dried for a few minutes and the dry film is applied to glass slides carrying sections. B, A small wire loop, 1 cm in diameter for EM, is dipped into the melted emulsion and air-dried for a few minutes and the dry film is applied to the mesh on the grid holder.
film appears gelled but wet (opaque) while the central zone is gelled and almost dry, appearing transparent. The films are almost 100% air-dried without breaking by the use of a dioctyl sodium sulfosuccinate solution. Without this agent, all films will burst (12). 5) Apply the dry films to the grids on the holders like quoits (Figure 6B).
6) Transfer the grids to Petri dishes and warm at 37oC for 1 h to help the films adhere to the grids.
7) Keep the grids in a light-tight con-tainer with desiccant and sealed with black vinyl tape.
8) Store in a refrigerator at 4oC for expo-sure.
9) Develop, stop and fix. We use gold latensification and phenidon developer. Other types of developer such as Kodak D-19 can also be used.
10) Rinse in distilled water, stain in lead citrate, and dry.
When several grids are attached to a square glass block, 12.5 mm in length (Fig-ure 5A), a large wire loop, 2.5 cm in diam-eter, can be used as done for the wet-mount-ing procedure but after air-drywet-mount-ing for a few minutes (Figure 5B,C). Several blocks are placed on a slide (Figure 5E), exposed, de-veloped, fixed and stained simultaneously (Figure 5F,G).
As a control, radioautography by means
References
1. Nagata T (1992). Radiolabeling of soluble and insoluble compounds as demon-strated by light and electron microscopy. In: Wegmann RJ & Wegmann MA (Edi-tors), Recent Advances in Cellular and Molecular Biology. Vol. 6. Molecular Biol-ogy of Pyridines and DNA, Peroxisomes, Organelles and Cell Movements. Peeters Press, Leuven, Belgium, 9-21.
2. Nagata T (1996). On the terminology of radioautography vs. autoradiography. Journal of Histochemistry and Cytochem-istry, 44: 1209.
3. Nagata T (1982). Radioautography Data Book. I.P.C., Tokyo.
4. Ullberg S (1954). Studies on the distribu-tion and fate of S35-labelled benzylpeni-cillin in the body. Acta Radiologica, 118: 1-110.
5. Ullberg S (1977). The techniques of whole body autoradiography. Cryosectioning of large specimens. Science Tools (Special issue): 195-199.
6. Shimada M & Watanabe M (1995). Re-cent progress in whole-body radioautog-raphy. Cellular and Molecular Biology, 41: 39-48.
7. Nagata T, Shibata S & Nawa T (1967). Simplified methods for mass production of radioautographs. Acta Anatomica Nipponica, 42: 162-166.
8. Nagata T (1982). Simple method for mass production of radioautographs. Cell (Saibo, in Japanese), 14: 40-50. 9. Nagata T (1996). Techniques and
applica-tion of electron microscopic radioautogra-phy. Journal of Electron Microscopy, 45: 258-274.
10. Yoshida K, Murata F, Ohno S & Nagata T (1978). A modified wire-loop method for quantitative electron microscopic radioau-tography. Histochemistry, 57: 93-96. 11. Nagata T (1995). Light and electron
micro-scopic radioautographic studies on mac-romolecular synthesis in digestive organs of aging mice. Cellular and Molecular Biol-ogy, 41: 21-38.
12. Nagata T & Nawa T (1966). A modification of dry-mounting technique for radioautog-raphy of water-soluble compounds. Histochemie, 7: 370-371.
13. Murata F, Yoshida K, Ohno S & Nagata T (1979). Electron microscopic radioautog-raphy using a combination of phenidon developer and domestic emulsion. Acta Histochemica et Cytochemica, 12: 443-450.
14. Reynolds ES (1963). The use of lead cit-rate at high pH as an electron opaque stain in electron microscopy. Journal of Cell Biology, 17: 208-212.
15. Nagata T (1994). Electron microscopic ra-dioautography with cryo-fixation and dry mounting procedure. Acta Histochemica et Cytochemica, 27: 471-489.
16. Nagata T, Nawa T & Yokota S (1969). A new technique for electron microscopic dry-mounting radioautography of soluble compounds. Histochemie, 18: 241-249. 17. Nagata T & Murata F (1977). Electron
mi-croscopic dry-mounting radioautography for diffusible compounds by means of ultracryotomy. Histochemistry, 54: 75-82. 18. Nagata T, Ohno S, Yoshida K & Murata F (1978). A simple picking up device for cryosections. Science Tools, 25: 59-60. 19. Nagata T (Editor) (1994). Radioautography
in Medicine. Shinshu University Press, Matsumoto, Japan.
20. Wegmann R & Nagata T (Editors) (1995). Radioautography: Special issue. Cellular and Molecular Biology, 41: 1-212.
of conventional wet-mounting procedures for insoluble compounds should be carried out and compared with the dry-mounting.
Conclusions
The routine methods for macroscopic and microscopic radioautography to demonstrate
both soluble and insoluble radioactive com-pounds were described in detail.