Department of Informatics
MARA - Mobile Augmented Reality for
Advertising
(Discover Covilhã)
Andreia Ferreira
Dissertation submitted in candidature for the degree of Master of Science in
Computer Science and Engineering
(2nd Cycle Degree)
Supervisor: Prof. Dr. Frutuoso Silva
Acknowledgements
It was quite a journey. I could not have done it without the help and strength from my family, friends and professors. Therefore I want to thank you all, I would not be here without you.
First, I want to thank my parents for being supportive and pushing me to not only proceed but to finish my studies. I would not have done it if it was not with their support and direction.
I want to thank to my supervisor, Professor Dr. Frutuoso Silva, for accepting to be my supervisor once more and for helping me every time that I needed, giving me suggestions and material to study which helped me improve and create a better app.
Lastly, I want to thank to the rest of my family and friends that supported me, not only during the development of this project but during both my academic and personal life.
For all of you thank you is not enough,
Resumo
As aplicações para dispositivos móveis aplicadas à publicidade têm visto a sua utilização a crescer massivamente. São mais interativas, não necessitam de um grande investimento monetário e chegam a um grande número de utilizadores. Esta dissertação tem como alvo criar uma apli-cação para publicidade/divulgação em Realidade Aumentada para dispositivos móveis (MARA), tendo-se optado por desenvolver uma aplicação de divulgação turística para a Covilhã.
A aplicação desenvolvida pretende dar a conhecer um percurso turístico na Covilhã, no qual é apresentada informação através da Realidade Aumentada, nos diversos pontos do percurso. Esta aplicação faz ainda uso de sistemas de geolocalização (GPS) permitindo assim guiar os utilizadores ao longo dos vários pontos do percurso.
A Realidade Aumentada (RA) funciona como um suplemento para o mundo real usando objetos vir-tuais criados em computação gráfica. Esta é uma tecnologia em grande expansão, com aplicações cada vez mais variadas e diversificadas, podendo ser utilizada em diversas áreas. Nesta disser-tação são apresentados exemplos de aplicações em áreas como publicidade e marketing, medicina, entretenimento, militar, educação e finalmente turismo.
A aplicação descrita nesta dissertação foi desenvolvida para Android utilizando o Apache Cordova, Wikitude e Google Maps.
O Android é um sistema operativo (SO) para dispositivos móveis baseado no Linux. É o SO para dispositivos móveis com mais utilizadores do mundo. Por ser open source facilita aos programadores o processo de desenvolvimento de aplicações, bem como a sua publicação na Play Store (loja de aplicações do Android).
Sendo esta aplicação uma aplicação de browser foi necessário o Apache Cordova para a sua real-ização. Esta framework facilita a criação de aplicações para dispositivos móveis, já que estas serão desenvolvidas utilizando HTML, CSS e JavaScript sem ser necessário código em Java.
Para criar as funcionalidades da aplicação foi necessário um plugin para realizar a RA, Wikitude, assim como os mapas e direções, Google Maps plugin para phonegap, presentes na aplicação.
Palavras-chave
Abstract
The use of applications for mobile devices applied to advertising has been increasing during the last few years, being more interactive, not requiring a large monetary investment and reaching a large number of users. The aim of this dissertation is to create an application in mobile Augmented Reality for advertising/divulgation (MARA), and it was decided that an application for turism divulgation in Covilhã would be developed.
The developed application aims to present a tourist route in Covilhã, which gives information through Augmented Reality, in the various waypoints. This application also makes use of geoloca-tion systems (GPS) that guides users through the various points.
Augmented Reality (AR) is like a supplement to the real world using virtual objects created with computer graphics. This technology is expanding, its applications are varied and their diversity has been increasing, being used in several areas. In this dissertation there are examples of applications in areas such as advertising and marketing, medical, entertainment, military, education and finally tourism.
The application described in this paper was developed for Android using the Apache Cordova, Wikitude and Google Maps.
Android is an operating system (OS) for mobile devices based on Linux. It is the OS for mobile devices with more users in the world. Being open source it facilitates the work of developers in the application development process as well as its publication in the Play Store (Android application store).
Being this application a browser application, Apache Cordova was needed to its execution. This framework facilitates the creation of applications for mobile devices, since these will be developed using HTML, CSS and JavaScript, without having to code in Java.
To create the functionalities of the application it was necessary Wikitude, a plugin to perform the AR, as well as Phonegap Google Maps plugin for maps and directions, presented in the application.
Keywords
Contents
Dedicatory iii
Acknowledgements v
Resumo vii
Abstract ix
List of Figures xiii
List of Listings xv
List of Acronyms xvii
1 Introduction 1
1.1 Focus and Scope . . . 1
1.2 Problem Definition and Objectives . . . 1
1.3 Organization of the Dissertation . . . 2
2 Android 3 2.1 Introduction . . . 3
2.2 Android History . . . 3
2.3 The Android Platform . . . 4
2.3.1 The Android Architecture . . . 4
2.4 The Android Development Environment . . . 6
2.4.1 Getting Started . . . 6
3 Apache Cordova 9 3.1 Introduction . . . 9
3.2 The Command-Line Interface . . . 9
3.2.1 Cordova CLI Installation . . . 9
3.3 Setup and Configuration . . . 10
3.3.1 Create an empty new app . . . 10
3.3.2 Add Platforms . . . 10
3.3.3 Build and Run the App . . . 11
3.3.4 Add Plugins . . . 11
4 Augmented Reality 15 4.1 Introduction . . . 15
4.2 The history of Augmented Reality . . . 17
4.3 Related Work . . . 17
4.3.1 Advertising and Marketing . . . 17
4.3.2 Medical . . . 18
4.3.3 Entertainment . . . 19
4.3.4 Military . . . 20
4.3.5 Education . . . 20
5 Development 23
5.1 Why Wikitude? . . . 23
5.2 System Architecture . . . 23
5.3 System Implementation and Design . . . 24
5.3.1 Initial Menu . . . 25
5.3.2 Paths . . . 26
5.3.3 Image Recognition . . . 28
5.3.4 Near You . . . 33
5.3.5 Directions . . . 39
6 Conclusions and Future Work 41
List of Figures
2.1 The first Android phone, HTC Dream/T-Mobile G1 [Tay15] . . . 3
2.2 Android Architecture [Joh15] . . . 4
2.3 Android SDK Manager . . . 7
3.1 Display the SHA-1 fingerprint . . . 12
3.2 Google Maps API Key for Android . . . 12
4.1 Simplified representation of a RV Continuum [MTUK94] . . . 15
4.2 Sensor-Based Tracking [Bla12] . . . 16
4.3 How markers work [Gra14] . . . 16
4.4 Webcam Social Shopper - Virtual Dressing Room [Web13] . . . 18
4.5 2D augmented reality image overlay device to guide needle insertion procedures [Que] 18 4.6 MonstAR Truck game using AR. [Out14] . . . 19
4.7 Game WonderBook: Book of Spells. [Son15] . . . . 19
4.8 Example of the information that smart helmets can add to the soldier’s field of vision [Pri14] . . . 20
4.9 Elements 4D by Daqri [Ara14] . . . 20
4.10 Anatomy 4D by Daqri [Kim14] . . . . 21
4.11 Example of POI Geolocation on a map [ARS] . . . 21
4.12 Museum of London StreetMuseum app [Jaw14] . . . . 22
5.1 System Architecture . . . 24
5.2 Discover Covilhã icon . . . 24
5.3 Discover Covilhã initial menu . . . 24
5.4 Points of the different paths and how to change them . . . 26
5.5 Page with the pictures of the places with Image Recognition . . . 28
5.6 Image Recognition with information in AR . . . 29
5.7 Image Recognition with video content in AR . . . 32
5.8 Image Recognition with animated 3D object in AR . . . 33
5.9 The radius menu, the POIs and the information shown when they are clicked . . . 34
List of Listings
3.1 Command to install Cordova on Windows . . . 9
3.2 Command to install Cordova on OS X and Linux . . . 9
3.3 Command to create a Cordova application . . . . 10
3.4 Command to add a platform, label=lst:plat . . . 10
3.5 Command to add the platform Android . . . 10
3.6 Command to remove a platform . . . 11
3.7 Command to list the added platforms . . . 11
3.8 Command to build the app . . . 11
3.9 Command to build the Android app . . . 11
3.10 Command to run the Android app . . . 11
3.11 Command to add plugins . . . 11
3.12 Command to get the SHA-1 fingerprint . . . 12
3.13 Command to add the Google Maps plugin . . . 12
3.14 Command to add the Wikitude plugin . . . 13
5.1 HTML code for initial menu . . . 25
5.2 HTML code to create map canvas . . . 26
5.3 Definition of POIs . . . 26
5.4 Create Map . . . 27
5.5 Target Collection load . . . 29
5.6 Creating HMTL information page and button . . . 29
5.7 Creating video content and respective play button . . . 30
5.8 Adding 3D object and animation . . . 32
5.9 Places definition . . . 34
5.10 Loading the POIs from the local data . . . 34
5.11 loadPoisFromJsonDataFn function . . . . 35
5.12 Radar div definition . . . 36
5.13 Near You header . . . . 36
5.14 showRangeFn function . . . . 36
5.15 Panel with range information . . . 37
5.16 Initialize the range in 100% . . . 37
5.17 Function onMarkerSelectedFn() . . . . 38
5.18 Panel with POI information . . . 38
List of Acronyms
ADT Android Development Tools AOT Ahead-of-time
API Application Programming Interface ATR Android Runtime
App Application AR Augmented Reality
CGI Computer Generated Imagery CLI Command-line Interface CSS Cascading Style Sheets GPS Global Positioning System HMS Helmet-Mounted Sights HTML HyperText Markup Language
HUD Head-Up Displays
MAR Mobile Augmented Reality
MARA Mobile Augmented Reality for Advertising OS Operating System
Chapter 1
Introduction
1.1
Focus and Scope
The focus of this project is the MARA that combines the AR with mobile devices, in this case Android ones, and advertisement, being this advertisement applied to a product/service or touris-m/culture.
AR is commonly confused with Virtual Reality even though they are completely different, being even on opposite sides on the Milgram’s Reality-Virtuality Continuum. While briefly augmented reality is the addition of CGI elements into the real world through a device, virtual reality is the addition of the real world into the virtual world through, for instance, HUD.
Being Android open source and the most used OS to mobile devices, it was the right choice to use it to create this application.
Since it was decided to create a touristic application to Covilhã it was intended to use Augmented Reality and the geolocation systems, not only to represent the different paths that already exist around the city but also to interactively show to the tourists the main points of interest.
Augmented Reality provides contents that can not usually be found in the POIs information given at the location, such as videos or even 3D objects and animations, which the tourist would only be able to visualize in the internet and in multimedia presentations of the place.
1.2
Problem Definition and Objectives
The main objectives for this dissertation were:
• To investigate and learn how to create an Android MAR application • To development of a prototype of an application using AR
In order to accomplish these objectives some tasks were needed to be executed, such as the elab-oration of a state of art about Augmented Reality, especially applied to mobile devices, selection of the right environment to the development of the application and the definition and implemen-tation of it, lastly it was needed to test the app and verify if everything was right and the image recognition was working properly.
The state of art, or the related work (Section 4.3), was the first thing to do. There was a large amount of AR applications so it was choose to reference the one that were more relevant on different areas.
Vuforia, Metaio and Wikitude were the environments considered to develop the Augmented Reality part of the application. In the end was the Wikitude the chosen plugin since it was the most suitable one.
About the app definition it was decided to create a MARA app about Covilhã points of interest (POIs) intended for the tourism of the city, since it did not exist and could be a good improvement to the city tourism.
The tests of the application were made on different devices but the opportunity to test it with people from different ages was not possible.
1.3
Organization of the Dissertation
This dissertation is divided into four main chapters preceded and succeeded by the Introduction and Conclusions and Future Work, respectively. After chapter 6 the bibliographical references used on this dissertation can be found. The contents of each chapter of this dissertation can be summarized as follows:
Chapter 1 is an introduction to the project, explaining the context of the dissertation. It also includes the identification of the main objectives and the problem to be solved.
Chapter 2 gives an overview about Android and its history. It also explains how to get started with the Android Development Environment.
Chapter 3 provides information about Apache Cordova and its Command-Line Interface. This chapter teaches how to setup and configure Apache Cordova properly and how to create, build and run a new app.
Chapter 4 Augmented Reality and its history are presented in this chapter. Afterwards it is shown some of the related work on different areas, such as Advertising and Marketing, Medical, Entertainment, Military, Education and finally Tourism.
Chapter 5 this chapter is the main core of the dissertation as it presents the app and how it was developed. The reasons why some decisions were taken are also explained in this chapter.
Chapter 6 the final chapter wraps up the conclusions of this dissertation and the directions for future work.
Chapter 2
Android
2.1
Introduction
Android powers hundreds of millions of mobile devices around the world, being the largest installed base of any mobile platform. It is increasing exponentially with about a million new users per day who start looking for applications as soon as they turn their devices on. [ANDb]
2.2
Android History
The Android is an open source OS initially developed by Android, inc. that was bought by Google in 2005. Founded in 2007 by a group of IT companies, like Google, Intel, Samsung, Acer, Motorola, Asus, DoCoMo, HTC, Huawei, Sprint, Kyocera, T-Mobile, LG, Vodafone, SonyEricsson, Qualcomm and NVidia, Open Handset Alliance (OHA) is nowadays its owner, being the company is responsible for the development and the growing of Android [OB14].
The first device that came into the market with the Android OS was the HTC Dream/T-Mobile G1 (Figure 2.1), in 2009 and was available specifically for the Australian market[Tay15]. After that several devices were released using Android, including not only phones but also a netbook and cars with smart panels and automotive navigation system [OB14]. Recently it is also possible to find the Android OS in watches, televisions and tablets.
Figure 2.1: The first Android phone, HTC Dream/T-Mobile G1 [Tay15]
Android allows developers to access all is native apps such as contacts, calendar, Google Maps, and many others. Developers can also access to the hardware of the devices [OB14]. Furthermore, as it is an open source system, the process of creating apps and publishing them is a lot easier than other platforms.
2.3
The Android Platform
Android is developed by Google Inc. and the Open Handset Alliance. It was based on the operating system Linux, therefore incorporating characteristics from this system, such as OS Kernel, archive manager, etc [Rab07].
The Android Platform consists in:
• A software stack for mobile devices • Android SDK for creating apps.
2.3.1
The Android Architecture
The android is composed of five different layers of software (Figure 2.2)each one providing different services to the layer immediately above it [Joh15]. These layers are:
• Applications
• Application Framework
• Libraries and Android Runtime • Linux Kernel
2.3.1.1 Applications
It consists on standard apps which include, for instance [Rab07]:
• Home - Main Screen • Browser - View web pages • Contact - Contacts database • Phone - Dial phone numbers
• Email Reader - Compose and read email messages
And other applications that will be developed, being all of them coded in Java.
2.3.1.2 Application Framework
At this level of the architecture one can find some components that will allow new structures to be used in future applications[Rab07].
These components are [Rab07]:
• Package Manager - Keeps track of app packages on device • Window Manager - Manages the windows comprising an app
• View System - Provides common user interface elements, such as icons, text entry boxes, buttons, etc
• Resource Manager - Manages non-compiled resources, such as strings, graphics and layout files
• Activity Manager - Manages the application lifecycle and navigation stack • Content Provider - Inter-application data sharing
• Location Manager - Provides location and movement information
• Notification Manager - Place notification icons in the status bar when important events occur
2.3.1.3 Libraries and Android Runtime
This layer is divided in libraries and android runtime. The libraries are coded in C/C++ and they are the following [Rab07]:
• System C Library - implementation of C standard library (libc) to systems that support the Linux platform
• Surface Manager - display management
• WebKit - Browser engine • OpenGL - Graphic engine
• SQLite - Relational database engine
Before Android 5.0.x (Lollipop or L) the apps were executed by the Dalvik Virtual Machine. In the most recent versions of Android the Dalvik is no longer available and it was substituted by ART [ART, Dal].
ART is the managed runtime used by applications and some system services on Android [Dal]. In ART, at the installation process, the dex code is compiled to native OAT files [ART].
The ART has various features such as AOT compilation, improved garbage collection and develop-ment and debugging improvedevelop-ments (support for sampling profiler and for more debugging features and improved diagnostic detail in exceptions and crash reports) [Dal].
2.3.1.4 Linux Kernel
The android has a linux kernel, version 2.6 and 3.0 (API level 11 and posteriors). This layer is responsible for the power management, android shared memory, low memory killer, interprocess communication and many other tasks. It is the Android’s responsibility to perform the communi-cation between the developed software and the device hardware[OB14].
2.4
The Android Development Environment
The android development environment is the workbench for writing Android applications.
2.4.1
Getting Started
First of all, one needs to download and install the ADT Bundle, which can be downloaded from http://developer.android.com/sdk. The ADT Bundle contains the latest android platform, the Eclipse and the ADT plugin, the latest system image for emulator and additional development
and some features are unavailable, like the bluetooth and USB connections. Moreover, the perfor-mance/user experience can be misleading. This is the reason why on this project the application was run on an actual android device.
2.4.1.2 Adding SDK Packages
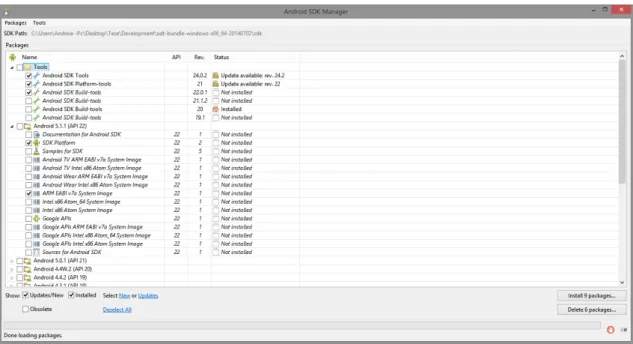
To add SDK packages one needs to execute the Android SDK Manager (Figure 2.3), which can be found at the root of the Android SDK directory on Windows and on Mac/linux by opening a terminal and navigate to the tools directory in the location where the Android SDK was installed, then execute android sdk [Anda].
To get the latest SDK tools select the Android SDK Tools, Android SDK Platform-tools and Android SDK Build-tools (latest version) from the directory Tools and the SDK platform and a system image for the emulator, such as ARM EABI v7a System Image, from the first Android X.X folder (Figure 2.3) [Anda].
In the Extras directory one can select the Android Support Repository and Android Support Library to get the support library for additional APIs and/or select Google Repository and Google Play Services to get Google Play services for even more APIs [Anda].
After selecting everything that one desires it is just necessary to click Install X packages, accept the license agreement for each one of them and finally click Install [Anda].
Chapter 3
Apache Cordova
3.1
Introduction
Apache Cordova is a set of device APIs that allow the access of native device functions such as the camera or accelerometer from JavaScript. The UI frameworks that Cordova combines, like jQuery Mobile, allows a smartphone app to be developed with just HTML, CSS, and JavaScript without any native code (Java, Objective-C, etc) [The13a].
The JavaScript APIs are consistent across multiple device platforms and built on web standards which makes the app portable to other device platforms with minimal to no changes [The13a].
Cordova is available for iOS, Android, Blackberry, Windows Phone, Palm WebOS, Bada, and Symbian. In this project Cordova was used with the Android platform [The13a].
3.2
The Command-Line Interface
3.2.1
Cordova CLI Installation
• Installation of Node.js, if not installed already, in order to be possible to invoke node and npm on the command line. May be necessary to add the npm directory to the PATH, in the environment variables. Usually, on Windows, npm can be found at C:\Users\username\ AppData\Roaming\npm, on OS X and Linux it can usually be found at /usr/local/share/ npm [The13b].
• Installation of a git client, if not already installed, so it is possible to invoke git on the command line
• Finally it is possible to install Cordova using npm utility of Node.js. The -g flag on the Cordova installation tells npm to install Cordova globally [The13b].
On Windows:
npm i n s t a l l - g c o r d o v a
Listing 3.1: Command to install Cordova on Windows
On OS X and Linux:
s u d o npm i n s t a l l - g \ t e x t i t { C o r d o v a }
3.3
Setup and Configuration
3.3.1
Create an empty new app
To create an application the user just needs to go into a directory, where the application is supposed to be created and run the listing 3.3 [The13b].
c o r d o v a c r e a t e h e l l o com . e x a m p l e . h e l l o H e l l o W o r l d
Listing 3.3: Command to create a Cordova application
If the user wants to get information about the process of the installation, he just needs to insert the flag -d [The13b].
The first hello determines the name of the directory to be generated for the project. This directory should not exist [The13b].
The second argument com.example.hello provides a reverse domain-style identifier. This argument is optional, only if the last argument is also omitted [The13b].
The last argument HelloWorld provides the display name of the application. This argument is optional [The13b].
3.3.2
Add Platforms
In order to add platforms the user needs to be within the project directory, or any subdirectories within its scope. Then one just needs to run the listing ?? [The13b].
c o r d o v a p l a t f o r m add P l a t f o r m N a m e
Listing 3.4: Command to add a platform, label=lst:plat
The PlatformName must be replaced with the platform the user wants to add to the project. The ability to use some platforms is related to whether the machine supports each SDK and whether the SDK is already installed [The13b].
In a Mac the names of the platforms supported are: ios, amazon-fireos, android, blackberry10 and firefoxos. In a Windows machine the names of the platforms supported are wp8 (relative to
c o r d o v a p l a t f o r m r e m o v e a n d r o i d c o r d o v a p l a t f o r m rm a n d r o i d
Listing 3.6: Command to remove a platform
To list all the current set of platforms added the command is:
c o r d o v a p l a t f o r m s ls
Listing 3.7: Command to list the added platforms
3.3.3
Build and Run the App
To build the application the command [The13b] is:
c o r d o v a b u i l d
Listing 3.8: Command to build the app
Or it can be limited to a certain platform by adding the name of the platform to the end of the command [The13b], like the example below.
c o r d o v a b u i l d a n d r o i d
Listing 3.9: Command to build the Android app
To run the application the command is the one on listing 3.10. [The13b]
c o r d o v a run a n d r o i d
Listing 3.10: Command to run the Android app
This command will run and install the application on the device connected to the machine or in an emulator. To specifically run the app on an emulator it is just necessary to substitute the word run for emulate on the command above.
3.3.4
Add Plugins
The command [The13b] to add plugins to the project is the following.
c o r d o v a p l u g i n add P l u g i n N a m e
Listing 3.11: Command to add plugins
In this project the plugins used were the Wikitude Plugin to Cordova and Phonegag googlemaps plugin that supports both Phonegap and Apache Cordova.
3.3.4.1 Phonegap Googlemaps Plugin
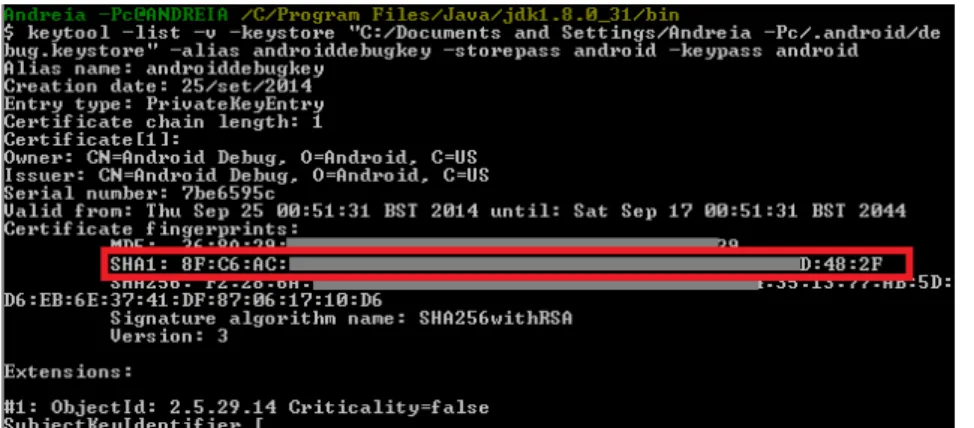
First of all it is necessary to display the debug certificate. The keytool can be found inside the bin folder of the Java installation directory, which can usually be found in C:\ProgramFiles\Java\ jdk1.8.0_31\bin. The path will change according to the jdk version.
Inside this folder the following command [Kat15] should be run.
k e y t o o l - l i s t - v - k e y s t o r e " C :/ D o c u m e n t s and S e t t i n g s / u s e r n a m e /. a n d r o i d
/ d e b u g . k e y s t o r e " - a l i a s a n d r o i d d e b u g k e y - s t o r e p a s s a n d r o i d - k e y p a s s a n d r o i d
Listing 3.12: Command to get the SHA-1 fingerprint
The result will be the one shown in figure 3.1, and the SHA-1 fingerprint must be saved.
Figure 3.1: Display the SHA-1 fingerprint
The next step is to obtain the Google Maps API Key for Android, which can be done by going to the Google APIs Console and then turn on Google Maps Android API v2. After turning on the API the user should go to API Access page and click on Create New Key button and then on Android Key, in the resulting dialog, the user should enter the SHA-1 fingerprint, previously saved, a semicolon and then the application’s package name (Figure 3.2) [Kat15].
3.3.4.2 Wikitude Plugin
The following command add the Wikitude plugin to the Cordova project [Wik15b].
c o r d o v a p l u g i n add
h t t p s :// g i t h u b . com / W i k i t u d e / w i k i t u d e - cordova - p l u g i n . git
Listing 3.14: Command to add the Wikitude plugin
This process takes several minutes and when it is done the command quits with a success message, Plugin "com.wikitude.phonegap.WikitudePlugin" fetched [Wik15b].
Chapter 4
Augmented Reality
4.1
Introduction
Augmented Reality is a component of mixed reality, according to the Milgram’s Reality-Virtuality Continuum (Figure 4.1). The RV Continuum puts Augmented Reality and Virtual Reality in opposite ends of the continuum. On one side, one has the real environment, and on the other side there is the virtual environment. Closer to the real environment side lays the augmented reality [MTUK94].
Figure 4.1: Simplified representation of a RV Continuum [MTUK94]
AR is a kind of supplement to the real world using virtual objects created by CGI. It raises the interaction between humans and technology, making the real world more complex, and the virtual world more realistic [KK14].
The Augmented Reality: [vKP10]
• Combines real and virtual images • Is interactive and in real-time • Aligns real and virtual objects in 3D
The combination of the real and virtual images is done with several different display technologies such as, head attached (head mounted display/projector), body attached (handheld display/pro-jector, e.g. mobile phones) and spatial (spatially aligned projector/monitor) [BCL15].
Registration (positioning virtual objects in regarding to the real world) and Tracking (continually locating the users view point) are two components of objects aligned in 3D[BCL15].
Tracking techniques can be divided into: [ZDB08]
• Sensor-Based Tracking Techniques • Vision-Based Tracking Techniques
• Hybrid Tracking Techniques
Sensor-Based Tracking Techniques (Figure 4.2) can be either active, such as mechanical, magnetic and ultrasonic sensors (GPS, Wifi and cell location) or passive, such as inertial sensors (compass, accelerometer and gyroscope) [BCL15].
Figure 4.2: Sensor-Based Tracking [Bla12]
Vision-Based Tracking Techniques can be divided in specialized tracking, marker-based tracking and markerless tracking.
Marker-based tracking (Figure 4.3) uses a technique to track the markers already agreed. This system is used in a space with a specific purpose. The target markers are recognized by the device via the camera and are defined by the developer [KK14].
Feature-based methods focuses on finding a correspondence between 2D image features, such as geometrical primitives (points, segments, circles, etc), object contours, regions of interest and other, and their 3D world frame coordinates [PM06, ZDB08].
Model-based trackers usually construct their models based on lines or edges in the model[ZDB08].
The hybrid tracking uses the combination of sensors (e.g. computer vision and inertial sensors)[BCL15].
4.2
The history of Augmented Reality
The first AR interface, Head Mounted Display, was developed in the 1960’s by Ivan Sutherland [Rob13].However, AR did not become popular until October 1998, when the first International Workshop on Augmented Reality ’98 (IWAR 98) conference was held,in San Francisco, which lead to an increase of AR developers and researchers [ZDB08, Rob13].
Due to this increase of popularity some other augmented reality conferences were born, such as the International Symposium on Mixed and Augmented Reality (ISMAR) and The International Symposium on Augmented Reality (ISAR) [Rob13].
AR is becoming increasingly popular over the years, and so are the applications of this technology, especially for smart phones.
4.3
Related Work
Augmented Reality does the merge of the virtual and real world through the interaction with sensorial channels, such as vision, sound and touch. This means that AR is being used increasingly more through the years and applicable diversely. Between many others, there are AR solutions for:
4.3.1
Advertising and Marketing
There are different applications of AR in this field like the creation of AR solutions that can be manipulated by the user in order to have a more realistic vision, in 3D, 3D animations or just in 2D but framed in the real world, of a determined product or object.
One example of this application is full-size AR virtual cars in shopping centers, so that users can see the whole car and interact with it virtually.
It is also possible to see a furniture object in one’s own environment so they can have a better impression of how that item is going to look there or which color looks better.
Some implementations are also making possible to virtually try clothes using virtual mirrors or even their webcams in virtual dressing rooms (Figure 4.4), making this process a lot easier, more fun and quicker.
Figure 4.4: Webcam Social Shopper - Virtual Dressing Room [Web13]
Probably the biggest and most practical usage of AR in Advertising and Marketing is through smartphones. Users can access to more information about a product or propaganda over applica-tions on their smartphones (e.g. Blippar).
4.3.2
Medical
One of the medical uses of augmented reality is in the field of minimally-invasive surgery (Figure 4.5), which reduces the trauma of an operation by using small incisions or no incisions at all [Azu97].
Augmented Reality can provide the patient’s anatomy, making this type of surgery possible without larger incisions [Azu97].
The combination of computer graphics and the real world view can be achieved by using 3D datasets from the patient. This datasets can be collected in real time using sensors like Magnetic Resonance Imaging (MRI), Computed Tomography scans (CT), or ultrasound imaging [Azu97].
AR is also used to help improve clinical and surgical practices, which results in a lowering of the costs and an increasement in safety of procedures [Rob13].
4.3.3
Entertainment
In this field, AR is noticeable mainly in games. Users can have a more realistic gaming experience with this technology, having the possibility to bring the game into the real world.
There are several examples of AR in games, like the one on the image below, MonstAR Truck by Outplay Entertainment, it is a game for mobile devices and turns the real world (e.g. user’s home) into a racetrack, like it is visible on figure 4.6 [Out14].
Figure 4.6: MonstAR Truck game using AR. [Out14]
Other games using AR can also be played in the most recent video games consoles (e.g. Playstation 3, Xbox 360, etc). On figure 4.7 there is an example of a game for Playstation 3, WonderBook: Book of Spells by SCE London Studio [Son15].
4.3.4
Military
One recent development in the military field was the smart helmet (Figure 4.8), an invention quite similar to Google Glass which has the capacity to soldiers on the battlefield. It attaches to a military helmet, gives live updates, overlays maps into the soldier’s field of vision and it can also be integrated with weapons control system [Pri14].
Figure 4.8: Example of the information that smart helmets can add to the soldier’s field of vision [Pri14]
Augmented reality is also used to superimpose vector graphics upon the military aircraft and helicopters pilot’s view of the real world using HUDs and HMS. This provides to the pilot basic navigation, information about the flight and targets in the environment [Azu97].
4.3.5
Education
There is a vast amount of educational applications for mobile devices that can provide a more interactive way of learning. These act not only as a motivational factor to students, who become more interested in learning, but also as a support during the learning experience [Nes13].
Applications such as Elements 4D Daqri 4.9 allow students to learn about chemical elements and how these interact. Using blocks, it shows students what happens when the elements are combined, and how the chemical reaction occurs. Anatomy 4D also by Daqri 4.10 allows users to explore the human body [Nes13].
Figure 4.10: Anatomy 4D by Daqri [Kim14]
Other types of applications allow students to scan their homework, leading to a video of the teacher helping the students on solving the problem [Nes13].
4.3.6
Turism
In this field are several applications for smart phones, tablets and other types of devices, using the sensors available on the system it is possible to create complete guides of cities and show some POIs from that place (Figure 4.11).
Figure 4.11: Example of POI Geolocation on a map [ARS]
There are also examples of AR apps that show to the user images of the history of some monuments or places, like is shown in Figure 4.12 [Jaw14].
Chapter 5
Development
This project is a browser app that was developed using Apache Cordova (Chapter 3), Wikitude Plugin (Section 3.3.4.2) and Phonegap Google Maps Plugin (Section 3.3.4.1).
5.1
Why Wikitude?
It was decided to use wikitude since it was the plugin that:
• Could be used completely with a free license, it just shows a Trial watermark • Had more information and documentation
• Was able to use the GPS, accelerometer and gyroscope • Had the best results in the image recognition of buildings
Another option was Vuforia however it was excluded not only because to use the GPS another plugin would be necessary, but also because the image recognition is centered on pattern recognition which did not correspond to what was needed.
Metaio was also an option that was tested but the lack of information and documentation about the plugin made the experience quite difficult to concretize.
5.2
System Architecture
The system has an initial menu (Section 5.3.1) that is divided in the following options: Paths, Image Recognition, Near You and Directions (Figure 5.1). These options were divided because they used different plugins and functionalities of those plugins.
In the Paths option (Section 5.3.2) the user can choose a path and see the location of the points of the path in a map, as well as its own location, this being possible by using the Phonegap Google Maps Plugin. The Image Recognition option (Section 5.3.3) allows the user to get information, in AR, about some POIs using the image of that place, Wikitude is the plugin responsible for this possibility. Near You (Section 5.3.4) shows to the user, using AR, the POIs near him, also allowing the user to get further information about that place, such as the distance to it, by clicking in the POI. Finally the Directions option (Section 5.3.5) asks the user which place he would like to visit and using Maps application, that it is native on Android devices, shows the path to that place from the user current location.
Figure 5.1: System Architecture
5.3
System Implementation and Design
Being a browser app it is not necessary to code in Java but with HTML, CSS and JavaScript. The visual design of the app is quite simple and minimalist, making the app more intuitive. Black, white and grey are the most used colors, as they allow everything to be easily seen and prevents the app from being tiresome for the eyes. The icon created for this app is the Covilhã logo with a magnifying glass, figure 5.2.
Figure 5.2: Discover Covilhã icon
5.3.1
Initial Menu
The initial menu of the app, figure 5.3, was created using jquery-mobile and it is in the same file as other pages, such as Paths and Directions.
To create the menu the code used was:
< ! - - New P a g e - - >
< div data - r o l e = " p a g e " id = " p a g e 1 " s t y l e = " b a c k g r o u n d : n o n e ; " >
< ! - - H e a d e r w i t h app n a m e - - >
< div data - r o l e = " h e a d e r " data - t h e m e = " b " > < h3 c l a s s = " ui - t i t l e " r o l e = " h e a d i n g " >
D i s c o v e r < br > C o v i l h ã < / h3 > < / div >
< ! - - N a v i g a t i o n Bar ( M e n u O p t i o n s ) - - >
< div data - r o l e = " n a v b a r " data - t h e m e = " b " data - g r i d = " a " > < ul > < li > < a h r e f = " # p a g e 2 " data - a j a x = " f a l s e " > < img src = " js / i m a g e s / m a p a . png " > < br > P e r c u r s o s < br > < br > < / a > < / li > < li > < a h r e f = " j a v a s c r i p t : app . l o a d A R c h i t e c t W o r l d ( g e t S a m p l e P a t h (0 , 0) ) ; " > < img src = " js / i m a g e s / r e c o n h e c i m e n t o . png " > < br > R e c o n h e c i m e n t o < br > de i m a g e n s < / a > < / li > < li > < a h r e f = " j a v a s c r i p t : app . l o a d A R c h i t e c t W o r l d ( g e t S a m p l e P a t h (0 , 1) ) ; " > < img src = " js / i m a g e s / p e r t o . png " > < br > P e r t o de si < br > < br > < / a > < / li > < li > < a h r e f = " # p a g e 3 " data - a j a x = " f a l s e " > < img src = " js / i m a g e s / c a m i n h o . png " > < br > C o m o c h e g a r < br > < br > < / a > < / li > < / ul > < / div > < / div >
Listing 5.1: HTML code for initial menu
name of the app, Discover Covilhã, and in the navigation bar there are the icons and names of the menu options, such as Paths, Image Recognition, Near you and Directions.
5.3.2
Paths
This option is coded on the same html file as the initial menu. The page has a navigation bar with the name of the option and a button to open the side bar where the user can choose the intended path.
Figure 5.4: Points of the different paths and how to change them
The html code is similar to the one used in the initial menu, however it is necessary to create a canvas to the map.
< div s t y l e = " w i d t h : 1 0 0 % ; h e i g h t : 5 0 0 px " id = " m a p _ c a n v a s " > < / div >
Listing 5.2: HTML code to create map canvas
After the canvas is created in the html code it is necessary to create the functions to originate the map, points and respective paths. On device ready it is defined the map and the points with their
{ " l a t l n g " : [ 4 0 . 2 8 0 7 1 1 , -7 .5 03 64 4] , n a m e : " I g r e j a da M i s e r i c ó r d i a " , P e r c u r s o 1 : 1 , P e r c u r s o 2 : 1 , P e r c u r s o 3 : 1} , // etc ];
Listing 5.3: Definition of POIs
When the paths are equal to 1 (e.g. PercursoX: 1) this means that the point is within that path. If it is equal to 0 then the point is not contained on the path. The category will change the path according to the user’s selection, making the markers for that path visible and the other ones invisible, and it is defined that Percurso1 is defined as the default path. Furthermore, the user’s current location is needed to be shown on the map. If getting the user location is successful, a marker is added to the map. If it is not successful, a message is shown saying that it was impossible to get user’s current location. The parameter option on getMyLocation enables high accuracy of the GPS. var b o u n d s = p o n t o s . map ( f u n c t i o n ( i n f o ) { var l a t L n g = new p l u g i n . g o o g l e . m a p s . L a t L n g ( i n f o . l a t l n g [0] , i n f o . l a t l n g [ 1 ] ) ; map . a d d M a r k e r ({ " p o s i t i o n " : latLng , " t i t l e " : i n f o . n a m e } , f u n c t i o n ( m a r k e r ) { map . on ( " c a t e g o r y _ c h a n g e " , f u n c t i o n ( c a t e g o r y ) { m a r k e r . s e t V i s i b l e ( i n f o [ c a t e g o r y ] ? t r u e : f a l s e ) ; }) ; }) ; r e t u r n l a t L n g ; }) ; map . t r i g g e r ( " c a t e g o r y _ c h a n g e " , " P e r c u r s o 1 " ) ; map . g e t M y L o c a t i o n ( option , o n S u c c e s s , o n E r r o r ) ;
5.3.3
Image Recognition
To perform the image recognition, the first step needed was to generate a target collection on Wikitude Target Manager.
To have good results the images should have high contrast, there should be evenly distributed textured areas and many corner like structures, repetitive patterns should be avoided, such as large single-colored areas or large amounts of text. The images should not be of smaller dimensions than 500 pixels as they would not contain enough graphical information, or larger than 1000 pixels as they would not improve the tracking quality [Wik15a].
In this project a target collection of ten different images from different places of Covilhã was created, such as Saint Maria Church, San Francisco Church, Theatre, City Council, Mercy Church, Wool Museum and some more.
The Wikitude will run on Android devices that fulfil the following requirements [Wik15c]:
• Android 4.0+ (API Level 14+) • High resolution devices (hdpi) • Rear-facing camera
• Devices with a capable CPU (armv7a and NEON support)
As far as HTML is concerned in this case it is just necessary to load the architect world and call the JavaScript code to perform the image recognition and to display augmented information (AR). It was also added a button to a page with the images of the places where the user can perform the image recognition, without this page the user could not have any idea of the places where it was possible to use the app (Figure 5.5).
Figure 5.6: Image Recognition with information in AR
In what refers to the JavaScript code, first of all, in order to load the target collection, it is necessary to download it from the Wikitude Target Manager.
t h i s . t r a c k e r = new
AR . C l i e n t T r a c k e r ( " a s s e t s / t a r g e t c o l l e c t i o n s . wtc " , { o n L o a d e d : t h i s . w o r l d L o a d e d
}) ;
Listing 5.5: Target Collection load
Then for each target it is going to be created the augmented reality content.
To the majority of targets it was developed an HTML page with some information about the place (Figure 5.6), for instance in the listing 5.6, it is called a button that will open the main page of the theatre, and the page with information about the theatre.
// C r e a t e H T M L and b u t t o n AR
var T = new AR . T r a c k a b l e 2 D O b j e c t ( t h i s . tracker , " t e a t r o " , {
d r a w a b l e s : { cam : [ t e a t r o B u t t o n , t e a t r o ] } }) ; // C r e a t e b u t t o n to p a g e w i t h i n f o r m a t i o n var t e a t r o B u t t o n = t h i s . c r e a t e W w w B u t t o n ( " h t t p :// www . cm - c o v i l h a . pt / s i m p l e s /? f = 4 8 1 5 " , 0.15 , { o f f s e t X : -0.3 , o f f s e t Y : -0.25 ,
z O r d e r : 1 }) ; // I m p o r t H T M L p a g e var t e a t r o = new AR . H t m l D r a w a b l e ({ uri : " a s s e t s / p a g e s / t e a t r o . h t m l " } , 0.5 , { v i e w p o r t W i d t h : 250 , v i e w p o r t H e i g h t : 450 , b a c k g r o u n d C o l o r : " # 0 0 0 0 0 0 " , o f f s e t X : +0.4 , o f f s e t Y : 0.5 , h o r i z o n t a l A n c h o r : AR . C O N S T . H O R I Z O N T A L _ A N C H O R . RIGHT , v e r t i c a l A n c h o r : AR . C O N S T . V E R T I C A L _ A N C H O R . TOP , c l i c k T h r o u g h E n a b l e d : true , a l l o w D o c u m e n t L o c a t i o n C h a n g e s : false , o n D o c u m e n t L o c a t i o n C h a n g e d : f u n c t i o n o n D o c u m e n t L o c a t i o n C h a n g e d F n ( uri ) { AR . c o n t e x t . o p e n I n B r o w s e r ( uri ) ; } }) ;
Listing 5.6: Creating HMTL information page and button
Another option is to insert a video (Figure 5.7) instead of the html page and the button. The listing 5.7 calls the video and the playButton. It also controls the pause and resume of the video according to the states of the video.
// C r e a t e V i d e o A u g m e n t e d R e a l i t y
var ML = new AR . T r a c k a b l e 2 D O b j e c t ( t h i s . tracker , " M u s e u " , {
d r a w a b l e s : {
cam : [ video , p l a y B u t t o n ] } ,
} } }) ; // I m p o r t V i d e o var v i d e o = new AR . V i d e o D r a w a b l e ( " a s s e t s / c o n t e n t s / m u s e u . mp4 " , 0.5 , { o f f s e t Y : p l a y B u t t o n . offsetY , o n L o a d e d : f u n c t i o n v i d e o L o a d e d () { p l a y B u t t o n . e n a b l e d = t r u e ; } , o n P l a y b a c k S t a r t e d : f u n c t i o n v i d e o P l a y i n g () { p l a y B u t t o n . e n a b l e d = f a l s e ; v i d e o . e n a b l e d = t r u e ; } , o n F i n i s h e d P l a y i n g : f u n c t i o n v i d e o F i n i s h e d () { p l a y B u t t o n . e n a b l e d = t r u e ; v i d e o . p l a y i n g = f a l s e ; v i d e o . e n a b l e d = f a l s e ; } , o n C l i c k : f u n c t i o n v i d e o C l i c k e d () { if ( p l a y B u t t o n . c l i c k e d ) { p l a y B u t t o n . c l i c k e d = f a l s e ; } e l s e if ( v i d e o . p l a y i n g ) { v i d e o . p a u s e () ; v i d e o . p l a y i n g = f a l s e ; } e l s e { v i d e o . r e s u m e () ; v i d e o . p l a y i n g = t r u e ; } } }) ; // C r e a t e p l a y b u t t o n var p l a y B u t t o n I m g = new AR . I m a g e R e s o u r c e ( " a s s e t s / p l a y B u t t o n . png " ) ; var p l a y B u t t o n = new AR . I m a g e D r a w a b l e ( p l a y B u t t o n I m g , 0.3 , { e n a b l e d : false , c l i c k e d : false , o n C l i c k : f u n c t i o n p l a y B u t t o n C l i c k e d () { p l a y B u t t o n . c l i c k e d = t r u e ; } , o f f s e t Y : -0.3 }) ;
Listing 5.7: Creating video content and respective play button
Figure 5.7: Image Recognition with video content in AR
Finally it is possible to add 3D objects (Figure 5.8) and animated 3D objects (Listing 5.8), which need to be converted to wt3 using the Wikitude 3D decoder tool.
// I m p o r t 3 D o b j e c t t h i s . m o d e l A r c o = new AR . M o d e l ( " a s s e t s / c o n t e n t s / c u b o v e r d e . wt3 " , { o n L o a d e d : t h i s . l o a d i n g S t e p , s c a l e : { x : 0.05 , y : 0.05 , z : 0 . 0 5 } , t r a n s l a t e : { x : 0.0 , y : 0.0 , z : -0.5 } ,
}) ;
// I m p o r t a n i m a t i o n
var a n i m = new AR . M o d e l A n i m a t i o n ( t h i s . m o d e l A r c o , " C u b e _ a n i m a t i o n "
) ;
Listing 5.8: Adding 3D object and animation
Figure 5.8: Image Recognition with animated 3D object in AR
5.3.4
Near You
The Near You shows using Augmented Reality the POIs around the user at a distance he defines. Even though it initially shows all the POIs, the user can change the radius.
It is essential that the user’s Android device fulfils the following requirements [Wik15c]:
• Android 4.0+ (API Level 14+) • Compass
• GPS and / or network positioning • Accelerometer
• High resolution devices (hdpi) • Rear-facing camera
Figure 5.9: The radius menu, the POIs and the information shown when they are clicked
• OpenGL 2.0
The first thing to do is to define the places and give information about them (Listing 5.9), so the Wikitude can show them on the right coordinates.
var m y J s o n D a t a = [{ " id " : " 1 " , " l o n g i t u d e " : " - 7 . 5 0 4 3 4 1 4 " , " l a t i t u d e " : " 4 0 . 2 8 0 5 8 8 2 " , " d e s c r i p t i o n " : " P e l o u r i n h o da C o v i l h ã " , " a l t i t u d e " : " 6 7 0 . 0 " , " n a m e " : " P e l o u r i n h o " } , { " id " : " 4 " , " l o n g i t u d e " : " - 7 . 5 0 4 4 6 2 1 " , " l a t i t u d e " : " 4 0 . 2 8 2 7 5 7 2 " , " d e s c r i p t i o n " : " A I g r e j a de N o s s a S e n h o r a da C o n c e i ç ã o f a z i a p a r t e do a n t i g o C o n v e n t o de São F r a n c i s c o e d a t a dos p r i m e i r o s t e m p o s da m o n a r q u i a " , " a l t i t u d e " : " 6 6 1 . 0 " , " n a m e " : " I g r e j a São F r a n c i s c o " } ,
r e q u e s t D a t a F r o m L o c a l : f u n c t i o n r e q u e s t D a t a F r o m L o c a l F n ( lat , lon , alt ) {
W o r l d . l o a d P o i s F r o m J s o n D a t a ( m y J s o n D a t a ) ;
} ,
Listing 5.10: Loading the POIs from the local data
The function loadPoisFromJsonData (Listing 5.11) will create an array (MarkerList) with marker objects. // c a l l e d to i n j e c t new POI d a t a l o a d P o i s F r o m J s o n D a t a : f u n c t i o n l o a d P o i s F r o m J s o n D a t a F n ( p o i D a t a ) { // e m p t y l i s t of v i s i b l e m a r k e r s W o r l d . m a r k e r L i s t = []; // s t a r t l o a d i n g m a r k e r a s s e t s W o r l d . m a r k e r D r a w a b l e _ i d l e = new AR . I m a g e R e s o u r c e ( " a s s e t s / m a r k e r _ i d l e . png " ) ; // l o o p t h r o u g h POI - i n f o r m a t i o n and c r e a t e an // AR . G e o O b j e c t (= M a r k e r ) per POI for ( var c u r r e n t P l a c e N r = 0; c u r r e n t P l a c e N r < p o i D a t a . l e n g t h ; c u r r e n t P l a c e N r ++) { var s i n g l e P o i = { " id " : p o i D a t a [ c u r r e n t P l a c e N r ]. id , " l a t i t u d e " : p a r s e F l o a t ( p o i D a t a [ c u r r e n t P l a c e N r ]. l a t i t u d e ) , " l o n g i t u d e " : p a r s e F l o a t ( p o i D a t a [ c u r r e n t P l a c e N r ]. l o n g i t u d e ) , " a l t i t u d e " : p a r s e F l o a t ( p o i D a t a [ c u r r e n t P l a c e N r ]. a l t i t u d e ) , " t i t l e " : p o i D a t a [ c u r r e n t P l a c e N r ]. name , " d e s c r i p t i o n " : p o i D a t a [ c u r r e n t P l a c e N r ]. d e s c r i p t i o n }; W o r l d . m a r k e r L i s t . p u s h ( new M a r k e r ( s i n g l e P o i ) ) ; } W o r l d . u p d a t e S t a t u s M e s s a g e ( c u r r e n t P l a c e N r + ’ p l a c e s l o a d e d ’ ) ; }
5.3.4.1 Adding Radar
To add the radar one should define a div in the HTML file, like is shown in listing 5.12.
< div c l a s s = " r a d a r C o n t a i n e r _ l e f t " id = " r a d a r C o n t a i n e r " > < / div >
Listing 5.12: Radar div definition
The radar should be defined after that on a file with the name Radar.js. In this file it will be defined the radar design like the background and north indicator images, and custom actions as when the radar is clicked or to set the maximum distance, for instance when the user changes the radius on the range panel.
The radar also has a CSS file to define the radar position on the screen. To show the radar it is crucial to call the PoiRadar.show() function onloadPoisFromJsonData.
5.3.4.2 Adding Range Panel
To add the range panel it is necessary to create a header and a panel on the HTML file (Listing 5.13). In the header when the user clicks on the Raio button it calls the function World.showRange() (Listing 5.14) that will open the panel and allow the user to change the current range.
< div id = " header - s t a t u s " data - r o l e = " h e a d e r " data - p o s i t i o n = " f i x e d "
data - t h e m e = " c " >
< a h r e f = " j a v a s c r i p t : W o r l d . s h o w R a n g e () ; " data - i c o n = " g e a r "
data - i n l i n e = " t r u e " data - m i n i = " t r u e " > R a i o < / a >
< / div >
Listing 5.13: Near You header
s h o w R a n g e : f u n c t i o n s h o w R a n g e F n () { if ( W o r l d . m a r k e r L i s t . l e n g t h > 0) { // u p d a t e l a b e l s on e v e r y r a n g e m o v e m e n t $ ( ’ # panel - d i s t a n c e - r a n g e ’ ) . c h a n g e ( f u n c t i o n () { W o r l d . u p d a t e R a n g e V a l u e s () ; }) ; W o r l d . u p d a t e R a n g e V a l u e s () ;
c a r r e g a d o s ’ , t r u e ) ; }
} ,
Listing 5.14: showRangeFn function
The functions World.updateRangeValues() and World.handlePanelMovements() also need to be created.
The first one updates the range values according to what the user defines, getting the value on the slider to update it. It also updates the radar maximum distance so that the points shown are just the ones at the range.
The second one handles the opening and closing of the panel when the user clicks on the button to open it or to close it. The range panel HTML code is shown in listing 5.15.
< div data - r o l e = " p a n e l " id = " panel - d i s t a n c e " data - p o s i t i o n = " l e f t "
data - d i s p l a y = " o v e r l a y " s t y l e = " b a c k g r o u n d - c o l o r :# F 0 F 0 F 0 ; " data - t h e m e = " c " >
< ! - - h e a d e r w i t h c l o s e b u t t o n - - >
< div data - r o l e = " h e a d e r " data - t h e m e = " c " > < h1 > R a i o < / h1 > < a h r e f = " # h e a d e r " data - rel = " c l o s e " > F e c h a r < / a > < / div > < ! - - d i s t a n c e i n f o r m a t i o n , c a l c u l a t e d / u p d a t e d in c o d e - - > < div data - r o l e = " c o n t e n t " > < ! - - R a n g e in m / km - - > < h4 > R a i o : < a id = " panel - d i s t a n c e - v a l u e " > < / a > < / h4 > < ! - - A m o u n t of v i s i b l e p l a c e s - - > < h4 > V i s i v e i s : < a id = " panel - d i s t a n c e - p l a c e s " > < / a > < / h4 > < ! - - d e f a u l t s l i d e r - - > < i n p u t id = " panel - d i s t a n c e - r a n g e " t y p e = " r a n g e " data - h i g h l i g h t = " t r u e " n a m e = " r a n g e S l i d e r " min = " 0 "
max = " 100 " v a l u e = " 100 " data - show - v a l u e = " f a l s e " s t e p = " 5 " data - popup - e n a b l e d = " f a l s e " >
< / div > < / div >
Listing 5.15: Panel with range information
To initialize the range in 100% in loadPoisFromJsonData it is necessary to add the listing 5.16.
$ ( " # panel - d i s t a n c e - r a n g e " ) . val ( 1 0 0 ) ;
$ ( " # panel - d i s t a n c e - r a n g e " ) . s l i d e r ( " r e f r e s h " ) ;
5.3.4.3 Adding Panel containing POI information
To add this panel, the POI object first needs to be selectable. In order to do this, a function called onMarkerSelectedFn (Listing 5.17) was implemented to show the selected POI information on the panel. o n M a r k e r S e l e c t e d : f u n c t i o n o n M a r k e r S e l e c t e d F n ( m a r k e r ) { W o r l d . c u r r e n t M a r k e r = m a r k e r ; // u p d a t e p a n e l v a l u e s $ ( " # poi - detail - t i t l e " ) . h t m l ( m a r k e r . p o i D a t a . t i t l e ) ; $ ( " # poi - detail - d e s c r i p t i o n " ) . h t m l ( m a r k e r . p o i D a t a . d e s c r i p t i o n ) ; var d i s t a n c e T o U s e r V a l u e = ( m a r k e r . d i s t a n c e T o U s e r > 9 9 9 ) ? (( m a r k e r . d i s t a n c e T o U s e r / 1 0 0 0 ) . t o F i x e d (2) + " km " ) : ( M a t h . r o u n d ( m a r k e r . d i s t a n c e T o U s e r ) + " m " ) ; $ ( " # poi - detail - d i s t a n c e " ) . h t m l ( d i s t a n c e T o U s e r V a l u e ) ; // s h o w p a n e l $ ( " # panel - p o i d e t a i l " ) . p a n e l ( " o p e n " , 1 2 3 ) ; $ ( " . ui - panel - d i s m i s s " ) . u n b i n d ( " m o u s e d o w n " ) ; $ ( " # panel - p o i d e t a i l " ) . on ( " p a n e l b e f o r e c l o s e " , f u n c t i o n ( event , ui ) { W o r l d . c u r r e n t M a r k e r . s e t D e s e l e c t e d ( W o r l d . c u r r e n t M a r k e r ) ; }) ; } ,
Listing 5.17: Function onMarkerSelectedFn()
This panel shows the distance to the user’s current location, the name of the POI and a brief description of the place (Listing 5.18).
< div data - r o l e = " p a n e l " id = " panel - p o i d e t a i l " data - p o s i t i o n = " r i g h t "
data - d i s p l a y = " o v e r l a y " s t y l e = " b a c k g r o u n d - c o l o r :# F 0 F 0 F 0 ; " data - t h e m e = " c " >
< ! - - t i t l e - - > < h3 id = " poi - detail - t i t l e " > < / h3 > < ! - - d e s c r i p t i o n - - > < h4 id = " poi - detail - d e s c r i p t i o n " > < / h4 > < ! - - d i s t a n c e - - > < h4 > D i s t â n c i a : < a id = " poi - detail - d i s t a n c e " > < / a > < / h4 > < / div > < / div >
Listing 5.18: Panel with POI information
5.3.5
Directions
The Directions option gives the coordinates of the current user’s location and the place to Maps that creates the direction to that place from the user location.
Figure 5.10: The directions to the desired place with Maps
This option is also on the same HTML file as the initial menu and the Paths. In HTML it is created a header with the page name and a combo box with the possible places. When the user clicks the button Seleccionar the app gets the places coordinates from the variable pontos (Section 5.10) as well as the current user location and sends it to Maps using the function goToMaps() (Listing 5.19). The function selectd (Listing 5.19) is the one responsible for getting the coordinates of the places.
f u n c t i o n s e l e c t d ( t o L o c a t i o n ) { var s e l e c t D o m = d o c u m e n t . g e t E l e m e n t B y I d ( " c a t e g o r y S e l e c t o r " ) ; var c a t e g o r y = s e l e c t D o m . o p t i o n s [ s e l e c t D o m . s e l e c t e d I n d e x ]. t e x t ; var b o u n d s = p o n t o s . map ( f u n c t i o n ( i n f o ) { if ( i n f o . n a m e === c a t e g o r y ) { t o L o c a t i o n = new p l u g i n . g o o g l e . m a p s . L a t L n g ( i n f o . l a t l n g [0] , i n f o . l a t l n g [ 1 ] ) ; } }) ; r e t u r n t o L o c a t i o n ; }; f u n c t i o n g o T o M a p s () { var t o L o c a t i o n ; map . g e t M y L o c a t i o n ( o n S u c c e s s , o n E r r o r ) ; t o L o c a t i o n = s e l e c t d ( t o L o c a t i o n ) ; p l u g i n . g o o g l e . m a p s . e x t e r n a l . l a u n c h N a v i g a t i o n ({ " f r o m " : y o u r L o c a t i o n , " to " : t o L o c a t i o n }) ; };
Chapter 6
Conclusions and Future Work
The main conclusions are that augmented reality is increasing exponentially and in the future it will certainly have a much wider range of applications. Furthermore, the use of AR in the field of tourism allows a more interactive way of visiting cities and getting information about specific places. Through the recognition of buildings it gives the user various informations, such as text, videos or 3D animations, which can be reached just by using a personal smartphone, tablet or other device. The possibilities are endless, especially when associated with geolocation systems. Discover Covilhã is a prototype in tourism area that shows the potentialities of combining AR and geolocation.
However, the growing of AR goes far beyond the tourism area. It can be currently used in many other fields such as education, medicine, military, entertainment and many others, as it is possible to read in Section 4.3.
To improve this work the interface design should be improved. Being the application a prototype, all the routes from Covilhã should be added as different paths, which would make the app more complete and a complete guide of the city. Another important improvement would be the addition of better, more informative and interactive contents about the different places, such as some videos or 3D models of the buildings and image galleries.
The option to change the language would also be an important addition, since Covilhã receives numerous foreign students and tourists from different places in the world. It would be wise to be possible to change the language at least to English.
After all these improvements it is envisioned to publish the app on the Play Store so everyone can install it and use it. Since the app was not published it could not be tested by people from different ages, even though it was tested with different devices. In conclusion to this tests, the app was recognizing the buildings but the direct sunlight to the camera could lead to some trouble.
Finally, a goal to this project is to make it available for iOS and Windows Phone so it would be accessible to a larger amount of people without OS restrictions.
Bibliography
[Anda] Adding sdk packages [online]. Available from: http://developer.android.com/sdk/ installing/adding-packages.html [cited 15 May 2015]. 7
[ANDb] Android, the world’s most popular mobile platform [online]. Available from: https: //developer.android.com/about/index.html [cited 5 May 2015]. 3
[Ara14] Arasam [online]. 3 June 2014. Available from: http://www.realtaaumentata.it/blog/ life/sociale. xiii, 20
[ARS] ARSOFT. Augmented reality in tourism [online]. Available from: http://www. arsoft-company.com/en/tourism/ [cited 12 April 2015]. xiii, 21
[ART] Configuring art [online]. Available from: http://source.android.com/devices/tech/ dalvik/configure.html [cited 15 May 2015]. 6
[Azu97] Ronald Azuma. A survey of augmented reality. Teleoperators and Virtual Environments, 6(4):355–385, 1997. 18, 20
[BCL15] M. Billinghurst, A. Clark, and G. Lee. A survey of augmented reality. Foundations and Trends in Human-Computer Interaction, 8(2-3):73–272, 2015. 15, 16, 17
[Bla12] Blandford, Rafe. Nokia city lens 1.5 beta for windows phone 7.5 [online]. 28 November 2012. Available from: http://allaboutwindowsphone.com/flow/item/16287_Nokia_ City_Lens_15_beta_for_Wi.php [cited 10 April 2015]. xiii, 16
[Dal] Art and dalvik [online]. Available from: http://source.android.com/devices/tech/ dalvik/index.html [cited 15 May 2015]. 6
[Gra14] Graz University of Technology. Media/press [online]. 2014. Available from: https: //handheldar.icg.tugraz.at/media_press.php [cited 10 April 2015]. xiii, 16
[Jaw14] Jawaid, Zehra. Tours come alive with augmented reality [online]. 3 January 2014. Available from: http://www.ephluxinsights.com/ tours-come-alive-with-augmented-reality/ [cited 15 May 2015]. xiii, 21, 22
[Joh15] John, Shiju P. Android architecture [online]. 3 February 2015. Available from: http: //www.eazytutz.com/android/android-architecture/ [cited 15 May 2015]. xiii, 4
[Kat15] Katsumata, Masashi. Tutorial for windows [online]. 2014-2015. Avail-able from: https://github.com/wf9a5m75/phonegap-googlemaps-plugin/wiki/ Tutorial-for-Windows [cited 10 April 2015]. 12
[Kim14] Kim, Bryan [online]. 22 July 2014. Available from: http://www.hostingreviewbox. com/5-amazing-augmented-reality-ar-apps-android-ios-device/. xiii, 21
[KK14] Young-geun Kim and Won-jung Kim. Implementation of augmented reality system for smartphone advertisements. International Journal of Multimedia and Ubiquitous Engineering, 9(2):385–392, 2014. 15, 16
![Figure 2.1: The first Android phone, HTC Dream/T-Mobile G1 [Tay15]](https://thumb-eu.123doks.com/thumbv2/123dok_br/18692944.915329/21.892.318.624.807.1004/figure-android-phone-htc-dream-t-mobile-tay.webp)
![Figure 4.1: Simplified representation of a RV Continuum [MTUK94]](https://thumb-eu.123doks.com/thumbv2/123dok_br/18692944.915329/33.892.261.675.482.610/figure-simplified-representation-rv-continuum-mtuk.webp)
![Figure 4.4: Webcam Social Shopper - Virtual Dressing Room [Web13]](https://thumb-eu.123doks.com/thumbv2/123dok_br/18692944.915329/36.892.203.652.106.236/figure-webcam-social-shopper-virtual-dressing-room-web.webp)
![Figure 4.6: MonstAR Truck game using AR. [Out14]](https://thumb-eu.123doks.com/thumbv2/123dok_br/18692944.915329/37.892.268.667.323.623/figure-monstar-truck-game-using-ar-out.webp)
![Figure 4.8: Example of the information that smart helmets can add to the soldier’s field of vision [Pri14]](https://thumb-eu.123doks.com/thumbv2/123dok_br/18692944.915329/38.892.227.625.262.560/figure-example-information-smart-helmets-soldier-field-vision.webp)
![Figure 4.10: Anatomy 4D by Daqri [Kim14]](https://thumb-eu.123doks.com/thumbv2/123dok_br/18692944.915329/39.892.229.707.209.466/figure-anatomy-d-by-daqri-kim.webp)
![Figure 4.12: Museum of London StreetMuseum app [Jaw14]](https://thumb-eu.123doks.com/thumbv2/123dok_br/18692944.915329/40.892.202.650.106.402/figure-museum-of-london-streetmuseum-app-jaw.webp)
