NATIONAL AND KAPODISTRIAN UNIVERSITY OF ATHENS
SCHOOL OF SCIENCE
DEPARTMENT OF INFORMATICS AND TELECOMMUNICATION
BSc THESIS
Defense Extensions for Website Fingerprinting Attacks on Nginx Web Server
Eleftherios I. Dimitras Michail I. Xanthopoulos
Supervisor: Konstantinos Chatzikokolakis, Associate Professor
ATHENS JUNE 2021
ΕΘΝΙΚΟ ΚΑΙ ΚΑΠΟΔΙΣΤΡΙΑΚΟ ΠΑΝΕΠΙΣΤΗΜΙΟ ΑΘΗΝΩΝ
ΣΧΟΛΗ ΘΕΤΙΚΩΝ ΕΠΙΣΤΗΜΩΝ
ΤΜΗΜΑ ΠΛΗΡΟΦΟΡΙΚΗΣ ΚΑΙ ΤΗΛΕΠΙΚΟΙΝΩΝΙΩΝ
ΠΤΥΧΙΑΚΗ ΕΡΓΑΣΙΑ
Επεκτάσεις Άμυνας για Website Fingerprinting Attacks στον Nginx Web Server
Ελευθέριος Ι. Δημητράς Μιχαήλ Ι. Ξανθόπουλος
Επιβλέπων: Κωνσταντίνος Χατζηκοκολάκης, Αναπληρωτής Καθηγητής
ΑΘΗΝΑ ΙΟΥΝΙΟΣ 2021
BSc THESIS
Defense Extensions for Website Fingerprinting Attacks on Nginx Web Server
Eleftherios I. Dimitras S.N.: 1115201600042
Michail I. Xanthopoulos S.N.: 1115201600119
Supervisor: Konstantinos Chatzikokolakis, Associate Professor
ΠΤΥΧΙΑΚΗ ΕΡΓΑΣΙΑ
Επεκτάσεις Άμυνας για Website Fingerprinting Attacks στον Nginx Web Server
Ελευθέριος Ι. Δημητράς Α.Μ.: 1115201600042
Μιχαήλ Ι. Ξανθόπουλος Α.Μ.: 1115201600119
Επιβλέπων: Κωνσταντίνος Χατζηκοκολάκης, Αναπληρωτής Καθηγητής
ABSTRACT
Website Fingerprinting is an attempt to identify a website, visited in anonymized and encrypted network traffic. Whilst this type of attack might not be very effective on the wide web, on the tor network, the websites can be distinguished with an accuracy of 90% more than regular sites.
To deal with this, we have developed ALPaCA, which was originally proposed by Giovanni Cherubin, Jamie Hayes, Marc Juarez, and stands for “Application Layer Padding Concerns Adversaries”.
This is a server-side defense mechanism that obscures the real content size of a website by changing the sizes of different objects sent to the client or by adding fake new ones.
The code of this thesis can be found at the following link: NGINX Module and ALPaCA Library
SUBJECT AREA: Web Defense
KEYWORDS: website fingerprinting, privacy, anonymity, subrequests, ALPaCA
ΠΕΡΙΛΗΨΗ
Το Website Fingerprinting είναι μια προσπάθεια αναγνώρισης της σελίδας που επισκέπτεται κάποιος υπό ανώνυμη και κρυπτογραφημένη δικτυακή κίνηση. Παρόλο που αυτού του είδους η επίθεση μπορεί να μην είναι ιδιαίτερα αποτελεσματική στον παγκόσμιο ιστό, στο δίκτυο του tor, οι ιστοσελίδες μπορούν να αναγνωριστούν με ακρίβεια 90%
περισσότερο από τις κανονικές ιστοσελίδες του παγκόσμιου ιστού.
Προκειμένου να το αντιμετωπίσουμε αυτό, έχουμε αναπτύξει το ALPaCA το οποίο αρχικά προτάθηκε από τους Giovanni Cherubin, Jamie Hayes, Marc Juarez και σημαίνει
“Application Layer Padding Concerns Adversaries”.
Το ALPaCA είναι ένας μηχανισμός άμυνας από την πλευρά του εξυπηρετητή το οποίο αποκρύπτει το πραγματικό μέγεθος του περιεχομένου μιας ιστοσελίδας, αλλάζοντας τα μεγέθη των διαφορετικών στοιχείων της που αποστέλλονται στον πελάτη ή προσθέτοντας νέα εικονικά στοιχεία.
Ο κώδικας της πτυχιακής βρίσκεται στον ακόλουθο σύνδεσμο: NGINX Module and ALPaCA Library
ΘΕΜΑΤΙΚΗ ΠΕΡΙΟΧΗ: Web Defense
ΛΕΞΕΙΣ ΚΛΕΙΔΙΑ: website fingerprinting, ιδιωτικότητα, ανωνυμία, subrequests, ALPaCA
To our families.
AKNOWLEDGMENTS
We would like to thank our supervisor, Prof. Konstantinos Chatzikokolakis, for his support, enthusiasm and the motivation he provided us with throughout this time. We also want to thank him for introducing and giving us the opportunity to delve into this interesting subject.
CONTENTS
PREFACE ... 12
1. INTRODUCTION ... 13
2. NGINX ... 14
2.1 What is NGINX? ... 14
2.2 The Basics of NGNIX ... 14
2.2.1 Configuration File ... 14
2.2.2 What is a NGINX Module? ... 15
3. ALPACA ... 21
3.1 General Idea ... 21
3.2 Deterministic ALPaCA ... 22
3.3 Probabilistic ALPaCA... 22
4. IMPLEMENTATION ... 23
4.1 Contributions ... 23
4.2 Module Implementation ... 24
4.2.1 Configuration File ... 24
4.2.2 NGINX Subrequests ... 29
4.2.3 Functionality (How it all ties together) ... 30
4.3 Rust Library Implementation ... 32
4.3.1 Inlining CSS Objects to HTML ... 32
4.3.2 Inlining Image Objects to HTML ... 33
4.4 Testing ALPaCA with Python ... 34
4.4.1 The Importance Behind the Tester ... 34
4.4.2 How the Tester Works ... 34
5. CHALLENGES ... 36
5.1 Communication Between Rust and C ... 36
5.2 Figuring NGINX Subrequests Workflow... 37
5.3 Building a Solid Tester... 38
6. CONCLUSION ... 39 ABBREVIATIONS - ACRONYMS ... 40 REFERENCES ... 41
LIST OF FIGURES
Figure 1: Simple Nginx Example Configuration ... 15
Figure 2: Nginx Module Configuration ... 16
Figure 3: Nginx Module Configuration Struct ... 16
Figure 4: Nginx Module Directives Declaration for C Implementation ... 17
Figure 5: Nginx Module Content Structure... 17
Figure 6: Nginx Module Definition Structure ... 18
Figure 7: Nginx Module Filter Initialization Function ... 19
Figure 8: Nginx Module Header Filter Example ... 19
Figure 9: Nginx Module Body Filter Example ... 20
Figure 10: Deterministic Object Padding Example ... 22
Figure 11: Nginx Configuration Example with ALPaCA Directives ... 27
Figure 12: Nginx Images Path Relocation Example ... 29
Figure 13: Linking C Structures with Rust Modules ... 36
PREFACE
The work for this thesis was done between August 2020 and June 2021 in Athens. The project was developed on Linux machines. The programming languages that were used are Rust and C and it was tested with the Nginx web server (v1.18.0). For the development of this project, it was of great importance to get familiar with the Nginx modules, the Rust programming language and the of Rust and C intercommunication.
Defense Extensions for Website Fingerprinting Attacks on Nginx Web Server
E. Dimitras - M. Xanthopoulos 13
1. INTRODUCTION
Anonymization techniques are often used to bypass country-level censorship or often avoid identification from another party. The Tor network -the most popular system nowadays that is used by millions of daily users- promises to hide the relationship between the sender of a message and its destination from a local observer. This is the entity that eavesdrops on the traffic between the sender and the first anonymization node.
It can be, for example, a local system administrator, an ISP, or everyone in the sending range of a signal if the user is connected via a wireless link. An entity with such capabilities is one of the weakest adversaries in the attacker model of this and other anonymization techniques.
The Website Fingerprinting (WFP) attack is a special case of traffic analysis. Performed by a local eavesdropper, it aims to infer information about the content (i.e., the website visited) of encrypted and anonymized connections by observing patterns of data flows. Here, the attacker merely utilizes meta information, such as packet size and direction of traffic, without breaking the encryption. This is accomplished by extracting features from the collected traffic and then these features are passed in a classifier. In the case of the Tor network, the dataset is way smaller than the general web, making such an attack highly effective.
To this point, most of these defenses have been designed to operate on the stream of network packets, making them extremely difficult to implement in practice.
In this thesis, we implement ALPaCA which is a server-side defense and very easily implementable. The way ALPaCA works is by changing the size of different objects requested by the clients which results in network data obscurity. This makes it hard for the adversary to accurately identify and classify the collected data.
Defense Extensions for Website Fingerprinting Attacks on Nginx Web Server
E. Dimitras - M. Xanthopoulos 14
2. NGINX
2.1 What is NGINX?
• It’s a high-performance, highly scalable, highly available web server, reverse proxy server and web accelerator.
• Offers a highly scalable architecture that is very different from that of Apache and other products that are used for the same purposes.
• Has a modular, event-driven, asynchronous, single-threaded architecture that scales extremely well on generic server hardware and across multi-processor systems.
• Uses all of the underlying power of modern operating systems, like Linux, to optimize memory, CPU, and network usage and extract the maximum performance out of a physical or virtual server.
This means that Nginx can often serve at least 10x more (and often 100-1000x more) requests per server compared to Apache.
In turn, that means more connected users per server, better bandwidth utilization, less CPU and RAM consumption.
2.2 The Basics of NGNIX
2.2.1 Configuration File
There are four contexts (called main, server, upstream, and location) that can contain directives with one or more arguments.
• Directives in the main context apply to everything
• Directives in the server context apply to a particular host/port
• Directives in the upstream context refer to a set of backend servers
• Directives in a location context apply only to matching web locations a (i.e., "/", "/images", etc.)
A location context inherits from the surrounding server context, and a server context inherits from the main context. The upstream context neither inherits nor imparts its properties; it has its own special directives that don’t apply elsewhere [9].
Defense Extensions for Website Fingerprinting Attacks on Nginx Web Server
E. Dimitras - M. Xanthopoulos 15
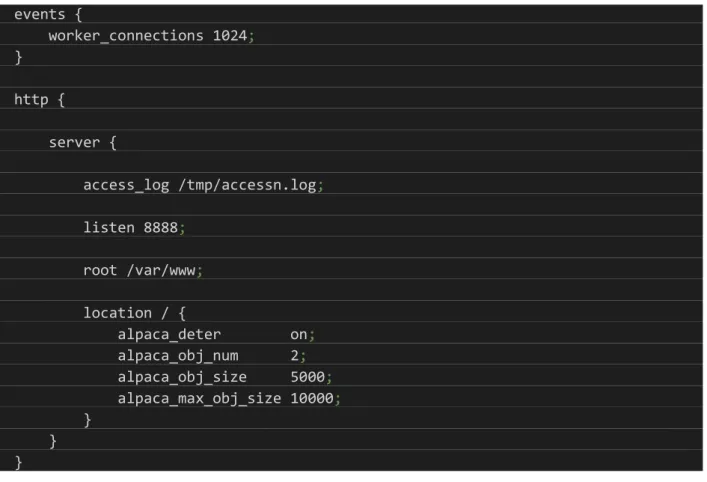
A typical configuration file looks like this: events {
worker_connections 1024;
} http {
server {
access_log /tmp/accessn.log;
listen 8888;
root /var/www;
location / {
alpaca_deter on;
alpaca_obj_num 2;
alpaca_obj_size 5000;
alpaca_max_obj_size 10000;
} } }
Figure 1: Simple Nginx Example Configuration
2.2.2 What is a NGINX Module?
Modules are responsible for every task associated with a web server. Nginx takes care of all the network and application protocols and sets up the eligible sequence of modules that will process the requests.
Nginx modules have three roles:
1. Handlers process a request and produce output 2. Filters manipulate the output produced by a handler
3. Load-balancers choose a backend server to send a request to, when more than one backend server is eligible
From serving a file to proxying a request to another server and from gzipping output to executing server-side include, there are handler and filter modules respectively that are doing the work.
Defense Extensions for Website Fingerprinting Attacks on Nginx Web Server
E. Dimitras - M. Xanthopoulos 16
The type of module that we are interested in in this thesis is the Filter module. Filters manipulate responses generated by Handlers. Filters are divided into two categories, Header filters and Body filters. Header filters manipulate the HTTP headers, while Body filters manipulate the response content.
The way filters are called is by using a “Chain of Responsibility” meaning that one filter is called, executes its task, then calls the next filter that executes its task respectively and so on until the final filter is called. Afterwards, Nginx finishes up the response. Multiple filters can hook into each location.
The filter chain works in a way that each filter doesn’t wait for the previous one to finish.
This means that a filter can process the previous one’s output as it’s being produced, kind of like the Unix pipeline. Filters operate on buffers, which are usually the size of a page (4K). For example, a response can begin to be compressed and be streamed to the client before the module receives the entire response from the backend.
A filter module consists of:
• The configuration file
• Module's implementation in C
Inside the config file, we state the name of our module, the fact that it belongs to the module group and lastly its source path. A typical config file looks like below:
ngx_addon_name = ngx_http_ModuleName_module
HTTP_MODULES = "$HTTP_MODULES ngx_http_ModuleName_module"
NGX_ADDON_SRCS = "$NGX_ADDON_SRCS $ngx_addon_dir/ngx_http_ModuleName_module.c"
Figure 2: Nginx Module Configuration
The C implementation consists of the following components:
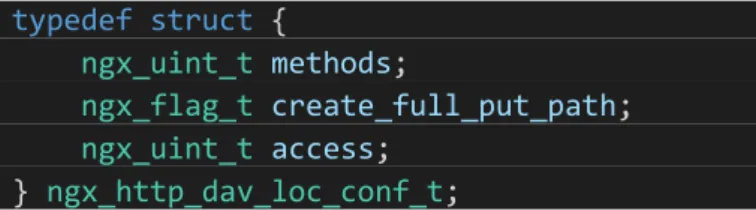
➢ Module Configuration Structs
They are populated by module directives and are responsible for keeping the data derived from those directives. There can be up to 3 of these structs. An example of such a struct is as follows:
typedef struct {
ngx_uint_t methods;
ngx_flag_t create_full_put_path;
ngx_uint_t access;
} ngx_http_dav_loc_conf_t;
Figure 3: Nginx Module Configuration Struct
Defense Extensions for Website Fingerprinting Attacks on Nginx Web Server
E. Dimitras - M. Xanthopoulos 17
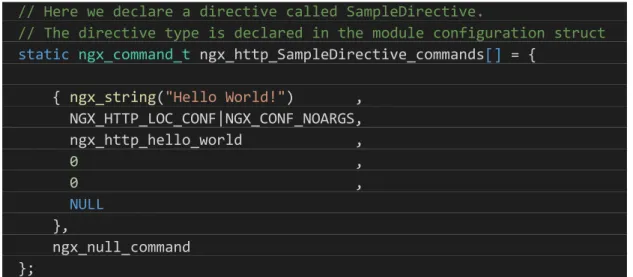
➢ Module Directives
They are assigned values inside the nginx.conf file. Inside the C implementation directives are declared like below:
// Here we declare a directive called SampleDirective.
// The directive type is declared in the module configuration struct static ngx_command_t ngx_http_SampleDirective_commands[] = {
{ ngx_string("Hello World!") , NGX_HTTP_LOC_CONF|NGX_CONF_NOARGS, ngx_http_hello_world , 0 , 0 , NULL
},
ngx_null_command };
Figure 4: Nginx Module Directives Declaration for C Implementation
➢ Module Content
It is a static ngx_http_module_t struct. It contains function references for creating the three configurations and merging them together. Most modules use the last 2 references. A typical module content struct looks like this:
static ngx_http_module_t ngx_http_ModuleName_module_ctx = { NULL, // preconfiguration NULL, // postconfiguration
NULL, // creating the main conf
// (i.e. do a malloc and set defaults)
NULL, // initializing the main conf // (i.e. override the defaults // with what’s in nginx.conf)
NULL, // create server configuration NULL, // merge server configuration
ngx_http_ModuleName_create_loc_conf, // create location configuration ngx_http_ModuleName_merge_loc_conf // merge location configuration };
Figure 5: Nginx Module Content Structure
The ngx_http_ModuleName_create_loc_conf is responsible for allocating memory for location-specific configuration while the ngx_http_ModuleName_merge_loc_conf is responsible for initialization, merging the configurations as well as throwing an error if the configuration is invalid which stops the server startup.
Defense Extensions for Website Fingerprinting Attacks on Nginx Web Server
E. Dimitras - M. Xanthopoulos 18
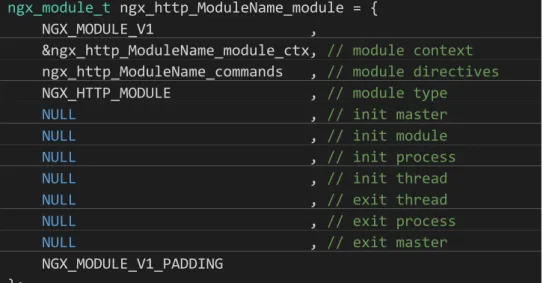
➢ Module Definition
It is a struct used for storing references of directives, context and the remaining callbacks such as exit process, thread, etc. This struct can also be used to look up data for a particular module. A typical module definition struct looks like so:
ngx_module_t ngx_http_ModuleName_module = { NGX_MODULE_V1 ,
&ngx_http_ModuleName_module_ctx, // module context ngx_http_ModuleName_commands , // module directives NGX_HTTP_MODULE , // module type
NULL , // init master NULL , // init module NULL , // init process NULL , // init thread NULL , // exit thread NULL , // exit process NULL , // exit master NGX_MODULE_V1_PADDING
};
Figure 6: Nginx Module Definition Structure
➢ Module Installation
The functions below apply to Filter modules only. They are executed in the post- configuration step. Both the Header and Body filters are installed at the same place.
The Header and Body filters consist of three basic steps:
• Decide whether to operate on this response
• Operate on the response
• Call the next filter
Filters are set up with a “Chain of Responsibility”. When a response is generated, two functions are called:
• ngx_http_output_filter, which calls the global function reference ngx_http_top_body_filter.
• ngx_http_send_header, which calls the global function reference ngx_http_top_header_filter.
Defense Extensions for Website Fingerprinting Attacks on Nginx Web Server
E. Dimitras - M. Xanthopoulos 19
We initialize the above references in the function ngx_http_sampled_filter_init which is defined as follows:
static ngx_int_t ngx_http_sample_filter_init(ngx_conf_t *cf) {
ngx_http_next_header_filter = ngx_http_top_header_filter;
ngx_http_top_header_filter = ngx_http_checkif_header_modified_filter;
ngx_http_next_body_filter = ngx_http_top_body_filter;
ngx_http_top_body_filter = ngx_http_counter_body_filter;
return NGX_OK;
}
Figure 7: Nginx Module Filter Initialization Function
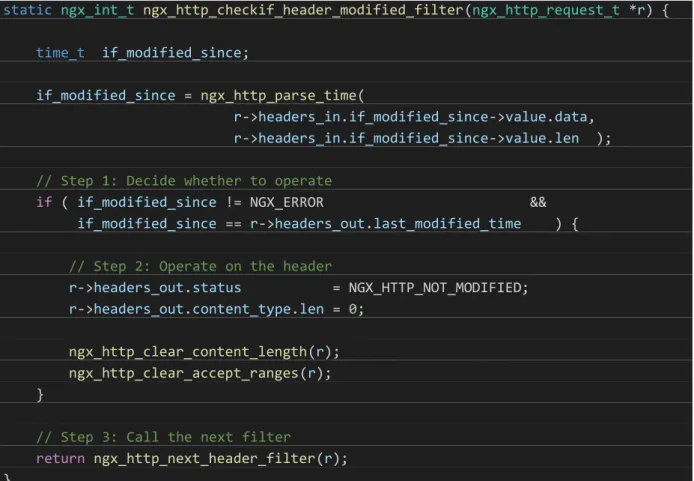
A typical Header filter may look like the one below:
static ngx_int_t ngx_http_checkif_header_modified_filter(ngx_http_request_t *r) { time_t if_modified_since;
if_modified_since = ngx_http_parse_time(
r->headers_in.if_modified_since->value.data, r->headers_in.if_modified_since->value.len );
// Step 1: Decide whether to operate
if ( if_modified_since != NGX_ERROR &&
if_modified_since == r->headers_out.last_modified_time ) {
// Step 2: Operate on the header
r->headers_out.status = NGX_HTTP_NOT_MODIFIED;
r->headers_out.content_type.len = 0;
ngx_http_clear_content_length(r);
ngx_http_clear_accept_ranges(r);
}
// Step 3: Call the next filter
return ngx_http_next_header_filter(r);
}
Figure 8: Nginx Module Header Filter Example
Defense Extensions for Website Fingerprinting Attacks on Nginx Web Server
E. Dimitras - M. Xanthopoulos 20
A typical Body filter may look like the one below:
static ngx_int_t ngx_http_counter_body_filter( ngx_http_request_t *r , ngx_chain_t *in ) {
ngx_chain_t *cl;
ngx_http_counter_filter_ctx_t *ctx;
static int filter_call_counter = 0;
// Step 1: Necessary most of the time to load module data
ctx = ngx_http_get_module_ctx(r, ngx_http_counter_filter_module);
if (ctx == NULL) {
ctx = ngx_pcalloc(r->pool, sizeof(ngx_http_counter_filter_ctx_t));
if (ctx == NULL) { return NGX_ERROR;
}
ngx_http_set_ctx(r, ctx, ngx_http_counter_filter_module);
}
// Step 2: Operate on the body filter_call_counter += 1
// Step 3: Call the next filter
return ngx_http_next_body_filter(r, in);
}
Figure 9: Nginx Module Body Filter Example
All in all, a typical Nginx processing cycle goes as follows: 1. Client sends HTTP request
2. Nginx chooses the appropriate handler based on the location config 3. Load-balancer picks a backend server (if applicable)
4. Handler does its job and passes each output buffer to the first filter 5. First filter passes the output to the second filter
6. Second to third 7. Third to fourth 8. ...
9. Final response is sent back to client
Defense Extensions for Website Fingerprinting Attacks on Nginx Web Server
E. Dimitras - M. Xanthopoulos 21
3. ALPaCA
3.1 General Idea
ALPaCA is a very simple yet effective server-side defense. As mentioned earlier the need for such a tool has arisen because to this point, most of these defenses have been designed to operate on the stream of network packets, making it extremely difficult to implement in practice. The reason for this is that for these defenses to be implemented we would have to make changes to the network layer protocols. Instead, ALPaCA alters the sizes of different objects as well as adding its own fake ones within a page resulting in the obscurity of the real traffic between the client and the server.
The way this padding is done is namely for:
• HTML/CSS
By adding random data in the form of comments.
• Images/GIFs/etc.
By adding random bytes at the end of them which doesn't alter them in any undesirable way.
There are two versions of ALPaCA that we can use to decide the padding size. The Probabilistic ALPaCA and the Deterministic ALPaCA.
Although the underlying idea between the two is the same, they differ in efficiency since the Probabilistic version adds more random objects in the equation making it way harder for the adversary to make predictions.
Despite their differences, both versions work by deciding a unique target size T for every single object within a page (i.e. HTML, CSS, images, etc.). Then the original objects are padded to match this target size. In case the number of desired objects is larger than the original object count, then fake ALPaCA objects are created and added to the HTML, thus increasing obscurity.
Defense Extensions for Website Fingerprinting Attacks on Nginx Web Server
E. Dimitras - M. Xanthopoulos 22
3.2 Deterministic ALPaCA
The way this version of ALPaCA works, is by providing 3 parameters:
• λ The number of desired objects in the page.
• σ Defines the target size of an object. If the real object size is greater than σ then we find a multiple of σ that is greater than the real object size.
• max(s) Defines the maximum target size we can get while getting multiples of σ.
Must be a multiple of σ.
let max(s) = 3 ⋅ σ
if real_object_size > σ then
The maximum multiple of σ we can get for a target size is 3 ⋅ σ
if real_object_size > max(s) then
We keep the original size as target size
Figure 10: Deterministic Object Padding Example
For fake ALPaCA objects, their size is randomly in {σ, 2σ, 3σ, ... , max(s)}. The HTML is padded at a multiple of σ as with other objects.
3.3 Probabilistic ALPaCA
The way this version of ALPaCA works is by also providing 3 parameters:
• Dn A distribution that defines the final number of objects the page is going to have
• Dh A distribution that defines the final HTML size
• Ds A distribution that defines the size for each of the objects
This version of ALPaCA operates by first sampling an HTML target size from the Dh distribution, a number of desired objects from the Dn distribution, and a size for each of the objects from the Ds distribution. Thereafter, it tries to morph the page to the target size and if it fails the whole procedure is repeated. Since a distribution can produce very large target sizes, an upper limit is provided for the target size. Setting a low bandwidth to avoid very big pages can be detrimental since the page will not be able to be morphed to a size that would resemble a larger page.
Defense Extensions for Website Fingerprinting Attacks on Nginx Web Server
E. Dimitras - M. Xanthopoulos 23
4. IMPLEMENTATION
ALPaCA is implemented as a Rust library along with a C module for Nginx that uses the library to add the ALPaCA protection to the website that is running, according to the selected ALPaCA version. Rust was selected because it works very well along with C code. Our C module uses some implemented Rust functions that allow us to manipulate the page and its objects. Both Rust and C share a map structure that maps the different object names to object content. To make this possible, we use CMAKE to compile the map.c code and also link it with Rust.
4.1 Contributions
This thesis is an extension of Panagiotis Kokkinakos thesis [1]. Here, we introduce some new features we implemented which enhance security and provide some new useful functionalities.
The most important among them are subrequests. Nginx subrequests are a very powerful feature that allows us to return the result of a different URL than what was originally requested. This gives us the ability to have multiple local redirections for each type of object (i.e. images, CSS, JS files etc.), predetermined in the Nginx configuration file, regardless of what URLs we seemingly use for requesting these objects. Having such an ability to redirect root paths of the objects, strengthens the security and provides another security level to the server as well as allowing for more flexibility for Nginx configuration.
We cover more extensively this feature in section 4.2.2.
Another addition we made is that we inserted the option to enable object inlining inside the HTML file. We provide CSS and Image object inlining. Inlining an object means that we replace the existing reference with its contents inside the HTML itself. We analyze this addition further in section 4.3.
Moreover, we added three new directives for the Nginx configuration for handling the inlining options we described above. More details can be found in section 4.2.1.
Finally, we created a python quality tester that can evaluate every possible ALPaCA configuration along with its directives. This tester is for developing purposes and can be used to examine if all code changes, improvements and additions work as intended. We further elaborate on the topic in section 4.4.
Defense Extensions for Website Fingerprinting Attacks on Nginx Web Server
E. Dimitras - M. Xanthopoulos 24
4.2 Module Implementation
4.2.1 Configuration File
ALPaCA directives for the configuration file are explained below:
• alpaca_prob
ALPaCA version Probabilistic Possible values on / off
Role This parameter is responsible for the activation/deactivation of the Probabilistic version of ALPaCA
• alpaca_deter
ALPaCA version Deterministic Possible values on / off
Role This parameter is responsible for the activation/deactivation of the Deterministic version of ALPaCA
• alpaca_obj_num
ALPaCA version Deterministic Possible values an integer value
Role
This parameter is responsible for the previously mentioned λ parameter which defines the final number of objects within the requested page
• alpaca_obj_size
ALPaCA version Deterministic Possible values an integer value
Role
This parameter is responsible for the previously mentioned σ parameter which defines the sizes of the padded objects within the requested page. Each object’s size will be a multiple of this value
Defense Extensions for Website Fingerprinting Attacks on Nginx Web Server
E. Dimitras - M. Xanthopoulos 25
• alpaca_max_obj_size
ALPaCA version Deterministic Possible values an integer value
Role
This parameter is responsible for the previously mentioned max(s) parameter which defines the maximum object size of the padded objects within the requested page. It must be a multiple of σ (alpaca_obj_size)
• alpaca_dist_html_size
ALPaCA version Probabilistic
Possible values (known distribution from the list below)
Role This parameter is responsible for sampling the HTML size
• alpaca_dist_obj_num
ALPaCA version Probabilistic
Possible values (known distribution from the list below)
Role This parameter is responsible for sampling the number of objects within the page
• alpaca_dist_obj_size
ALPaCA version Probabilistic
Possible values (known distribution from the list below)
Role This parameter is responsible for sampling the size of each object within the page
Defense Extensions for Website Fingerprinting Attacks on Nginx Web Server
E. Dimitras - M. Xanthopoulos 26
• alpaca_use_total_obj_size
ALPaCA version Probabilistic
Possible values (known distribution from the list below)
Role This parameter is responsible for sampling the size of the whole page HTML + objects
• alpaca_obj_inlining_enabled (NEW) ALPaCA version Both versions
Possible values on / off
Role
This parameter is responsible for the activation/deactivation of the object embedding. If set to off, ALPaCA will try to have a number of final objects which is a multiple of alpaca_obj_num or alpaca_dist_obj_size (depending on the version) which is greater than or equal to the original object number within the requested page
• alpaca_css_as_inline_object (NEW) ALPaCA version Both versions
Possible values on / off
Role
This parameter is responsible for the activation/deactivation of considering CSS files as objects that can be inlined. If turned off, then when alpaca_obj_inlining_enabled is enabled, the algorithm will ignore all CSS files
• alpaca_force_css_inlining (NEW) ALPaCA version Both versions
Possible values on / off
Role
This parameter is responsible for the activation/deactivation of the CSS embedding. If turned on, then all CSS files are forcibly inlined. If left off then they are considered as objects within the requested page and they are padded or inlined.
The objects within these CSS files though are not padded or inlined (i.e. images, GIFs, etc.)
Defense Extensions for Website Fingerprinting Attacks on Nginx Web Server
E. Dimitras - M. Xanthopoulos 27
The known distributions for the above distribution parameters are the following:
• LogNormal / mean, std_dev2
• Normal / mean, std_dev2
• Exp / lambda
• Poisson / lambda
• Binomial / n, p
• Gamma / shape, scale
Instead of a distribution, a file can be provided that contains possible values and a probability for each value in ascending probability order.
Finally, ALPaCA can be used in both server and location contexts. It can be used along with fastcgi_pass (for dynamic content) and proxy_pass (for proxying upstream servers), but only if the embedded images are static and accessible locally.
load_module test/build/nginx-1.18.0/objs/ngx_http_alpaca_module.so;
error_log /tmp/errorn.log;
pid /tmp/nginx.pid;
events {
worker_connections 1024;
} http {
include ../build/nginx-1.18.0/conf/mime.types;
client_body_temp_path /tmp/client_body;
fastcgi_temp_path /tmp/fastcgi_temp;
proxy_temp_path /tmp/proxy_temp;
scgi_temp_path /tmp/scgi_temp;
uwsgi_temp_path /tmp/uwsgi_temp;
server {
access_log /tmp/accessn.log;
listen 8888;
root test/html/images;
Defense Extensions for Website Fingerprinting Attacks on Nginx Web Server
E. Dimitras - M. Xanthopoulos 28
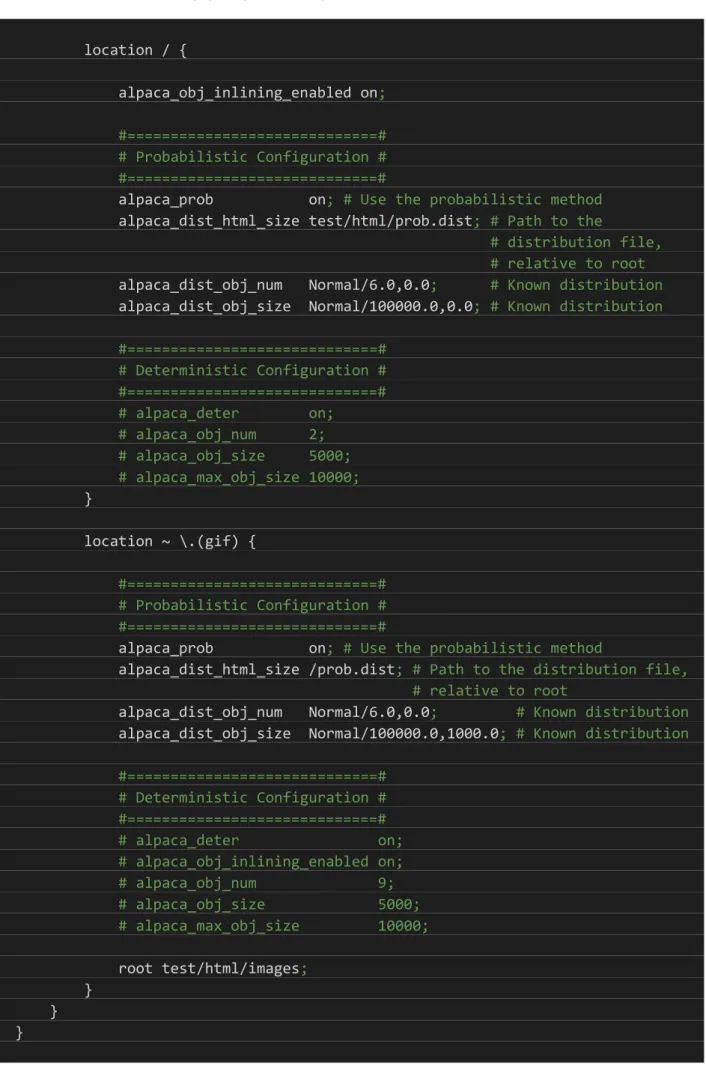
location / {
alpaca_obj_inlining_enabled on;
#=============================#
# Probabilistic Configuration # #=============================#
alpaca_prob on; # Use the probabilistic method alpaca_dist_html_size test/html/prob.dist; # Path to the
# distribution file, # relative to root alpaca_dist_obj_num Normal/6.0,0.0; # Known distribution alpaca_dist_obj_size Normal/100000.0,0.0; # Known distribution
#=============================#
# Deterministic Configuration # #=============================#
# alpaca_deter on;
# alpaca_obj_num 2;
# alpaca_obj_size 5000;
# alpaca_max_obj_size 10000;
}
location ~ \.(gif) {
#=============================#
# Probabilistic Configuration # #=============================#
alpaca_prob on; # Use the probabilistic method
alpaca_dist_html_size /prob.dist; # Path to the distribution file, # relative to root
alpaca_dist_obj_num Normal/6.0,0.0; # Known distribution alpaca_dist_obj_size Normal/100000.0,1000.0; # Known distribution
#=============================#
# Deterministic Configuration # #=============================#
# alpaca_deter on;
# alpaca_obj_inlining_enabled on;
# alpaca_obj_num 9;
# alpaca_obj_size 5000;
# alpaca_max_obj_size 10000;
root test/html/images;
} } }
Figure 11: NGINX Configuration Example with ALPaCA Directives
Defense Extensions for Website Fingerprinting Attacks on Nginx Web Server
E. Dimitras - M. Xanthopoulos 29
4.2.2 NGINX Subrequests
As described before, subrequests are a great Nginx feature that enhance the security of the server with the functionality they provide. They also allow our implementation to use the feature of object location redirection, also known as “Internal Redirects” along with the security improvements that ALPaCA offers. More specifically, local redirections mean that we can change the root paths for any of the objects regardless of what the server’s main root path is and yet serve all requests to these objects like they are located in the root path hiding the relocation from the web.
What actually happens, is that when an HTML, CSS, etc. contains some URLs pointing to objects in our server, doesn’t mean that they are under the path which is visible in the web, but they can be under different paths that only Nginx can reach. These alternative paths or redirections are defined in Nginx configuration files.
In our C module, for example, we have to obtain the contents of the objects by using subrequests. They effectively allow Nginx to find the files and return the contents as a request, one for each file, which in turn enables us to save said contents to a map structure used later in Rust. We can perform multiple subrequests and combine the outputs into a single response when needed as well. Below, we give a more detailed example of the need and the use of subrequests in Rust modules.
In ALPaCA's previous implementation, to pad a file, ALPaCA had to obtain its content to determine the padding size as well as adding the padding itself. This was done by manually opening the file through Rust and reading its content. While this might work when our files are under the root folder, it will not work when there are path redirections for certain types of objects.
...
root /var/www/html
location ~ \.(jpg) {
root /var/www/html/images;
} ...
Figure 12: NGINX Images Path Relocation Example
The above configuration sets the path of .jpg files to be under images folder. Rust wouldn’t be aware of that, because it is being handled internally by Nginx. To handle situations like this, we used Nginx subrequests to get the file contents before calling any Rust functions for padding or calculating the size.
Defense Extensions for Website Fingerprinting Attacks on Nginx Web Server
E. Dimitras - M. Xanthopoulos 30
At first, we perform a HTML search to find all internal to-be-requested objects and then we make a subrequest for each one of them.
Thereafter, we store their contents inside a map structure we have created that maps file names to contents.
Finally, when we call the corresponding functions for padding and size managing, we pass this map structure to the Rust functions instead of providing them with the file paths.
Hence, this allows Rust to get the file contents directly, without having to mess with file opening and file management.
4.2.3 Functionality (How it all ties together)
Our C module works by mainly using a Header filter and a Body filter. The Header filter is responsible for manipulating the header of a request while the Body filter is responsible for manipulating the body of the request.
The Header filter’s functionality is basically to force the browser to load a file that in actuality doesn’t exist and also accept the response we send back for this specific file.
This fake file is the __alpaca_fake_image.png and is responsible for obscuring the traffic between the client and server.
Since this particular image is a fake ALPaCA image and is nowhere to be found in the file system, Nginx returns a 404 status, meaning that it couldn’t be found. Although that is the case, we know that this image was created on the fly while the module was running and so we use the header filter to change the status to 200 which means that this image exists.
The Body filter is responsible for all other module functionalities. Specifically, if the response is a HTML file, we collect the whole response in a buffer and determine which version of ALPaCA to use, according to the arguments of the directives. We also use a struct called MorphInfo which we use to save important information, like the original HTML response, the HTML size, parameters for the specific ALPaCA version, etc.
Afterwards, if the parameter alpaca_css_inlining_enabled is on we search for every CSS file inside the HTML. After we find those files, we do a subrequest for each one of them to get their contents.
Defense Extensions for Website Fingerprinting Attacks on Nginx Web Server
E. Dimitras - M. Xanthopoulos 31
Instead, if the parameter alpaca_css_inlining_enabled is off or there are no CSS files to be found, we search the HTML for any other objects like images, GIFs, etc. After we find them, we do a subrequest for every single one of them to get their contents.
Finally, we return an empty response because the subrequests must be completed first so that we can pad the objects within the page.
If there are no subrequests, meaning the page has no paddable objects, then we simply pad the HTML and return the response.
If the response comes from a subrequest, we create a new entry to the map structure.
Once we reach the last subrequest we do the following:
• If the requested file is CSS
o Firstly, we inline the contents of every CSS file we have collected into the HTML response
o We then perform a HTML search to find all objects that will be requested
o Lastly, we make a subrequest for each one of those files
• If the requested file is any other HTML object
o We morph the HTML page by finding every object inside it, calculating its final size after padding it and finally changing its reference to look like below using an image reference as an example:
<img src="image1.png">
But by morphing it the ALPaCA GET parameter is being added and the morphed image looks like this:
<img src="image1.png?alpaca-padding=10000">
This means that the image1.png will be padded until it reaches a size of 10000 bytes.
If the response is a fake image, we set its status to 200 (which means found) and then we get the padding for this image which is determined by the selected ALPaCA version.
Afterwards, we return this padding as a response to the requested fake image (since this image has no original size, the padding is equal to the alpaca-padding GET parameter).
If the response is a paddable object we call the Rust function which is responsible for padding the objects and after getting the padded response we return it. If any kind of error occurs during the morphing, we pass the original response to the next filter.
Defense Extensions for Website Fingerprinting Attacks on Nginx Web Server
E. Dimitras - M. Xanthopoulos 32
4.3 Rust Library Implementation
4.3.1 Inlining CSS Objects to HTML
During the previous ALPaCA implementation, the CSS elements of the requested HTML were padded. Although that was the case, the elements inside those CSS files (i.e. images, links, etc.) were not padded and they were being sent to the client with their original size despite ALPaCA being activated.
Another problem was that we had to pad the CSS and its elements during the handling of the HTML request. To resolve this, we inline the requested CSS objects inside the HTML itself.
For example, if the HTML contains a link like the one below:
<head>
<link rel="stylesheet" href="style.css">
</head>
we replace this link with the CSS contents as follows:
<head>
<style>
body {
background-image: url("image.jpg");
background-color: lightblue;
}
h1 {
color : navy;
margin-left: 20px;
} </style>
</head>
Now that the requested CSS is embedded in the HTML, we do an HTML search for every to-be-requested element such as the "image.jpg" above and we pad it accordingly to the original way of padding.
We have implemented this feature to be optional and can be enabled/disabled from the Nginx configuration.
Defense Extensions for Website Fingerprinting Attacks on Nginx Web Server
E. Dimitras - M. Xanthopoulos 33
4.3.2 Inlining Image Objects to HTML
In ALPaCA's previous implementation if we were given a desirable number of final objects smaller than the actual objects contained in the requested HTML, then ALPaCA would try to find a final object number that is a multiple of the given desired number of objects. For example, if the desired number of objects was 3 and the actual object number was 5 then ALPaCA would return 6 as the final object number.
To allow for a desired object number, that is smaller than the actual object number and also give the ability to the owner of the server to reduce the overall size of the data, we randomly embed some of the to-be-requested images inside the HTML until the actual object number and the desired object number become equal.
Considering the following example, we have an HTML index file:
<img src="q1.jpg">
<img src="q2.jpg">
<img src="q3.jpg">
<img src="q4.jpg">
<img src="q5.jpg">
As we can see the actual number of objects is 5. If the desired number of objects is 3, we will embed the first 2 images to the HTML as shown below:
<img src="data:image/jpg;base64,(base64_data)>
<img src="data:image/jpg;base64,(base64_data)>
<img src="q3.jpg">
<img src="q4.jpg">
<img src="q5.jpg">
This effectively reduces the overall data size.
This feature is also optional and can be enabled/disabled from the Nginx configuration.
Defense Extensions for Website Fingerprinting Attacks on Nginx Web Server
E. Dimitras - M. Xanthopoulos 34
4.4 Testing ALPaCA with Python
We developed a software tester that would test every configuration directive, their combinations and functionality of the C module as well as the Rust library. To build this tester we used python along with the selenium package.
4.4.1 The Importance Behind the Tester
This tester is a handful tool for developers that would like to extend ALPaCA module and add new features. They will be able to test their changes quickly yet effectively for errors and misconfigurations.
The necessity for developing this tester occurred because of the extensive code and the various changes we had to make in order to incorporate the new features and extend the existing functionality of ALPaCA. Changes we made were affecting multiple directives at once, so testing them by hand was error-prone, time consuming and not productive at all.
4.4.2 How the Tester Works
This tester is automated and examines whether the ALPaCA code follows the rules and functions as expected. It works by running ALPaCA with many predefined configurations that are made to test the different parameters and functionalities, based on a sample index page we created for such purpose.
We have produced a set of 23 test cases, that combine the directives in multiple ways.
For example, having a configuration with the object inlining enabled, we separately verify if it operates correctly when it is combined with the other directives related to it like alpaca_css_as_inline_object and alpaca_force_css_inlining.
We have calculated the expected number of objects that should be produced and returned by ALPaCA based on the sample website for each one of the 23 configurations and we perform tests on the code expecting these values to remain the same, no matter what changes we make on it.
To run a configuration for ALPaCA, we have to run a Nginx server and make requests to it. Though to run a different configuration we have to restart the server as well as switching the current configuration with the next one.
Defense Extensions for Website Fingerprinting Attacks on Nginx Web Server
E. Dimitras - M. Xanthopoulos 35
For every instance run we check the following conditions:
• If the website has been successfully loaded
• If the correct number of images has been inlined
• If the correct number of fake images has been created
• If the correct number of CSS files has been returned
• If the expected target size of the received objects is the same as the actual size (If they are equal, means that the objects are padded correctly)
To retrieve the data we need from the website, we use Selenium. Selenium offers a simple way to retrieve the whole website (the requested page as well as its dependencies), meaning that we do not have to do it manually as we would with the python requests package.
The way we retrieve data for the main site and its dependencies is through events (otherwise called browser logs) that represent the packets that are received from the server. Logs are represented in JSON format.
There are 3 types of logs we are interested in:
1. Network.responseReceived It is responsible for letting us know whether the requested URL was successfully retrieved as well as its status (200: Found, 404: Not Found, etc).
2. Network.dataReceived It shows us the chunk size of a received packet for a specific file. For example, if we request a file with a size of 1000 bytes, instead of receiving it all at once, the browser receives a stream of data packets meaning that the file will be split into smaller chunks
(i.e. 1st chunk → 400B, 2nd chunk → 400B, 3rd chunk → 200B). 3. Network.loadingFinished It shows us the chunk size of a received packet as
encoded data for a specific file. It works exactly as Network.dataReceived but the size we get is the size of the chunk before decoding objects.
Defense Extensions for Website Fingerprinting Attacks on Nginx Web Server
E. Dimitras - M. Xanthopoulos 36
5. CHALLENGES
In this section, we will describe the challenges we faced during the Nginx module and the Rust library implementation.
5.1 Communication Between Rust and C
The main challenge we faced, involves the communication between Rust and C languages and the way we could share objects and data between them.
At first, we had Rust modules open and get object contents directly from the root folder, but this method is not eligible to use some Nginx features, like Location Redirection. This means that we couldn’t have the objects in folders other than root.
Therefore, we had to implement subrequests, that allowed us to make use of this feature and remove unnecessary file manipulation from Rust modules. But then, we faced the problem of passing the contents of the retrieved objects by C to Rust modules for padding them.
The solution was to create a hash table that maps the object names to their contents as we encounter them from the subrequests.
Finally, we had to pass this hash table to the Rust module to pad the contents which was the main challenging part.
The solution was to use CMAKE to compile the map.c code and also externally link it with Rust as follows:
pub type Map = *mut map;
#[link(name = "map", kind = "static")]
extern "C" {
fn map_get(m: Map, key: *const libc::c_char) -> *mut libc::c_void;
}
Figure 13: Linking C Structures with Rust Modules
Defense Extensions for Website Fingerprinting Attacks on Nginx Web Server
E. Dimitras - M. Xanthopoulos 37
5.2 Figuring NGINX Subrequests Workflow
The need to use Nginx subrequests arose because previously ALPaCA had to know the file location within the server and couldn’t work with a configuration that redirects locations for specific types of objects, as described in chapter 4.2.2.
That happened because only Nginx knew the relocation path for .jpg images and there was no way for the C module to acquire this information. Subrequests allowed us to receive the contents of these objects within the C module.
The greatest challenge by using subrequests, was to make Nginx’s unsynchronized request processing synchronized, meaning that we had to “wait” for all subrequests to finish in order to be able to morph the HTML. Since the subrequests were made when the response for the HTML was being processed and had to be sent back in the Body filter made this task quite difficult.
There is no wait function in Nginx so naturally, we couldn’t do the following: 1. Body filter is called for HTML response
2. Make the sub-requests 3. Wait for them to finish 4. Morph the HTML
5. Send the response back
So, what we finally did instead was:
1. Body filter is called for HTML response 2. Make the sub-requests
3. Send back an empty response for the HTML
4. When we reach the last sub-request then call the morph function for the HTML 5. Send back the morphed HTML response when the last sub-request returns
Defense Extensions for Website Fingerprinting Attacks on Nginx Web Server
E. Dimitras - M. Xanthopoulos 38
5.3 Building a Solid Tester
Another challenge was building the tester that would test our application from the client’s side. To do this we had to decide what programming language to use and how to make requests through this language. We concluded that using python would provide the easiest way to implement such a tool.
For making requests we used Selenium and Chromium, tools that provided us with easier ways to request the whole website, calculate page and file sizes and overall have a cleaner interface. The tester works very simply but makes it a lot easier to test different functionalities when making code adjustments within the module and the library.
One of the challenges with building such a tester occurred from having to run multiple configurations without having to restart the tester each time. For these configurations to be able to work in every Linux system as well as with non-root users, we had to make them independent from any system path or file. To achieve this, we changed every system path that is set by Nginx during compilation to different paths in /tmp that are not going to mess with the system files and also are not going to be permanent. We also don’t need root permissions to open those files. To run different configurations with the tester we had to run multiple instances of the Nginx server sequentially. Meaning we have to kill the current instance and re-run it with a different configuration. Configurations are chosen from a dictionary that maps different config names to their respective paths.
The hardest part about using Selenium was to calculate the received data size and check whether a file was successfully found or not. To do that we had to retrieve the browser logs, then parse them as JSON and lastly search for the different parameters required to accomplish our goals. Calculating the received data size was particularly challenging since a file is received in chunks that we have to combine to get the final size. Firstly, we had to find under what parameter the chunks were stored in the JSON struct we retrieved from the browser logs. Secondly, since the chunks of the different files are received in mixed order and at the same time, we had to categorize each chunk correctly for each file. Finally, we combine the categorized chunks to calculate the sizes of the requested files respectively.
Defense Extensions for Website Fingerprinting Attacks on Nginx Web Server
E. Dimitras - M. Xanthopoulos 39
6. CONCLUSION
As we know, website fingerprinting attacks on .onion websites are extremely potent and dangerous since a .onion website can be identified with 90% accuracy more than regular websites. Tor network was created based on the principle of anonymity and the right to free speech. Fingerprinting attacks violate those values and so there is a dire need for protecting the network’s users.
In that regard, we implemented ALPaCA as a Rust library along with a Nginx C module that uses this library as a very simple and easy-to-use server-side defense mechanism.
Its simplicity comes down to the fact that the user doesn’t have to do anything to reap the benefits of the added protection. Despite being so simple, ALPaCA offers satisfying results approximately reducing the accuracy of WFP attacks to 1/6 of what it would be without it.
Defense Extensions for Website Fingerprinting Attacks on Nginx Web Server
E. Dimitras - M. Xanthopoulos 40
ABBREVIATIONS - ACRONYMS
ALPaCA Application Layer Padding Concerns Adversaries CSS Cascading Style Sheets
GIF Graphics Interchange Format HTML HyperText Markup Language HTTP HyperText Transfer Protocol JSON JavaScript Object Notation
NGINX Engine-X
WFP Website Fingerprinting
Defense Extensions for Website Fingerprinting Attacks on Nginx Web Server
E. Dimitras - M. Xanthopoulos 41
REFERENCES
[1] P. Kokkinakos, “Defense Implementation for Website Fingerprinting Attacks on Nginx Web Server”, Bachelor’s Thesis, Department of Informatics & Telecommunications, National and Kapodistrian University of Athens, 2019.
[2] G. Cherubin, J. Hayes, and M. Juarez, “Website Fingerprinting Defenses at the Application Layer”. In Proceedings on Privacy Enhancing Technologies 2017, doi:10.2307/j.ctt7s8xg
[3] A. Panchenko, F. Lanze, A. Zinnen, M. Henze, J. Pennekamp, K. Wehrle, and T. Engel, “Website Fingerprinting at Internet Scale”, University of Luxembourg, RheinMain University of Applied Sciences, RWTH Aachen University 2016, doi:10.14722/ndss.2016.23477
[4] D. DeJonghe, “NGINX Cookbook”, O’Reilly Media, Inc., 1005, US, November 2020 [5] D. Usama, “Nginx Module Extension”, Packt Publishing, December 2013
[6] P. Sirinam, M. Imani, M. Juarez and M. Wright, “Deep Fingerprinting: Undermining Website Fingerprinting Defenses with Deep Learning”, CCS ’18, October 15–19, 2018, Toronto, ON, Canada, doi:10.1145/3243734.3243768
[7] A. Hintz, “Fingerprinting Websites Using Traffic Analysis", The University of Texas at Austin, USA, 2003, doi:10.1007/3-540-36467-6_13
[8] A. Panchenko, L. Niessen, A. Zinnen, and T. Engel, “Website Fingerprinting in Onion Routing Based Anonymization Networks”, In Proceedings of the 10th ACM Workshop on Privacy in the Electronic Society, pages 103–114, 2011, doi:10.1145/2046556.2046570
[9] E. Miller, “Emiller’s Advanced Topics In Nginx Module Development”, August 2009
[10] E. Miller, “Emiller’s Guide to Nginx Module Development”, August 2017