Francisco Duarte Brites
Licenciado em Conservação e Restauro
Analysis and Treatment of a male
portrait in oil and a study of the size
layer with reconstructions from Vibert’s
recipe (1892)
Dissertação para obtenção do Grau de Mestre em
Conservação e Restauro
Orientador: Doutora Leslie Anne Carlyle, Associate
Professor, Faculdade de Ciências e Tecnologia,
Universidade Nova de Lisboa
Co-orientador: Doutora Isabel Pombo Cardoso,
Investigadora, Faculdade de Ciências e Tecnologia,
Universidade Nova de Lisboa
Júri:
Presidente: Doutora Maria João Seixas de Melo Arguente: Doutora Maria Cunha Matos Lopes Pinto Aguiar
Vogal: Doutora Leslie Anne Carlyle
Analysis and Treatment of a male portrait in oil and a study of the size layer with
reconstructions from Vibert’s recipe (1892)
Copyright © Francisco Duarte Brites, Faculdade de Ciências e Tecnologia, Universidade Nova de Lisboa.
ACKNOWLEDGMENTS
‘’It always seems impossible until it’s done.’’– Nelson Mandela
Throughout this year, there was a feeling that such project was impossible to be complete, but thanks to people that I met, who taught me and made me grow both professionally and personally, I
can finally say: it’s done. I have to thank in particular:
Primarily, I would like to give the biggest and most sincere thanks to a person that I admire a lot: my supervisor Leslie Carlyle, for her work, knowledge, and enthusiasm. Her attention and support were crucial, since that was what kept me going to do bigger and better. Her pleasant words were constantly motivating me. It has been a great honour to work by your side and to be one of your
Master’s students.
To my co-supervisor Isabel Pombo Cardoso, for always being very logical and providing lucid comments throughout this year. Her generous guidance during analysis was very important and I am very grateful. Besides the work of this project, I had entertaining moments which always cheered me up.
Raquel Marques, my ‘’twin sister’’, who always read my thoughts and made the hours spent in the
laboratory much more hilarious. I enjoyed every moment we had to share ideas as well as creating good relationships. I hope to continue having your friendship.
To my colleagues Sara and Leonor, we always supported each other’s work and during moments of frustration, one of us always had the capability of making the others laugh. I hope you enjoyed this year as much as I did.
This project could not have been done without the opportunity conceived by Colecção Caixa Geral de Depósitos. Special thanks to Isabel Corte-Real and Inês Dias for the information provided and for allowing me to know better the collection displayed in storage.
To José Rodrigues, Ana Alves and Sara Santos from Instituto Superior de Agronomia, for their generosity, interest and help during pyrolysis analysis.
To the doctoral students, in specific Marta, Vanessa, Tatiana, Élia, Diogo, Joana, Susana and Sara Babo for the wise advices and for the laughs when most needed.
To the professors from the DCR: Professor Maria João Melo, for the availability to accomplish µ-FTIR analysis, as well as the precise advices given and for the passion and accurateness of teaching us students; Professor Márcia Vilarigues for the support and interesting discussions.
To Ana Maria who helped me during these five years when I needed. Her smile and nice words always have the capacity of enriching the day of anybody.
To my best friends Ana Sabala and Nadine, for all the support, moments, friendship and laughs we take with us from these years in Faculty. And of course to my friends Escada, Artur, André, Horta, Mariana, Marta, Sara and Mafalda. The best five years of my life were spent with all of you, by constantly sharing true friendship and remarkable moments. I wish the best of the successes to each and every one of you throughout the upcoming years.
To my family, especially my parents and brother, that were constantly supporting and encouraging me (especially when I was frustrated). Your unconditional love and strength was very important this year and I hope I made you proud.
RESUMO
Este projecto de tese focou-se no estudo e tratamento de um retrato masculino a óleo, do início do século XX, pertencente à Colecção Caixa Geral de Depósitos, Lisboa, Portugal. O retrato de Januário Correia de Almeida apresenta um rasgão (aproximadamente 4.0cm por 2.3cm) juntamente com perdas das camadas pictóricas no canto superior direito, onde é possível observar uma camada de encolagem com uma espessura fora do vulgar (aproximadamente 50 mícrons) e a tela de trama invulgarmente aberta. As camadas de encolagem, feitas de cola animal, por serem susceptíveis às flutuações de humidade relativa (HR), poderão sofrer graves alterações dimensionais e, assim, afectar a estabilidade da pintura. Neste caso, a resposta à HR da camada de encolagem é mínima e a pintura apresenta-se pouco fissurada e quase sem destacamento. Isto sugere que a camada de encolagem sofreu pré-tratamento para a tornar insensível à humidade ou água. Reconstruções baseadas em receitas do final do século XIX, usando materiais historicamente apropriados, foram preparadas com o objectivo de explorar várias opções que possam tornar a camada de encolagem não higroscópica e, ainda, com o intuito de identificar o processo que foi utilizado no Retrato.
A tese é apresentada em duas partes:
Parte 1: Descreve a história, condição, materiais e técnicas da pintura. De igual modo, detalha o tratamento de Januário Correia de Almeida assim como as escolhas feitas e problemas encontrados durante o tratamento.
Parte 2: Aborda a história da produção de gelatina comercial, a escolha da origem animal apropriada para extrair o colagénio a utilizar nas reconstruções da camada de encolagem do retrato, assim como a caracterização de reconstruções seleccionadas.
A execução de um preenchimento superficial texturado resultou numa publicação e uma apresentação:
Resumo aceite para apresentação e publicação em International Meeting on Retouching of Cultural Heritage (RECH3), Francisco Brites, Leslie Carlyle and Raquel Marques, ‘’Hand building a
Low Profile Textured Fill for a Large Loss’’.
ABSTRACT
This thesis project concentrated on both the study and treatment of an early 20th century male portrait in oil from Colecção Caixa Geral de Depósitos, Lisbon, Portugal. The portrait of Januário Correia de Almeida, exhibits a tear (approximately 4.0 cm by 2.3 cm) associated with paint loss on the right upper side, where it is possible to observe an unusually thick size layer (approximately 50 microns) and an open weave mesh canvas. Size layers made from animal glue remain subject to severe dimensional changes due to changes in relative humidity (RH), thereby affecting the stability of the painting. In this case, the response to moisture of the size layer is minimal and the painting is largely uncracked with very little active flaking. This suggests that the size layer has undergone pre-treatment to render it unresponsive to moisture or water. Reconstructions based on late nineteenth century recipes using historically appropriate materials are used to explore various options for
modifying the characteristics of gelatine, some of which may relate to the Portrait’s size layer.
The thesis is separated into two parts:
Part 1: Describes the history, condition, materials and techniques of the painting. It also details the treatment of Januário Correia de Almeida as well as the choices made and problems encountered during the treatment.
Part 2: Discusses the history of commercial gelatine production, the choice of the appropriate
animal source to extract the collagen to produce reconstructions of the portrait’s size layer as well as
the characterization of selected reconstructions.
The execution of a shallow textured infill led to one publication and one presentation:
Abstract accepted for presentation and publication, International Meeting on Retouching of Cultural Heritage (RECH3), Francisco Brites, Leslie Carlyle and Raquel Marques, ‘’Hand building a Low Profile Textured Fill for a Large Loss’’.
SYMBOLS and ACRONYMS
µ- Micro
® Registered Trademark
DCR Departamento Conservação e Restauro
EDX Energy Dispersive X-Ray
EDXRF Energy Dispersive X-Ray Fluorescence FCT Faculdade de Ciências e Tecnologia FTIR Fourier Transform Infrared Spectroscopy
HART Historically Accurate Reconstruction Techniques
IR Infrared
MW Molecular Weight
OM Optical Microscopy
PVAL Polyvinyl Alcohol
Py-GC/MS Pyrolysis-Gas Chromatography-Mass Spectrometry
RH Relative Humidity
RSG Rabbit Skin Glue
SEM Scanning Electron Microscopy
TABLE OF CONTENTS
PART 1- STUDY OF THE MATERIALS, TECHNIQUES AND TREATMENT OF THE PAINTING . 1
1. INTRODUCTION ... 1
1.1. Description of the Painting ... 1
1.2. Historical Context ... 2
1.3. Januário Correia de Almeida (1829-1901)... 2
1.4. Costume and Awards... 2
2. CONDITION REPORT ... 3
2.1. Auxiliary Support: Stretcher ... 3
2.2. Original Support: Fabric ... 3
2.3. Sizing and Preparation Layers ... 4
2.4. Pictorial Layers ... 5
2.5. Surface Coating: Varnish ... 5
3. CHARACTERIZATION OF MATERIALS AND TECHNIQUES ... 7
3.1. Painting Technique ... 7
3.2. Analysis of Materials ... 7
4. TREATMENT SUMMARY ... 9
4.1. Surface Cleaning ... 9
4.2. Consolidation ... 9
4.3. Tear Repair ... 10
4.4. Local Flattening ... 11
4.5. Infill: texture fill ... 12
PART 2- INVESTIGATION OF THE SIZE LAYER... 15
5. HISTORICALLY APPROPRIATE RECONSTRUCTIONS ... 15
5.1. Size layer- Characterization and Analysis ... 16
5.2. History of Gelatine ... 18
5.3. Chemical composition and properties of gelatine ... 19
5.4. The terms glue and gelatine ... 20
.
Reconstructions of size layers - Experimental details ... 215.4.1
.
Reconstructions - Vibert’s recipes ... 225.4.2 5.5. Results - Observation during preparation and application... 23
. Results- Observation of dried reconstructions ... 24
5.5.1 5.6. RH and water sensitivity tests- Results ... 25
5.7. Analysis of the reconstructions ... 26
6. CONCLUSIONS ... 29
REFERENCES ... 33
APPENDICES ... 1
Appendix II – Before Treatment Details of Januário Correia de Almeida ... 2
Appendix III –Januário Correia de Almeida’sChronology and Awards ... 5
Appendix IV – Map of Damages ... 6
Appendix V – Material Analysis ... 7
Appendix V.1 - Instrument Description………...…….7
Appendix V.2 - Sampling areas for Cross-section (S), µ-FTIR (F), µ-EDXRF points and Py-GC/MS (P)……….…..8
Appendix V.3 - Cross-sections, Normal light (left) and Ultraviolet light (right)………...…...9
Appendix V.4 - Fibre Identification………...………..10
Appendix V.5 - Materials Identification Table.……….…...11
Appendix V.6 - µ-FTIR spectra analysis………..……….13
Appendix VI –Treatment Photographs ... 13
Appendix VII – Size Layer Studies ... 15
Appendix VII.1 - Size layers: comparison of cross-sections, Normal light (left) UV light (right)………..………….15
Appendix VII.2 - RH and water sensitivity tests……….…15
Appendix VII.3 - Analysis of size layers………..….17
Appendix VIII – Recipes ... 17
Appendix IX – Sample Codes ... 20
Appendix IX.1 - General Sample Codes………..……20
Appendix IX.2 - Stepped Proportions of ingredients………21
Appendix IX.3 - Diagrams of reconstructions………...….28
Appendix X – Reconstructions Analysis ... 30
Appendix X.1 - Reconstructions Cross-sections, Normal and Ultraviolet light……….30
Appendix X.2 - Sensitivity tests……….
.
.31Appendix X.3 - Reconstructions Analysis Table………...32
INDEX OF FIGURES IN TEXT
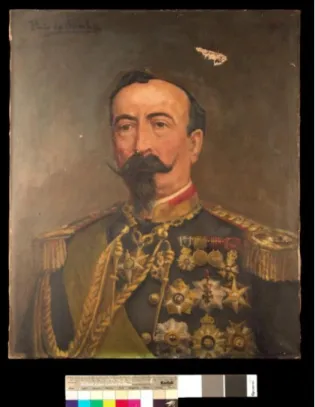
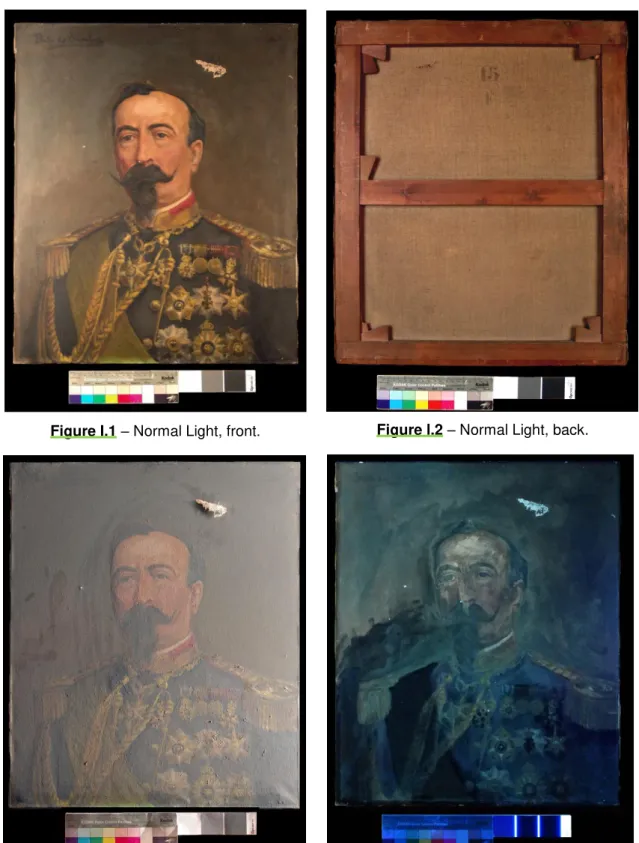
Figure 1 - Conde de S. Januário portrait, normal light, photograph before treatment. ... 1
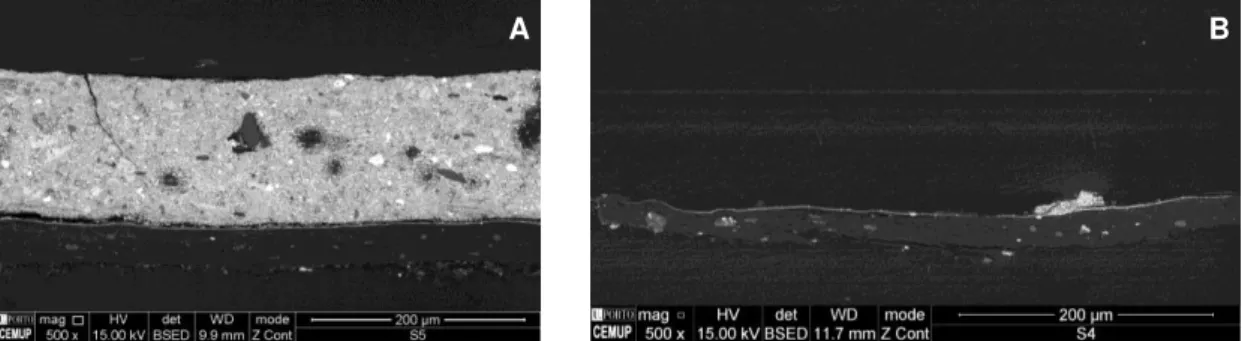
Figure 2 – SEM images. (A) is sample S5, ground and size, and (B) is sample S4, size alone. Image (B) suggests the delamination zone at the interface of ground and size. ... 8
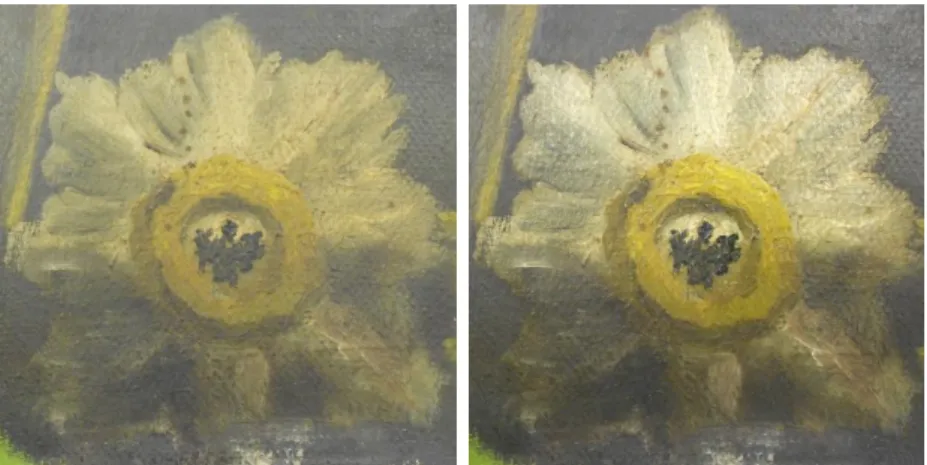
Figure 3 - Before (left) and after (right) surface cleaning images of a medal. ... 9
Figure 4 – Diagram of the system used during consolidation. ... 10
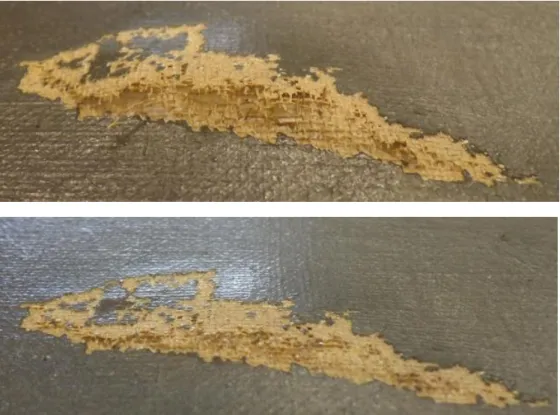
Figure 5 - Before (top) and after (bottom) tear repair treatment. ... 11
Figure 6- Appearance of damaged area after BEVA®371 + Kaolin fill material was applied. ... 12
Figure 7 – Final appearance (after softened) of textured fill under raking light. ... 13
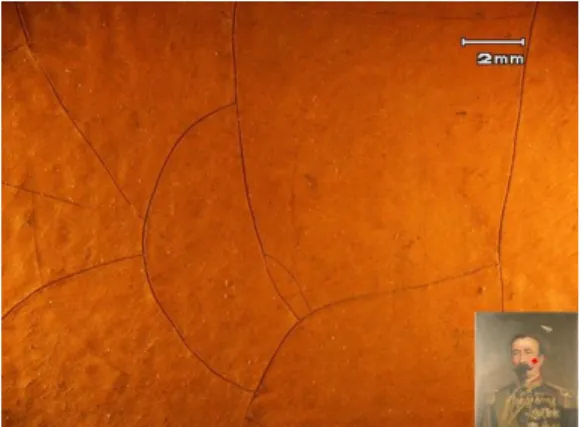
Figure 8 – Plastic box used for RH tests, red circle shows size sample. ... 17
Figure 9 - µ-FTIR spectrum of the reference sample of collagen (A) and the portrait’s size layer (B). 17 Figure 10 – Final gelatine obtained. ... 22
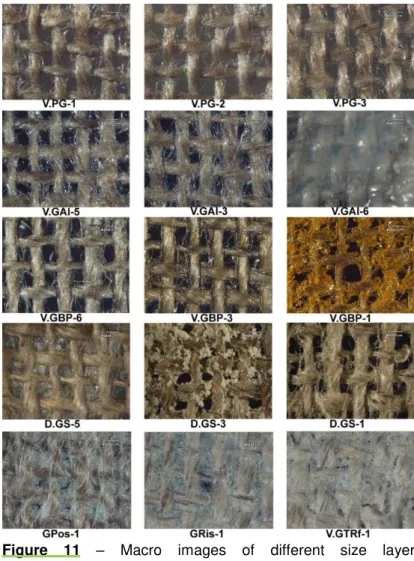
Figure 11 – Macro images of different size layer reconstructions. ... 25
Figure 12 - µ-FTIR spectrum of portrait’s size layer (A) and D.GS-5 sample (B)... 26
Figure 13 – SEM images. A is reconstruction G.Ris, showing rounded aggregates; B is reconstruction D.GS-5 indicating the micelle-like areas and C is reconstruction V.GAl-5 where the collagen appears to be unaltered. ... 27
INDEX OF FIGURES IN APPENDICES Figure I.1 – Normal Light, front. ... 1
Figure I.2 – Normal Light, back………...…………....1
Figure I.3 – Raking Light from the right side………....…..1
Figure I.4 – Ultraviolet (UV) light………..……….…….1
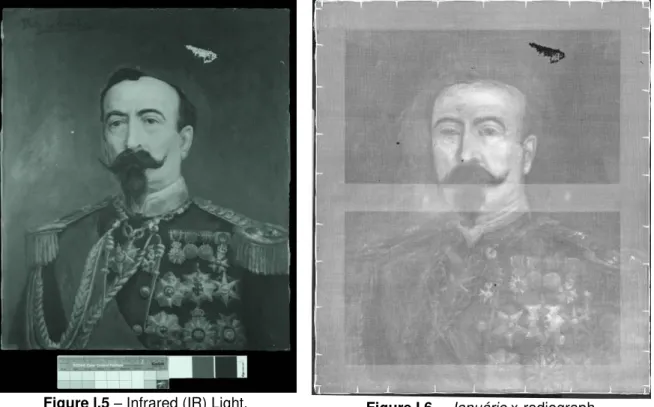
Figure I.5 – Infrared (IR) light………..…….…2
Figure I.6 –Januário x-radiograph………..……….…..2
Figure II.1 – Back of the canvas indicating presence of exit hole……….…….….2
Figure II.2 – Baxter Method applied on different types of fabric to compare thread count……….2
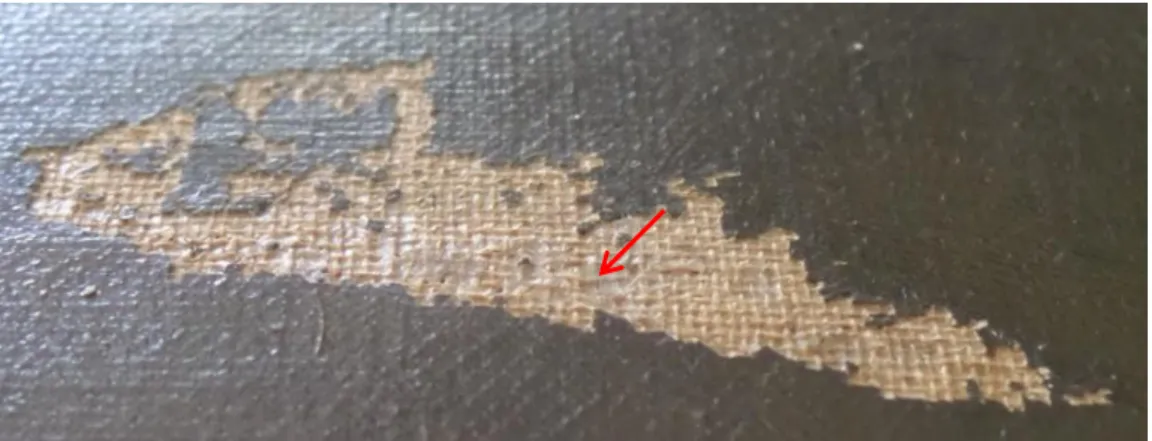
Figure II.3 – Detail of missing paint composite associated with the tear. The size layer is visible between canvas threads………..3
Figure II.4 – Back of the canvas showing stencil mark ''F'' and ''15'' and Table of standard stretchers from Bourgeois aîné, published in a catalogue from 1888 (reproduced from p.46 [11])………….…….…3
Figure II.5 – Detail of small paint/ground losses……….4
Figure II.6 – Detail of mechanical crack………4
Figure II.7 A and B – Details of drying cracks………..4
Figure II.8 – Detail of opaque dark coating………..4
Figure II.9 – Detail of different fluorescence'………4
Figure II.10 – Detail of paint application……….4
Figure II.11 – Detail of drips and different shades………..4
Figure III.1 – Identification of medals present in the oil painting [6]. ... 5
Figure V.1 – Sample areas for Cross-Sections (S), µ-FTIR (F), µ-EDXRF points (·) and Py-GC/MS
(P). ... 8
Figure V.2 – Cross-section S4, showing the thickness of the size layer on the portrait……….….9
Figure V.3 – Cross-section S5, showing both the ground and size layers on the portrait………
.
9Figure V.4 –Cross-section S6, showing ground and paint layers from the sash on the portrait………
…
.9Figure V.5 – Cross-section S8, showing ground and paint layers from the background………...9
Figure V.6 – Longitudinal view of a fibre from the canvas under OM: Cross polarised light, total magnification 50x. Red arrow indicates cross-marking (x-shaped)……….10
Figure V.7 – Transverse view of a fibre from the canvas. Red circle indicates rounded shape with central lumen………
.
...10Figure V.8 – Reference images of flax. Transverse view (top) and longitudinal view (bottom) of fibre……….10
Figure V.9 – Reference images of hemp. Transverse view (top) and longitudinal view (bottom) of fibre……….…10
Figure V.10 – µ-FTIR spectrum of a ground sample……….13
Figure VI.1 – Detail of face during surface cleaning showing the top half cleaned………..13
Figure VI.2 – Local moisture treatment with moist blotter forming a bridge over the tear. Before tear repair……….…….13
Figure VI.3 – Thread realignment using raking light and 10x magnification optivisors………....13
Figure VI.4 – Detail of tear repair during treatment, right side has been repaired, left side has not………....
.
13Figure VI.5 – Diagram of the system used during flattening……….14
Figure VI.6 – Diagram showing the system used to achieve a plain surface……….….14
Figure VI.7 – Flattening of tear area with light weights on top of silicone coated Melinex®………14
Figure VI.8 – Detail image of BEVA®371 and kaolin……….14
Figure VI.9 – Appearance of BEVA®371 and kaolin after being heated between sheets of thin silicone coated Melinex®………..14
Figure VI.10 – First layers of the infill material………14
Figure VI.11 – Cork covered with polyester fabric used to smooth surface of the infill Figure VI.12 – Appearance of textured fill before softened………..14
Figure VII.1 – Cross-sections of (A) portrait’s size showing layer thickness; (B) HART sample EX10, size layer- under a layer of chalk and glue showing thickness and (C) size from Landscape with Deer painting, showing layer thickness. ... 15
Figure VII.2 –Portrait’s size: RH tests, measurements before (left) and after (right). ... 16
Figure VII.3 – 7% RSG: RH tests, measurements before (left) and after (right). ... 16
Figure IX.1 – Diagrams showing where samples are located on loomed canvas (top) and on foam
cards with fabric (bottom)……….………..28
Figure IX.2 – Diagram indicating where samples are located on all Melinex® sheets………29
Figure X.1 – V.PG-3, pure calf’s feet gelatine………....30
Figure X.2 – V.GAl-5, gelatine and alum………
…
………30Figure X.3 – V.Ga-4, gelatine and glycerine…
…
………..30Figure X.4 – V.GBP-6, gelatine and bichromate of potash………..30
Figure X.5 – D.GS-5, gelatine and bleached shellac………30
INDEX OF TABLES IN APPENDICES Table III.1 – Name of Military Orders/Medal identified. ... 5
Table V.1 – Code for identification of cross-sections (left) and µ-FTIR and Py-GC/MS sample (right). 9 Table V.2 – Materials analysis from the ground (visible as white material in normal and UV light). .... 11
Table V.3 –Pigments identified in the Portrait’s paint layers and ground layers. ... 11
Table VII.1 – RH and Water Sensitivity Testing. ... 15
Table VII.2 – Analysis of two different size layers. ... 17
Table IX.1 –Sample codes for reconstructions………20
Table IX.2 –Sample codes regarding number of layers applied to each square of canvas………….21
Table X.1 –Sensitivity tests results……….31
PART 1- STUDY OF THE MATERIALS, TECHNIQUES AND TREATMENT OF THE PAINTING
1.
INTRODUCTIONThis thesis focuses on the male portrait in oil of Conde de S. Januário along with its treatment and a study of its materials and techniques (Part 1) as well as a detailed investigation of the size layer (Part 2). The painting presents an unusually thick size layer on an open weave canvas. Normally a painting with such a thick size layer should have on-going problems with paint flaking and overall dimensional stability, related to RH response, since animal glue undergoes severe dimensional changes which the paint composite cannot follow and which affects the planar stability of the painting [4]. However in this case flaking is minimal and isolated samples of the size layer indicate very little response to water suggesting that this layer has undergone some form of treatment to remove its RH sensitivity.
In Part 2, reconstructions based on late nineteenth century recipes explore various options for modifying the characteristics of gelatine with the hope of identifying the process used on the painting to create the insoluble collagen-based size layer [5]. A better understanding of the size layer was important in the design and application of the treatment, in particular the tear and the missing paint.
1.1 . Description of the Painting
This official portrait from the early twentieth century (oil on canvas), by Pinto da Cunha, belongs to Colecção Caixa Geral de Depósitos, Lisbon, Portugal. The man portrayed is ‘’Conde de S. Januário,
Presidente do Conselho Fiscal (1881-1900)’’ [1] (Fig.1). The figure is in the foreground and centered in an undefined background. He is presented in a formal position wearing his military uniform, the details of which are of great importance since they display his status and his awards placing him at the top of the hierarchical pyramid as a social and military leader [2]. The basic upper features of the uniform, namely the dolman (military coat) and the collar, identifies this uniform as one used between 1885 and 1892 in Portugal [7]. The dolman is made of blue cloth with two gold metal buttons visible. The collar is opened with rounded corners and made from red cloth containing also gold ornaments. As for the epaulettes (ornamental shoulder pieces), these are of gold metal with six scales (that can be related to its hierarchical position), laid on red cloth. Lastly there is a gold aiguillette (ornamental braided
cord) placed on the sitter’s right shoulder.
1.2 . Historical Context
According to Saraiva, the development of art in Portugal was affected by general alterations in society and the impoverished economy, until the triumph of the Liberal army in 1820 [8]. Until then neither the government nor the church could invest in new structures. In the first twenty years of Liberalism, which lasts until the Regeneration (1834-1851) - art in Portugal presented a revivalist style, i.e. exhibiting mixtures of traditional and modern styles (especially in architecture) that lasted until the beginning of the twentieth century [8,9].
The economic growth in the last quarter of the 19th century, allowed the development of artists, most specifically portrait painters, since the Bourgeoisie society created capacity, ordering self-portraits from artists [8]. Thus, as José Mattoso notes, the portrait in Portugal became very common, as the Bourgeoisies desired to exhibit their social and political status [10].
1.3 . Januário Correia de Almeida (1829-1901)
According Zûquete, writing in 1989, the sitter, Januário Correia de Almeida was in the military, a colonial governor, a politician and a Portuguese diplomat. He was the 1st Baron, Viscount and Earl of São Januário, who was born in Paço de Arcos, Oeiras, Portugal (March 31, 1829) and died on May 27, 1901. He enlisted in the Caçadores (Hunters), term which is used to designate light infantry soldiers, on November 4, 1842, and after attending Army School was promoted to second Lieutenant of cavalry on March 22, 1846. He subsequently went to the University of Coimbra where he studied in Mathematics and Philosophy then returned to the Army School, graduating as a Lieutenant and joining General Staff in 1856 [2].
On the General Staff, he followed his military career and was promoted to Captain in 1863; to Major in 1876; to Lieutenant Colonel in 1879; Colonel in 1884; Brigadier General in 1893 and to Major General in 1896.
Januário reached the top position in The Army and with that came important positions in Portuguese society, for example in 1880 where he was named Peer of the Realm, and was also Councillor of State and Aide de Camp of King D.Luís. By 1896 he was delegated to the command of the 1st Military Division and was also commander of the General Staff and the Military School [2].
1.4 . Costume and Awards
2.
CONDITION REPORTIn general the portrait did not initially appear unstable, since the significant paint loss associated with the tear on the upper right side was due to a single incident. However, the image was not acceptable for display due to a thick layer of dust and dirt (Fig.I.3) and because of the paint loss which exhibited active flaking, both at the interface of ground and canvas and at the interface of paint and ground (Fig.II.3). The missing area of paint associated with the tear is approximately 4.0 cm long by 2.3 cm wide.
2.1 . Auxiliary Support: Stretcher
The auxiliary support (wooden stretcher or strainer) has the main function of holding the canvas under tension by keeping it taut and in plane [14]. In this case, the auxiliary support is a wooden stretcher (likely softwood) which measures 65 cm x 54 cm, with a Blind Mortise & Tenon corner construction (2 wooden keys with 2 blind slots) [14]. The stretcher has a horizontal cross bar in the center and all 9 keys are present. The wood is sound although it has some small splits and the corners are slightly distorted from square. There are also two exit holes from a previous insect infestation on the bottom part of the stretcher (Fig.II.1).
2.2 . Original Support: Fabric
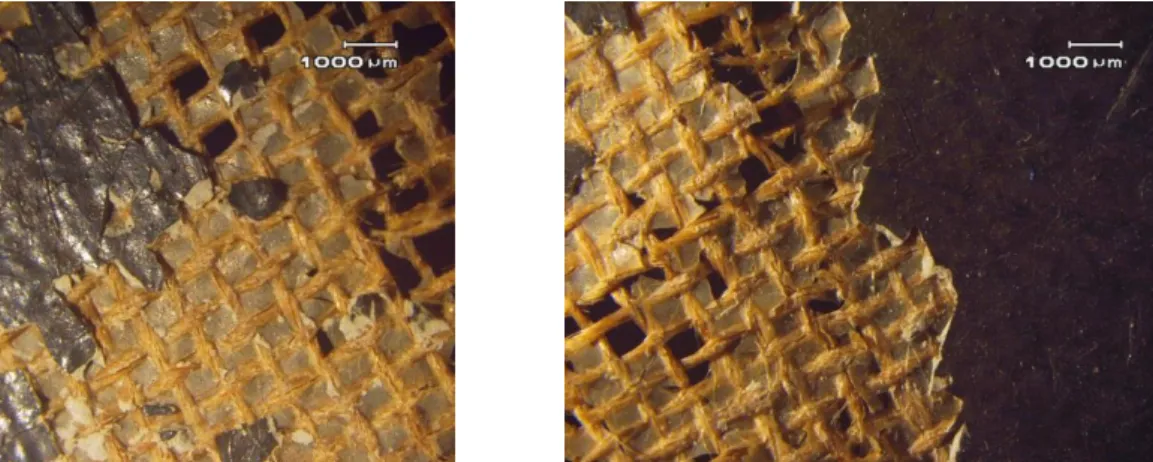
The portrait is painted on a single piece of wide mesh1 plain fabric with a fine thread. Fibre identification indicated bast fibres, likely linen (see Appendix V.4). The thread count consisted of 12 vertical and 10 horizontal threads per cm2 (The Baxter Method for Thread Counting was used to compare thread counts from this and other paintings. Threads are photographed through a 1cm2 square window of graph paper, which allows threads to be counted on an enlarged digital image, see Fig.II.2). The canvas and the size layer could be clearly observed in the area of paint loss associated with the tear at the top right (Fig.II.3). Such plain woven mesh canvases with thin individual threads and a low thread count are reported to be common in paintings from latter half of the nineteenth century in France2 [53]. Townsend reports their use by Turner (approximately 10-12 threads per cm2)
between 1830’s – 1840’s in the UK [12]. Similar wide mesh canvases are seen in the 17th century Italian paintings3. Kate Seymour, SRAL, Maastricht, NL, notes that in Italy these canvases are referred to as pavemento canvases.
The back of the canvas bear the stencil marks, ‘’F’’ and ‘’15’’ which corresponds to a table of
standard stretchers with prepared supports from the firm of Bourgeois aîné, that was published in a catalogue from 1888 (it was reproduced on page 46 in the Impressionism: Art in the Making catalogue from the National Gallery London Exhibition (1991) [11]. The portrait corresponds exactly to the dimensions for ‘’15 F’’ in the table. The number 15 refers to the standard size (65 x 54 cm) and the letter F to the word ‘’Figure’’ (Fig.II.4). While it is not possible to date the support precisely, the stencil and the corner construction (mentioned above) place it after 1888 as stated by Labreuche. According
1
Mesh- any fabric, knitted or woven, with an open texture, fine or coarse. Described by Dan River, in his book, A Dictionary of textile terms (1980, 13th edition, page 63).
2
Personal communication from Anne Baxter, Paintings Conservator, Montpellier, France, August 2015. 3
Personal communication from Leslie Carlyle, based on observations of 17th century Italian paintings in the
to Labreuche this type of stretcher appeared first in the 1888 catalogue (Janvier 1888. Catalogue general illustré. Fabrique de Couleurs Fines […] Bourgeois Aîné[…], (pg.86)) [13].
2.3 . Sizing and Preparation Layers
A painting is a multilayered structure made of composite materials [14]. Traditionally, the first layer applied onto the support is the size, with the main function of isolating the canvas to reduce its absorption, and to ensure that the ground or preparation layers do not penetrate to the back of the canvas through the fabric interstices [14,15,16]. According to Witlox [16], who researched ground preparation in Northern Europe from 1550-1900, the most commonly used material for canvas sizing was animal glue, although other materials might have been employed, such as starch or flour paste sizes [15, 16]. As noted by some authors [4,16,17,18] size layers are often too thin to be readily visible on a painting and in cross-section. Nevertheless that is not the case for this portrait since it presents a very thick size layer especially relative to reconstructions from the HART Project (see Appendix VII.1).
Studies carried out by Mecklenburg demonstrate that an animal glue size layer is more flexible in high RH but very rigid at low RH and is the material in a canvas paintings that develops the greatest stress when desiccated while the painting is under tension (stretched on a stretcher/strainer) [4]. Hence Mecklenburg proposed that this layer could be responsible for the stresses that cause rupture (cracks) in the paint composite system at low RH. An especially thick size layer of untreated collagen (glue) would be expected to also cause delamination since at very high RH the glue size has no strength while the canvas shrinks. As the glue loses its adhesive qualities (while swelling and changing in dimension) the ground layers (and paint) can detach from the canvas.
The Portrait’s size layer was analyzed by µ-FTIR, confirming the presence of a protein based material (most likely collagen). This proteinaceous material is extensively described in Chapter 5.
The preparation layers (also called the ground) are applied after the size and can have many functions, but primarily provide a surface for the application of paint. The preparation layers play an important role in the overall texture of the painting since the fabric texture can either be reduced or enhanced and in addition this layer can vary in absorbency [15]. The ground has to make good bonding properties between the canvas and the paint layers otherwise there is a risk of delamination [15].
The portrait’s ground is a light grey-beige colour and covers the canvas thinly and evenly making the fabric texture visible but not pronounced. In the x-radiograph its application is visible and appears to have been applied by brush (Fig.I.6). It is likely that the ground was commercially prepared since it extends evenly to the edges of the tacking margin. An indication that it was commercially prepared, as noted above, are the stencil marks on the canvas (section 2.2).
2.4 . Pictorial Layers
The paint is very thinly applied, with semi-opaque paint, both in the dark and light colours. There are a few areas of impasto (more noticeable on the medals) and some textured brushstrokes in the background, yellow collar and the epaulettes. The layering application is very notable in the green sash, where both the layer of a light green (evident along the bottom edge) with a brownish top coat are visible; this is confirmed by the cross-section stratigraphy (Fig.V.4). However the sequence of the paint layers is difficult to define on the background, due to an overlap of different tonalities. In the lighter areas a yellow tone (left side of the background) is more pronounced with absence of the dark green (right side of the background). This visual appearance was also confirmed with one cross-section stratigraphy (see Fig.V.5).
Overall the painting presents both local and minor mechanical and drying cracks. The first type of cracks can be easily seen in the sitter’s left cheek under the stereomicroscope (see Fig.II.6). As for the drying cracks these are confined to the black uniform, specifically between the junction of the neck and the collar (Fig.II.7 A and B). There are also abrasions along the edges that are associated with the frame (see Fig.IV.1).
2.5 . Surface Coating: Varnish
Normally the varnish is the last coat to be applied to a painting for the purpose of saturating the colours as well as evening out gloss [15].
The painting clearly shows varnish coatings visible both in normal and Ultraviolet (UV) light, which are best seen on the bottom edge of the sash (Fig.I.4). Under UV light, the surface presents several peculiarities, since there are two types of fluorescence’: one greenish (near the shoulder’s and background) and a blueish tone (located over all of the black uniform and medals), suggesting the presence of a natural resin (Fig.II.9) [14]. The sash and the sitter’s right side show an opaque dark coating (Fig.II.8). Cross section S8 reveals the presence of a thin varnish layer, although S6 which corresponds to the sash, does not fluoresce and exhibits the same dark opaque tonality.
Although no analyses were carried to characterize the varnishes, it is suggested that the surface of the painting has a retouching varnish. According to Carlyle, retouching involved applying over a previously painted passage a layer or layers of ‘’retouch varnish’’. It was recommended when the paint had become dull or there was a lack of medium at the surface [15]. As noted by Carlyle, by the end of the 19th century retouch varnish was likely to consist of a fast drying solvent-based varnish, such as shellac in alcohol [15,19].
Overall the varnish applications are very uneven and the coating is transparent yellow (more evident in lighter areas, such as the background and flesh tones). The varnish coating stops at the bottom and the left frame edge (Fig.II.8) and there are signs of drips above the head as well as the
3
. CHARACTERIZATION OF MATERIALS AND TECHNIQUES 3.1 . Painting TechniqueThe paint is applied in layers which are similar to those described in instruction manuals on oil painting, in Britain, France and Portugal from the mid eighteenth century and throughout the 19th century [14,19]. Such system required the paint to be applied in separate stages with the paint being allowed to dry between each layer [19,20].
The areas where the technique is most pronounced is in the forehead, the eyes and the background. The forehead exhibits two tonalities of beige (one lighter than the other) over which red, brown and white shades are used to build the following features: cheeks, nose, eyes, eyelids and chin (Fig.II.10). As for the background this presents a green brown tonality, although there is a shift in hue, since there are more pronounced tones of blue and yellow in the right side as well as more red and yellow shades in the left side (Fig.II.11).It is also possible to observe layers made with mixtures of different pigments as well as impasto paint which is most evident in the medals.
By comparing the X-radiograph with the paint under normal light, a difference was detected between the sitter’s right eye. On the X-radiograph a misalignment and deformation are visible (see Fig.I.6). This suggests that the artist decided to change the appearance rather than an overpaint done by another artist, since the technique, colour palette and brushstrokes are extremely similar with the rest of the painting.
To confirm the layer stratigraphy, cross-sections were mounted and most indicate the presence of two paint layers, although in one case, in the background (S8, see Appendix V.3, Fig.V.5) a third layer was visible. There are no signs of restoration layers on the cross-sections analysed, nor was there evidence of restoration on the painting over all.
3.2 . Analysis of Materials
The paint was analysed by EDXRF and cross-sections were examined by OM, SEM and µ-Raman, while micro samples were analysed by µ-FTIR. For more complete information regarding the pigments identified in the ground and paint layers see Appendix V.5, Table V.2 and V.3.
The size layer information and analysis are fully detailed in PART 2.
Concerning the preparation layers on the portrait, under the OM it was possible to observe in most cross-sections a beige ground. Sample S4 contains the size layer alone (see Fig.V.2, V.3). SEM provided information on the morphology and on the stratigraphy of the ground (S5) and size (S4). The sample with the ground and size layers (S5) (Fig.2A) exhibits a sign of extreme instability: at the interface between the ground and size layer is a line of detachment. The sample with size alone, S4 (Fig.2B), where the paint/ground had previously been lost shows a top surface the same as the top surface of the size seen in S5. While cross-sections can show delaminations and damage due to sampling, the presence of the line of delamination in S5 and the evidence that the ground had delaminated in the same place in S4 suggests that the delamination line in S5 is a characteristic of the painting, and not just sample damage. To confirm this, more sampling of the ground and size layers would be necessary from different locations, since one sample might not be representative.
Sulphur (S) suggests the addition of zinc sulphide (ZnS). The Calcium (Ca) and Phosphorus (P) suggest the presence of calcium phosphate (CaPO4). As for the Fluorine (F) it is associated with Calcium (Ca) and indicates the presence of fluorite (CaF2). The Calcium (Ca) and the association with Sulphur (S) suggests the presence of gypsum (calcium sulphate dehydrate, CaSO4.2H2O). However, the analysis by µ-Raman of the ground in cross-section S6 showed evidence of only barium sulphate (BaSO4) and lead white (2PbCO3.Pb(OH)2) (see Table V.2), possibly because the signal of barium sulphate and lead white overwhelm the signal of the other compounds present in very low amounts. These results are in accordance with the results from µ-FTIR, which indicated only the presence of barium sulphate and lead white in S6. The presence of fluorite particles could be associated with the Barium Sulphate as an impurity [54]. The binder present in the ground was identified as a drying oil by µ-FTIR (Appendix V.6). The appearance of the ground in OM strongly suggests a homogeneous layer (Fig.V.3, V.5).
The materials identified in the paint layers are: lead white, carbon-based pigment (carbon black), chrome yellow, vermilion, ultramarine blue (likely artificial ultramarine). The µ-FTIR spectra of the green identifies the presence of a copper carboxylate [47]. Chromate anion, CrO42-, is also present. By combining the information of µ-FTIR and µ-EDXRF (Appendix V.5, Table V.3), possibly the green is composed of a mixture of a copper based pigment and chrome yellow. All are consistent with the period of the painting.
Figure 2 – SEM images. (A) is sample S5, ground and size, and (B) is sample S4, size alone. Image (B) suggests the delamination zone at the interface of ground and size.
4.
TREATMENT SUMMARY 4.1 . Surface CleaningAs noted in Chapter 2, the painting presented a very thick layer of dirt, which was hindering the overall reading of the painting since most of the colours were very dull (see Figure I.3, Appendix I). Cleaning is normally undertaken to recover the general appearance of the painting [14]. To improve colours saturation and aesthetic value, surface cleaning was performed in two stages using aqueous materials. First with distilled water, which removed a significant amount of dirt, then saliva was used (Fig. 3). This second step was undertaken, since it was noticed that after an overall cleaning with distilled water, while no further dirt was being removed (according to the cotton swabs) the surface still exhibited a dirt layer obscuring the paint surface. This remaining layer was easily removed with saliva. A final rinse with distilled water was done after cleaning the surface with saliva. After this stage, the colours emerged brighter and richer (see Fig.VI.1).
4.2 . Consolidation
Consolidation can be defined as the action used to re-adhere materials that previously have lost their ability to bond [14].
As noted in Chapter 2, the portrait suffered severe mechanical damage that resulted in a tear associated with paint and ground losses. To prevent more flaking in this area, consolidation was performed to secure the paint/ground layers at the edges of the previous losses as well as minor losses in other areas (approximately 1 to 3mm size) using BEVA® 371b4 (BEVA). This adhesive is a mixture based on poly(ethylene-vinyl acetate) (EVA) copolymers that is known for its high tack, strength, and elasticity/flexibility [14,21]. BEVA is also a “heat-seal” adhesive that is soluble in petroleum distillate solvents (white spirits, naphtha and toluene) [21].
Using a small brush (Winsor & Newton No.00) a BEVA solution of approximately 1:1 in white spirits (this dilution achieved the desired flow properties) was introduced locally. The adhesive penetrated easily into cracks and underneath the paint and paint composite. The operation was performed under a magnifying microscope. After the BEVA had dried somewhat (approximately 15 minutes), the
4
BEVA® 371b adhesive was originally designated BEVA® 371, which contained two EVA copolymers (Elvax 150 (45%), A-C 400 Copolymer (15%)), a ketone resin tackifier (Laropal K80 (27%)), a phthalate ester plasticizer (Cellolyn 21 (4%)) and a paraffin wax (9%) [22,23,24]. As reported
(http://www.conservationsupportsystems.com/system/assets/msds/New_Beva_Formula), the reformulated BEVA® contains an aldehyde ketone resin to replace the former Laropal K80.
consolidated paint, covered with a silicone coated polyester film (Melinex®, see Suppliers) was pressed down gently with a heat spatula set to approximately 65ºC (see Equipment). Immediately after heating, while the paint composite was still plasticised, two light lead weights (each 237.2g) were applied over the areas consolidated to flatten the paint and while the adhesive set (Fig.4).
4.3 . Tear Repair
As explained by Tomkiewicz, in Conservation of Easel Paintings, p.384, tear mending aims for maximum recovery of the condition prior to damage by returning similar stress tolerance and flexibility to the damaged area as well as to recover the weave pattern, thread count and thread distance [14].
Prior to tear repair, in order to support the individual threads and effect their alignment on either side of the tear, a small raised lump of plasticine (see Suppliers) covered with thin Melinex® (25 microns) was placed underneath the painting, immediately below the affected area. This plasticine sat on top of a board which was placed beneath the painting. To ensure good alignment and easy manoeuvrability of the fibres, a piece of blotting paper (4cm long by 1,5cm wide), previously moistened with distilled water, was suspended over an area which covered approximately 14 threads at once (see Fig.VI.2). The blotting paper was left in place for approximately 10 minutes. This moisture treatment allowed the fibres to relax. Threads were then lined up across from each other, this realignment was aided by the raised plasticine as it conformed to the distortion in the threads (Fig.VI.3). The threads were then joined under 10x magnification (using optivisors, see Suppliers), by applying with a brush a drop of 40% solution of Paraloid® B-725 (B-72) in xylene to both thread ends and creating a slight overlap in the centre (butt join with slight overlap). B-72, an acrylic resin, presented good tensile strength and flexibility, enough to hold the threads together since the canvas would not be under significant further tension (the painting was still in its original stretcher and was at the correct taughtness) (see Fig.VI.4). According to Horie, B-72 does not degrade significantly in normal conditions of exposure, although oxidation can occur slowly [24]. This acrylic polymer is considered one of the most stable resins available for conservation use [14,24]. After the realignment of the threads, when the B-72 was fully dry (after a week) a local flattening of the whole area around the torn fabric was carried in order to ensure that the paint surface was completely in plane before applying the fill (see Fig.5).
4.4 . Local Flattening
The back of the painting was supported with layers of boards, the one which sat next to the canvas cardboard was covered with silicone coated Melinex®, facing up. This then allowed an even distribution of boards and cushioning materials with weights that were going to be applied from the top as well as providing a flat surface during flattening.
Prior to flattening, the canvas and paint composite required plasticising with moisture. Blotting paper was pre-moistened6 then cut to the size of the distorted area. Dry blotters larger than the moist blotters were placed over the top. Once in place the blotters were covered with thin Melinex® (25 microns) to prevent moisture loss. Beneath the blotters it was placed silicone coated Melinex® (side down) with rounded edges to prevent direct contact of the paper with the painting (see Fig.VI.5). The moisture response of the painting was constantly monitored with gentle finger pressure until the canvas/ground/paint became flexible. It was established that 10 minutes was the most suitable length of time. Once plasticity was achieved, the blotter was removed and rapidly replaced with light lead weights on top of silicone coated Melinex® (facing down) (Fig.VI.7). Gradually as the distortions were reduced, light weights were replaced by a large flat lead weight supported on a piece of foam-core to better achieve a plain surface (Fig.VI.6). This process was repeated until complete flattening was attained.
6
Previously sprayed with distilled water then sealed in Melinex® with weights on top for 10mins before use to allow a good moisture distribution within the blotter.
Figure 6- Appearance of damaged area after BEVA®371 + Kaolin fill material was applied. 4.5 . Infill: texture fill
In order to improve the physical and aesthetic values in the area of the large loss, 2 stage infilling was undertaken. The choice of materials are carefully made and based on what was most appropriate for this painting and the size and thickness of the lost paint/ground. Due to the loss of the size layer between the threads it was important to guarantee that before introducing the filler in the lacunae, to avoid having the filler run through to the back of the canvas, an infill material was needed which could be capable of being as thin as the size layer, as well as flexible and stable. The system that best suited these requirements is used in SRAL7, it consists of a mixture of BEVA®371b and kaolin8 (Fig.VI.8). It forms a flexible infill material. The filler also exhibits a tonality very similar to the size layer present in the painting. A strip was cut from a thin film of this mixture and was heated between sheets of thin silicone coated Melinex® with a heat spatula to create a thinner film close in thickness of the size layer (see Fig.VI.9). From this very thin fill, small squares were cut in order to insert the film between the threads to fill the gap left by missing size. By heating a dental tool and placing silicone coated Melinex® (side down) on top of the filler, the fill material was inserted such that it bridged the gap between the threads while some of it was incorporated into the canvas threads so that it was secure (Fig.6). This operation was carried until no more gaps were found.
The second stage of infilling involved the execution of a shallow textured infill. In order to prepare for reintegration, the topography of the infill needed to match its surroundings. Initial attempts to cast a silicone mould of the surface texture were frustrated because the painting remains on its original stretcher, therefore achieving conformation of a barrier film against silicone staining by using the low-pressure suction table was not possible. Given the very low profile of the original paint texture, it was necessary to find a material which could provide an extremely thin textured film but that would remain flexible. According to Devesa, who studied several binders and fillers for her Master’s Thesis [18], Mowiol® 4-88 (Mowiol) exhibited good working properties and did not form severe cracks as it has very low shrinkage [18]. According to Horie, this polyvinyl alcohol (PVAL) material, which is soluble in water, is very stable to oxygen/ultraviolet ageing since chain scissions occur very slowly, but he notes
that it might become insoluble if in acid or alkaline conditions. Therefore, Horie states that treatments done with Mowiol are irreversible. However, the irreversibility of this binder is not a main concern since it does not cover original paint and can be removed mechanically. Although water based in application, Mowiol® 4-88 does not affect the size layer, as it would in a normal painting. 20% Mowiol®4-88 in distilled water (10g Mowiol to 50 ml water), was mixed with Champagne chalk (natural calcium carbonate from France, see Suppliers), until the desired properties (the more chalk is added to the Mowiol, the greater the viscosity). Mowiol itself has excellent working properties and is very easy to manipulate. The working time is also very good, since it easily allows alterations while it is being applied.
Tests with the mixture applied in thin films to Melinex® (25 microns) and allowed to dry, showed that on bending the Melinex®, the fill material easily cracked. However, when a brush coat of BEVA (60:40 in white spirits) was applied to the dried film, and then allowed to dry itself, the combination of the Mowiol and BEVA was very flexible, showing no signs of cracking when bent. A further advantage to saturating the Mowiol infill with BEVA is that is likely to reduce the Mowiol’s response to humidity (Horie notes that it is hygroscopic, since it will absorb water vapours above 75% RH [24]).
The infill was initially applied in a thin film with a brush and allowed to dry (Fig.VI.10). This step was repeated until the desired thickness was achieved. Applying water-based infill materials in a series of thin layers which are dried in between coating, ensures that the material does not crack during application. To smooth the rough surface of the infill, a cork covered with a thin polyester net fabric was moistened then rubbed over the surface (Fig.VI.11). All these actions were done using an optivisor and raking light, since it was necessary to pay careful attention to shadows to detect any missing infill material.
PART 2- INVESTIGATION OF THE SIZE LAYER
5.
HISTORICALLY APPROPRIATE RECONSTRUCTIONSTo better understand the art of the past, a methodology has been devised with the aim to recreate historic oil painting materials with as much accuracy as possible by exploring historical recipes [17]. Reconstructions help interpret historical recipes since we can learn why materials were prepared in a certain way and if a correlation can be established with an actual sample from an oil painting. If made from historically appropriate materials results from reconstructing recipes can be used as reference material for visual and chemical analysis. Furthermore the effectiveness or performance of the materials can be evaluated during use and their chemistry explored [16,25,26,42]. Reconstructions can be made to answer particular questions in conservation research and can therefore be modelled to look at specific ingredients and their effects [25,26]. For reconstructions aiming at a degree of historical accuracy it is important to note that modern materials are unlikely to have exactly the same physical characteristics and chemical composition as those used in the past. An investigation is necessary to understand how modern materials may differ from the materials that would have been used in the period contemporary with the recipe(s) chosen [25,26,42].
Because of the unusually thick size layer on the portrait, and the lack of response of this layer to RH changes, as well as the use of the open weave fabric (mesh fabric), an investigation was undertaken with historically appropriate reconstructions based on a series of gelatine size recipes in the painting instruction manual by Jehan Georges Vibert (The Science of Painting- A translation from the eighth edition. London: Percy Young, 137, Gower Street, W.C) which was published in 1892 (pages 189-190). As noted by Carlyle, Jehan Georges Vibert trained at the École des Beaux-Arts and
was awarded in 1864 with the ‘’medaille de Salon’’ [15]. Vibert’s recipes were chosen because he
wrote extensively on artists’ materials at a time appropriate to the time of the portrait (his work was published only 9 year before the portrait is dated), and in addition Vibert produced retail products under his name: ‘’All the new productions spoken of in this book may be found in the house of Lefranc
&Co., 64 & 66, Rue de Turenne, Paris (pg.196)’’ [5].
Some of Vibert’s gelatine size recipes were intended to modify the characteristics of the gelatine. Therefore by recreating the recipes, a series of reference samples would be available for studying those new characteristics and would allow a comparison with the portrait’s size layer offering the
possibility of uncovering the method used for the gelatine in the portrait’s layer, as well as to explore
ways of overcoming the challenges faced when interpreting old and vague recipes.
Reconstructions, using known amounts of ingredients in stepped proportions would also establish the detection limits of the instruments used for analysis. It was anticipated that reagents could be effective in rendering the gelatine unresponsive to moisture in amounts well below the detections limits of some instruments. By re-creating the recipes, the effect of the various reagents could also be determined during use.
appropriate for the time of the recipe. Evidence was found that a common gelatine source in use now, made from pigskin, was introduced in the 1930’s [27] while 19th century references indicate that commercial gelatine came from bovine sources [48]. Furthermore as Schrieber notes, modern commercially prepared gelatines are not processed according to the same methods as used in the 19th [27]. Nowadays, the first step to produce gelatine is to reduce the raw material, by cutting or grinding. The bones are ground to between 2 to 25mm, while skins are reduced to 30-150mm. Degreased bone (called ossein) is then treated with hydrochloric acid. By the end of this operation, only organic matter remains [33]. Consequently reconstructions made with current commercially available gelatines do not represent the materials and processes used in the past, leading to the introduction of anachronistic variables. According to Schellmann, the information given by the suppliers is not reliable, and the exact composition of industrially produced collagen is difficult to know, since manufacturers tend to keep their recipes a secret [37]. In addition, Schriber notes that in making instant gelatine additives, such as carbohydrates (sugar, starch or maltodextrin) are used. As well, flavour and colour might also be added [27].
In contrast, Ure writing in 1840, notes that gelatine is an animal product that is obtained by boiling the muscles, skin, cartilages and membranes with water. Alcohol and tannin are used to precipitate gelatine from solution (but he states that no other acid, except the tannic is used and no alkali possesses the property of precipitating gelatine). He also notes that chlorine, nitrate and bi-chloride of mercury can render its solution more or less turbid, which implies that these materials were also used (pg.570) [49].
5.1 . Size layer- Characterization and Analysis
As noted above, the size layer on the portrait exhibits unique characteristics. To gain more knowledge about this layer, a visual comparison under OM was done with a HART Project reconstruction and with samples of rabbit skin glue (RSG) 7% in water. Typically according to studies by Mecklenburg, a size layer has a thickness of 0.015mm (dependent also on the number of layers spread over canvas), however the size from the portrait has 3x greater thickness (approximately 50 microns) when compared to HART Project samples (which are approximately 13 microns). A size layer from another painting (Landscape with Deer), dated 1936, was also compared. The latter exhibits an identical morphology and thickness to the size layer from the portrait (see Appendix VII.1) [4].
To establish the portrait’s size layer’s sensitivity to relative humidity (RH) and water (that would help with the treatment as well as to know how it would influence the other composite layers), tests on isolated samples were carried out and compared with the response of three other size layers: a size of 7% rabbit skin glue (RSG) prepared in the laboratory; the size from a painting by Wassily Kandinsky (c.1900)9; and the size from an early 20th century oil painting, Landscape with Deer, with a similar mesh canvas and size layer to the Portrait. Micro samples were taken from the three sources and measured10 prior to moisture and water exposure.
the RH to ensure 99%RH was attained11 (Fig.8). Testing with liquid water was also carried out. This involved filling a 10ml beaker with distilled water and placing the sample in the water for a total of 15 minutes to allow a complete interaction with water. After the tests, the samples were all re-measured and compared to their dimensions before exposure (see Appendix VII.2).
After both RH and water tests were completed (see Table VII.1, Appendix VII.2), it was possible to confirm the low RH and
water response of the portrait’s size. Of all the samples tested it was the least reactive (along with the Kandinsky size layer which was similar in behaviour to the portrait’s size layer, although it cracked). Both the RSG 7% and the size from the Landscape with Deer exhibited considerable dimensional changes, especially in thickness, in the RH test, and dissolved completely in the water test.
µ-FTIR analysis on a reference sample of collagen (parchment glue) (A) and that taken from the portrait (B) showed that there were significant differences between the two (see Figure 9). Although the size from the portrait exhibits the common characteristics of a protein (Amide A, I, II and III) it also shows relevant particularities such as the regions (marked with a dot) at 1080cm-1, which presents a higher absorption than the reference sample of collagen (parchment glue) (A) and at 1720 cm-1
a ‘’shoulder’’ is displayed that might suggest the presence of shellac or other material with a
similar absorption band. This is in agreement with the C-H absorption pattern observed (C-H stretching mode at 2939 cm-1), which does not show a profile of a collagen type protein. The Amide A (designation given for amide infrared bands of proteins) is shown at 3300 cm-1 that corresponds to the N-H stretching mode. Consequently the Amide I is present at 1653 cm-1 (C=O stretching mode), the Amide II at 1547cm-1 (C-N-H bending) and the Amide III is seen at 1339 cm-1 (C-H bending mode) [28].
Given that the portrait size is non-responsive to RH and water when compared with a size that is responsive (as would be expected of an untreated size), and exhibited significant differences in µ-FTIR when compared with the reference sample, the supposition that the portrait size layer had been treated to render it non-hygroscopic was then considered in depth.
As mentioned previously, SEM analysis was carried in cross-section S4. EDX shows mainly Carbon (C), Sodium (Na), Calcium (Ca) and Chlorine (Cl). Potassium (K), Sulphur (S) and Lead (Pb) are also present. The Lead (Pb) is likely associated with the ground layer. The presence of Sodium
11
Ambient conditions before tests were at 40% HR and 23ºC.
Figure 9 - µ-FTIR spectrum of the reference sample of collagen (A) and the portrait’s size
layer (B).
(Na) and Chlorine (Cl) could indicate the presence of sodium chloride (NaCl). Considering the substantial amount present, this could have been added as a flavouring agent (see identification of vanillin below which was also found in the size), and/or a preservative. However, as Dr Ure explains, soaking animal parts in brine prior to collagen extraction was also done (pg.895, Volume I) [49].
5.2 . History of Gelatine
The use of gelatine has been traced as far back as the Ancient Egyptians [29]. However it wasn’t
until the 17th century that the French mathematician Denis Papin (1647-1712) recorded his research experiments on the subject, making it possible to cook bones by using a ‘digester’ (a pressure cooker) which he demonstrated to the Royal Society in London [30]. The main issue with making gelatine by this method was that it was a laborious process, since the bones had to be cooked under pressure for a full day (about 6-8 hours). The stock then had to be clarified as it dripped through a jelly bag and then boiled again prior to being finally been allowed to sit.
In 1754 the first English patent for the manufacture of gelatine was registered [31]. Methods of producing gelatine were systematically improved during the Napoleonic Wars since there was a shortage of meat protein for the population during this period and gelatine became an alternative.
In 1818 in Lyon, France the first company to manufacture gelatine on an industrial scale, Coignet & Cie., was established. Two types of material were used: the hide split (also known as ‘glue leather’)
and gelatine leaves [27].
By 1842 The J and G Company of Edinburg, Scotland was producing dried gelatine and in 1845 the first American patent (US4084) for commercial gelatine was granted to Peter Cooper, called
‘Improvement in The Preparation of Portable Gelatine’. It involved a dried product that just required the addition of hot water. The company mentioned above (J and G Company of Edinburgh) also began exporting its Cox Gelatine to the United States in the same year.
Aside from the food industry, new applications for gelatine were developed in both medicine and photography during the nineteenth century. Gelatine capsules for medicine began to be manufactured as early as 1833. In the field of photography, the British Journal of Photography announced the gelatine process in 1871 which had been developed by Richard Leach Maddox (1816-1902) [32].The use of gelatine provided a fast, sensitive photographic technique that further popularized photography since the negative plates could be sold ready-made [32].
quality water was used in batch processes where the gelatine was dissolved in different stages at temperatures between 50ºC and 100ºC. An interesting fact that Schriber notes is that gelatine colouration increases with increasing reaction time between protein and traces of carbohydrate in the raw material due to ‘’the Maillard Reaction (a reaction that takes place with amines and amino acids with reduced sugar content)’’(p.77). If colour is not wanted in the modern product then, oxidizing or reducing agents (e.g. hydrogen peroxide or sulphur dioxide) can render the product lighter [27]. Today there are a variety of production processes that result in gelatine with different properties [27].
5.3 . Chemical composition and properties of gelatine
Gelatine is derived from collagen, which consists of protein molecules (amino acids monomeric units) that are linked by covalent peptide bonds and are the major structural protein found in skin, bone, tendons, cartilage and connective tissues. Gelatine is obtained by hydrolysis of the collagen [27,33]. This macromolecule exhibits different molecular structures: primary, secondary, tertiary and quaternary [27]. According to Osada et al, in 2000, the main peculiarity of collagen is its ability to crosslink by forming triple helixes caused by the formation of a helix by hydrogen bonding between the NH group of the prolin and the CO group of the peptide in hydroxyprolin [34]. It is also known that due to its triple helix collagen is insoluble in cold water but when heated, it loses all of its structure, since the triple helix unwinds and the chains separate (the H-bonds are broken). This process is called denaturation and thereby soluble gelatine is obtained [27,33,35]. Another relevant fact about collagen is that depending on the part of the animal from which it is extracted it will give different types of collagen [27].
The surface properties are based on the gelatine side chains that have charged groups and hydrophilic or hydrophobic amino acids as mentioned by Schriber [27]. These amino acids tend to migrate to the surface, thereby they reduce the surface tension of aqueous solutions. Another important property is the IEP (Isoelectric Point), since it will influence the overall charge distribution of the gelatine. Neutrally charged, the gelatine exhibits a ‘’random coil structure’’. However, the pH of the matrix can shift and thereby change the charge of the molecule. With this, the molecule tends to unfold, thereby the pH will influence the surface effect of gelatine [27]. The binding properties of gelatine are based upon adhesion and cohesion. According to Schriber, adhesion is related to the interaction force between a solid interface and another substance, while cohesion is due to the interaction between the molecules within a substance [27]. When the gelatine solution has been spread over the surface, it will start to gel on cooling as the polymer cross links and returns to is helix form.
5.4 . The terms glue and gelatine
The terms glue and gelatine are sometimes misunderstood. According to the Merriam Webster online Dictionary (accessed May 2015) the word gelatine is used to describe a glutinous material obtained from animal tissues by boiling12. As for glue this term refers to any of various strong adhesive substances especially a hard protein, chiefly a gelatinous substance that is obtained by cooking down collagenous materials13. To understand better the terminology for each term, Portuguese and French
Dictionaries from 1895 were consulted as well as a book entitled ‘Glue and Gelatin’ from 1923. As
stated by the Portuguese Dictionary, the term glue (‘’colla’’) refers to ‘a glutinous material that has the intention of holding, joining and attaching paper, wood, etc (pp 112)’ [39]. The French Dictionary mentions that glue manufacture (‘’colle’’) ‘comprises cooking to gelatinous solution’ and has different
purposes, such as to photography, ceramics, porcelain and glass (pg.348)’ [40]. Both dictionaries do not include the term gelatine. Lastly, the ‘Glue and Gelatin’ book gives more detailed information
concerning these terms. As for glue it is stated that it is an ‘organic colloidal substance of varying appearance, chemical composition and physical properties, obtained upon drying the solution resulting from boiling with water properly prepared animal matter such as skin and bone’ (pp 11). The term
gelatine is ‘made from bone and skin or hide fragments, selected, cleaned and treated with especial care so that the resulting product is clearer, purer and generally cleaner and light in colour than glue’
(pp 11-12). However, to complicate matters in terms of clear definitions, Alexander also states that glue is an impure gelatine, and any glue possessing suitable strength and appearance may be termed gelatine [41].
In this dissertation, the term size is referred to the glutinous solution used to spread over the canvas during the preparation of the fabric for painting as described above and gelatine is assigned to the material that was obtained by hydrolysis of the collagen present on the ligaments, cartilages and tendons of the animal, which therefore was used as size.
Witlox, in her PhD thesis on historical paint preparation layers (1550-1900), found documentary