edgeBOX Remote Management
Paulo S´
ergio Campos Cavaleiro
Report of Project
Master in Informatics and Computing Engineering Supervisor: Jo˜ao Manuel Couto das Neves (Prof.)
Paulo S´
ergio Campos Cavaleiro
Report of Project
Master in Informatics and Computing Engineering
Approved in oral examination by the committee:
Chair: Pedro Alexandre Guimar˜aes Lobo Ferreira do Souto (Prof.)
External Examiner: Artur Jos´e Carneiro Pereira (Prof.) Internal Examiner: Jo˜ao Manuel Couto das Neves (Prof.)
This document starts to introduce the project, that is integration between OpenNMS and iTEMS; describes the goals to achieve that integration and the motivation.
It as a study of the different technologies that will be used in the development of the project and a overview of iTEMS and OpenNMS.
In the project analysis are described the different features that will compose the project, their domain, architecture and the test cases.
The implementation will highlight the strategy adopted to implement the differ-ent features, the most relevant parts developed in code and the configuration details so the solution work properly.
Finally in the conclusion is made an balance of the features developed and are described some future implementations.
O presente documento inicia-se com uma introdu¸c˜ao do projecto, que ´e uma inte-gra¸c˜ao entre OpenNMS e iTEMS. Descreve os objectivos para alcan¸car essa inte-gra¸c˜ao e a motiva¸c˜ao para a elabora¸c˜ao deste projecto.
Cont´em o estudo das diferentes tecnologias que ir˜ao ser usadas no desenvolvi-mento do projecto e uma vis˜ao do iTEMS e do OpenNMS.
Na an´alise do projecto s˜ao descritas as v´arias funcionalidades que ir˜ao fazer parte do projecto, o seu dom´ınio, arquitectura e casos de teste.
A implementa¸c˜ao ir´a real¸car a estrat´egia adoptada para implementar as difer-entes funcionalidades, as partes mais importantes desenvolvidas em c´odigo e os de-talhes de configura¸c˜ao para que a solu¸c˜ao funcione correctamente.
Na conclus˜ao ´e feito um balan¸co das funcionalidades desenvolvidas e s˜ao descritas algumas das poss´ıveis implementa¸c˜oes futuras.
1 Introduction 1
1.1 Context . . . 1
1.2 Project . . . 2
1.3 Motivation and Objectives . . . 2
1.4 Project Structure . . . 2
2 State of the Art 3 2.1 Technologies . . . 3
2.1.1 SNMP . . . 3
2.1.2 XML . . . 3
2.1.3 Java . . . 4
2.1.3.1 Java Server Pages (JSP) . . . 4
2.1.3.2 Java Servlets . . . 4 2.1.4 JDOM . . . 5 2.1.5 Acegi-Security . . . 5 2.1.6 RRDTool . . . 5 2.1.7 JRobin . . . 6 2.1.8 SNMP4j . . . 6 2.1.9 LOG4j . . . 7 2.1.10 Jetty . . . 7 2.1.11 Castor . . . 7 2.1.12 PostgreSQL . . . 8 2.1.13 FindBugs . . . 8 2.2 Platforms overview . . . 9 2.2.1 iTEMS Overview . . . 9 2.2.2 OpenNMS Overview . . . 10
2.3 Summary and Conclusions . . . 12
3 Project Analysis 13 3.1 Requirements Analysis . . . 13 3.1.1 Functional requirements . . . 13 3.1.1.1 Actors . . . 14 3.1.1.2 iTEMS Package . . . 14 3.1.1.3 OpenNMS Package . . . 24 3.1.2 Information requirements . . . 27 3.1.2.1 Class Domain . . . 27 3.1.2.2 Relational Model . . . 27
3.1.3 Non-Functional requirements . . . 30
3.2 Architecture Analysis . . . 30
3.3 Test Cases . . . 31
3.4 Summary and Conclusions . . . 41
4 Implementation 43 4.1 Integration Strategy . . . 43
4.1.1 Phase one . . . 43
4.1.2 Phase two . . . 44
4.1.3 Phase three . . . 45
4.1.3.1 CPE Groups Management . . . 45
4.1.3.2 Profiles Management . . . 47 4.1.3.3 Tasks Management . . . 48 4.1.3.4 Access Management . . . 51 4.2 Generated code . . . 51 4.3 Configuration . . . 55 5 Conclusions 61 5.1 Accomplished Objectives . . . 61 5.2 Future work . . . 62 References 64 A OpenNMS database 65 B CPE Group XML schema 69 C XML messages 71 C.1 Status retrieve . . . 71
2.1 OpenNMS concrete architecture [Shi02] . . . 10
3.1 General use case diagram . . . 14
3.2 iTEMS Package use case diagram . . . 15
3.3 Group Management Package use case diagram . . . 15
3.4 Profile Management use case diagram . . . 17
3.5 Task Management use case diagram . . . 18
3.6 Access Management use case diagram . . . 20
3.7 Task Engine use case diagram . . . 21
3.8 OpenNMS package use case diagram . . . 24
3.9 Domain diagram . . . 27
3.10 iTEMS part in database . . . 28
3.11 System Architecture . . . 31
4.1 Node List rebuild . . . 44
4.2 New node navigation bar options for edgeBOX . . . 44
4.3 Status retrieving . . . 46
4.4 CPE Group management in node page . . . 47
4.5 CPE Group management in node list page . . . 47
4.6 State machine for tasks . . . 48
4.7 Complete task execution . . . 50
A.1 OpenNMS database - First part . . . 65
A.2 OpenNMS database - Second part . . . 66
A.3 OpenNMS database - Third part . . . 66
A.4 OpenNMS database - Fourth part . . . 67
API Application Programming Interface CPE Customer Premises Equipment CPU Central Processing Unit
DHCP Dynamic Host Configuration Protocol HTML HyperText Markup Language
HTTP Hypertext Transfer Protocol
iTEMS Integrated edgeBOX Management System
JAR Java ARchive
JSP JavaServer page
NMS Network Management System OpenNMS Open Network Management System SGML Standard Generalized Markup Language SNMP Simple Network Management Protocol W3C World Wide Web Consortium
webUI Web User Interface
Introduction
The present project focus on a well know problem that is network management. In this particular project it will be made a solution intended to manage a specific network appliance, edgeBOX. This solution is integration between an open-source technology, OpenNMS, and a propriety technology, iTEMS. One resolves the prob-lem of monitoring and the other the probprob-lem of configuring, together they make a full solution for managing edgeBOXs.
So this project will focus on the integration problem between the two of them. For accomplish this it’s necessary to study the two platforms to capture the needs and the problems of this integration. First will be study the OpenNMS solution, because the integration is going to be made having as base the existing project of OpenNMS. This creates some technologies limitations since OpenNMS is made in Java and JSP, and been the configuration of the solution made in XML. The iTEMS solution is going to be studied for the best way of importing the features and functionalities existent and to be merged with OpenNMS, providing a unique solution.
1.1
Context
This project is an improvement of another solution existent in Critical Links that combines OpenNMS and iTEMS separately. In that solution OpenNMS and iTEMS coexist in the same machine but running in separated systems by using VMWare, since iTEMS is a Windows based program and OpenNMS was primordially Linux based. Because of the inconvenient of this solution and the fact that OpenNMS allows to make adaptive solutions, it was defined that a unique solution of iTEMS
and OpenNMS would be a better approach, with OpenNMS project been the support for this.
Critical Links is a company dedicated to the development and maintenance of edgeBOX.
The edgeBOX is a network device composed of hardware and software which combines all the required functions needed for the connection of a small or medium sized organization to the Internet, fully integrated into a single box.
1.2
Project
The project is essentially integration between OpenNMS and iTEMS to create a complete remote management solution for edgeBOXs.
1.3
Motivation and Objectives
The motivation for this project is to gain more knowledge in remote network manage-ment in a professional point of view applied to a real network appliance, edgeBOX.
To accomplish this the next objectives will be accomplished: • Study of OpenNMS platform;
• Study of iTEMS platform;
• Elaboration of integration strategy; • Creation of integrated solution; • Test solution.
1.4
Project Structure
Chapter 1 – introduction of the project. Chapter 2 – study of the state of the art. Chapter 3 – analysis of the project.
Chapter 4 – description of the implementation.
State of the Art
This chapter contains the study relative to all the technologies that are going to be used in the project. It evidences the choices made. Because of the nature of the project, an integration, almost all of the technologies were impose and so this chapter will focus on show that technologies lacking the comparison between similar technologies.
2.1
Technologies
2.1.1 SNMPSimple Network Management Protocol (SNMP) [Wik08] is a protocol developed to allow to simply manage networks. It main components are agents and network management systems (NMS), that basically work in a request response way been all the requests made by the NMS.
The agent collects data and responds to requests from the NMS. These responses will be essentially retrieving of variables that are defined in management informa-tion bases (MIB’s), by calls made from the NMS using the GET, GETNEXT and GETBULK operations, but the agent can send information without being asked using TRAP or INFORM operations. The NMS can to perform some configurations changes using the SET operation.
2.1.2 XML
The eXtensive Markup language (XML) [Wor08] is a markup language that can be used to create your own tags. It was created by the World Wide Web Consortium (W3C) to overcome the limitations of HTML, the Hypertext Markup Language that is the basis for all Web pages. Like HTML, XML is based on SGML – Standard
Generalized Markup Language. Although SGML has been used in the publishing industry for decades, its perceived complexity intimidated many people that other-wise might have used it (SGML also stands for ”Sounds great, maybe later”). XML was designed with the Web in mind.
With it large use and simplicity it started to be the preferred way of sending data through the web and other applications.
2.1.3 Java
2.1.3.1 Java Server Pages (JSP)
JavaServer Pages (JSP) [Sun08b] technology enables Web developers and designers to rapidly develop and easily maintain, information-rich, dynamic Web pages that leverage existing business systems. As part of the Java technology family, JSP technology enables rapid development of Web-based applications that are platform independent. JSP technology separates the user interface from content generation, enabling designers to change the overall page layout without altering the underlying dynamic content.
JSP technology uses XML-like tags that encapsulate the logic that generates the content for the page. The application logic can reside in server-based resources (such as JavaBeans component architecture) that the page accesses with these tags. Any and all formatting (HTML or XML) tags are passed directly back to the response page. By separating the page logic from its design and display and supporting a reusable component-based design, JSP technology makes it faster and easier than ever to build Web-based applications.
JavaServer Pages technology is an extension of the Java Servlet technology. Servlets are platform-independent, server-side modules that fit seamlessly into a Web server framework and can be used to extend the capabilities of a Web server with minimal overhead, maintenance, and support. Unlike other scripting languages, servlets involve no platform-specific consideration or modifications; they are appli-cation components that are downloaded, on demand, to the part of the system that needs them. Together, JSP technology and servlets provide an attractive alterna-tive to other types of dynamic Web scripting/programming by offering: platform independence; enhanced performance; separation of logic from display; ease of ad-ministration; extensibility into the enterprise; and, most importantly, ease of use. 2.1.3.2 Java Servlets
Servlets [Sun08a] are the Java platform technology of choice for extending and en-hancing Web servers. Servlets provide a component-based, platform-independent method for building Web-based applications, without the performance limitations
of CGI programs. And unlike proprietary server extension mechanisms (such as the Netscape Server API or Apache modules), servlets are server- and platform-independent. This leaves you free to select a ”best of breed” strategy for your servers, platforms, and tools.
Servlets have access to the entire family of Java APIs, including the JDBC API to access enterprise databases. Servlets can also access a library of HTTP-specific calls and receive all the benefits of the mature Java language, including portability, performance, reusability, and crash protection.
Today servlets are a popular choice for building interactive Web applications. Third-party servlet containers are available for Apache Web Server, Microsoft IIS, and others. Servlet containers are usually a component of Web and application servers, such as BEA WebLogic Application Server, IBM WebSphere, Sun Java System Web Server, Sun Java System Application Server, and others.
2.1.4 JDOM
JDOM [JDO08] is an API developed to provide a Java-Based solution for accessing, manipulating, and outputting XML data from Java code. It provides a robust, light-weight means of reading and writing XML data without the complex and memory-consumptive options that current API offerings provide.
2.1.5 Acegi-Security
Acegi Security [Sec08] is a powerful, flexible security solution for enterprise software (particularly with Spring). It provides comprehensive authentication, authorization, instance-based access control, channel security and human user detection capabili-ties.
2.1.6 RRDTool
RRDtool [Oet08] was written by Tobi Oetiker, the author of MRTG. It is, effectively, the next generation of MRTG, with a complete reimplementation of MRTGs graph-ing and logggraph-ing features. MRTG works great for simple network monitorgraph-ing, but thats really all it was originally intended to do. These days people are using MRTG to monitor everything from router bandwidth, to memory and disk statistics.
There are a number of drawbacks to MRTG however. On the graphing front, MRTG graphs always use a Y axis starting at 0, if you only want to see the relevant values in a range, you’re out of luck. You are significantly limited to the number of different values that can be graphed, if you want to see the network throughput of 10 different servers you’re probably going to be forced to use 10 different graphs. The list goes on and on. The point is that RRDtool fills in the gaps that MRTG leaves
wanting, and provides for open customization that was difficult if not impossible before.
But, MRTG has one thing that RRDtool doesn’t, simplicity. Many Network Admins who know more about air purifiers than UNIX systems are using MRTG on a regular basis, thanks to tools like cfgmaker and indexmaker, coupled with simple and basically straightforward config syntax. RRDtool isn’t quite so simple though, at least at first. Almost all functions are provided by a single tool: rrdtool. The same program is used to create databases, modify, tune and update them, generate graphs, and even make backup dumps.
2.1.7 JRobin
JRObin [Van08] is an API written by Sasa Markovic and Arne Vandamme to make a 100% Java tool of the functionalities of RRDtool. It acts exactly as RRDtool excepts that is written in Java allowing to take full party of Java portability and to simplify the life of the ones that perfer Java.
2.1.8 SNMP4j
SNMP4J is an object oriented SNMP API for Java Managers and Agents.
SNMP4J is an enterprise class free open source and state-of-the-art SNMP im-plementation for JavaTM 2SE 1.4 or later. SNMP4J supports command generation
(managers) as well as command responding (agents). Its clean object oriented design is inspired by SNMP++, which is a well-known SNMPv1/v2c/v3 API for C++.
The SNMP4J Java SNMP API provides the following features:
• SNMPv3 with MD5 and SHA authentication and DES and AES 128, AES 192, and AES 256 privacy.
• Pluggable Message Processing Models with implementations for MPv1, MPv2c, and MPv3
• All PDU types.
• Pluggable transport mappings. UDP and TCP are supported out-of-the-box. • Pluggable timeout model.
• Synchronous and asynchronous requests.
• Command generator as well as command responder support. • Free open source with the Apache license model
• Logging based on Log4J
• Row-based efficient asynchronous table retrieval with GETBULK. • Multi-threading support.
2.1.9 LOG4j
Almost every large application includes its own logging or tracing API. In confor-mance with this rule, the E.U. SEMPER project decided to write its own tracing API. This was in early 1996. After countless enhancements, several incarnations and much work that API has evolved to become log4j [Fou08], a popular logging package for Java.
As know logging can be very complex but is an important aspect of development and maintenance, with the use of an API as log4j this is made simpler and allows to have better performance, a problem that comes of inserting code for logging point. 2.1.10 Jetty
Jetty [Jet08] is an open-source, standards-based, full-featured web server imple-mented entirely in Java. It is released under the Apache 2.0 licence and is therefore free for commercial use and distribution. First created in 1995, Jetty has benefitted from input from a vast user community and consistent and focused development by a stable core of lead developers. There are many more examples of Jetty in action on the Jetty Powered Page that has selections from among the tens of thousands of production Jetty instances. However, as Jetty aims to be as unobtrusive as possible, countless websites and products are based around Jetty, but Jetty is invisible!
Jetty can be used as:
• a stand-alone traditional web server for static and dynamic content
• a dynamic content server behind a dedicated HTTP server such as Apache using mod proxy
• an embedded component within a Java application 2.1.11 Castor
Castor [Cas08] is an Open Source data binding framework for Java. It’s the shortest path between Java objects, XML documents and relational tables. Castor provides Java-to-XML binding, Java-to-SQL persistence, and more.
Castor XML is an XML databinding framework. Unlike the two main XML APIs, DOM (Document Object Model) and SAX (Simple API for XML) which deal
with the structure of an XML document, Castor enables one to deal with the data defined in an XML document through an object model which represents that data. Castor XML can marshal almost any ”bean-like” Java Object to and from XML. In most cases the marshalling framework uses a set of ClassDescriptors and Field-Descriptors to describe how an Object should be marshalled and unmarshalled from XML.
For those not familiar with the terms ”marshal” and ”unmarshal”, it’s simply the act of converting a stream (sequence of bytes) of data to and from an Object. The act of ”marshalling” consists of converting an Object to a stream, and ”unmarshalling” from a stream to an Object.
2.1.12 PostgreSQL
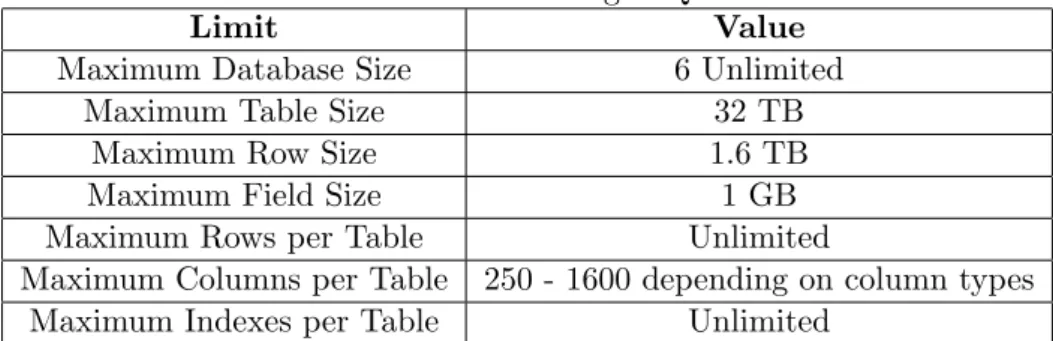
PostgreSQL [Pos08] is a powerful, open source relational database system. It has more than 15 years of active development and a proven architecture that has earned it a strong reputation for reliability, data integrity, and correctness. It runs on all ma-jor operating systems, including Linux, UNIX (AIX, BSD, HP-UX, SGI IRIX, Mac OS X, Solaris, Tru64), and Windows. It is fully ACID compliant, has full support for foreign keys, joins, views, triggers, and stored procedures (in multiple languages). It includes most SQL92 and SQL99 data types, including INTEGER, NUMERIC, BOOLEAN, CHAR, VARCHAR, DATE, INTERVAL, and TIMESTAMP. It also supports storage of binary large objects, including pictures, sounds, or video. It has native programming interfaces for C/C++, Java, .Net, Perl, Python, Ruby, Tcl, ODBC, among others, and exceptional documentation.
An enterprise class database, PostgreSQL boasts sophisticated features such as Multi-Version Concurrency Control (MVCC), point in time recovery, tablespaces, asynchronous replication, nested transactions (savepoints), online/hot backups, a so-phisticated query planner/optimizer, and write ahead logging for fault tolerance. It supports international character sets, multibyte character encodings, Unicode, and it is locale-aware for sorting, case-sensitivity, and formatting. It is highly scalable both in the sheer quantity of data it can manage and in the number of concurrent users it can accommodate. There are active PostgreSQL systems in production en-vironments that manage in excess of 4 terabytes of data. Some general PostgreSQL limits are included in the table 2.1.
2.1.13 FindBugs
FindBugs is a static analysis tool that examines classes or JAR files looking for potential problems by matching bytecodes against a list of bug patterns. It allows
Table 2.1: General PostgreSQL limits
Limit Value
Maximum Database Size 6 Unlimited
Maximum Table Size 32 TB
Maximum Row Size 1.6 TB
Maximum Field Size 1 GB
Maximum Rows per Table Unlimited
Maximum Columns per Table 250 - 1600 depending on column types Maximum Indexes per Table Unlimited
to clean the code and to provide better quality, but as all static analysis tools it will have some false positives.
2.2
Platforms overview
2.2.1 iTEMS Overview
iTEMS is a tool created by Critical Software and adapted by Critical Links to provide configuration utilities for edgeBOXs. More specifically, the general aims of the solution include the ability to offer a set of utilities, termed the Network Operations Center, in such a way as to centralize and manage all the services presented by the edgeBOX network [Sou06].
Briefly, the major functions provided by this system are:
• The centralized and integrated configuration of all the existing edgeBOX units in a network.
• Pre-provisioning, ability to pre-configure a network of edgeBOX units.
• The centralized gathering of alarms. It is important to have a global vision of the network condition with an indication of the places where problems might occur and which require immediate intervention.
• Access control and auditing of executed operations. It is important for oper-ators to be able, at any moment in time, to decide who has access to which utility and to identify Who did What and When. Additionally, it is important to guarantee the confidentiality of the information produced or maintained in the system – only authorized users should have access to it.
2.2.2 OpenNMS Overview
“OpenNMS [Ope08] is the world’s first enterprise grade network monitoring platform developed under the open source model. It consists of a community supported open-source project as well as a commercial services, training and support organization.” Currently OpenNMS focuses on three areas: service polling, data collection, and event management.
In addition to service polling, OpenNMS can collect SNMP data from network devices running SNMP agents. It stores the data using RRDTool or JRobin and can display it as reports in the webUI. There are configurable thresholds (such as disk space and CPU utilization) to generate events when the thresholds are met.
One important aspect of data collection on the scale of an enterprise is the need to automate as much as possible. It is very difficult to configure data collection on 20,000 devices manually. OpenNMS has the concept of a ”system,” defined by a particular System Object ID (systemOID), which matches devices with the data to collect from them.
The last main functional area is event management and notifications. OpenNMS generates events corresponding to outage detection and exceeded thresholds, etc.. In addition, it can receive and display external events such as SNMP traps.
Figure 2.1: OpenNMS concrete architecture [Shi02]
As it’s been mentioned OpenNMS has been designed from its inception to be enterprise-grade and for those purposes the following information it’s stated from the OpenNMS group:
• High performance (vertical scaling): A single instance of OpenNMS supports monitoring of a large number of nodes (tens of thousands, hundreds of thou-sands) from a single server.
• Automation: OpenNMS minimizes the amount of manual configuration and reconfiguration needed by automatically performing tasks on a regular basis, like discovering new nodes, detecting services on new and existing nodes, and gathering response time and performance data.
• Rule-based configuration (policy-based): Flexible rules can be used to specify what services are polled on certain devices, which SNMP data is collected and how often, and to whom various notifications should be delivered, without having to explicitly identify and configure each host in the monitoring system. All of these features made OpenNMS one high-end monitoring solution being easy to use and configure and with the code made available enabling customizations to overcome the special needs of determined NMS. OpenNMS is built upon three main components the webUI in jsp, the engine in Java and the database in postgreSQL.
The webUI is where administrators can make some configurations and where they can monitor the network; it provides a graphical interface and can construct graphics based on the data collected.
The engine as various daemons that perform different tasks, the ones identified in this study and that seamed relevant for our implementation are:
– Eventd – is responsible for handling all the events generated;
Trapd – is responsible for listening SNMP traps on the standard port; –
– Dhcpd – is responsible for listening DHCP requests;
– Capsd - is responsible to collect all the capabilities for a node after been notified by the discovery, and to load all the data into the database;
– Scriptd – is responsible for executing scripts;
– Rtcd – is responsible to maintain data required so as to calculate availability; – Pollerd – is responsible for polling on services on a node;
– Discovery – is responsible for discovering nodes on the network;
– Vacuumd – is responsible to run periodic updates against the database for database maintenance work;
There are other daemons in OpenNMS that where identified but it couldn’t be made a good description of their main functions.
2.3
Summary and Conclusions
The chapter introduced the different technologies that will be present in the project and the overview of the two solutions for integration.
Project Analysis
Problem description
As the edgeBOX solution evolved the need for its remote management raised. So its previous solution, iTEMS, that only provided configuration management and some alarms become obsolete it was need to expand that solution. Initial was made a study to see which management and monitoring solution existed and which ones were closer to the features intended, but there was none that covered all that features. OpenNMS was the one closer to what was wanted and allowed to expand. Initially the solution adopted combined OpenNMS, for monitoring, and iTEMS, for configuring. But it was an inefficient solution so it drove to the problem of integrating the two solutions in one. This new solution will provide monitoring and configuration capabilities for the edgeBOX.
3.1
Requirements Analysis
This section is dedicated to the requirements analysis. Where will be described the requirements defined for accomplish the objectives.
3.1.1 Functional requirements
The functional requirements capture the intended behavior of the system. With the use of use cases this requirements are easier to understand and create a baseline for development.
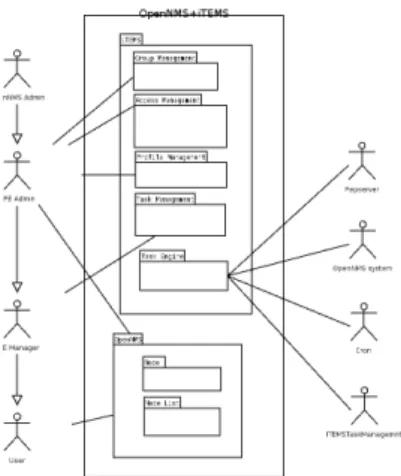
The figure 3.1 represents the use cases that will be implemented in the system. The use cases are divided in two main package:
• iTEMS package • OpenNMS package
Figure 3.1: General use case diagram
3.1.1.1 Actors
OpenNMS admin: actor from original OpenNMS solution that as full access to all functionalities. Extends CPE Admin.
CPE Admin: actor responsible for administrating the iTEMS functionali-ties, this are, managing CPE Groups and managing profiles. Extends CPE Manager.
CPE Manager: actor responsible for managing tasks. Extends User.
User: actor from original OpenNMS, it can consult the information available. OpenNMS system: actor that represents calls from the OpenNMS engine to the task engine.
Cron: actor that represents calls from the cron to the task engine.
Pepserver: actor from edgeBOX that receives the requests to the edgeBOX and sends responses to that requests.
iTMESTaskManagement: actor that represents the process where the task engine is execute.
3.1.1.2 iTEMS Package
This package represents the functionalities to import from the previous iTEMS solution; the figure 3.2 represents the diagram for the package.
Figure 3.2: iTEMS Package use case diagram
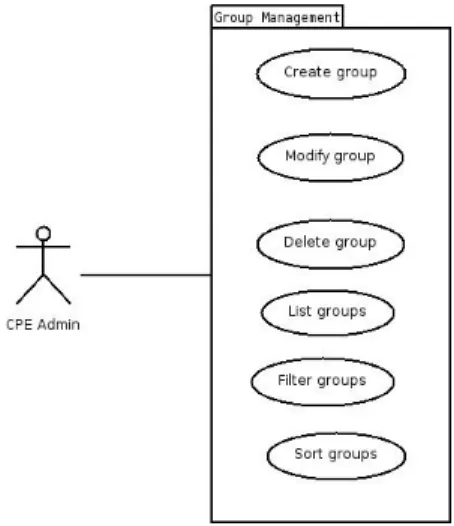
CPE Group Management Package
This package contains the use cases for CPE Group Management; the figure 3.3
represents the diagram for the package.
Id: UC.1
Name: Create CPE Group
Description: The user will be able to create a new CPE Group Actors: OpenNMS Admin, CPE Admin
Assumptions: – Priority: High
Id: UC.2
Name: Modify CPE Group
Description: The user will be able to modify a CPE Group Actors: OpenNMS Admin, CPE Admin
Assumptions: The CPE Group that’s going to be modified exists Priority: High
Id: UC.3
Name: Delete CPE Group
Description: The user will be able to delete a CPE Group Actors: OpenNMS Admin, CPE Admin
Assumptions: The CPE Group that’s going to be deleted exists Priority: High
Id: UC.4
Name: List CPE Group
Description: Will be made available for the user a list of CPE Groups Actors: OpenNMS Admin, CPE Admin
Assumptions: – Priority: High
Profile Management Package
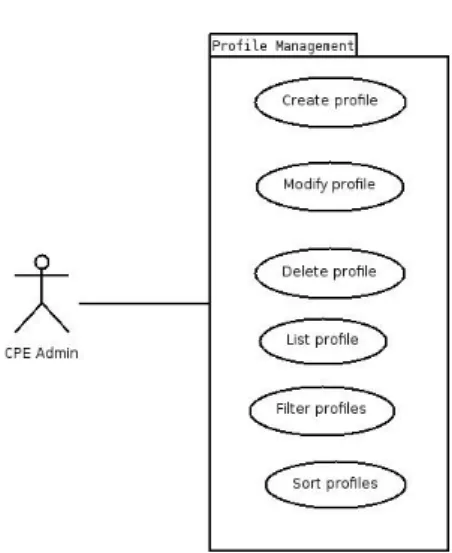
This package contains the use cases for Profile Management; the figure 3.4 repre-sents the diagram for the package.
Figure 3.4: Profile Management use case diagram
Id: UC.5
Name: Create profile
Description: The user will be able to create a new profile by adding and configuring the operations and by giving a name to the profile
Actors: OpenNMS Admin, CPE Admin Assumptions: –
Priority: High
Id: UC.6
Name: Modify profile
Description: The user will be able to modify a profile Actors: OpenNMS Admin, CPE Admin
Assumptions: The profile that’s going to be modified exists Priority: High
Id: UC.7
Name: Delete profile
Description: The user will be able to delete a profile Actors: OpenNMS Admin, CPE Admin
Assumptions: The profile that’s going to be deleted exists Priority: High
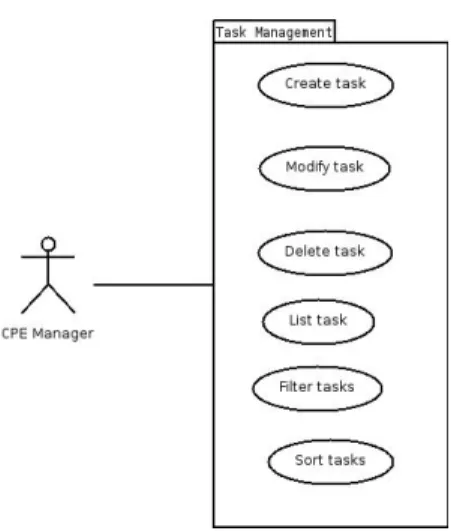
Figure 3.5: Task Management use case diagram
Id: UC.8
Name: List profiles
Description: Will be made for the user a list of profiles Actors: OpenNMS Admin, CPE Admin
Assumptions: – Priority: High
Id: UC.9
Name: Filter profiles
Description: It allows to refine the list of profiles Actors: OpenNMS Admin, CPE Admin Assumptions: –
Priority: High
Id: UC.10
Name: Sort profiles
Description: For ordering the profiles
Actors: OpenNMS Admin, CPE Admin Assumptions: –
Priority: High Task Management Package
This package contains the use cases for Task Management, the figure 3.5 represents the diagram for the package.
Id: UC.11
Name: Create task
Description: The user will be able to create a new task Actors: OpenNMS Admin, CPE Admin, CPE Manager Assumptions: –
Priority: High
Id: UC.12
Name: Modify task
Description: The user will be able to modify a task Actors: OpenNMS Admin, CPE Admin
Assumptions: The task that’s going to be modified exists Priority: High
Id: UC.13
Name: Delete profile
Description: The user will be able to delete a task
Actors: OpenNMS Admin, CPE Admin, CPE Manager Assumptions: The task that’s going to be deleted exists Priority: High
Id: UC.14
Name: List tasks
Description: Will be made for the user a list of tasks
Actors: OpenNMS Admin, CPE Admin, CPE Manager Assumptions: –
Priority: High
Id: UC.15
Name: Filter tasks
Description: It allows to refine the list of tasks
Actors: OpenNMS Admin, CPE Admin, CPE Manager Assumptions: –
Priority: High
Id: UC.16
Name: Sort tasks
Description: For ordering the tasks
Actors: OpenNMS Admin, CPE Admin, CPE Manager Assumptions: –
Figure 3.6: Access Management use case diagram
Access Management Package
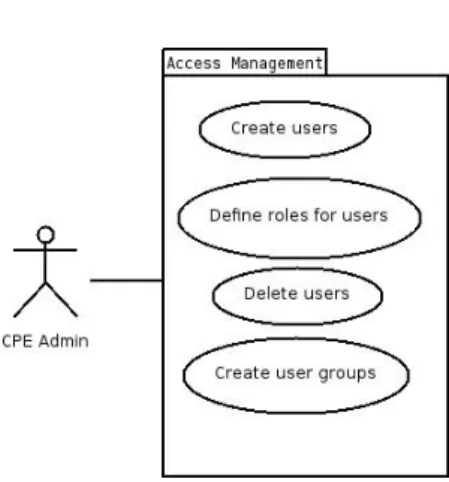
This package contains the use cases for Access Management; the figure 3.6 repre-sents the diagram for the package.
Id: UC.17
Name: Create user
Description: The administrator will be able to create a new user Actors: OpenNMS Admin, CPE Admin
Assumptions: – Priority: High
Id: UC.18
Name: Delete user
Description: The administrator will be able to delete a user Actors: OpenNMS Admin, CPE Admin
Assumptions: The user to delete exists Priority: High
Id: UC.19
Name: Define role
Description: Define what kind of role a user will have in the system Actors: OpenNMS Admin, CPE Admin
Assumptions: – Priority: High
Figure 3.7: Task Engine use case diagram
Id: UC.20
Name: Create user group
Description: The administrator will be able to create a new user group
Actors: OpenNMS Admin, CPE Admin Assumptions: –
Priority: High
Id: UC.21
Name: Delete user group
Description: The administrator will be able to delete a user group Actors: OpenNMS Admin, CPE Admin
Assumptions: The user to delete exists Priority: High
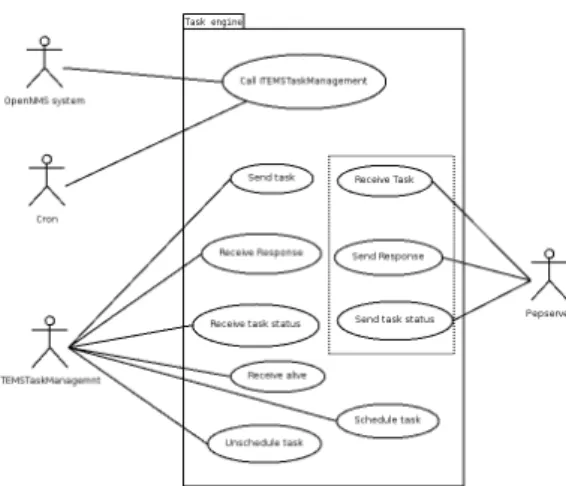
Task Engine Package
This package contains the use cases for Task Engine; the figure 3.7 represents the diagram for the package.
Id: UC.22
Name: Call iTEMSTaskManagemnt
Description: This use case represents a call to the process iTEM-STaskManagemnt that is responsible for sending, sched-ule and unschedsched-ule tasks.
Actors: OpenNMS system, Cron
Assumptions: The process exists and can be executed Priority: High
Id: UC.23
Name: Send task
Description: A task is sent to the pepserver to be processed. Actors: iTEMSTaskManagemnt
Assumptions: There’s a connection to the pepserver Priority: High
Id: UC.24
Name: Receive response
Description: A task as been processed by the pepserver and the re-sponse is received by the iTEMSTaskManagemnt. Actors: iTEMSTaskManagemnt
Assumptions: There’s a connection to the pepserver Priority: High
Id: UC.25
Name: Receive task status
Description: A task has been executed, all the operations have been performed, and the iTEMSTaskManagemnt receives a response of the pepserver if it was successful or failed. Actors: iTEMSTaskManagemnt
Assumptions: There’s a connection to the pepserver Priority: High
Id: UC.26
Name: Receive alive
Description: The OpenNMS catches an SNMP trap which repre-sented an alive and sends it to iTEMSTaskManagemnt. Actors: iTEMSTaskManagemnt
Assumptions: – Priority: High
Id: UC.27
Name: Schedule task
Description: The task is schedule in the cron. Actors: iTEMSTaskManagemnt
Assumptions: – Priority: High
Id: UC.28
Name: Unschedule task
Description: The task is unschedule in the cron. Actors: iTEMSTaskManagemnt
Assumptions: – Priority: High
The next use cases are present only to allow a simple understand of some in-formation transaction, these use cases aren’t part of the solution to develop they belong to the use cases of the pepserver solution.
Id: UC.29
Name: Receive task
Description: A task is received by the pepserver to be processed. Actors: Pepserver
Assumptions: –
Priority: –
Id: UC.30
Name: Send response
Description: A task as been processed by the pepserver and a re-sponse is sent to iTEMSTaskManagemnt.
Actors: Pepserver Assumptions: –
Priority: –
Id: UC.31
Name: Send task status
Description: A task has been executed, all the operations have been performed, and the pepserver sends if it was successful or failed.
Actors: Pepserver Assumptions: –
Figure 3.8: OpenNMS package use case diagram
3.1.1.3 OpenNMS Package
The OpenNMS package shows the main use cases for the OpenNMS solution, the figure 3.8 represents the diagram for the package.
Node Package
Node package represents the use cases that will expand the way nodes are viewed in OpenNMS with iTEMS.
Id: UC.32
Name: Add node to CPE group
Description: In the node view it will be possible to add that specific node to a CPE Group
Actors: OpenNMS Admin, CPE Admin Assumptions: There are CPE groups
Priority: High
Id: UC.33
Name: Remove node from CPE group
Description: In the node view it will be possible to remove that spe-cific node from a CPE Group
Actors: OpenNMS Admin, CPE Admin Assumptions: The node belongs to the CPE group Priority: High
Id: UC.34
Name: Create edgeBOX credentials
Description: Create the credentials for the edgebox by adding the user and the password for that particular edgeBOX Actors: OpenNMS Admin, CPE Admin
Assumptions: The node is an edgeBOX Priority: High
Id: UC.35
Name: Modify edgeBOX credentials
Description: Modify the credentials for the edgebox by modifying the user and/or the password for that particular edgeBOX Actors: OpenNMS Admin, CPE Admin
Assumptions: The node is an edgeBOX Priority: High
Id: UC.36
Name: Access edgeBOX-Management service
Description: Quick link to access the webAdmin for an edgeBOX us-ing the saved credentials
Actors: OpenNMS Admin, CPE Admin Assumptions: The node is an edgeBOX
Priority: High
Id: UC.37
Name: View edgeBOX status
Description: A group of status about an edgeBOX will be displayed Actors: OpenNMS Admin, CPE Admin, CPE Manages, User Assumptions: The node is an edgeBOX and there are credentials for
that edgeBOX Priority: High
Node list Package
Node list package is a group of use cases to improve the way nodes are listed in OpenNMS and to have some iTEMS operations in the same view.
Id: UC.38
Name: View asset information
Description: Show the asset information for the nodes been listed Actors: OpenNMS Admin, CPE Admin, CPE Manages, User Assumptions: –
Priority: High
Id: UC.39
Name: Add node to CPE Group
Description: Allows the administrator to add a selected node to a selected CPE Group
Actors: OpenNMS Admin, CPE Admin, CPE Manages, User Assumptions: There are CPE Groups
Priority: High
Id: UC.40
Name: Remove node from CPE Group
Description: Allows the administrator to remove a selected node from a selected CPE Group
Actors: OpenNMS Admin, CPE Admin, CPE Manages, User Assumptions: The node belongs to the CPE Group
Priority: High
Id: UC.41
Name: Filter nodes
Description: Filters the nodes according to the search parameters Actors: OpenNMS Admin, CPE Admin, CPE Manages, User Assumptions: –
Priority: High
Id: UC.42
Name: Sort nodes
Description: For ordering the nodes.
Actors: OpenNMS Admin, CPE Admin, CPE Manages, User Assumptions: –
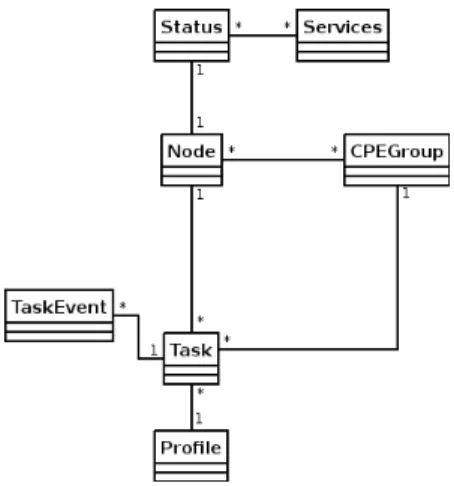
Figure 3.9: Domain diagram
3.1.2 Information requirements 3.1.2.1 Class Domain
The class domain represents the way that information will be processed, and as we can see in figure 3.9 there are five main classes: Node, Status, CPEGroup, Profile and Task.
The Node class defines all the information and operations need to process nodes. The Status class defines all the information and operations need to process status for edgeBOX nodes.
The Services class is used to process the services existent in edgeBOX, which will be retrieved for status information.
The CPEGroup class defines all the information and operations need to process groups.
The Profile class defines all the information and operations need to process pro-files.
The Task class defines all the information and operations need to process tasks. The TaskEvent class is responsible for treatment of the log events relative to tasks.
3.1.2.2 Relational Model
The relational model defines the database schema and how the information is going to be stored in the database. The figure3.10represents part of that schema accord-ing to the new tables added to the original OpenNMS database schema, in appendix
Figure 3.10: iTEMS part in database
Table: items profiles Primary keys: name
Attribute Type Attributes: name varchar(50)
description varchar(255) userName varchar(50) userGroup varchar(50) createDate timestamp modifyDate timestamp profileData text Foreign keys: Constrains: unique(name)
Table: items tasks Primary keys: taskId
Attribute Type
Attributes: taskId integer
name varchar(50) cpe integer cpeGroupName varchar(50) profileName varchar(50) description varchar(255) userName varchar(50) userGroup varchar(50) startDate varchar(50) endDate varchar(50) period varchar(50) type varchar(1) state varchar(1) Foreign keys: cpe,profileName
Constrains:
Table: items tasksEvents Primary keys: eventId,taskId
Attribute Type Attributes: eventId integer
taskId integer status integer sendDate varchar(50)
endDate varchar(50) Foreign keys: taskId
Constrains:
Table: items credentials Primary keys: nodeId
Attribute Type Attributes: nodeId integer
userName varchar(50) password varchar(50) Foreign keys: nodeId
3.1.3 Non-Functional requirements
Non-functional requirements are very important on the creation of software because they allow to better execute the implementation of the intended product use cases with better quality and less risks.
Availability – it must be available all the time.
Dependencies – it depends on Linux, ethernet connection and PostgreSQL database.
Extensibility – it must allow adding new features
Open-Source – the source code is produced under the GNU GPL license. Performance – it must deliver information in a time considered satisfactory to the user.
Quality – it must comply with the quality standard used in Critical Links Scalability – it must be capable of support large number of nodes and oper-ations over them.
Security – it must be secure in all its layers.
Usability – it must be simple allowing the user to interact with minimum effort.
3.2
Architecture Analysis
The systems architecture will have as base the OpenNMS architecture been added a layer for the iTEMS integration. In the figure 3.11 can be seen the different parts that will compose this architecture.
The webUI – this is where the user will interact with the OpenNMS engine and iTEMS engine.
The OpenNMS engine – this compiles all the functionalities of gathering data and monitoring the network.
The iTEMS engine – this performs specific operations over edgeBOXs. The PostgreSQL database – this is the database were all data is stored. Security - all layers must have the most security possible.
Figure 3.11: System Architecture
3.3
Test Cases
Test cases reflect how a use case should be performed and what are the expected results. Next are listed all the test cases according to its use cases.
Id: T.1 – Create a CPE Group (UC.1)
Description: In this test it will be created a CPE Group in the webUI.
Steps: 1 Go to iTEMS.
2 Select CPE’s Group Management. 3 Select add new CPE Group. 4 Configure the group.
5 Save group.
Expected results: A new group created in the XML file and listed in the webUI.
Id: T.2 – Modify a CPE Group (UC.2)
Description: In this test it will be modified a CPE Group in the webUI.
Steps: 1 Go to iTEMS.
2 Select CPE’s Group Management. 3 Select the CPE Group to modify. 4 Modify the configuration.
5 Save group.
Id: T.3 – Delete a CPE Group (UC.3)
Description: In this test it will be deleted a CPE Group in the webUI.
Steps: 1 Go to iTEMS.
2 Select CPE’s Group Management. 3 Select the CPE Group to delete. 4 Confirm.
Expected results: The group removed from the XML and not listed. Id: T.4 – List CPE’s Groups (UC.4)
Description: In this test it will be list the CPE’s Groups in the webUI.
Steps: 1 Go to iTEMS.
2 Select CPE’s Group Management. 3 A list of CPE’s Groups will be shown.
Expected results: See all the groups that exist in the XML listed in the webUI.
Id: T.5 – Create a profile (UC.5)
Description: In this test it will be created a profile from the webUI.
Steps: 1 Go to iTEMS.
2 Select Profiles Management. 3 Select add new profile.
4 Insert the name of the profile and comments. 5 Select operation.
5.1 Configure operation. 5.2 Save configuration. 6 Save profile.
Expected results: A new profile created in the database and shown in the list of profiles in the webUI.
Id: T.6 – Modify a profile (UC.6)
Description: In this test it will be modified a profile from the webUI.
Steps: 1 Go to iTEMS.
2 Select Profiles Management. 3 Select the profile to modify. 4 Select operation.
4.1 Configure operation. 4.2 Save configuration. 5 Save profile.
Id: T.7 – Delete a profile (UC.7)
Description: In this test it will deleted a profile from the webUI.
Steps: 1 Go to iTEMS.
2 Select Profiles Management. 3 Select the profile to delete. 4 Confirm deleting.
Expected results: The profile will be deleted from the database as the tasks associated with it.
Id: T.8 – List profiles (UC.8)
Description: In this test it will be list the profiles in the webUI.
Steps: 1 Go to iTEMS.
2 Select Profiles Management. 3 A list of profiles will be shown. Expected results: See a list of profiles in the webUI. Id: T.9 – Filter profiles (UC.9)
Description: In this test it will be filter profiles in the webUI.
Steps: 1 Go to iTEMS.
2 Select Profiles Management. 3 Insert name to filter.
4 Press search.
Expected results: See a list of profiles in the webUI according to the search. Id: T.10 – Sort profiles (UC.10)
Description: In this test it will be sorted profiles in the webUI.
Steps: 1 Go to iTEMS.
2 Select Profiles Management. 3 Press the column to sort.
Expected results: See the list of profiles in the webUI sorted by the column selected.
Id: T.11 – Create a task (UC.11)
Description: In this test will it be created a task in the webUI.
Steps: 1 Go to iTEMS.
2 Select Tasks Management. 3 Select add new task. 4 Configure the task. 5 Save task.
Expected results: A new task created in the database and shown in the list of tasks in the webUI.
Id: T.12 – Modify a task (UC.12)
Description: In this test it will be modified a task in the webUI.
Steps: 1 Go to iTEMS.
2 Select Tasks Management. 3 Select the task to modify. 4 Modify the configuration. 5 Save task.
Expected results: The task will be updated in the database. Id: T.13 – Delete a task (UC.13)
Description: In this test it will be deleted a task in the webUI.
Steps: 1 Go to iTEMS.
2 Select Tasks Management. 3 Select the task to delete. 4 Confirm.
Expected results: The task will be deleted from the database.
Id: T.14 – List tasks (UC.14)
Description: In this test it will be list the tasks in the webUI.
Steps: 1 Go to iTEMS.
2 Select Tasks Management. 3 A list of tasks will be shown. Expected results: See a list of tasks in the webUI. Id: T.15 – Filter tasks (UC.15)
Description: In this test it will be filter tasks in the webUI.
Steps: 1 Go to iTEMS.
2 Select Tasks Management. 3 Insert name to filter. 4 Press search.
Expected results: See a list of tasks in the webUI according to the search.
Id: T.16 – Sort tasks (UC.16)
Description: In this test it will be sorted tasks in the webUI.
Steps: 1 Go to iTEMS.
2 Select Tasks Management. 3 Press the column to sort.
Expected results: See the list of tasks in the webUI sorted by the column selected.
Id: T.17 – Create a user (UC.17)
Description: In this test it will be created a new user.
Steps: 1 Go to Admin.
2 Select Configure Users, Groups and Roles. 3Select Configure Users.
4 Select add new user.
5 Insert credentials for new user. 6 Configure user.
7 Save user.
Expected results: The user is created in the XML file and listed in the webUI.
Id: T.18 – Delete a user (UC.18)
Description: In this test it will be deleted a user.
Steps: 1 Go to Admin.
2 Select Configure Users, Groups and Roles. 3 Select Configure Users.
4 Select the user to delete. 5 Confirm.
Expected results: The user is deleted from the XML file.
Id: T.19 – Define the role for a user (Administrator) (UC.19)
Description: In this test it will be defined the role for a user.
Steps: 1 Add a user.
2 Edit [OPENNMS
HOME]/etc/magic-users.properties.
3 Add the user to role.admin.users. 4 Restart OpenNMS.
Id: T.20 – Create a user group (UC.20)
Description: In this test it will be created a user group.
Steps: 1 Go to Admin.
2 Select Configure Users, Groups and Roles. 3 Select Configure Groups.
4 Select Add new group. 5 Insert name and comment. 6 Confirm.
7 Select users. 8 Save.
Expected results: The group will be added to the XML file and listed in the webUI.
Id: T.21 – Delete a user group (UC.21)
Description: In this test it will be deleted a user group.
Steps: 1 Go to Admin.
2 Select Configure Users, Groups and Roles. 3 Select Configure Groups.
4 Select the group to delete. 5 Confirm.
Expected results: The group will be deleted from the XML file.
Id: T.22 – Call iTEMSTaskManagemnt process (simple) (UC.22)
Description: In this test the process will be called in the command line.
Steps: 1 Open shell.
2 Go to OPENNMS HOME\bin.
3 Enter execItemsTaskManagement.sh
[state|taskStatus|alive] [type] [taskId] [source]. 4 The process will execute.
Expected results: The process will execute and the opera-tions performed will be logged in OPEN-NMS HOME\logs\webapp\iTEMSTaskManagemnt.lo g
Id: T.23 – Call iTEMSTaskManagemnt process (webUI) (UC.22)
Description: In this test theprocesss will be called using the webUI.
Steps: 1 Go to iTEMS.
2 Select Task Management. 3 Select Add new task. 4 Configure the task. 5 Save.
6 Theprocesss will be called.
Expected results: Theprocesss will execute and the opera-tions performed will beloggedd in OPEN-NMS HOME\logs\webapp\iTEMSTaskManagemnt.lo g
Id: T.24 – Call iTEMSTaskManagemnt process (cron) (UC.22)
Description: In this test it will be called thprocessss in the command line.
Steps: 1 Edit \etc\crontab.
2 Insert a new line with the format: [minute] [hour] [day] [mount] [dayOfWeek] root OPEN-NMS HOME\bin\execItemsTaskManagement.sh
[state|taskStatus|alive] [type] [taskId] [source].
3 The processes will be called at the shedulled time in the crontab.
Expected results: The process will execute and the opera-tions performed will be logged in OPEN-NMS HOME\logs\webapp\iTEMSTaskManagemnt.lo g
Id: T.25 – Send a task (UC.23)
Description: Test if a task is sent to the pepserver. Steps: 1 Perform test T.23
Expected results: The task will be sent and the
re-sult can be confirmed in
Id: T.26 – Receive response (UC.24)
Description: Test for receiving confirmation response of task pro-cessed bytheh pepserver.
Steps: 1 Perform test T.23
Expected results: The pepserver will respond and the
result can be confirmed in
OPEN-NMS HOME\logs\webapp\iTEMSTaskManagemnt.lo g and in the webUI in tasks logs.
Id: T.27 – Receive task status (UC.25) Description: Test to receive the status of a task. Steps: 1 Perform test T.23
Expected results: Update of the status in the database and it can be viewed in task logs in the webUI
Id: T.28 – Receive alive (UC.26) Description: Test to receive an alive.
Steps: 1
2 Configure a profile for the operation iTEMS alive 3 Perform test T.23 selecting that profile
Expected results: There will be a log of the received alive in OPEN-NMS HOME\logs\webapp\iTEMSTaskManagemnt.log
Id: T.29 – Schedule task (UC.27)
Description: Test to see if the task is schedule in the cron.
Steps: 1 Perform test T.23 configuring the task to be unique or periodic.
Expected results: The task will be schedule in the crontab file.
Id: T.30 – Unschedule task (UC.28)
Description: Test to see if the task is unschedule in the cron. Steps: 1 Perform test T.23 configuring the task to be unique
2 Wait until task executes. 3 Confirm crontab.
Id: T.31 – Add a node to CPE Group in node page (UC.32) Description: In this test it will be added a node to a CPE Group in
the node view page. Steps: 1 Go to the node page.
2 In Group Management select the CPE Group to add the node to.
3 The node is added automatically.
Expected results: The node will be added to the selected CPE Group.
Id: T.32 – Remove a node from CPE Group in node page (UC.33)
Description: In this test it will be removed a node from a CPE Group in the node view page.
Steps: 1 Go to the node page.
2 In Group Management select the CPE Group to re-move the node from.
3 Confirm.
Expected results: The node will be removed from the selected CPE Group.
Id: T.33 – Create edgeBOX credentials (UC.34)
Description: In this test it will be created the credentials for an edge-BOX.
Steps: 1 Go to the node page. 2 Select credentials.
3 Insert user name and password. 4 Save.
Expected results: The credentials are inserted in the database.
Id: T.34 – Modify edgeBOX credentials (UC.35)
Description: In this test it will be modified the credentials for an edgeBOX.
Steps: 1 Go to the node page. 2 Select credentials.
3 Modify user name and/or password. 4 Save.
Id: T.35 – Access the edgeBOX-Management service (UC.36)
Description: In this test it will be accessed the edgeBOX webAdmin. Steps: 1 Go to the node page.
2 Select edgeBOX-Management. 3 A new window will appear.
Expected results: A new window of webAdmin, authenticated with the credentials existent in the database for that node.
Id: T.36 – View edgeBOX status (UC.37)
Description: In this test it will be viewed the edgeBOX status. Steps: 1 Go to the node page.
2.1 The status will be shown in the node page. 2.2 Select status.
Expected results: Information about the status of the edgeBOX.
Id: T.37 – View asset information in node list (UC.38) Description: In this test it will be viewed the asset information in the
node list page.
Steps: 1 Go to the node list page.
2 The asset information will be shown for each node. Expected results: See asset information for each node.
Id: T.38 – Add a node to a CPE Group in node list (UC.39) Description: In this test it will be added a node to a CPE Group in
the node list page.
Steps: 1 Go to the node list page. 2 Select the node.
3 Select the operation to add a node to a CPE Group. 4 Select the CPE Group.
5 The node will be added automatically.
Expected results: The node will be added to the CPE Group in the XML file and will be shown in the webUI.
Id: T.39 – Remove a node from a CPE Group in node list (UC.40)
Description: In this test it will be removed a node from a CPE Group in the node list page.
Steps: 1 Go to the node list page. 2 Select the node.
3 Select the operation to remove a node from a CPE Group.
4 Select the CPE Group. 5 Confirm.
Expected results: The node will be removed from the CPE Group in the XML file and will be shown in the webUI.
Id: T.40 – Filter nodes (UC.41)
Description: In this test it will be filter the nodes in the node list page.
Steps: 1 Go to the node list page. 2 Insert the filter criterions. 3 Press search.
Expected results: See a list of nodes in the webUI according to the search.
Id: T.41 – Sort nodes (UC.42)
Description: In this test it will be sorted the nodes in the node list page.
Steps: 1 Go to the node list page. 2 Select the column.
Expected results: See a list of nodes in the webUI sorted by the column selected.
3.4
Summary and Conclusions
The functional requirements are a simplified set of use cases for the functionalities to export from the original iTEMS solution to the integrated one. It is composed of some use cases for the rebuild of the node list and others for the new information to be added to the nodes that are edgeBOXs.
From these requirements where created the necessary information requirements to retrieve and store data.
The test cases represent the necessary tests to be performed so the solution is considered viable to be used.
Implementation
This chapter describes the different steps performed to achieve the integrated solu-tion between OpenNMS and iTEMS. It starts to show an integrasolu-tion strategy that was adopted during the implementation. Next is shown the relevant generated code. Finally configuration details are exposed to show how this allow to take full party of the solution developed.
4.1
Integration Strategy
The integration strategy is divided in three phases.
Phase one is to rebuild the node list page so its better for network management. Phase two is to add some new option to the node page for better monitor edgeBOXs.
Phase three is to create a package for iTEMS in OpenNMS. 4.1.1 Phase one
The principal aspects of the rebuild of the node page are the filter options added to the page, the management options and the table view for the nodes (figure4.1).
The filter options are composed of the paremeters shown on the table; these parameters came from different sources, which make an ”AND” between all of them. The different sources for the parameters came of the use of the OpenNMS code for retrieving that information and because of that it were made two methods that made the merge of the searches, the mergeNodes and the mergeNodeswithAssets.
The mergeNodes is a method that receives two searches containing lists of nodes and returns one list of nodes with the nodes that appeared in the two searches.
Figure 4.1: Node List rebuild
The mergeNodeswithAssets receives a list of assets and a list of nodes returning a list of nodes that are the nodes that were in the list of assets.
The management options allow performs some operations over the nodes. When one of these operations is applied the correspondent servlet is called. This performs the necessary steps in Java to perform the operation using the input provided by the HTTP post. In this implementation there are two operations Add to group and Remove from group.
The table view is the result of the merges of the filter options with visual reference to the overall in the last 24 hours.
4.1.2 Phase two
The phase two add to the node view some new options and more information re-garding edgeBOXs, this options are edgeBOX-Management, Status and credentials. The edgeBOX-Management is made available by detecting which nodes have the edgeBOX-Management service running.This service is collected by OpenNMS, by making a scan to that service in port 8011 that is the port were the service runs. Them the service is available by an hiper-link to it, if there are credentials available it will automatically login, if not it will be asked to insert them.
The status will be made available in the same manner as edgeBOX-Management. To retrieve the status is necessary to send a set of messages. These messages are formated in XML and send over HTTPS. First it’s needed to establish the secure connection for each request to retrieve the status. To do this it’s used the credentials that exist for that edgeBOX to create a cookie that will be used in all the requests. There are four different types of requests that have particular XML messages. The figure 4.3 represents a flow diagram to get the status information.
The localeInformation method retrieves information regarding the serial number, hardware description, number of users allowed, version, revision and build.
The networkInformation method retrieves information regarding two XML mes-sages, one to retrieve status and timestamp of the WAN and the other to retrieve ethernet configuration parameters for the WAN.
The systemInformation method retrieves information about the CPU usage, sys-tem memory usage, storage usage and the uptime.
The firewallInformation method retrieves information for the services, autho-rization, firewall and Nat. For each service it retrieves the information about which services are open and in which interface (WAN External, LAN Internal, DMZ -Enterprise).
In the appendix C can be consulted the XML messages exchanged to retrieve the status of an edgeBOX.
To be possible to fetch the status information it’s necessary to configure the cre-dentials for the edgeBOX. These initially don’t exist been inserted in the database, in future alterations it will be updated.
4.1.3 Phase three
4.1.3.1 CPE Groups Management
There were two possible implementations to the CPE Group Management, one was to use a XML based approach, used in OpenNMS to store users and users groups, and the other to create in the database the table correspondent. For the implemen-tation it was used the first, in order to use some of the OpenNMS concepts and to see if it would be efficient. In this approach first it must be created a XML schema for the CPE group, this schema will be used by Castor to generate the classes for ma-nipulating the XML file for the CPE groups. For better manipulation of the objects retrieved it were created two classes, CPEGroupManager and CPEGroupFactory.
When adding a new group it will be called a servlet (AddNewCPEGroupServlet) that sees if the group that is been added exists or not. If it exists it will be sent a request to insert a different name, if it not exists it will be created an object that will be stored in the session so it can be used when adding CPE’s and it
Figure 4.4: CPE Group management in node page
will redirect to the modify CPE group page. When finishing modifying a servlet (UpdateCPEGroupServlet) will be called to add the selected CPE’s to the group that was saved in the session, then another servlet (SaveCPEGroupServlet) is called to save the group to the XML file.
The operation to modify a CPE Group is similar to add a CPE Group. The difference is in the first part. When modifying a servlet (ModifyCPEGroupServlet) is called to retrieve the selected CPE group and saves it to the session so it can be modified and them the same steps as in adding a group are performed.
The CPE groups can be modified in more two places, in the node page (figure
4.4) and in the node list (figure 4.5).
In the node page the servlet called (AddCPEToGroupServlet) adds the node to the selected group by fetching the selected group from the XML file and creating an object of that CPE group, them adds the node to the object and finally the object is saved to the XML file.
In the node list page the servlet (AddAllCPEToGroupServlet) called can perform two operations according to the input received. One is to add the selected nodes to the selected CPE group and the other is to add all the nodes in the search to the selected CPE group.
The remove operations perform the same things as in the add operations, but instead of adding, it removes nodes from the CPE Group.
4.1.3.2 Profiles Management
The creation of new profiles is made in a similar way as in the creation of CPE Groups. When adding the profile there is a servlet (AddNewProfileServlet) that sees if the profile exists or not. If it exists it will be sent a request to insert a different name, if it not exists it will be created an object that will be stored in the session
Figure 4.6: State machine for tasks
so it can be used when adding operations and it will redirect to the modify profile page.
In the modify profile page for each operation there are a corresponding form and servlet that updates the profile object, that as been saved in the session, with the configured parameters for the operation.
When finishing configuring the profile a servlet (SaveProfileServlet) will be called to save the profile to the database, converting the profile into a XML message composed of the configured operations. An example of this message can be consulted in appendix C.
4.1.3.3 Tasks Management
In tasks management the creation and modification of a task is made in the same form, been a flag that identifies if the task is new or to modify.
When the task is new the servlet (SaveTaskServlet) called will insert the task in the database and the new task id will be returned to be used when calling the process iTEMSTaskManagement.
When modifying a task the information about the task is fetched from the database and the form is fill. After modifying and when saving the servlet (Save-TaskServlet) will update the database and call the process iTEMSTaskManagement.
The task engine (iTEMSTaskManagement) is a process that executes different actions according to the arguments that it receives.
One of those arguments is the type of task and depending on that type there will be performed different actions.
If the type is immediate the method execImediateTask is called and it will get the data for that task from the database. With that data it sees if it’s only a CPE or a CPE Group, if it’s a CPE Group will perform a cycle. For each CPE it will call the method sendTask that will retrieve the host address by using the node id and the service id for edgeBOX-Management. With that address and with the credentials for that host it will make a connection to retrieve a cookie that will be used for sending the XML message of the profile associated with the task. Before sending the XML message it inserts in the database a new taskEvent and add the returned event id to the XML message, this id identifies the message in future communications.
If the type is unique and the source is the webUI it will be made a schedule in the cron so the task will be performed in the schedule time. For this is created a line that will be added to the crontab file with the format:
S t r i n g c r o n L i n e = minute+” ”+hour+” ”+” ”+day+” ”+month+” ∗ r o o t
”+System . g e t P r o p e r t y (OPENNMS HOME PROPERTY)+” / b i n / execItemsTaskManagement . sh ”+s t a t e+” ”+t y p e+” ”+t a s k I d+” c r o n \n”
If the type is unique and the source is the cron it means that task is to be executed and the method execImediateTask is called and when it finishes the task is unscheduled of the cron.
As in for the type unique the type periodic executes in the same manner, except when the source is the cron and the method execImediateTask finishes executing it will call the method newScheduleTask that unschedules the task executed and sees if there are a new task to schedule according to the period and the finished date defined, if it has a new task to schedule it returns the new date and a new schedule is made in the cron.
Another action of the task engine is to receive the status of the tasks sent and update their status in the database. This is made by calling iTEMSTaskManage-ment with the arguiTEMSTaskManage-ment taskStatus that will call the method taskStatus that is responsible of interpret the string that comes with the status and update it in the database according to the message id that comes in the same string. The call of iTEMSTaskManagement is made by OpenNMS trough the actiond daemon that’s responsible of executing external commands in OpenNMS and is called by eventd which is the daemon that receives the event created by the trap sent with the task status.
![Figure 2.1: OpenNMS concrete architecture [Shi02]](https://thumb-eu.123doks.com/thumbv2/123dok_br/15868668.1087729/26.892.323.532.675.935/figure-opennms-concrete-architecture-shi.webp)