UNIVERSIDADE DE LISBOA
FACULDADE DE CIÊNCIAS
DEPARTAMENTO DE FÍSICA
Deep Learning for Cardiac MR Images Analysis
Cristiana Ferreira Tiago
Mestrado Integrado em Engenharia Biomédica e Biofísica
Perfil em Engenharia Clínica e Instrumentação Médica
Dissertação orientada por:
Prof. Dr. ir. Marcel Breeuwer
Prof. Dr. Alexandre Andrade
Acknowledgments
I would like to start by expressing my deepest gratitude to everybody involved in this project.
In first place, I give a special appreciation to my supervisors at the Medical Image Analysis Group (IMAG/e) from the Eindhoven University of Technology (TU/e), Prof. Dr. Marcel Breeuwer and Dr. Mitko Veta. To Marcel for accepting me as his student, for trusting me this project, for helping me when I needed, for the casual conversations/meetings and much more, and to Mitko for all the support and advices given during these 10 months and for the social times.
Furthermore, Professor Alexandre Andrade, my supervisor back at the Faculty of Sciences of the University of Lisbon (FCUL), could not stay out this list. Thank you for taking care of everything during my stay in The Netherlands, for enlightening me about all the questions and for the advices given during this time until today. Also to Prof. Raquel Conceição, for the encouragement and revision of my texts.
I cannot forget the rest of the group with whom I spent a really good time while staying at TU/e: Koen, Maxime, Andrey, Friso, Pim, Samaneh, Veronika, Josien, Linde, Rina and Suzanne. Dank je wel! A special thanks goes to João and Leroy for all the time spent together having lunch or watching the World Cup matches, for helping me solving some of my problems, for staring with me at the asian guy rage and for the laughs. I’ll take you both with me.
I would also like to say thank you to the best group of friends I gained back in Eindhoven: my roomies! Linh, Ilaria, Teodora and to my guys with whom I spent the last 6 months, Erwan, Jonathan and Mark. Thank you for all the international meals, conversations in the balcony, bike tours around Eindhoven, UNO nights and everything else. I had a blast with all of you! Inês, Marta, Natália, Rodrigo, Paulo e Nuno, obrigada pelas visitas e pelas conversas que tivemos. São vocês quem eu levo destes 5 anos.
A very special acknowledgment goes to my family. For trusting, supporting and hearing me while I was 1000 km away. Para os meus pais, por todos os sacrifícios que fizeram e por sempre acreditarem que eu conseguiria fazer qualquer coisa, mesmo quando eu não acreditava. Para o meu irmão, por me visitar, por ter feito um buraco na parede do meu quarto, por cozinhar a massa de frango para mim e especialmente pela companhia feita em Eindhoven e durante todos estes anos. Adoro-te chavalo!
Abstract
In the current days cardiac functional parameters are measured from Computed Tomography (CT) scans or from echocardiographies using clinical softwares that rely on an experienced user to select relevant points and areas in the images. The used images are usually collected in the aorta or following a Short Axis (SA) cardiac plane. The parameters’ quantification through Cardiac Magnetic Resonance (CMR) is also possible since this imaging modality provides better anatomical information about the left ventricle (LV) and when this is the chosen modality to obtain the heart images, the SA plane is, again, the most commonly used.
It would be useful to have a clinical software to quantify the more relevant cardiac functional parameters such as Stroke Volume (SV), Ejection Fraction (EF) and Cardiac Output (CO) with minimal user interaction from the image acquisition part to the final quantification of these parameters. Even though the most used plane to acquire images is the SA and the majority of the scientific results concern this image view, its usage presents a disadvantage when trying to quantify the LV volume. The SA images are acquired from the apex of the heart to the valve plane of the LV and then are used to extrapolate the LV volume. However, these 2 boundary positions are the most complicated to obtain and it affects the final value of the volume. To avoid this difficulty, in this project the considered plane was the Long Axis (LA) one, where one can see the apex and the valve points, and this plane was set in different areas of the heart producing three different views: the 2 Chamber Long Axis (2 CH-LA), the 3 Chamber Long Axis (3 CH-LA) and the 4 Chamber Long Axis (4 CH-LA) view.
This project aims to analyze the three different kinds of LA CMR images leading to the SV, EF and CO quantification while reducing the user interaction with the software. To achieve it Deep Learning (DL) methods, which belong to the Artificial Intelligence (AI) area and model the human brain behavior and function by creating artificial neurons as well as synapses in the form of Convolutional Neural Networks (CNNs), were developed and explored. These DL methods can perform classification tasks yielding results similar to the ones obtained by humans.
To quantify the parameters there is a quantity which is crucial to have, the LV volume. The followed methodology consisted in create CNNs and train them to perform the classification task of segmenting the LV in any LA image. The network training is realized by presenting a wide variety of labeled LA images, i.e. images where the area to segment, the LV, is already indicated, to the CNN and let it learn what to look for in a new image to correctly segment it. From the network LV area prediction it was possible to derivate the LV volume and from this quantify the SV, EF and CO.
The results of this methodology allow to analyze the CNNs’ performance and the final parameters’ values obtained from real patients’ data in order to derive a conclusion about the DL potential to segment LA images and the creation of a user independent framework that could be translated into a clinical software.
Resumo
Atualmente os indicadores da função cardíaca, tais como o Volume Sistólico (VS), a Fração de Ejeção (FE) e o Débito Cardíaco (DC), são calculados a partir de exames de Tomografia Axial Computorizada (TAC) ou ecocardiografias usando softwares clínicos cuja utilização requer a experiência do utilizador que seleciona pontos e áreas da imagem relevantes para o cálculo final. As imagens usadas são, geralmente, obtidas na zona da aorta ou considerando o plano anatómico que segue o eixo curto (EC) cardíaco, i.e., o plano transversal, capturando apenas ambos os ventrículos. A quantificação destes indicadores através de imagens de Ressonância Magnética Cardíaca (RMC) também é possível, embora não seja tão usada devido ao elevado custo do exame por paciente, uma vez que esta modalidade fornece imagens com melhor informação anatómica sobre as estruturas cardíacas sendo o Ventrículo Esquerdo (VE) a mais importante uma vez que é a partir desta cavidade que o sangue flui para todo o corpo devido à ação contrativa do miocárdio. Mesmo utilizando a RMC como modalidade de imagem, o plano mais utilizado continua a ser o transversal.
Tendo em conta os progressos tecnológicos que hoje em dia se verificam, seria de grande utilidade o desenvolvimento de um software clínico para avaliar os parâmetros cardíacos acima referidos, entre outros, com a mínima interação do utilizador desde que se adquirem as imagens até que se faz o cálculo final dos valores dos indicadores. Sendo que o plano de imagem mais usado é o do EC e a maioria dos resultados provenientes de grupos de investigação nesta área consideram imagens com esta vista, ou seja, apenas com ambos os ventrículos. A obtenção de imagens segundo o EC passa por fazê-lo situando o plano em várias posições entre o ápice e o plano que inclui a válvula mitral, permitindo reconstruir o volume do VE. No entanto as imagens correspondentes ao plano da válvula e ao do ápice são complicadas de adquirir, o que afeta o valor final do volume. Para ultrapassar esta dificuldade, neste projeto foram utilizadas imagens cujo plano anatómico contém o eixo longo (EL) cardíaco. Nesta situação, existem 2 planos que permitem visualizar aurículas e ventrículos na mesma imagem, o plano longitudinal e o sagital. Consoante o escolhido, conseguem produzir-se 3 tipos de vistas diferentes, sempre seguindo o EL, onde se podem visualizar 2, 3 ou 4 cavidades cardíacas simultaneamente. Nas imagens das duas cavidades distingue-se o ventrículo e a aurícula esquerda, nas de três distinguem-se estas duas estruturas mais uma porção da aorta e nas de quatro é possível observar os dois ventrículos e as duas aurículas.
Este projeto tem como principal objetivo analisar imagens de RMC obtidas segundo o EL do coração levando à quantificação dos parâmetros VS, FE e DC reduzindo ao máximo a interação do utilizador com o software. Para tal, são usados métodos de DL.
No que toca ao desempenho de tarefas cognitivas, a melhor solução passa por utilizar o cérebro humano e todos os conhecimentos a ele associados. No entanto, por vezes, as tarefas cognitivas em questão são desafiadoras, complicadas e demoradas e nestas circunstâncias é benéfica a utilização de ferramentas que simulem o funcionamento do cérebro, deixando o utilizador livre para realizar outras funções ao mesmo tempo. Assim apareceu a Inteligência Artificial (IA) que permite modelar o comportamento e funções do cérebro humano através da criação de neurónios artificiais assim como das sinapses, ou seja, do comportamento fisiológico que explica a transmissão de informações entre neurónios, sob a forma de Redes Neuronais Convolucionais (RNCs). Estas RNCs permitem simular a inteligência humana assim como o processo de aprendizagem.
Durante os anos 80 e 90 apareceram as primeiras redes de neurónios artificiais, redes estas que não continham tantos neurónios como o cérebro humano mas que revelaram uma elevada capacidade para
resolver problemas de classificação, como por exemplo fazer a distinção entre uma imagem de um paciente doente e de um saudável, e regressão, criando uma nova área, a de Machine Learning (ML). Já durante os anos 2000 o DL apareceu, onde se podem encontrar redes com mais neurónios com capacidade para resolver problemas mais complexos e de maneira mais independente, como por exemplo segmentar vários órgãos numa só imagem, sendo muito utilizados nas mais variadas áreas do conhecimento incluindo o processamento de imagens médicas. Estes métodos de DL apresentam resultados muito próximos daqueles obtidos por especialistas.
A metodologia aqui usada passa por criar RNCs e treiná-las de modo a segmentarem o VE em qualquer tipo de imagem de RMC obtida segundo o EL do coração. O treino de uma rede neuronal passa por apresentar-lhe um elevado e variado número deste tipo de imagens onde o VE já se encontra identificado, isto é, já têm “legendas” e deixá-la procurar características que a própria rede considera mais importantes de modo a conseguir segmentar uma nova imagem, nunca antes vista durante a fase de treino. Neste projeto foram desenvolvidas várias RNCs, treinadas durante diferentes períodos de tempo e sujeitas a imagens com diferentes vistas e “legendas”, prevendo diferentes estruturas.
Para atingir os objetivos deste projeto e quantificar os indicadores da função cardíaca é crucial saber o volume do VE que pode ser derivado a partir da área e do comprimento do EL do VE. Estas duas últimas variáveis são obtidas através dos resultados de segmentação das várias RNCs. Foram treinadas 8 redes diferentes: duas redes que segmentam o contorno do VE (Net_20000 e Net_50000), cinco que prevêem a área desta estrutura (Net_FilledMasks_20000, U-Net_FilledMasks_50000, U-Net_2CH, U-Net_3CH e U-Net_4CH) e uma que identifica 3 pontos chave numa imagem obtida segundo o EL (8th trained U-Net). Ambas as redes que segmentam o contorno do
VE, a que identifica os 3 pontos chave e duas das que prevêem a área do VE foram treinadas com recurso a um conjunto de imagens onde se viam 2, 3 ou 4 câmaras cardíacas, sendo que as restantes 3 foram treinadas usando conjuntos de imagens com vistas específicas. De modo a desenvolver o software que não dependa do utilizador para quantificar o VS, FE e DC, começou por usar-se o resultado da segmentação dos 3 pontos chave: o ápice do coração e os 2 pontos que definem o segmento de reta entre os limites da válvula mitral, obtendo as suas coordenadas de modo a medir o EL do ventrículo. De seguida, e usando as segmentações da área do VE em adição ao previamente calculado comprimento do eixo, foi calculado o volume do VE e, consequentemente, os indicadores da função cardíaca.
Novas imagens de RMC obtidas segundo o EL do coração foram utilizadas para avaliar tanto o potencial da utilização de métodos de DL na segmentação deste tipo de imagens como o desempenho das RNCs e deste software independente de um utilizador, com os resultados a mostrar que: (i) é mais complicado prever com exatidão pequenas áreas nas imagens do que grandes, daí as segmentações do contorno do VE não serem tão precisas quanto as da área, (ii) devido à conclusão anterior e ao facto dos resultados obtidos relativamente à segmentação das áreas do VE a partir de imagens obtidas segundo o EL estarem nivelados com os resultados considerados como estado-da-arte para esta tarefa, foram usadas as predições das áreas em detrimento dos contornos na criação do software independente do utilizador, (iii) até à data é-me desconhecida a existência de uma RNC que detete os 3 pontos chave aqui mencionados sendo que os resultados obtidos são satisfatórios e facilitam a criação do já mencionado
software, (iv) os valores finais dos parâmetros cardíacos estão de acordo com os valores estabelecidos
para referência e não dependem da proveniência da segmentação final da área do ventrículo esquerdo.
Concluindo, o objetivo inicial do projeto foi alcançado havendo espaço para futuras correções nomeadamente através da criação de “legendas” para as imagens mais exatas, de novas RNCs ou alteração das já existentes de modo as que as predições sejam semelhantes às produzidas por humanos ou utilização da mesma metodologia para analisar imagens de RMC obtidas segundo o EC do coração.
Devido ao tempo extra disponível, foi treinada uma nona RNC para, desta vez, resolver um problema de regressão. De modo a tentar avaliar qualitativamente o grau de oclusão das artérias coronárias, artérias estas que são responsáveis pela perfusão do miocárdio, foi utilizado o Modelo de
Tofts (MT) para tentar prever o valor do parâmetro que representa a taxa de fluxo de sangue dos vasos
para as células do tecido, neste caso do miocárdio a partir da evolução temporal de 2 sinais fisiológicos: da concentração do agente de contraste que entra no tecido e daquela que de facto se mede dentro deste. Treinando a rede neuronal com várias amostras geradas computacionalmente destes sinais, os resultados obtidos mostram que os valores previstos para o parâmetro mencionado não diferem muito dos originais, havendo, mesmo assim, margem de manobra para melhorar esta rede de regressão, e que a partir deste parâmetro é possível visualizar graficamente a condição da perfusão na zona do tecido em causa, o miocárdio, havendo uma conexão com o nível de oclusão das artérias coronárias.
Palavras chave: Deep Learning, Eixo Longo, Rede Neuronal Convolucional, Ventrículo Esquerdo.
List of Contents
Acknowledgments ... iii
Abstract ... iv
Resumo ... v
List of Contents ... viii
1 Introduction ... 1
2 Background ... 2
2.1 Cardiac Performance and CMR Imaging ... 2
2.2 Cardiac Functional Parameters ... 2
2.3 Heart Segmentation ... 5
2.4 Machine and Deep Learning ... 6
2.5 Learning a Model ... 8
2.6 Optimization and Stochastic Gradient Descent (SGD) ... 10
2.7 Training and Validation Errors and Regularization ... 10
2.8 Hyperparameters and Algorithm Performance ... 13
2.9 Convolutional Neural Networks ... 13
2.10 Classification and Regression Scenarios ... 17
2.11 Deep Learning Progresses and State of the Art Results ... 18
2.12 Quantitative Myocardial Perfusion – Kinetic Model ... 21
3 Methodology ... 23
3.1 Project Overview: Motivation and Goals ... 23
3.2 Classification Scenario ... 23
3.2.1 Data Processing ... 24
3.2.2 Data Labeling and Augmentation ... 25
3.2.3 U-Net: Implementation ... 27
3.2.4 U-Net: Training ... 28
3.2.5 Functional Parameters Quantification and User Independent Framework ... 31
3.3 Regression Scenario ... 34
3.3.1 Data Simulation ... 34
3.3.2 Regression Network ... 34
4 Results ... 36
4.1 Data Processing and Labeling ... 36
4.2 U-Nets Training and Predictions ... 38
4.3 Ventricular volume – Time curves And Functional Parameters ... 48
4.5 Ktrans Obtained from Regression ... 54
5 Discussion ... 56
6 Conclusions ... 60
7 References ... 61
List of Figures
Figure 2.1 Ventricular volume – Time curve. ... 3
Figure 2.2 Ventricular volume dependency over time. ... 4
Figure 2.3 Different views of CMR images, where the LV is pointed out with the red square. ... 6
Figure 2.4 ML working process. ... 7
Figure 2.5 DL working process. ... 7
Figure 2.6 Iterative process of learning a model. ... 9
Figure 2.7 Graphic representation of training error (dashed blue line) and test error (green line), in terms of model capacity, underfitting and overfitting. ... 11
Figure 2.8 Dropout scheme. ... 12
Figure 2.9 (A) Schematic representation of a simple NN, usually used in ML. (B) Schematic representation of a DL NN. ... 14
Figure 2.10 Activation function influence on a CNN. ... 15
Figure 2.11 CNN with the input layer, 2 convolutional layers with ReLU, 2 pooling layers, 1 fully connected layer and a classification layer using softmax function to analyze the scores from the fully connected layer and provide the class output. ... 16
Figure 2.12 TM schematic representation. ... 22
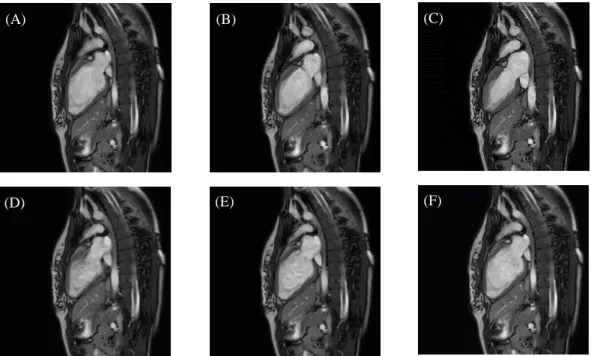
Figure 3.1 Functional (cine) CMR images. ... 24
Figure 3.2 Two contours drawn using the Matlab interface. ... 26
Figure 3.3 U-Net graphical representation. ... 27
Figure 3.4 Lasagne layers implementation. ... 28
Figure 3.5 Training procedure using (A) distance maps and (B) LV areas as labels. ... 30
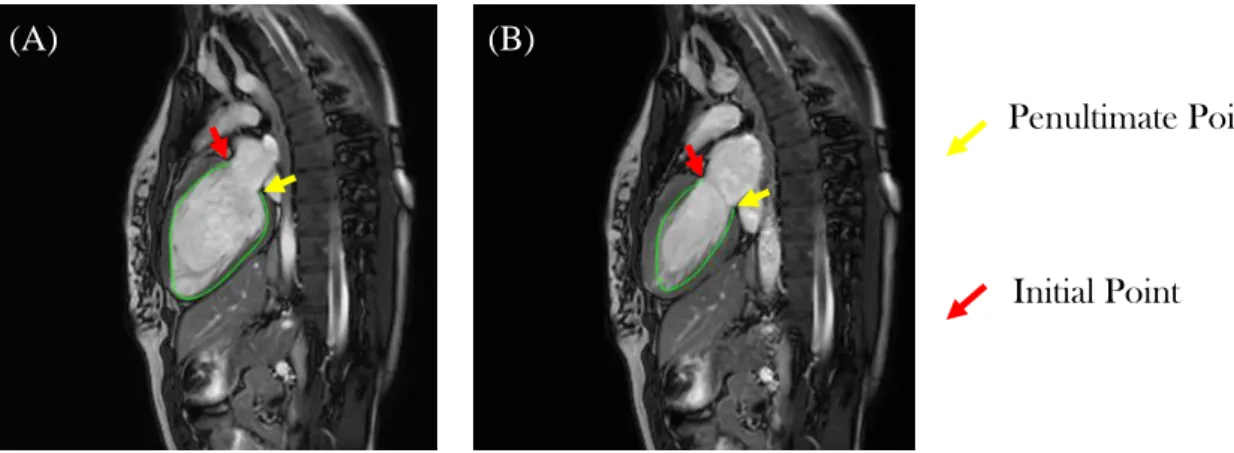
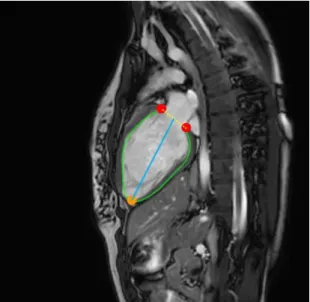
Figure 3.6 LV interest points and distances. ... 32
Figure 3.7 User independent framework. ... 33
Figure 3.8 Regression network training procedure. ... 35
Figure 4.1 Functional CMR images with respective contours. ... 36
Figure 4.2 Contour resampling and center of mass. ... 37
Figure 4.3 Distance maps labels. ... 37
Figure 4.4 LV area label. ... 37
Figure 4.5 Three points label. ... 38
Figure 4.6 Training (red curve) and validation (blue curve) errors for both networks, U-Net_20000 and U-Net_50000. ... 38
Figure 4.7 LV contour predictions obtained from both networks U-Net_20000 and U-Net_50000. ... 39
Figure 4.8 Dice score evolution during training (red) and validation (blue) for U-Net_20000. ... 39
Figure 4.9 Dice score evolution during training (red) and validation (blue) for U-Net_50000. ... 40
Figure 4.10 Training (red curve) and validation (blue curve) errors for both networks, U-Net_FilledMasks_20000 and U-Net_FilledMasks_50000. ... 41
Figure 4.11 LV area predictions obtained from both networks Net_FilledMasks_20000 and U-Net_FilledMasks_50000. ... 41
Figure 4.12 Dice score evolution during training (red) and validation (blue) for U-Net_FilledMasks_20000. ... 42
Figure 4.13 Dice score evolution during training (red) and validation (blue) for U-Net_FilledMasks_50000. ... 42
Figure 4.14 Training (red curve) and validation (blue curve) errors for the U-Net_3CH network. ... 43
Figure 4.15 LV area predictions obtained from three networks. ... 44
Figure 4.16 Dice score evolution during training (red) and validation (blue) for Net_2CH, U-Net_3CH and U-Net_4CH. ... 45
Figure 4.18 Matlab script output. ... 46
Figure 4.19 Apex point Dice score evolution during training (red) and validation (blue) from the 8th trained U-Net. ... 47
Figure 4.20 First valve point Dice score evolution during training (red) and validation (blue) from the 8th trained U-Net. ... 47
Figure 4.21 Second valve point Dice score evolution during training (red) and validation (blue) from the 8th trained U-Net. ... 48
Figure 4.22 Ventricular volume – Time curves obtained using LV area predictions from two different networks: U-Net_2CH and U-Net_FilledMasks_50000. ... 49
Figure 4.23 Ventricular volume – Time curves obtained using LV area predictions from two different networks: U-Net_3CH and U-Net_FilledMasks_50000. ... 50
Figure 4.24 Ventricular volume – Time curves obtained using LV area predictions from two different networks: U-Net_4CH and U-Net_FilledMasks_50000. ... 50
Figure 4.25 ANOVA tables for the parameter SV, EF and CO. ... 52
Figure 4.26 Generated regression data: AIF, IRF and Cmyocardium. ... 53
Figure 4.27 Training (red curve) and validation (blue curve) errors for the regression network. ... 54
Figure 4.28 Ktrans ground truth values and predictions obtained from the regression network... 54
Figure 4.29 300 validation observations for the Ktrans and respective fitted model. ... 55
List of Tables
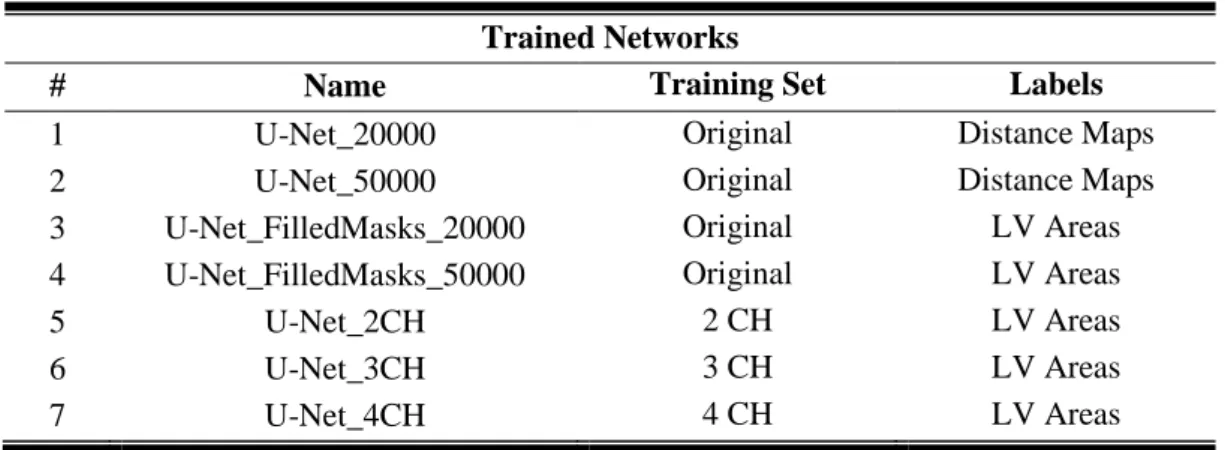
Table 2.1 Normal range values for cardiac performance parameters and heart rate, considering a healthy subject... 5 Table 3.1 Information regarding the data set. ... 25 Table 3.2 Information regarding the training and validation sets. ... 25 Table 3.3 Transformations’ constraints and correspondent intervals used during data augmentation. 27 Table 3.4 Training Parameters Configuration. ... 29 Table 3.5 Training and validation sets used by the three specific CNNs: the 2 CH-LA, 3 CH-LA and 4 CH-LA. ... 30 Table 3.6 Identification of all seven trained networks, used training sets and labels. ... 30 Table 3.7 Training Parameters Configuration for the 8th trained U-Net, used for the user independent framework. ... 33 Table 3.8 Training Parameters Configuration for the regression network. ... 35 Table 4.1 Mean Dice Coefficients and SD for both U-Net_20000 and U-Net_50000 networks’ validation predictions. ... 40 Table 4.2 Mean Dice Coefficients and SD for both Net_FilledMasks_20000 and U-Net_FilledMasks_50000 networks’ validation predictions. ... 42 Table 4.3 Mean Dice Coefficients and SD for U-Net_2CH, U-Net_3CH and U-Net_4CH networks’ validation predictions. ... 43 Table 4.4 Mean Dice Coefficients and SD for U-Net_3points network, considering the 3 existent classes: apex point, first and second valve points. ... 48 Table 4.5 Test set characteristics. ... 49 Table 4.6 Paired t-tests results for LV areas comparing each pair of networks: Net_FilledMasks_50000 vs Net_2CH, Net_FilledMasks_50000 vs Net_3CH and U-Net_FilledMasks_50000 vs U-Net_4CH. ... 51 Table 4.7 Reference values and SDs for SV, EF, HR and CO used to analyze this project’s results... 51 Table 4.8 Functional parameters obtained for each of the 14 cardiac cycles, using LV area predictions resultant from 4 different networks. ... 52 Table 4.9 Paired t-tests results for each parameter, SV, EF, and CO, comparing each pair of networks: Net_FilledMasks_50000 vs Net_2CH, Net_FilledMasks_50000 vs Net_3CH and U-Net_FilledMasks_50000 vs U-Net_4CH. ... 53 Table 4.10 RMSE and R2 calculated from the model fitted to the 300 validation observations. ... 55
List of Abbreviations
2 CH-LA 2-Chamber Long Axis 3 CH-LA 3-Chamber Long Axis 4 CH-LA 4-Chamber Long Axis AI Artificial Intelligence AIF Arterial Input Function CAD Coronary Artery Disease
CMR Cardiovascular Magnetic Resonance CNN Convolutional Neural Network
CO Cardiac Output
CPU Central Processing Unit CT Computed Tomography DC Débito Cardíaco DL Deep Learning EC Eixo Curto
EDV End Diastolic Volume
EES Extravascular Extracellular Space EF Ejection Fraction
EL Eixo Longo
ESV End Systolic Volume
fCNN Fully Convolutional Neural Network FE Fração de Ejeção
GAN Generative Adversarial Network GPU Graphics Processing Unit
HR Heart Rate
IA Inteligência Artificial
ILSVRC ImageNet Large Scale Visual Recognition Challenge IRF Impulse Response Function
LA Long Axis LV Left Ventricle
MBF Myocardial Blood Flow ML Machine Learning
MRI Magnetic Resonance Imaging MSE Mean Squared Error
MT Modelo de Tofts NN Neural Network ReLU Rectified Linear Unit
RMC Ressonância Magnética Cardíaca RMSE Root Mean Squared Error
RNC Rede Neuronal Convolucional RNN Recurrent Neural Network
ROI Region of Interest RV Right Ventricle
SA Short Axis
SGD Stochastic Gradient Descent SV Stroke Volume
TAC Tomografia Axial Computorizada TM Tofts Model
VE Ventrículo Esquerdo VS Volume Sistólico
1 Introduction
When it concerns the performance of a certain cognitive task, the human brain and knowledge are the best options to go with. However, sometimes the task can be very demanding and time consuming and it would be beneficial to use a different tool allowing the human brain to do different things at the same time. AI was developed as an attempt to describe and simulate the human intelligence and learning process using computers.
After some development years, in the 80s and 90s researchers started to focus their attention on how the human brain works to learn how to reproduce its behavior as accurately as possible. That is when the first artificial neurons showed up creating the first artificial neural networks. These networks did not have as many neurons as the human brain but definitely had the power to solve problems such as classification and regression tasks, since the created networks could take conclusions from data, i.e. learn, this way creating the ML area. This new AI field started to produce breakthrough results, as it was demonstrated by the computer, Deep Blue, that beat the chess world champion, at the time, in a chess game.
In the mid 00s, a new field inside ML came up, the DL, where networks with more neuronal layers were created to solve more complicated tasks more independently than the ML algorithms, in a way similar to how humans think. With DL being a very powerful and desirable area to work on, its abilities started to be applied to different knowledge fields such as medical image processing.
This project was designed to explore the potentialities of the DL area in the medical image processing field. CNNs are made of artificial neurons layers connected between them that model the way the synapses occur in the human brain during the thinking process. These networks were used to analyze CMR images in a user independent way in order to segment and register them, using these results to quantify functional parameters related to the myocardial condition.
In Chapter 2 the background information regarding AI, ML, DL and cardiac functionality needed to fully understand this project’s broadness can be found, following Chapter 3 with all the project’s methodology used to achieve the results which can be found in Chapter 4. Chapters 5 and 6 contain the results’ analysis and the conclusions taken from them together with some future work considerations, respectively.
2 Background
The present chapter focuses in introducing the essential concepts regarding cardiac medical images analysis and segmentation, cardiac performance parameters, ML and DL, and kinetic models, which will be essential to the understanding of these project’s results.
2.1 Cardiac Performance and CMR Imaging
The heart is a muscular organ whose function is to receive the deoxygenated blood from the whole body, send it to the lungs in order to oxygenate and, once it is inside the heart again, send it to the whole body in order for the cells to exchange their carbon dioxide for the oxygen in the blood. The heart performs this action throughout the life span of an individual, cyclically, and, as in all mechanical systems, its performance must be evaluated when problems appear or, ideally, before these show up.
Usually these problems are related with cardiac conditions such as Coronary Artery Disease (CAD), which turns out to be one of the several cardiovascular diseases and the major cause of ischemic heart disease corresponding to the first cause of death worldwide, accordingly to the World Health Organization (WHO) [1]. CAD is characterized by the accumulation of atheroma plaques inside the coronary arteries, which reduce the blood flow to the heart muscle, the myocardium. This drop in the amount of blood that reaches the heart muscle creates a scenario of ischemia characterized by the lack of oxygen which can lead to myocardial infarction and, consequently, to death.
Diagnosis through CMR imaging is possible and its utilization is growing worldwide due to its non-invasive profile and no need for ionizing radiation nor iodine contrast [2]. To make this technique reliable to use it is necessary that it becomes easily implemented and relies on accurate and fast acquisition methods so the information derived from these images can be precisely interpreted. CMR is becoming increasingly popular when comparing to other imaging techniques because it can accurately measure: end-diastolic (when the heart at its most dilated phase) and end-systolic (when the heart at its most contracted phase) ventricular volumes, mass and also myocardial perfusion, i.e. oxygenated blood delivery to the myocardium, which is a very good indicator of CAD and cardiac performance [3].
These different measures that can be obtained from CMR are strongly influenced by the used CMR modality since each one offers different information, with perfusion CMR being used to quantitatively assess the myocardial tissue perfusion level and functional cine cardiac Magnetic Resonance Imaging (MRI) being widely used due to the ability to visualize the contractile function of the myocardium. Consequently, cine cardiac MRI allows segmenting the myocardium and the LV and, also, facilitates the analysis of the myocardial contractile function by quantifying some parameters such as the SV, the EF and the CO [4] – [5].
2.2 Cardiac Functional Parameters
As previously mentioned the heart works in a cyclic way. The cardiac cycle corresponds to the time interval since the heart contracts, relaxes and contracts once again and can be split in two different
phases: ventricular systole and ventricular diastole. The systole is the contraction of the myocardium and correspondent blood ejection to the whole body, and the diastole the myocardial relaxation and correspondent ventricular filling.
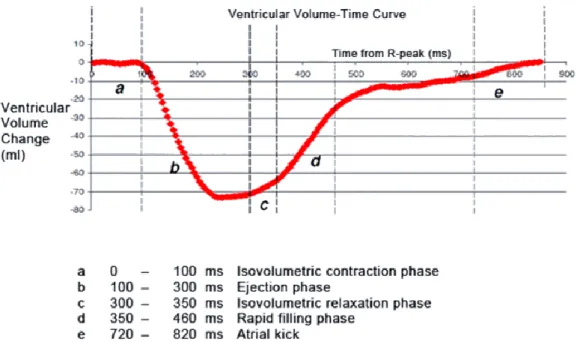
Focusing on the LV, the ventricular systole starts with the mitral valve closure and left-ventricular pressure rise, but maintaining the ventricular volume, a phase known as isovolumetric contraction (Figure 2.1). When the pressure inside the LV is higher than in the aorta, the aortic valve opens and a fast blood ejection happens followed by a decrease in the ejection rhythm until the pressure in the aorta gets higher than the one in the LV, causing the aortic valve to close, the systole to come to an end and the diastole to start. When the aortic valve closes, the ventricular pressure decreases and there is a small increase in the LV volume, i.e. isovolumetric relaxation. The ventricular pressure continues to drop until the point when the mitral valve opens due to the pressure difference between the LV and the left atrium and the blood can flow inside the LV [6]. The ventricular filling is fast in the beginning, filling more than half of the ventricle, and then the ventricular pressure starts to rise causing the filling rate to decrease until the left atrium contracts and makes the rest of the blood flow from this cavity to the LV. As soon as the ventricular pressure overcomes the atrial pressure, the mitral valve closes and a new cycle can start with the systole phase. Figure 2.1 [7] shows the relation between the ventricular volume and time. It is important to mention that the same cycle happens for the right atrium and ventricle, at the same time. However, the ventricular volume – time curve is plotted regarding the LV as the blood goes from this cavity to the whole body, being possible to quantify some performance parameters.
There are some physical parameters useful to evaluate the cardiac activity such as SV, EF and CO, as mentioned, and these parameters directly or indirectly depend on two quantities which can be
Figure 2.1 Ventricular volume – Time curve. The red line represents the LV relative volume changes over time.
From the curve one can distinguish several phases from the cardiac cycle: a) represents the very beginning of the systole, i.e. the isovolumetric contraction phase, when there is no change in the ventricular volume in spite of the pressure increase; b) corresponds to the blood ejection phase which is fast in the beginning and then slows down until c) which represents the isovolumetric relaxation phase, i.e. a small increase in ventricular volume; d) translates the fast ventricular filling which gets slower as time goes on and e) shows the atrial kick which is the contraction of the left atrium in order to make the rest of the blood flow from the atria to the ventricle. Adapted from [7].
measured from the ventricular volume – time curve and, consequently, from CMR images: the End Diastolic Volume (EDV) and the End Systolic Volume (ESV).
The EDV is the volume of the ventricle at the end of diastole when this cavity if fully filled with blood just before systole begins and the ESV is the volume of the ventricle at the end of systole when the ventricle is minimally filled right after the blood ejection. Both these parameters can be calculated from the ventricular volume – time curve in Figure 2.2. This figure shows the relation between the ventricular volume with time. It represents the volume instead of the volume change (as in Figure 2.1), therefore EDV is the maximum value of the ventricular volume, which happens in the end of diastole, and ESV is the minimum value of the ventricular volume, which happens in the end of the systolic phase.
From the EDV and ESV one can directly get the SV. It represents the total amount of blood that is ejected during one myocardial contraction and it can be quantified from:
SV = EDV - ESV 2.1
The EF translates the fraction of EDV that is ejected from the ventricle during one myocardial contraction. This parameter is an indicator of the heart’s contractility and can be derived from the SV and the EDV accordingly to:
EF = SV
EDV × 100% 2.2
Figure 2.2 Ventricular volume dependency over time. Please note that the vertical axis represents the absolute
ventricular volume. EDV represents the volume when the ventricle is fully filled, corresponding, in the graph, to the maximum volume possible. ESV represents the volume when the ventricle is minimally filled, corresponding, in the graph, to the minimum volume possible. Adapted from [7].
Finally, the CO is the total amount of blood ejected from the heart in one minute and this measure is a good approximation of the cardiac function. It comes as in equation 2.3 where HR represents the Heart Rate:
CO = SV × HR 2.3
Accordingly to [6], the normal range for each of these parameters is represented in Table 2.1, considering a healthy subject.
Table 2.1 Normal range values for cardiac performance parameters and heart rate, considering a healthy subject.
Parameter Normal Range
SV 50 to 100 mL
EF 55% to 75%
CO 1.9 to 3.5 L/min
HR 60 to 70 beats/min
As previously mentioned, CAD leads to ischemia which can lead to infarction if the oxygen supply to the affected area is not restored. The areas that suffer ischemia are still considered as living tissue but as soon as the infarction starts, the tissue will start to die and, in the cardiac scenario, the myocardium will lose its ability to contract creating non-functional areas in the heart muscle. These deceased regions will affect the cardiac performance and, therefore, the EDV, ESV, SV, EF and CO final values, allowing to differentiate healthy from non-healthy patients by plotting the ventricular volume – time curve and quantifying the parameters.
2.3 Heart Segmentation
When evaluating cardiac performance, it is useful to accurately localize and segment not only the LV but also the myocardium, which is responsible for the heart contraction. Both the epicardium (the thin serous membrane which protects and lubricates the outside of the heart), and the endocardium (the squamous layer that keeps the blood flowing avoiding it to stick to the inside of the heart), need to be segmented in order to retrieve the parameters related to the myocardium, like its thickness and perfusion levels, among others [4]-[5]. When obtaining certain parameters such as SV, EF or CO, there is not the direct need to segment the myocardium since the LV segmentation is enough [8].
There are several views of CMR images (Figure 2.3) from which one can localize and, consequently, segment the LV, such as SA, 2 CH-LA, 3 CH-LA and 4 CH-LA. The existing segmentation approaches are mainly based on SA images, where the LV and the myocardium can be segmented with a good level of accuracy, since the SA plane is the most commonly used one when working with cardiac images [9] and is also considered as a gold standard. Also in this plane both the myocardium and the LV are easier to detect due to geometric properties. However the SA images showing the heart apex and the valve plane present some difficulties when trying to reconstruct the LV
volume from a SA cine sequence. To avoid this influence in the LV volume value, this can also be quantified from LA images, where is also easy to segment the LV.
The most accurate and precise way to segment both the LV and the myocardium is still manual, being the gold standard in clinical practices and in image processing and being widely used to evaluate the accuracy of fully automatic segmentation methods. However, manual segmentation is very time consuming, user dependent [10] and error sensitive. Consequently, there is a need for automatic LV segmentation approaches, which are significantly challenging mainly because the current existing approaches still require some manual corrections or some initial data processing in order to establish a Region of Interest (ROI). Additionally, the presence of papillary muscles, which connect the apex of the LV to the mitral valve controlling its opening and closing, also influences the final segmentation, due to the similarity between the grey levels of these muscles and the myocardium.
The majority of the existing segmentation methods are based on (1) LV localization, (2) time-dependent, and (3) shape-dependent techniques. The approach (1) assumes that the heart is in the center of the image but does not take into account its variability of size and spatial orientation from one patient to another [11]. Approach (2) assumes that the heart is the only organ moving in the image but it can fail due to poor sensitivity as, for example, the lungs also move and produce image artifacts that must be considered. Approach (3) considers the LV a circular shape but may fail when the ventricles have abnormal shapes or when dealing with LA images, where the LV has more of an elliptical shape than a circular one. Despite all these slight shortcomings, many of the existing segmentation methods are based on SA images and can be quite precise. However the usage of LA images can achieve great results similar to when using SA images [12], despite being a less common approach.
Recently, a set of methods collectively named as DL have advanced the state of the art in many computer vision and image analysis tasks, including medical image analysis. These new methods rely on CNNs, to achieve a fully automatic segmentation method that accurately localizes and segments the LV, and, in the end, does not require any manual corrections.
2.4 Machine and Deep Learning
AI is a wide region of knowledge inside which one can find the ML area. A ML approach, in practice, analyzes a set of data and all the features that are linked to this data set (a priori information),
(A) (B) (C) (D)
Figure 2.3 Different views of CMR images, where the LV is pointed out with the red square: (A) SA view, (B) 2
learns from it and, in the end, makes a prediction about an unseen observation (Figure 2.4). For example, if the data set is made of annotated functional CMR images, the ML approach learns features previously obtained from those images (the training set) to make correct predictions about unseen CMR images (the test set). However, if the new images in the test set were acquired using a different methodology to the one used to obtain the training data set or if they present a significant difference from the ones in the training set, for example in contrast or intensity, the performance of the ML model is likely to be compromised and yield low accuracy levels, since the used features during the training process are no longer reliable to classify the new data set and it is necessary to extract other features. Still regarding the ML model, the training process includes, in most of the times, manual feature extraction, i.e. the user helps the network to look for the characteristics it considers more important for the final output.
The DL concept, which creates a domain included inside the ML one, appeared to define a set of methods that, despite sharing the same working principle as machine learning ones, i.e. learn from data and make a prediction, are inspired by the human brain behavior and are capable of learning features from raw data by themselves, i.e. without user influence (Figure 2.5). Besides this last-mentioned advantage, DL methods are more powerful, therefore requiring more computational power and the utilization of a GPU (Graphics Processing Unit) instead of the CPU (Central Processing Unit), can handle big data, are more prepared to deal with images and can show a good performance even when there is variability among the data, for example CMR images obtained with different MRI scanners, but at the cost of a greater training time.
There are three more common ways to make machine and deep learning algorithms learn something: (1) supervised learning, (2) unsupervised learning and (3) semi-supervised learning. Approach (1) happens when the algorithm tries to establish a relationship between the given input and the output with this relationship being evaluated as the algorithm learns since it uses labeled data sets, i.e. the algorithm knows the correct output for each input. Approach (2) is followed when the algorithm
Figure 2.4 ML working process. The features are extracted a priori from the inputs and then are used by the ML
algorithm to correctly predict a certain input, creating an output. Usually the feature extraction is manual, requiring a user to do it.
Figure 2.5 DL working process. With this new set of models there is no need to extract features prior to the usage
learns or looks for patterns in unlabeled data which seem more relevant to assess the output even though there is not a correct or wrong output since there are no labels. Approach (3) happens when the algorithm learns from a data set that contains both labeled and unlabeled entries [13], and in this case one can use both supervised algorithms to try to predict labels for the unlabeled data and unsupervised algorithms to try to find a pattern between the variables. Supervised machine learning (1) usually obtains the best results but big sets of labeled data are very difficult and expensive to get. Therefore, unsupervised methods (2) are also used with results not as good as supervised learning ones but which have been improving.
In a general way, ML algorithms (where DL ones are included) are made up of three important parts [14]: (1) the system that makes the predictions, i.e., the model that outputs the final result. It can go from a simple binary classifier distinguishing between 2 different classes (healthy or non-healthy) to a more complex system that segments a CMR image, for example. Parts (2) and (3) are the learning algorithm and its parameters, θ, respectively. The learning algorithm uses the features previously collected in the ML case or learns them from the training data set, 𝑋, in the DL case, and adjusts the parameters, θ, so the output, i.e. the prediction, 𝑌̂, provided by part (1), matches the input, i.e. the ground truth, 𝑌, as accurately as possible. These last steps of adjusting parameters and improving the learning algorithm are usually referred as “learning a model” or “training” it.
2.5 Learning a Model
Learning a model (Figure 2.6), is an iterative process and it is carried out following some essential steps, starting with the definition of a score function (done by the network), moving on to the choice of a loss function and ending with an optimization problem [15]. The score function establishes a score between the images and all classes being considered, accordingly to the function parameters. Considering a simple binary classifier, this model relies on very simple and not complex functions, such as a linear regression (equation 2.4). In a binary classifier, considering a set 𝑋 with 𝑁 images, the score function associates one value to each pixel from each image 𝑖:
sf (Xi, W, b) = WXi + b 2.4
This simple linear score function, 𝑠𝑓, only has 2 parameters: the weights, 𝑊, which interact with the images, 𝑋𝑖, and the biases, 𝑏, which do not interact with the images but influence the final value for
each one, as the biases reflect the learner’s ability to keep learning something wrong. 𝑊 and 𝑏 can be referred to just as weights or, more simply, parameters. When considering a more complex model to make a prediction, like in DL models, the used score functions still attribute a value to each image/classes pair, but these functions are more complex and contain more parameters because there are many more images being used and, usually, one is not dealing with binary classes.
The loss function, 𝐿, measures how good the model being learned is when it actually performs its predictive task. Since it is not possible to change 𝑋, one can only manipulate the parameters, θ, and change them so that the predicted label for each image, 𝑌̂, matches the ground truth one, 𝑌𝑖 𝑖. Therefore,
between the real training labels and the ones obtained during the learning process (equation 2.5), with 𝐸 being the number of iterations during the learning process.
L(θ) = ∑ [Yi - Ŷi(Xi, θ)] 2 E
i=1
2.5
If the prediction made by the model does not match the reality (𝑌𝑖 ≠ 𝑌̂), then the loss will be high 𝑖
and, on the other hand, if the obtained prediction is close to reality (𝑌𝑖 = 𝑌̂), the loss will be low. 𝑖
Following the previous example of the binary classifier, the loss function is such that it considers that some label prediction is correct if the attributed score to the correct class is higher than the score of the wrong class by a certain threshold.
Since that the loss provided by 𝐿(𝜃) should be minimal, i.e. the prediction should match the ground truth, the optimization problem comes up. Optimizing a model is looking for the best parameters set θ, which is the set that minimizes the loss. This optimization in DL models relies on powerful methods such as Stochastic Gradient Descent (SGD).
All this learning process (Figure 2.6) is performed using the training set allowing, in the end, to save the parameters and then use the learned model on the validation and test sets. This is the reason
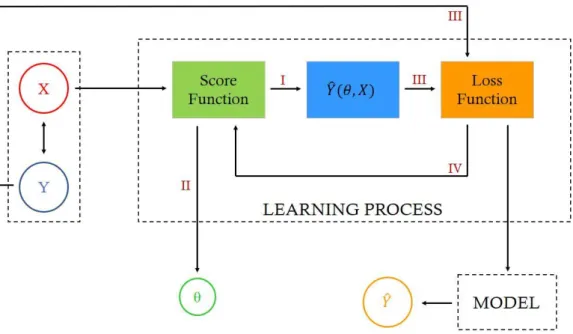
Figure 2.6 Iterative process of learning a model. X and Y represent the training images set and its labels,
respectively. The Model, Learning Process and Parameters are the three major parts of a ML system: the score function receives as input the images X, and its outputs are – the parameters θ (II) and, accordingly with the produced score for each image, a prediction Ŷ (I) of the corresponding label, the loss function receives (III) the previously produced prediction, Ŷ, and the real label, Y, corresponding to the image being analyzed, and compares them producing a loss value which is used as input in the score function (IV) allowing to update θ and produce new Ŷ. This iterative process, which reflects the optimization problem, continues until the loss is minimum and the predictive model outputs the final prediction for the image label.
why this learning process is also called training: one trains the network based on a training set, saves the parameters and the overall model so it can be used again without the need to train it one more time.
2.6 Optimization and Stochastic Gradient Descent (SGD)
Like it was mentioned, optimization is a fine way to find the proper parameters set, θ, and this is the set that minimizes the loss function. The first thought might be to try and use different values for the parameters and keep track of the ones which provide the minimum loss but it is clear that this approach is not the best one since it is time consuming, especially if there are many parameters to find, very rudimentary and random. The best way to get the best parameters and the lowest loss as possible is to use iterations, i.e. start with random values and change them in an iterative way [16].
The concept behind the iterative idea is based on the usage of gradients, i.e. derivatives. In the described optimization scenario, the loss function gradients are used, since these indicate the direction of this function maximal variation, introducing the Gradient Descent algorithm which tells how to change the input in order to improve the output.
The SGD algorithm works as follows: the loss function gradients with respect to each parameter are calculated and then each parameter update is set at every iteration by evaluating the gradients (gradient descent). The gradients point in the direction of the function maximal variation but since the goal is to minimize the loss, the algorithm must follow the opposite direction, i.e. the opposite sign of the gradient.
When following the chosen direction, the algorithm moves along it in several steps whose size is determined by the learning rate. The learning rate tells how far should the algorithm advance at each iteration in order to achieve the lowest loss. It can be set in different ways but the most common one is to set the learning rate as a small constant since it is better to take a little longer to find the optimal solution than to set the learning rate too high, giving a larger step that leads to faster progress at the cost of maybe missing the optimal point. This parameter can, later, be updated to its best value.
The optimization algorithm computes each parameter update based on the loss obtained using only a small sample from the training set, i.e. a minibatch, at each iteration, instead of doing it for all examples in the data set individually, since the gradient obtained from a minibatch is a good approximation of the gradient obtained from all examples in the training set [16]. This type of algorithm is called stochastic since it only uses minibatches [17]. Usually the minibatch size is a small number between 1 and 100 and in medical images datasets it does not get greater than 10. Another SGD property is that often the training sets are very large and contain thousands of examples which forces the SGD algorithm to perform more iterations until it reaches convergence, however SGD will always converge before it analyzes all examples in the training set and perform parameter updates more frequently (minibatch advantage).
2.7 Training and Validation Errors and Regularization
When creating a DL model there is no certainty that it will work properly when analyzing images never seen before, i.e. test sets, therefore generalization can be defined as the system ability to work well on test sets, and a new error can be quantified, the generalization error. Optimization focuses in
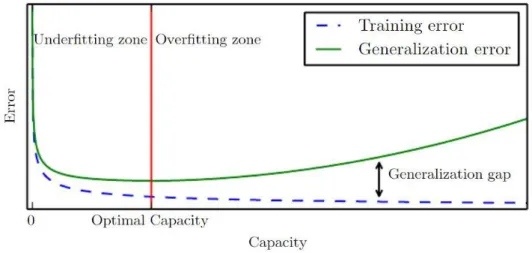
minimizing the training error, i.e. error measured using a training set (loss is a good measure of this error), and, on the other side, the way to minimize the generalization error relies on regularization methods [17]. The test set is a precious resource that should only be used once, in the end, when the DL algorithm performance cannot be further improved. Therefore, the test error can only be quantified in the end. To avoid reaching the test phase without having the best model, i.e. the one that has the best performance, as possible, the regularization error is calculated from the validation set. It is important to keep in mind that the regularization error will always be greater than the training one and, in the best-case scenario, they will be equal, and the relationship between these two errors must reflect 2 properties: (1) the training error must be as low as possible and (2) the gap between the training and regularization errors should be as small as possible. When these conditions are not achieved by the DL algorithm performance, 2 scenarios can occur: underfitting and overfitting. Underfitting happens when the training error is not the lowest, i.e. property (1) is not fulfilled, and overfitting occurs when the gap between both errors is too large, i.e. property (2) is not fulfilled (Figure 2.7).
In case of overfitting the learning model capacity should be stopped at its best value (Figure 2.7 – red line). The model capacity is translated by the degree of the polynomial that best fits the training data so when a model has a low capacity, like a binary classifier whose capacity is 1, it cannot fit a wide variety of data and when the capacity is too high the model fits too perfectly to the training set data not being able to perform very good on test sets, since these are different from the training ones, consequently leading to overfitting. A good way to change model capacity, and avoid overfitting, is by setting a hypothesis space made of a limited number of functions that the model can use during the learning process which also limits the number of parameters θ, which is another factor contributing to overfitting. As the amount of data in the training set increases, the model being learned becomes more and more complex using more complex score functions and, therefore, computing more parameters needed to make the final prediction.
As previously mentioned, regularization methods influence the parameters of the model, θ, keeping these as low as possible and even making some of them equal to zero. Regularization is important to obtain good parameters, which lead to a better predictive model and, consequently, to a better prediction, and also to avoid overfitting [15], therefore regularization is another way to influence model capacity.
Figure 2.7 Graphic representation of training error (dashed blue line) and generalization error (green line), in terms
of model capacity, underfitting and overfitting. On the left side of the red line the underfitting domain is displayed as both training and regularization errors are high and on the right side one can see the overfitting domain where the gap between both errors is increasing. Adapted from [17].
The regularization usually is included in the loss function, influencing its outcome, in many different ways as there are many different regularization methods.
Dropout is one form of regularization and it is described as a method to reduce interdependent learning between the neurons of the neural network, i.e. during the training phase some randomly chosen neurons are not considered [18] since the neurons belonging to a certain layer can depend on each other therefore sharing the same information and overloading the final set of parameters (Figure 2.8). Dropout works in a probabilistic manner where there is some probability, 𝑝, of a neuron being ignored at each layer.
Another common regularization method is the L2-Regularization, also known as Weight Decay, which influences the loss function as shown in equation 2.6.
L(θ) = ∑ [Yi - Ŷi(Xi, θ)] 2 N i=1 + 1 2λθ 2 2.6
The new added term is called the regularization term or the regularizer, and it strongly penalizes the model complexity. The constant λ reflects the preference for larger or smaller θ: a larger λ makes the parameters go smaller so the loss can remain the same (ideally as small as possible), but not excessively large so the regularizer does not become more important than finding the parameters that provide the lowest lossand a λ which approaches zero will lead the model to overfit. λ is called the regularization strength [16] and its initial value is unknown, so this should be picked in the beginning,
(A)
(B)
Figure 2.8 Dropout scheme. (A) represents a simple neural network where all neurons are working and sharing
weights between them, all of them contributing for the final output of the model. (B) represents the same neural network but with the regularization method known as dropout. The white neurons are ignored, what creates less connections between the neurons reducing the interdependent parameter learning.
not at random but from literature recommended values, avoiding very large or very small values, and then perform cross-validation on it [19] in order to find its best value.
2.8 Hyperparameters and Algorithm Performance
The parameter λ is not computed by the DL system, it is, instead, selected by the user and then updated. All variables that are used to control the deep learning system performance, such as λ, the model capacity or the dropout percentage, and are not learned by the algorithm are known as hyperparameters. These hyperparameters are updated using the validation set and not the test set, otherwise the hyperparameters values would be part of a model that would work perfectly when considering that specific test set, leading to overfitting. The validation set is, consequently, used to set these hyperparameters.
Cross-validation is performed when the validation set is small or even nonexistent, making the hyperparameters initialization and update complicated [20]. During cross-validation instead of creating a validation set from the training set, one splits the training set in a certain number k of equal folds and uses one of them for validation and the rest for training, iterating over which fold is used for validation. For each value of the hyperparameter one wants to quantify, it is trained in k-1 folds and validated in
one-fold changing the validation fold at each iteration, creating k cross-validation accuracies and the
chosen value is the one that provides the highest accuracy. However cross-validation is computationally expensive and one validation fold is preferred.
The learning rate and the minibatch size are, as well, hyperparameters that need to be set before the training starts. However, it is not common to cross-validate the later since its value is constrained by memory issues and computation time.
To make sure the used DL algorithm is as good as possible, the validation set is also used to obtain the validation error which corresponds to the training error but regarding the validation set. Given a training data set, one initially obtains certain values for the parameters θ (Figure 2.6 – path II) which, then, allow to obtain a prediction 𝑌̂ (Figure 2.6). With these predictions and parameters the loss can be quantified (the loss acts as the training error as it measures how different the prediction is from the ground truth). During the training, the model is also used to make predictions on the validation data set which will allow to quantify the validation error. Having both training and validation errors, they can be compared following the conditions presented before: (1) the training error must be as low as possible and (2) the gap between the training and validation errors should be as small as possible. The algorithm training is performed until the commitment between both conditions cannot be further improved. The final trained and validated model can then be used and its performance evaluated on a test set [15]. As previously mentioned, the test set should only be used at this stage when one has the best predictive model (with proper losses and regularization).
2.9 Convolutional Neural Networks
The task of recognizing something in an image presents lots of challenges, which influence the DL model final result, such as: scale, illumination and viewpoint variations, deformations, occlusions and
also intra-class variations. The algorithm used to perform the predictive task must be invariant to all these aspects [16] so it can be generalized to a wide variety of data sets.
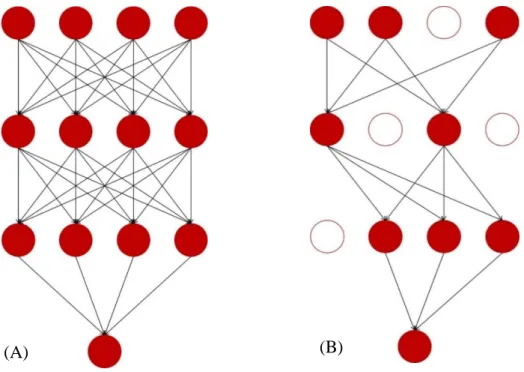
DL algorithms use CNNs which work like the neurons in our brain. In CNNs there are layers composed by artificial neurons connected to adjacent layer neurons but not connected between them in the same layer and are explicitly used when the inputs are images, allowing to extract more features since these networks are made of more kinds of layers and neurons and use more complex mathematical operations, such as convolution. In the simple Neural Networks (NNs) every neuron from one layer is connected to all neurons of the next layer (Figure 2.9 – A) and these networks do not share weights between layers, creating a great number of numerical parameters to describe the predictive model. Regarding CNNs, these share the weights so the model does not have to learn different features every time to detect the same object in one image, this way reducing the number of parameters that need to be learned, and the neurons from one layer are only connected to some of the next layer (Figure 2.9 – B). This architecture is based in biological processes such as the ones that occur in the visual cortex, where individual neurons respond to stimuli in a limited receptive field. These receptive fields overlap, so the full field, like an image, can be fully processed.
CNNs have different kinds of layers such as (1) input layer that receives the input image, (2) convolutional layers that compute the convolution (dot product) between neurons’ weights and the input region they are connected to, (3) Rectified Linear Units (ReLU) which are nonlinear activation functions
Figure 2.9 (A) Schematic representation of a simple NN, usually used in ML (requires more a priori information).
(B) Schematic representation of a DL NN (requires less a priori information due to the greater number and variety of layers).
that allow to obtain an output given a certain input, and (4) pooling layers, typically max-pooling, which aggregate pixels from the neighborhoods of the image area being analyzed whose value is maximal (max-pooling case), reducing the image size and, also, the number of parameters in the model. There are also (5) fully connected layers that compute each class score and in these layers each neuron is connected to all neurons from the previous layer, and (6) classification layer that uses a function to predict the class accordingly to the scores from the fully connected layers, being softmax the most commonly used. Layers 3 and 4 implement their own functions and layers 2 and 5 depend on their neurons’ parameters and on the activation function applied to the input.
As mentioned, the activation functions are nonlinear, otherwise the network would behave like a linear regression model with limited learning ability. Since DL is more complex and uses more complicated datasets, nonlinear functions are used since they offer the network the power to learn any function that best maps the inputs to the outputs. Each neuron computes the dot product between its weights and the input, adds the biases and introduces the nonlinearities through the activation function (Figure 2.10). There are several options to use as activation function though recently ReLUs became popular and are widely used in DL models [21]. Equation 2.7 shows the ReLU function which only activates a certain neuron, z, if its output is positive.
f (z) = max(0, z) 2.7
The CNN behavior can be explained accordingly to Figure 2.11: the network receives an image as input, it enters the first convolutional layer, which has ReLU as an activation function, and the convolution is performed accordingly to the kernel used by the layer. The kernel is the filter that the
Figure 2.10 Activation function influence on a CNN. Using the input, X, and the layer weights, W, the convolution
between these two is calculated and the biases, b, are added. The output of these operations, considering one neuron at the time, is submitted to the activation function, f, judgment which decides to use this neuron output as input to the next layer or not. The working principle is analogous for the rest of the hidden layer neurons.
layer will use to extract the feature that it considers more relevant and this kernel can have different sizes, which can be specified by the user along with the number of filters used by each layer. Therefore, the convolution is the dot product between the kernel and an area of the input image whose size corresponds to the kernel size (blue square in Figure 2.11). When the image is larger than the kernel, the kernel receptive field does not cover the full image and several convolutions have to be performed moving the kernel receptive field along the image and the result of this operation is translated into a feature map. There are as many feature maps as kernels used. Once these maps are obtained, the pooling layer aggregates the pixels from the image neighborhood reducing their size and these new feature maps will be the input of the next convolutional layer where convolutions will be, again, performed accordingly to the new kernels size and number. After this feature extraction process, the fully connected layer analyzes all feature maps computing a score for each one, and the classification layer, represented by the softmax function, converts this score into a class.
The softmax function used in the classification process analyzes the probabilities for all classes and allows to classify them. The main advantages of this function are that all probabilities range from 0 to 1 (normalized class probabilities) and the sum of all classes probabilities is 1, making this the most used function by neural networks [16]. Softmax is widely used in multi-classification tasks since the other option, the sigmoid function, only works for binary classification problems because it only provides the probability for one class.
The chosen loss function depends on the classification task. When using the softmax function for classification, the used loss function is cross-entropy. This function is more complex that the one represented by equation 2.5,even though it still measures the distance between the real labels and the ones outputted by the model. The cross-entropy function is defined in equation 2.8, where
p
i represents the real label andq
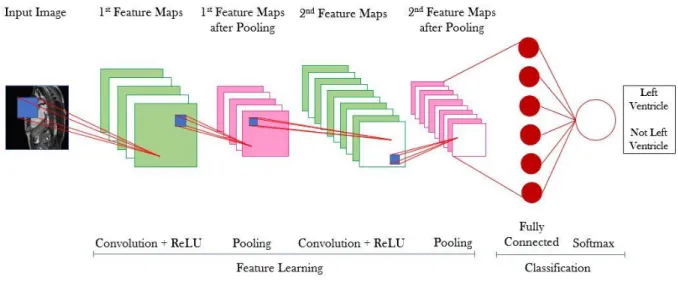
i the predicted one for the ith image.Figure 2.11 CNN with the input layer, 2 convolutional layers with ReLU, 2 pooling layers, 1 fully connected layer
and a classification layer using softmax function to analyze the scores from the fully connected layer and provide the class output. The blue square represents the receptive field of the considered kernel and depends on its size. There are as much feature maps after each convolutional layer as kernels used.