Math and Engineering Department
BALANCE-BOT
Presented to Universidade da Madeira for the Degree of Master
iii
Math and Engineering Department
BALANCE-BOT
Presented to Universidade da Madeira for the Degree of Master
iv ABSTRACT
Research on inverted pendulum has gained momentum over the last decade on a number of robotic laboratories over the world; due to its unstable proprieties is a good example for control engineers to verify a control theory. To verify that the pendulum can balance we can make some simulations using a closed-loop controller method such as the linear quadratic regulator or the proportional–integral–derivative method.
Also the idea of robotic teleoperation is gaining ground. Controlling a robot at a distance and doing that precisely. However, designing the tool to takes the best benefit of the human skills while keeping the error minimal is interesting, and due to the fact that the inverted pendulum is an unstable system it makes a compelling test case for exploring dynamic teleoperation.
Therefore this thesis focuses on the construction of a two-wheel inverted pendulum robot, which sensor we can use to do that, how they must be integrated in the system and how we can use a human to control an inverted pendulum.
The inverted pendulum robot developed employs technology like sensors, actuators and controllers.
This Master thesis starts by presenting an introduction to inverted pendulums and some information about related areas such as control theory. It continues by describing related work in this area. Then we describe the mathematical model of a two-wheel inverted pendulum and a simulation made in Matlab. We also focus in the construction of this type of robot and its working theory. Because this is a mobile robot we address the theme of the teleoperation and finally this thesis finishes with a general conclusion and ideas of future work.
KEYWORDS: Two-wheel inverted pendulum, Arduino, accelerometer, gyroscope,
v ACKNOWLEDGMENTS
This Master Thesis has been done with technical and moral support from several persons. I would like to thank all of them.
I owe a great debt to Ian Oakley who has been very supportive throughout this thesis. And is help with all my questions and concerns.
My brother for the support, encouragement and company spent over the years. Eng. Filipe Santos for all technical help and for the equipment.
My parents for their love and moral support when I most needed it. My relatives for the moral support.
People who supported me when it was needed, it includes friends and colleagues.
1 CONTENT
Abstract ... iv
Acknowledgments ... v
Figures ... 3
Chapter 1 - Introduction ... 6
1.1. Overview... 6
1.2. Thesis Outline ... 9
Chapter 2 - Related Work (State of the Art) ... 10
2.1. Inverted Pendulum ... 10
2.2. Two-Wheeled Inverted Pendulum Robots... 10
2.2.1. Sensors ... 11
2.3. 2 Degree of Freedom Inverted Pendulum Robots ... 17
2.4. Teleoperation ... 18
2.4.1. Telemanipulator ... 20
2.4.2. Telechir ... Erro! Indicador não definido. Chapter 3 - Robot Modeling ... 25
3.1. Nomenclature ... 25
3.2. Force Analisys and System Equations ... 25
3.3. Matlab Analysis ... 28
3.3.1. Linear Quadratic Regulator ... 28
3.4. Matlab Simulation ... 34
3.4.1. Weight ... 34
4.3.2. Center of Gravity ... 36
Chapter 4 - Robot Construction ... 39
4.1. Sensors ... 39
2
4.1.2. ADXRS610 - 300 degree/sec GYroscope... 39
4.2. Hardware... 40
4.2.1. Arduino Nano ... 40
4.2.2. Arduino BT ... 41
4.2.3. Devantech RD01 Drive System ... 41
4.2.4. Bases and Structure ... 42
4.2.5. Battery ... 42
4.3. Robot’s construction ... 43
4.4. Assembled Circuit ... 47
4.5. Software Implementation... 50
Chapter 5 - Robot Evaluation ... 53
5.1. Test with +20g of extra weight ... 54
5.2. Test with +100g of extra weight ... 58
5.3. Test with +400g of extra weight ... 60
Chapter 6 – Conclusion ... 64
References ... 67
Appendix ... 70
Appendix A – Open-loop poles m-file ... 70
Appendix B - LQR design ... 70
Appendix C – Nbar control ... 71
Appendix D – Estimator ... 71
Appendix E – Kalman Code ... 72
3 FIGURES
FIGURE 1 - INVERTED PENDULUM ... 10
FIGURE 2 - KAZUO YAM AFUJI ROBOT ... 11
FIGURE 3 – EQUIBOT ... 12
FIGURE 4 - STEVE'S LEGWAY ... 12
FIGURE 5 - PHILIPPE HURBAIN’S NXTWAY ... 13
FIGURE 6 - UM ASS UBOT ... 14
FIGURE 7 - DAVID ANDERSON'S NBOT ... 14
FIGURE 8 - TED LARSON'S BENDER ... 15
FIGURE 9 – JOE ... 16
FIGURE 10 - RYO WATANABE NXTWAY-G ... 16
FIGURE 11 - BALLBOT... 18
FIGURE 12 - VOYAGER PROBE ... 19
FIGURE 13 - TELIRIS UNIFIED VIRTUALIVE TELEPRESENCE ROOM IN USE (2007) ... 20
FIGURE 14 - IED DETONATOR ... 20
FIGURE 15 - DA VINCI TELEROBOTIC SURGICAL SYSTEM ... 21
FIGURE 16 – DEXTRE ... 22
FIGURE 17 - ROV HERCULES ... 23
FIGURE 18 - EXPLOSIEVEN OPRUIM INGSDIENST ... 23
FIGURE 19 – FREE BODY DIAGRAM OF THE ROBOT... 26
FIGURE 20 - SCHEM E FOR CONTROL SYSTEM PROBLEM S (CJC, 1997) ... 30
FIGURE 21 - STEP RESPONSE WITH LQR CONTROL ... 31
FIGURE 22 - REFERENCE INPUT SCHEM ATIC (CJC, 1997) ... 32
FIGURE 23 - STEP RESPONSE WITH LQR AND NBAR CONTROL ... 32
FIGURE 24 - FULL-ORDER ESTIM ATOR SCHEM ATIC (CJC, 1997) ... 33
FIGURE 25 - STEP RESPONSE WITH ESTIM ATOR... 34
FIGURE 26 - FINAL M ATLAB SIM ULATION ... 35
FIGURE 27 - M ATLAB SIM ULATION BODY M ASS +100G ... 35
FIGURE 28 - M ATLAB SIM ULATION BODY M ASS +500G ... 36
FIGURE 29 - M ATLAB SIM ULATION BODY M ASS +1000G ... 36
FIGURE 30 - 10CM LOWER CENTER OF GRAVITY ... 37
FIGURE 31 - 10CM UPPER CENTER OF GRAVITY ... 37
FIGURE 32 - ACCELEROM ETER ... 39
FIGURE 33 - GYROSCOPE... 40
FIGURE 34 - ARDUINO NANO ... 41
FIGURE 35 - ARDUINO BT-V06... 41
FIGURE 36 - DEVANTECH RD01 DRIVE SYSTEM SET ... 42
4
FIGURE 38 - ROBOT STRUCTURE ... 43
FIGURE 39 – BRACKET M ONTAGE ... 44
FIGURE 40 – M OTORS ... 44
FIGURE 41 – M OTORS AND WHEELS ... 45
FIGURE 42 – BOLT SPANNER AND NUTS ... 45
FIGURE 43 – FIRST SHEET OF PERSPEX WITH M ETAL RODS. ... 46
FIGURE 44 – BASE AND M ETAL RODS ... 46
FIGURE 45 - ROBOT STRUCTURE ... 47
FIGURE 46 - ASSEM BLED CIRCUIT ... 48
FIGURE 47 - FINAL CIRCUIT ... 49
FIGURE 48 - FINAL ROBOT FRONT ... 50
FIGURE 49 - FINAL ROBOT SIDE ... 50
FIGURE 50 - INVERTED PENDULUM PROCESS ... 50
FIGURE 51 - PENDULUM 'S ANGLE ... 51
FIGURE 52 - KALM AN PROCESS ... 52
FIGURE 54 - TEST STRUCTURE ... 54
GRAPHIC 1 - ROBOT'S ANGLE ... 53
GRAPHIC 2 - EXTRA 10G AT TOP CENTER ... 55
GRAPHIC 3 - PARALLEL BETWEEN NORM AL AND EXTRA 10G AT TOP CENTER ... 55
GRAPHIC 4 - EXTRA 10G TOP NEGATIVE ... 56
GRAPHIC 5 - EXTRA 10G TOP POSITIVE ... 56
GRAPHIC 6 - EXTRA 10G M IDDLE CENTER ... 56
GRAPHIC 7 - PARALLEL BETWEEN NORM AL AND EXTRA 10G M IDDLE CENTER ... 57
GRAPHIC 8 - EXTRA 10G M IDDLE POSITIVE ... 57
GRAPHIC 9 - EXTRA 10G M IDDLE NEGATIVE ... 57
GRAPHIC 10 - EXTRA 100G TOP CENTER ... 58
GRAPHIC 11 - PARALLEL BETWEEN NORM AL AND EXTRA 100G TOP CENTER ... 58
GRAPHIC 12 - EXTRA 100G TOP NEGATIVE ... 59
GRAPHIC 13 - EXTRA 100G TOP NEGATIVE ... 59
GRAPHIC 14 - EXTRA 100G M IDDLE CENTER ... 59
GRAPHIC 15 - PARALLEL BETWEEN NORM AL AND EXTRA 100G M IDDLE CENTER ... 60
GRAPHIC 16 - EXTRA 100G M IDDLE POSITIVE ... 60
GRAPHIC 17 - EXTRA 100G M IDDLE NEGATIVE ... 60
GRAPHIC 18 - EXTRA 400G TOP CENTER ... 61
GRAPHIC 19 - PARALLEL BETWEEN NORM AL AND EXTRA 400G TOP CENTER ... 61
5
GRAPHIC 21 - EXTRA 400G TOP POSITIVE ... 62
GRAPHIC 22 - EXTRA 400G M IDDLE CENTER ... 62
GRAPHIC 23 - PARALLEL BETWEEN NORM AL AND EXTRA 400G M IDDLE CENTER ... 63
GRAPHIC 24 - EXTRA 400G M IDDLE NEGATIVE ... 63
6 CHAPTER 1 - INTRODUCTION
1.1. OVERVIEW
When we think of a pendulum we think of a ball at the end of a wire suspended from a pivot point, well an inverted pendulum is exactly the opposite. The inverted pendulum is a pendulum with is mass above the pivot point, by the simple fact that its mass is above the pivot point the system is unstable by nature. Due to the fact that it is unstable it’s a very good example in control engineering to verify a control theory.
Inverted pendulum provides a good model example for a rocket or missile guidance, an automatic aircraft landing system, aircraft stabilization in the turbulent air-flow, stabilization of a cabin in a ship, and so forth.
A two-wheeled inverted pendulum robot is a robot that simulates the behavior of a inverted pendulum, i.e., we aim to build a robot that can self balance on two wheels only by reading and understanding the data provided by a sensor and act on the two-wheel according.
Due to the unstable nature of the pendulum it’s an example of the use of control theory. Control theory is a discipline that deals with the behavior of unstable systems. The desired output of a system is called reference, when a system as multiples inputs it need a controller to act on them so that its possible obtain the desire output of the system. A controller, in control theory, is a device that observe and manipulates the inputs of a system so that we get the desire output. For example, the sensors of an automatic door (controller) that will open the door when a person approaches. In this case the controller is called an open-loop controller because isn’t concerned about any unexpected forces that act on the system. To solve this problem, control theory introduces feedback. A close-loop controller uses feedback to control the output of a dynamical system.
Common closed-loop controller architectures include the PID controller and the LQR method.
7 through calculating a corrective action to adjust the process accordingly and rapidly in order to keep the error minimal. It’s the sum of the tree terms; the proportional term that changes the output value according to the current error, the integral term is proportional to the magnitude of the error and the duration of the error, and the derivate term of the PID calculate the error over the time.
The linear quadratic regulator (LQR) is a well know method to determine the feedback gains of a dynamic system. It’s assumed that we have an optimal full-state feedback, i.e. that we can measure all of our states.
When we talk about robotic we need to consider which type of function we need to have, what type of data are we interest in collect and to what purpose. In an inverted pendulum robot we are interested in measure the tilt of the pendulum, the tilt will tell us to which side and if the robot is falling.
To do that we can use different types of sensors such as; light sensor, infrared sensors, accelerometer or gyroscope.
Light sensors and infrared sensors have the disadvantage of being subject to the lighting conditions. In order to operate successfully we need to control those conditions precisely with little margin for error, in the other side the accelerometer and gyroscope don’t have that problem because they don’t act on the light but with the gravity of the earth.
An accelerometer is used to measure the acceleration that a body experiences relative to freefall, with that we can determine when and to which side the body is falling. Accelerometers are used to measure vehicle acceleration; machinery health monitoring; measure the motion and vibration of a structure; measure the depth of CPR chest compressions; in navigation to calculate the position, orientation, and velocity (direction and speed of movement) of a moving object; detect apogee in both professional and in amateur rocketry and more recently phones contain accelerometers for user interface control.
8 UAVs. Due to higher precision, gyroscopes are also used to maintain direction in tunnel mining.
To measure the tilt of the inverted pendulum system we need to use an accelerometer that can measure the acceleration in two-axis, with these data it’s possible to determine the pendulum tilt and more precisely the angle. However we can simply use the accelerometer but if we only use an accelerometer we are subject to that the information give by the accelerometer is not the most exact as possible, for that and to get the most precise information on the tilt we associate and gyroscope, so that the information is more precise.
Data from accelerometer and gyroscope are subject to noise. The noise can be from a bad wire contact, bad reading, etc. To correct the value and minimize the noise the value need to be filtered; the most well know filter algorithm to combine accelerometer and gyroscope data is the kalman filter.
A kalman filter is an efficient recursive filter that estimates the state of a linear dynamic system from a series of noisy measurements. It is used in a wide range of engineering applications from radar to computer vision, and is an important topic in control theory and control systems engineering. (Wikipedia, Kalman filter, 2009)
In a mobile inverted pendulum motors are an important part, it’s necessary to choose the more suitable motor to the robot. The Devantech RD01 12v Drive System is composed by a MD23 motor drive module, two EMG30 gearmotors with encoders to allow controlling each motor and respective speed. Only a single 12v battery capable of supplying peak current of 6 Amps is required to power the system. Power for the logic comes from an on-board 5v regulator which is also capable of supplying up to 300mA to other circuits. The board communicates with the Arduino trough the MD23 IC2. Arduino is an open-source physical computing platform based on a simple microcontroller board and it has a specific development environment for writing software for the board, the “Arduino IDE”. Arduino BT is a microprocessor platform incorporating a Bluetooth module that can be use to control the robot at distance.
9 as tele-surgery, exploration, bomb disposal, and work in hazardous environments. Although the intelligence of devices is increasing, many of these situations still require that a person perform complex physical tasks with a high level of skill.
This project will involve building a simple robotic system, programming its controller to automatically balance it then developing a feedback system which allows a human operator to complete this skilled task.
The robot developed uses technologies like microcontrollers (Arduino), sensors (accelerometer, gyroscope), motors encoders (MD23), and Bluetooth communication. It provides experience with basic electronics.
1.2. THESIS OUTLINE
This thesis will cover the following chapters.
Chapter 2 consists of the references to existing works that relate to this thesis and that influenced us in making prototype.
In chapter 3 we describe the modeling and simulation of a two-wheel inverted pendulum with the linear quadratic regulator method using Matlab.
Chapter 4 describes the components and the construction of a two-wheel inverted pendulum. We also discuss the main circuit of the robot and the computing structure of the program.
At chapter 5 we will describe the tests that were made and their conclusion.
In chapter 6 we describe the teleoperation and its connection with the inverted pendulum problem.
10 CHAPTER 2 - RELATED WORK (STATE OF THE ART)
In this chapter we mention the different types of mobile inverted pendulum robots and the different components used in their construction. We will only review the most important, their similarity and differences.
2.1. INVERTED PENDUL UM
An inverted pendulum is a pendulum which has its mass above its pivot point. It is often implemented with the pivot point mounted on a cart that can move horizontally and may be called a cart and pole. Whereas a normal pendulum is stable when hanging downwards, an inverted pendulum is inherently unstable, and must be actively balanced in order to remain upright, either by applying a torque at the pivot point or by moving the pivot point horizontally as part of a feedback system.
Figure 1 - Inverted Pendulum
2.2. TWO-WHEELED INVERTED PENDULUM ROBOTS
The idea of a robot that can self-balance has gained momentum over the last decade in various robot laboratories, for academic or research purpose worldwide and peoples who have robotic as a hobby.
11
Figure 2 - Kazuo Yamafuji Robot
Basically, independent of how the robot was built, the idea is the same, built a robot that can simulate the behavior of an inverted pendulum. That can be made of different forms, we can use rolling carts attached to a platform or two wheels, different types of sensors from light sensor to accelerometers and gyroscopes and different type of controller.
2.2.1. SENSORS
Sensors are an important part of a mobile inverted pendulum robot. They will give us the angle of the pendulum.
2.2.1.1. LIGHT SENSORS
They must be positioned at front or back of the robot facing downwards so that it’s possible to measure the wavelength of floor’s color. With that value it’s possible to measure the distance to the floor, and figure out which side the robot is falling.
12
Figure 3 – Equibot
Steve Hassenplug’s LegWay is a two wheel robot that uses RCX Lego. It balances using the IR Lego sensor to detect the floor proximity. Can follow a black line and/or spin in place. (Hassenplug, 2007)
Figure 4 - Steve's LegWay
13
Figure 5 - Philippe Hurbain’s NXTWay
2.2.1.2. ACCELEROMETER WITH GYROSCOPE
To sense the robot’s angle we can use an accelerometer associated with a gyroscope. The accelerometer is responsible for measuring the proper acceleration the robot experiences relative to freefall, with this data we can determinate the angle of the robot and the gyroscope will measure the orientation that is used to correct accelerometer’s angle. These sensors can be placed at any side of the robot, provided that they are aligned according to axis in which the robot falls.
14
Figure 6 - UMASS uBot
Another example of an inverted pendulum that uses accelerometer and gyroscope is David P. Anderson’s nBot. The data collected from both sensors is processed by the FAS-G IMU that implements a "Weiner" filter to combine the two sensors into a single measurement.
The robot uses the HC11 robot controller developed for the M.I.T. 6.270 Robotics Course, the same robot controller used on the LegoBot and SR04. (Anderson, 2007)
15 Bender is another inverted pendulum robot to use both sensors to measure angle. Ted Larson and Bob Allen are the brains behind it. Bender is a robot that consists of several platforms to support its various components. Its “brain” is a Microchip PIC18F452.
Figure 8 - Ted Larson's Bender
16
Figure 9 – JOE
Roy Watanabe’s NXTWay-G can be described like been a new version of the NXTWay but instead of using the NXT Light sensor it uses the NXT Gyro sensor. It means that instead of detect the proximity to the floor to balance; the balancing is made using the rotation detected by the gyro sensor, the number of degrees. By using this type of sensor it can eliminate the problem of the light sensor (must have a light controlled environment) and now use the body’s rotation angle. (Watanabe, 2007)
Figure 10 - Ryo Watanabe NXTWay-G
17 pendulum. Among these components we highlight the sensors used; robots that use light sensors have the drawback that it is necessary to control the lighting conditions of area the robot will operate. The smallest difference in light intensity in this spot will affect sensor’s reading and the controller may think that the robot is falling when in fact is in equilibrium position, or vice versa. Furthermore, the use of an accelerometer associated with a gyroscope, by not being associated with light but to gravity, resolves this problem and provides a better way to detect the tilt of the robot.
2.3. 2 DEGREE OF FREEDOM INVERTED PENDUL UM ROBOTS
Another example of an inverted pendulum robot it’s Ballbot. The Ballbot is a mobile robot, an attempt to solve the robotic unicycle problem, and is designed to balance itself on its single spherical wheel while travelling around. It is the focus of the Ballbot Research Platform, a project conducted at Carnegie Mellon University, made possible by grants from the National Science Foundation. The robot is being developed by Ralph Hollis and George Kantor, with help from the graduate students Tom Lauwers, Anish Mampetta and Eric Shearer. The purpose of the Ballbot project is to discover how robots may maintain dynamic stability (that is, reliable balance), to enable designs with narrower bases for improved navigability (such as in a crowded room). This is a departure from the current paradigm in robot design, which relies on the static stability provided by having three or more wheels (and a much wider base). The project is titled "Dynamically-Stable Mobile Robots in Human Environments".
18
Figure 11 - Ballbot
2.4. TELEOPERATION
Teleoperation indicates operation of a machine at a distance. It is similar in meaning to the phrase "remote control" but is usually encountered in research, academic and technical environments. It is most commonly associated with robotics and mobile robots but can be applied to a whole range of circumstances in which a device or machine is operated by a person from a distance. (Wikipedia, 2009)
A telemanipulator (teleoperator or telerator) is a device that is controlled remotely by a human operator. If such a device has the ability to perform autonomous work, it is called a telerobot. If the device is completely autonomous, it is called a robot. Devices designed to allow the operator to control a robot at a distance are sometimes called telecheric robotics.
19 Some teleoperated robots have a limited range of functions. A good example is a space probe, such as Voyager, hurtling past some remote planet. Earthbound scientists sent commands to Voyager based on the telemetry received from it, aiming its cameras and resolving minor problems.
Figure 12 - Voyager probe
20
Figure 13 - Teliris Unified VirtuaLive telepresence room in use (2007)
2.4.1. TELEMANIPULAT OR
The IED detonator, is a telemanipulator for investigating potentially explosive devices.
Its goes investigate the presence of explosive and allows that the human operator is safe from any danger.
Figure 14 - IED detonator
The Da Vinci Telerobotic Surgical System permits the surgeon to perform an operation on a patient from a remote site. Currently, the FDA requires the surgeon to sit physically in the same room as the patient on whom he is operating.
21 position with arms supported by a rest. His feet activate several peddles that control various aspects of the robot’s movements.
The surgeon’s console contains the binocular 3-dimensional imaging system. The surgeon immerses himself within a virtual operative field that is viewed through the binocular viewing finders.His arms are supported by the arm rest. Foot pedals control various adjustments of the robotic arms and instruments.
The surgeon inserts his hands into a “master” that translates motions of his hands into motions of the robotic arms and hand-like instruments. The surgeon acts as the “master” and the robot as the “slave” in this telerobotic “master-slave” system.Da Vinci only duplicate the motions of the surgeon. Da Vinci does not initiate any actions on its own volition. (Association)
Figure 15 - DA VINCI TELEROBOTIC SURGICAL SYSTEM
22
Figure 16 – Dextre
We can also make a difference between a remotely operated vehicle (ROV) and a remote control vehicle (RCV).
2.4.2. REMOTELY OPERATED VEHICLE
23
Figure 17 - ROV Hercules
2.4.2. REMOTE CONTROL VEHICLE
A remote control vehicle (RCV) is defined as any mobile device that is controlled by a means that does not restrict its motion with an origin external to the device. This is often a radio control device, cable between control and vehicle, or an infrared controller. A remote control vehicle or RCV differs from a robot in that the RCV is always controlled by a human and takes no positive action autonomously. (Wikipedia, Remote control vehicle, 2009)
25 CHAPTER 3 - ROBOT MODELING
The first important step in the construction of the robot is modeling the system. This means deducing the mathematical equations that concern to the movement of the system, the set of forces that act in the main body and in every single wheel.
3.1. NOMENCLATURE
Symbol Parameter Value[unit]
xr Straight line position [m]
θp Pitch angle [rad]
δp Yaw angle [rad]
JRL, JRR Moment of inertia of the rotating masses with respect to z axis [kgm 2
] Mr Mass of rotating masses connected to the left and rigth wheel.
MRL = MRR = Mr
0.4[kg]
Jp Moment of inertia of of the chassis with respect to z axis [kgm2]
Jδ Moment of inertia of of the chassis with respect to y axis [kgm2]
Mp Mass of body 2.1[kg]
R Radius of wheel 0.05[m]
L Distance between the z axis and the center of gravity of the vehicle
0.3[m]
D Lateral distance between the contact patches of the wheel [m] yr Shift position of the wheel with respect to the y axis [m]
xp Shift position of the chassis with respect to the x axis [m]
g Garvity constant 9.8[ms-2]
CL,CR Input torque for right and left wheels accordingly 0.147[Nm]
3.2. FORCE ANALIS YS AND SYSTEM EQUATIONS
To develop an efficient control system for the vehicle, its dynamics have to be described by a mathematical model.
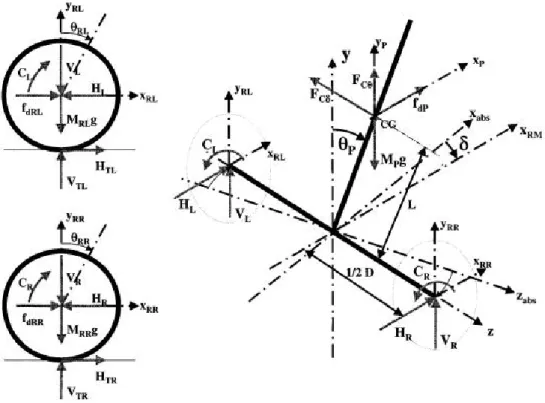
26
Figure 19 – Free body diagram of the robot
The following equations can be derivated from the model and can be found at (Grasser, D'Arrigo, Colombi, & Rufer, February 2002).
For left hand wheel (analog for right hand wheel).
ẍ = − + ( + ) (1)
ӱ = − − (2)
̈ = − (3)
ẋ = ̇ (4)
ẏ = − ̇ sin ̇ (5)
ẋ = ̇ cos ̇ (6)
̇ = ẋ ẋ (7)
For the chassis:
27
ӱ = + − + (9)
̈ = + ) sin − + ) cos −( + ) (10)
̈ = ( − ) (11)
where HL, HR, HTL, VL, VR, VTL, and VTR represent reaction forces between the
different free bodies.
Equations (1)-(11) can be represented in the state-space form as:
ẋ( ) = ( ) + ( ) (12)
where x ϵ IRn, u ϵ IRm are respectively the state and the control. f(x) is nonlinear dynamic function matrix and g(x) is nonlinear input function matrix. The state, x of the system is defined as:
= ,ẋ , , ̇ , , ̇ ′ (13)
Modifyng the equations above and then linearizing the result around the operating point (θp=0, xr=0, δ=0) and de-coupling, the system’s state space equations can be written in
matrix form.
The state-space equations for the robot can be written as two different systems: 1) a system “pendulum” describing the rotation about the z axis and 2) a system “rotation” modeling the rotation about the y axis.
For the “pendulum” we have,
⎣ ⎢ ⎢ ⎢ ⎡ẋẍ
Ɵ̇
Ӫ ⎦⎥
⎥ ⎥ ⎤
=
0 1 0 0
0 0 0
0 0 0 1
0 0 0 ⎣⎢
⎢ ⎡ẋ
Ɵ Ɵ̇ ⎦⎥
⎥ ⎤
+ 0
0 [ ] (14)
and for the “rotation”,
̇
̈ = 00 10 ̇ + 0
[ − ] (15)
where,
= ( 1−4
28
= 4
3 −
1
, = − , = 6
9 +
and,
= 1
3
+ 6 )
+ 3 2
, =
+ 3
2 )
+ 1
The details for equations (14) and (15) are not shown here and can be found elsewhere (Nawawi, Ahmad, & Osman, Dec 2007).
We are now able to design an independent controller for each of these subsystems with the possibility of assigning different dynamics to each of them.
3.3. MATLAB ANALYS IS
In this section we will use the state-space equations, for the “pendulum” system, in the Matlab to run some simulations and see the response of the system to a determinate impulse.
We use the tutorial present at (CJC, 1997).
3.3.1. LINEAR QUADR ATIC REGULATOR
The Linear Quadratic Regulator (LQR) is a well know method to determine a practical feedback gains of a system.
The main advantage of this method is that the optimal input signal u(t) is obtained from full state feedback; i.e. u = Kx for some K matrix. The feedback matrix K in question is obtained by solving the Ricatti equation associated with the particular LQR problem we have at hand.
One of the disadvantages of the LQR controller is that obtaining an analytical solution to the Ricatti equation is quite difficult in all but the simplest cases.
29 The state space model represents a physical system as n first order coupled differential equations. This type of representation helps doing computer simulations and allows observe the behavior of the system to a set of inputs instead of a single input.
The general vector-matrix form of the state space model is:
̇( ) = ( ) ( ) + ( ) ( )
( ) = ( ) ( ) + ( ) ( )
where y is the output equation, and x is the state vector. The state-space equations for this problem are:
⎣ ⎢ ⎢ ⎢ ⎡ẋẍ
̇ ̈ ⎦⎥ ⎥ ⎥ ⎤ =
0 1 0 0
0 0 0
0 0 0 1
0 0 0 ⎣⎢
⎢ ⎡ẋ ̇ ⎦⎥ ⎥ ⎤ + 0
0 [ ]
= 1 0 0 0
0 0 1 0
ẋ Ф Ф̇ + 0 0 where,
= ( 1−4
3 , =
= 4 3 − 1 , = − and = 1 3
+ 6 )
+ 3 2 , = + 3 2 ) + 1
30
Figure 20 - Scheme for control system problems (CJC, 1997)
In this problem R represents the input that needs to be given to the wheels, i.e., the velocity of the wheels; the four states represent the position and velocity of the wheels and the angle and angular velocity of the pendulum. The output y contains the position of the wheels and the angular velocity of the pendulum.
We use it to design a controller that when an input is given to the system the pendulum should return to is balanced position and the wheel should move according.
3.3.1.2. OPEN-LOOP POLES
The first step to solve the problem is to determinate the open-loop poles of the system. For that we use the Maltab file (m-file) present in Appendix A according to the tutorial fount at (CJC, 1997).
The Matlab command window should output the following text as a result:
One of the poles is in the right-half plane, which means that the system is unstable in open-loop.
3.3.1.3. LINEAR QUADRATIC REGULATOR METHOD
31 For that we enter the code from the m-file of Appendix B according to the tutorial fount at (CJC, 1997).
You should get the next value for K and a response plot:
Figure 21 - Step response with LQR control
The curve in green represents the pendulum's angle, in radians and the curve in blue represents the wheel’s position in meters. As you can see the wheels are not in the desire position but in the other direction.
3.3.1.4. REFERENCE INPUT
Now we want to get rid of the state error. We need to compute what the steady-state value of the steady-states should be, multiply that by the chosen gain K, and use a new value as our reference for computing the input. This can be done by adding a constant gain Nbar after the reference. The schematic below shows this relationship:
0 0.5 1 1.5 2 2.5 3 3.5 4 4.5 5
-2.5 -2 -1.5 -1 -0.5 0 0.5 1 1.5
2x 10 -3
32
Figure 22 - Reference Input schematic (CJC, 1997)
After adding the m-file of Appendix C according to the tutorial fount at (CJC, 1997) to your Matlab simulations you should see the following response:
Figure 23 - Step response with LQR and Nbar control
Now, the steady-state error is within our limits, the rise and settling times are met and the pendulum's overshoot is within range of the design criteria.
3.3.1.5. OBSERVER DESIGN
0 0.5 1 1.5 2 2.5 3 3.5 4 4.5 5
-0.8 -0.6 -0.4 -0.2 0 0.2 0.4 0.6
33 This response is good, but was found assuming full-state feedback, which most likely will not be a valid assumption. To compensate for this, we will next design a full-order estimator to estimate those states that are not measured. A schematic of this kind of system is shown below, without Nbar:
Figure 24 - Full-order estimator schematic (CJC, 1997)
34
Figure 25 - Step response with estimator
This response is about the same as before. All of the design requirements have been met with the minimum amount of control effort, so no more iteration is needed.
With this simulation we can observe that our inverted pendulum can reach an equilibrium position. It helped us understand and realize the variables involved in the process and which we need to consider, in this case are the angle of the pendulum and the position of the wheels to reach that position at that time the wheels must move at a certain speed, that speed is one of the inputs of our final system.
3.4. MATLAB SIMULATION
In this section we present a few simulations that were done in Matlab so that we can understand better the behaviour of the mobile inverted pendulum robot.
3.4.1. WEIGHT
First we start by adding some extra weight to the body of the robot so that we can analyse its behaviour.
0 0.5 1 1.5 2 2.5 3 3.5 4 4.5 5
-0.8 -0.6 -0.4 -0.2 0 0.2 0.4 0.6
35
Figure 26 - Final Matlab simulation
This figure represents the final simulation of the LQR method applied to our mobile inverted pendulum robot.
Figure 27 - Matlab simulation body mass +100g
In this simulation we add more 100g to the body. As we can see there is no big difference in pendulum rise time or in the wheel’s position. They are both around 1.26 seconds.
0 0.5 1 1.5 2 2.5 3 3.5 4 4.5 5
-0.8 -0.6 -0.4 -0.2 0 0.2 0.4 0.6 X: 1.28 Y: -0.001209 Wheel Pendulum
0 0.5 1 1.5 2 2.5 3 3.5 4 4.5 5
36
Figure 28 - Matlab simulation body mass +500g
In this simulation we add more 500g to the body. As we can see it took more time to settle the pendulum with the increase of weight. If compared with the initial graphic the difference is significative.
Figure 29 - Matlab simulation body mass +1000g
In this simulation we add more 1000g to the body. As we were excpecting it took more time to settle the pendulum.
In conclusion we can observe that a heavy robot will take more time to settle. By taking more time to settle the robot it means that the robot will tilt more making it more unstable. If it takes more time it will be necessary more acceleration to reach the equilibrium state.
Therefore when choosing materials for the pendulum we have to choose strong, lightweight materials.
4.3.2. CENTER OF GRAVITY
0 0.5 1 1.5 2 2.5 3 3.5 4 4.5 5
-0.8 -0.6 -0.4 -0.2 0 0.2 0.4 0.6 X: 1.39 Y: 0.002296 Wheel Pendulum
0 0.5 1 1.5 2 2.5 3 3.5 4 4.5 5
37 In this simulation we changed the center of gravity of the robot. By changing the robot center of gravity we are changing robot’s mass distribution. With this we can see how the mass of the robot must be distributed along its body.
Figure 30 - 10cm lower Center of Gravity
Figure 31 - 10cm upper Center of Gravity
0 0.5 1 1.5 2 2.5 3 3.5 4 4.5 5
-1 -0.8 -0.6 -0.4 -0.2 0 0.2 0.4 0.6
X: 0.9 Y: 0.0009867
Wheel Pendulum
0 0.5 1 1.5 2 2.5 3 3.5 4 4.5 5
-0.8 -0.6 -0.4 -0.2 0 0.2 0.4 0.6 0.8
X: 2.38 Y: 0.0006415
38
As we can see in the figures if we lower the center of gravity of the robot we will decrease the setling time from 1.39s to 0.9s to settle the pendulum and when we increase the center of gravity the time to setle will be bigger and by the graphic we can also see that the pendulum doesn’t settle by complete.
39 CHAPTER 4 - ROBOT CONSTRUCTION
In this chapter we discuss the physical construction of the robot as well as the components used in construction.
First we will discuss the components and their characteristics. And then we will talk about the real construction of the robot.
4.1. SENSORS
The sensors are responsable for given feedback to the system so that the robot can move according. Thre are two types os sensor in this projects gyroscope and accelerometer.
4.1.1. ADXL203 ACCELEROMETER
Accelerometers are used for measure the acceleration that a body suffers relatively to free fall on a determinate axis. In our case we will need an accelerometer capable of given that acceleration on two axes so that we can calculate the angle.
The ADXL103/ADXL203 are high precision, low power, complete single- and dual-axis accelerometers with signal conditioned voltage outputs, all on a single, monolithic IC. The ADXL103/ADXL203 measure acceleration with a full-scale range of ±1.7 g. The ADXL103/ADXL203 can measure both dynamic acceleration (for example, vibration) and static acceleration (for example, gravity). (Analog Devices, 2006)
Figure 32 - Accelerometer
40 The ADXRS610 is a complete angular rate sensor (gyroscope) that uses the Analog Devices, Inc. surface-micromachining process to create a functionally complete and low cost angular rate sensor integrated with all required electronics on one chip. (Electronics)
This gyro is meant to be use with the accelerometer. As the gyroscope is capable of measuring the rate of a single direction it’s used to correct the angle given by the accelerometer.
Figure 33 - Gyroscope
4.2. HARDWARE
4.2.1. ARDUINO NANO
Arduino Nano is a surface mount breadboard embedded version of the Arduino with integrated USB. It is small, complete, and breadboard friendly. The Nano was designed and is being produced by Gravitech. (A. Mellis, Arduino - ArduinoBoardNano, 2006) Arduino is an open-source physical computing platform based on a simple microcontroller board and it has a specific development environment for writing software for the board, the “Arduino IDE”.
41
Figure 34 - Arduino Nano
4.2.2. ARDUINO BT
The Arduino BT is an Arduino board with built-in bluetooth module, allowing for wireless communication. (A. Mellis, Arduino - ArduinoBoardBluetooth, 2007)
Figure 35 - Arduino BT-V06
4.2.3. DEVANTECH RD01 DRIVE S YSTEM
42
Figure 36 - Devantech RD01 Drive System set
4.2.4. BASES AND STRUCTURE
For the bases of the robot we used Perspex, this material was chosen because it’s light and robust, precisely, five Perspex sheets of 15*20cm with 5mm thickness. For the main structure we used four metal rods of 50cm long and 6mm thickness.
Figure 37 - Perspex and metal rods
4.2.5. BATTERY
43
4.3. ROBOT’S CONSTRUCTION
From theory we know that a taller robot will be easier to balance, because it will fall slowly. However a taller robot will be more massive and there for it will need more acceleration to balance.
Therefore we build a 0.56m tall (including wheels) robot that weight 2.1kg.
Figure 38 - Robot structure
Before the “real” construction of the robot begins, we drilled holes to hook up the metal rods in all the Perspex sheets before proceed further. We drilled 2cm away of each corner, with 6mm holes. Was also drilled a hole in the middle of the Perspex sheets for wiring.
44
Figure 39 – Bracket montage
Then we hooked up the motors and respective wheels.
45
Figure 41 – Motors and wheels
After both motors and wheels are hooked up its time to build the main structure which will support the MD23 for the motors, the accelerometer, gyroscope and all the necessary battery and wires.
For that it will be necessary one bolt spanner and some nuts. Nuts of 6mm and bolt spanner of 10mm.
Figure 42 – Bolt spanner and nuts
46
Figure 43 – First sheet of Perspex with metal rods.
After all four metal rods are attached to the main base it should be similar to the following image. We must ensure that all nuts used in the process are well tight to avoid that the robot wobbling while balancing.
Figure 44 – Base and metal rods
47
Figure 45 - Robot structure
4.4. ASSEMBLED CIRCUIT
The main circuit of the robot is composed by the sensors (accelerometer and gyroscope), the Arduino, the motors and battery.
When we assemble this circuit we need to make sure that the all GND (ground) pins are connected. And that we supply power to both accelerometer and gyroscope, it can be made throw the Arduino +5V output.
From the motors encoder we need to connect the SCL to pin 21, analog 5, of the Arduino and SDA is connected to two 1k8Ω parallel resistances and continues to pin 22, analog 4, of Arduino (the scheme is at figure 39). It’s important that this pin are respected, otherwise the MD23 will not communicate with Arduino.
In the accelerometer we are interest in read the values of x and y and so we connect them to pins 23 and 24 respectively analog 3 and 2, from gyroscope we are only interested in the rate that we connected to pin 20, analog 6. They are connected to the analog pins of the Arduino because they are analog devices.
We used the +5v output (at orange in figure 41) of MD23 to power the Arduino Nano and its connected to pin 27, +5v of Arduino.
48
49
Figure 47 - Final Circuit
Now that the main structure is done and we know how to assemble the circuit we place the components in their place.
The sensors were placed at the top of the robot so that we can detect the angle the faster as possible.
The MD23 is placed in the base to be connected with the motors.
We have placed the 12v battery to power both motors and Arduino at the base just up the MD23.
50
Figure 48 - Final robot front Figure 49 - Final robot side
4.5. SOFTWARE IMPLEMENTAT ION
Now that the circuit is assembled we need to know how to use sensor’s information.
Figure 50 - Inverted Pendulum process
51 scale must be precise for that we collect all the data and perform the kalman and pid calculation at 50Hz.
In an unstable system we must have mechanism that can help us measure that instability; in this case we need a way to measure the pendulum’s tilt for that we used an accelerometer and a gyroscope. We used a two-axis accelerometer because we need to measure the acceleration that the pendulum experiences in those two axes.
Figure 51 - Pendulum's Angle
Only with those values and some trigonometry it’s possible to determine the pendulum’s angle. If we only have one axis, that would not be possible.
After we have the angle (given by the accelerometer) and due to the fact that it is with noise we need to minimize that noise, this noise can be from a bad cable contact, bad readings from the pin. For estimate the real angle we need to use the accelerometer’s angle and gyroscope’s angular rate, which is noisy, and filter. We use a Kalman filter to achieve this.
52
Figure 52 - Kalman process
After we get the final angle it’s time to work with it. As we said before to make the robot balancing is necessary that the wheels move according to the angle, for this and even though the simulation was done using the LQR method, we use the PID method to balance the robot.
A PID controller attempts to correct the error between a measured process variable, which in our case is pendulum’s angle, and a desired setpoint, for us the setpoint is the equilibrium angle, i.e., the angle when the robot is at an equilibrium position, by calculating and then instigating a corrective action that can adjust the process accordingly and rapidly, to keep the error minimal, by corrective action we understand the wheel’s speed. We have tuned each of the PID values manually by trial and error.Then with PID’s corrective action we feed the motors and if everything works well it should balance.
53 CHAPTER 5 - ROBOT EVALUATION
In this chapter we will discuss the result of the tests that were made to the mobile inverted pendulum robot.
To test the dynamic of the mobile inverted pendulum we test its behavior when we change its unstable variable, i.e. when we changed the mass of the body. Due to the fact that we can’t remove mass to the body we have test it by adding different mass to the body.
First we need to know the behavior of the pendulum as it is. More specifically, angle variation. For that we made the following graphic to illustrate it. It illustrates the angle variation in a 20 second time window.
Graphic 1 - Robot's angle
As we can see in the graphic the robot´s angle will tilt 1degree around the equilibrium angle, i.e. the angle when the robot is perfectly stable, in this case is 90degrees.
In the following test we add some mass to robot’s chassis in different position and then we noticed the change in the angle.
The extra weights (20g, 100g and 400g) were added at the top and middle of the robot, in the center (black rectangle), positive (red rectangle) and negative (green rectangle), as
87 87.5 88 88.5 89 89.5 90 90.5 91 91.5 92
A
n
g
le
54 showed in the figure 53, this has allowed us to notice the behavior of the pendulum to different variations of the weight in different parts of its body.
Figure 53 - Test structure
5.1. TEST WITH +20G OF EXTRA WEIGHT
55
Graphic 2 - Extra 20g at top center
Graphic 3 - Parallel between Normal and Extra 20g at top center
As we can observe in the figure the robot’s behavior was the same as before, the tilt of the robot was around 1 degree in relation to its setpoint. Therefore it’s possible to add a little mass to the robot that it should continue balancing.
88 88.5 89 89.5 90 90.5 91 91.5
A
n
g
le
Extra weight center
87 87.5 88 88.5 89 89.5 90 90.5 91 91.5 92
A
n
g
le
Parallel
56
Graphic 4 - Extra 20g top negative Graphic 5 - Extra 20g top positive
These two graphic represent the tilt of the angle when adding the extra weight in the negative or positive side of the robot. As we can see and for this mass there is no difference between them and between the original plot.
The next graphic represent adding the same extra weight but now in the middle of the body.
Graphic 6 - Extra 20g middle center
87 88 89 90 91 92 A n g le
Extra weight
negative
87 88 89 90 91 92 A n g leExtra weight positive
87.5 88 88.5 89 89.5 90 90.5 91 91.5 A n g le
57
Graphic 7 - Parallel between normal and extra 20g middle center
As we can see the effects of that extra weight is practically none in the balancing of the robot even if that weight is added to the middle of the robot.
Graphic 8 - Extra 20g middle positive Graphic 9 - Extra 20g middle negative
These two graphic represent the tilt of the angle when adding the extra weight in the negative or positive side of the robot. As we can see and for this mass there is no difference between them and between the original plot.
In conclusion we can observe that adding a small weight to the top or middle the robot will not influence the behavior of the robot. Regardless if that mass is added at the center, right or left. The robot should be able to balance.
87 87.5 88 88.5 89 89.5 90 90.5 91 91.5 92 A n g le
Parallel M iddle
norm al ext ra_m iddle
87.5 88 88.5 89 89.5 90 90.5 91 91.5 A n g le
Extra weight middle
positive
87.5 88 88.5 89 89.5 90 90.5 91 91.5 A n g le58
5.2. TEST WITH +100G OF EXTRA WEIGHT
In this test we add 100g of extra weight to the robot; it was made to observe the behavior of the robot to a slight increase in its mass.
Graphic 10 - Extra 100g top center
Graphic 11 - Parallel between normal and extra 100g top center
Even with 100g of extra weight the robot still can balance and the variation of the angle is the same, 1 degree around the setpoint, however the robot tilt more (frequency in the graphic).
The problem came when we add that extra weight to the left or right side of the robot, the robot can respond to that extra weight and it will fall. Both following test only have the duration of 10s, and as we can see the balance was not regular, it tilted a lot.
87.5 88 88.5 89 89.5 90 90.5 91 91.5 A n g le
Extra weight center
59
Graphic 12 - Extra 100g top negative Graphic 13 - Extra 100g top negative
Now if we add the extra weight to the middle of the robot, the robot can balance as we can see in the following figures.
Graphic 14 - Extra 100g middle center
87.5 88 88.5 89 89.5 90 90.5 91 91.5 92 A n g le
Extra weight
negative
87.5 88 88.5 89 89.5 90 90.5 91 91.5 A n g leExtra weight positive
86 87 88 89 90 91 92 A n g le
60
Graphic 15 - Parallel between normal and extra 100g middle center
However the robot can respond if we add that extra weight in the middle but in the left or in the right side. It falls about 10 seconds before the start.
Graphic 16 - Extra 100g middle positive Graphic 17 - Extra 100g middle negative
5.3. TEST WITH +400G OF EXTRA WEIGHT
In this test we add 400g of extra weight to the robot; it was made to observe the behavior of the robot to a slight increase in its mass.
The robot still can perform a shy balance, but cannot maintain balance for a big period of time, it eventually will fall faster that for the others extra weight.
86 87 88 89 90 91 92 A n g le
Parallel M iddle
norm al ext ra_m iddle
87 87.5 88 88.5 89 89.5 90 90.5 91 91.5 92 A n g le
Extra weight middle
positive
87.5 88 88.5 89 89.5 90 90.5 91 91.5 A n g le61
Graphic 18 - Extra 400g top center
Graphic 19 - Parallel between normal and extra 400g top center
If we add that weight to the negative or positive side of the robot it will be chaotic. The robot can perform any kind of balance. It falls about 4second before it begins.
87.5 88 88.5 89 89.5 90 90.5 91 91.5
A
n
g
le
Extra weight at center
87 87.5 88 88.5 89 89.5 90 90.5 91 91.5 92
A
n
g
le
Parallel
62
Graphic 20 - Extra 400g top negative Graphic 21 - Extra 400g top positive
When adding the extra weight of 400g to the middle of the robot it behaves more erratically. It as a bigger tilts that in the normal case. If that weight is added to the positive or negative side of the robot, it has the same irregular behavior and falls.
Graphic 22 - Extra 400g middle center
86 87 88 89 90 91 A n g le
Extra weight at
negative side
84 86 88 90 92 A n g leExtra weight at
positive side
87.5 88 88.5 89 89.5 90 90.5 91 91.5 A n g le63
Graphic 23 - Parallel between normal and extra 400g middle center
Graphic 24 - Extra 400g middle negative Graphic 25 - Extra 400g middle positive
In general if we add weight to the center of the robot it can still balance regardless if it is in the top or middle of the robot. The major difference in them is, if the weight is added to the top we are moving the center of gravity up and therefore it will take more time to settle the robot and will be necessary more acceleration for it.
When we added a heavy extra weight to the positive or negative side of the robot we observe an erratic behavior, this is due to the fact that the robot’s center of gravity is shifted of the axis.
87 88 89 90 91 92 A n g le
Parallel M iddle
norm al ext ra_m iddle
87.5 88 88.5 89 89.5 90 90.5 A n g le
Extra weight middle
negative
88 88.5 89 89.5 90 90.5 91 91.5 92 A n g le64 CHAPTER 6 – CONCLUSION
In control engineering we deal with dynamic systems, an example of one of those systems is the inverted pendulum system, in this thesis we have model and build a mobile inverted pendulum robot.
The inverted pendulum represents a fine example of an unstable system; it’s widely used in research labs to demonstrate the capacities of feedback systems due to its unstable nature. It’s considered a simplified representation of a rocket flying into space. We have simulated the pendulum behavior in Matalb in which we could observe the behavior of our mobile inverted pendulum. In the simulations we used the Linear Quadratic Regulator method because it can provide us a rapid way to simulate an unstable system. This was a difficult part of the thesis because we didn’t have any experience with Matlab and with simulations of this type.
In the simulation we assume that we have predefined a mass, maintaining all other variables, and then we add some extra weight to observe the settling time. From this we could see that a massive robot will take more time to settle in comparison with a lighter robot and therefore will origin a more unstable system. With this we can conclude that our robot will need to be as light as possible.
That’s why we used Perspex and metal rods for the structure, they are both strong, to avoid that the robot break during the test and case it falls, and these components are not heavy.
In others simulations we changed the place of system center of gravity. This allowed us to see how the weight should be distributed in the robot and we have concluded that the center of gravity of the robot should be as low as possible.
We build a mobile inverted pendulum of 56cm tall because a taller robot is more easily balanced, we can observe that by balancing a broom for example, a taller broom is easily balanced than a shorter.
65 We choose the ADXL203 accelerometer because it’s a two-axis accelerometer with high precision and low cost. We needed for a two-axis accelerometer because we were interested in measuring the acceleration that the pendulum suffers in two axes so that we can determinate the angle.
We used a single axis gyroscope to correct the angle given by the accelerometer, it was only necessary a single axis gyroscope because we were interested in measuring the angular rate in the vertical direction, that is the direction were the pendulum balance. The Arduino board used in this prototype has provided us a way to read the analog values from the accelerometer and gyroscope, and to communicate with the computer. It is the “brain” of our robot.
The developed prototype can balance using the implemented PID (proportional-integral-derivate) controller; we implemented a PID controller instead of the LQR (Linear Quadratic Regulator) controller used in the Matlab simulation because the PID controller is easier to implement. The values founded for the terms of the PID method were found by trial and error and that as caused that they may not be the more accurate as possible, also the process of trial and error isn’t the most academic process to find those values.
Due to the fact that the motors don’t have an integrated PID and because we didn’t have the opportunity to implement a PID in the motors the robot can only balance in a particular surface. The robot was developed and tested in that surface. Although we think that the major problem is in the wheels.
66 Therefore, future work for this thesis should involve improving the balance process of the robot so that it can be more stable, this could be by implementing a PID algorithm for the motors or by eventually changing the wheels or the motors.
67 REFERENCES
A. Mellis, D. (2007, January 27). Arduino - ArduinoBoardBluetooth. Retrieved June 19, 2009, from Arduino: http://www.arduino.cc/en/Main/ArduinoBoardBluetooth
A. Mellis, D. (2006, March 25). Arduino - ArduinoBoardNano. Retrieved June 19, 2009, from Arduino: http://www.arduino.cc/en/Main/ArduinoBoardNano
Amherst, U. o. (2006, August 24). Robotics at UMASS Amherst - Robots - UBot-2. Retrieved June 18, 2009, from uBot-2: http://www-robotics.cs.umass.edu/Robots/UBot-2
Analog Devices, I. (2006, March). ADXL203: Precision ±1.7g Dual-Axis iMEMS®
Accelerometer. Retrieved August 15, 2009, from Analog Devices:
http://www.analog.com/en/sensors/inertial-sensors/adxl203/products/product.html Anderson, D. P. (2007, July 1). nBot, a two wheel balancing robot. Retrieved June 18, 2009, from nBot Balancing Robot: http://www.geology.smu.edu/~dpa-www/robo/nbot/ Association, M. I. (n.d.). Da Vinci. Retrieved August 25, 2009, from Telerobotic Surgery: http://www.teleroboticsurgeons.com/davinci.htm
CJC. (1997, August 8). CTM Example: State-space design for the inverted pendulum. Retrieved April 15, 2009, from Control Tutorials for Matlab:
http://www.engin.umich.edu/group/ctm/examples/pend/invSS.html
Electronics, S. (n.d.). SparkFun Electronics - Gyro Breakout Board - ADXRS610 - 300°. Retrieved August 15, 2009, from SparkFun Electronics:
http://www.sparkfun.com/commerce/product_info.php?products_id=9058
Grasser, F. (2004, May 06). JOE le pendule - Home. Retrieved June 18, 2009, from The homepage of JOE le pendule, a mobile inverted pendulum:
http://leiwww.epfl.ch/joe/index.html
68 Hassenplug, S. (2007, July 2). Steve's LegWay. Retrieved June 18, 2009, from
Steve'sLegWay: http://www.teamhassenplug.org/robots/legway/
Hurbain, P. (n.d.). Get up, NXTway! Retrieved June 18, 2009, from Get up, NXTway!: http://www.philohome.com/nxtway/nxtway.htm
Larson, T. (2008). Balancing Robot. Retrieved June 18, 2009, from TedLarson.com: http://www.tedlarson.com/robots/balancingbot.htm
Nawawi, S., Ahmad, M., & Osman, J. (Dec 2007). Development of Two-wheeled Inveter Pendulum Mobile Robot. In SCOReD07 (pp. 153-158). Malaysia, Malaysia. Piponi, D. (n.d.). Equibot the Balancing Robot. Retrieved November 10, 2009, from Equibot the Balancing Robot: http://homepage.mac.com/sigfpe/Robotics/equibot.html Robots Ltd., A. (n.d.). Active Robots - RD01 Robot Drive System - UK. Retrieved June 19, 2009, from Robot Electronics - RD01 12Vdc Robot Drive System:
http://www.active-robots.com/products/motorsandwheels/rd01-drive.shtml
Robots Ltd., A. (2003). SparkFun - Sensors - IMU/GYROS. Retrieved June 19, 2009, from Active Robots - SparkFun - Sensors - IMU/Gyros - UK:: http://www.active-robots.com/products/sensors/sparkfun/5degreesoffreedom.shtml
techtarget.com. (2008, March 18). Teleoperation. Retrieved August 25, 2009, from What is Teleoperation?:
http://whatis.techtarget.com/definition/0,,sid9_gci1196650,00.html
Times, T. J. (2001, December 31). Scientist claims he made Segway predecessor in '86 |
The Japan Times Online. Retrieved June 18, 2009, from The Japan Times Online:
http://search.japantimes.co.jp/member/member.html?nn20011231a9.htm
Watanabe, R. (2007, March 23). NXTway-G. Retrieved June 18, 2009, from NXTway-G: http://web.mac.com/ryo_watanabe/iWeb/Ryo%27s%20Holiday/NXTway-G.html Wikipedia. (2009, September 17). Dextre. Retrieved September 22, 2009, from Dextre: http://en.wikipedia.org/wiki/Dextre
69 Wikipedia. (2009, September 13). Remote control vehicle. Retrieved September 15, 2009, from Remote control vehicle:
http://en.wikipedia.org/wiki/Remote_control_vehicle
Wikipedia. (2009, September 5). Remotely operated underwater vehicle. Retrieved September 15, 2009, from Wikipédia:
http://en.wikipedia.org/wiki/Remotely_operated_vehicle
Wikipedia. (2009, July 21). Teleoperation. Retrieved 09 15, 2009, from Teleoperation: http://en.wikipedia.org/wiki/Teleoperation
70 APPENDIX
APPENDIX A – OPEN-LOOP POLES M-FILE
%data M = 2.1; m = 0.4; %Hr = 0.25; %Hfr = 0.6; C = 1.5*0.0980; %i = 0.006; g = 9.8; l = 0.3; r = 0.05;
%var iables
X= ( 1/ 3) *( ( M*( M+ 6*m) *l) / ( M+ ( 3/ 2) *m) ) ; Y= ( M/ ( ( M+ ( 3/ 2) *m) *r ) ) + 1/ l;
A23= g*( 1-( 4/ 3) *l*( M/ l) ) ; A43= g*M/ l;
B2= ( ( 4*l*Y/ 3*X) -( 1/ M*l) ) ; B4= -( Y/ X) ;
%A, B, C and D matr ices A= [ 0 1 0 0;
0 0 A23 0; 0 0 0 1; 0 0 A43 0] ; B_1= [0; B2; 0; B4] ;
B_2= [ C+ C] ; B= B_1*B_2; C= [ 1 0 0 0; 0 0 1 0] ; D= [ 0; 0] ;
%open-loop poles p= eig( A)
APPENDIX B - LQR DESIGN
C'*C
71
y= 500; Q= [ x 0 0 0; 0 0 0 0; 0 0 y 0; 0 0 0 0] ; R = 1;
K = lqr ( A,B,Q,R) Ac = [ ( A-B*K) ] ; Bc = [ B] ;
Cc = [ C] ; Dc = [ D] ;
T= 0:0.01:5;
U= 0.2*ones( size( T) ) ;
[ Y,X] = lsim( Ac,Bc,Cc,Dc,U,T) ; plot( T,Y)
legend( 'Wheels','Pendulum')
APPENDIX C – NBAR CONTROL
Cn= [ 1 0 0 0] ;
Nbar = r scale( A,B,Cn,0,K) Bcn= [ Nbar *B] ;
[ Y,X] = lsim( Ac,Bcn,Cc,Dc,U,T) ; plot( T,Y)
legend( 'Car t','Pendulum')
APPENDIX D – ESTIMATOR
p = eig( Ac)
P = [ -40 -41 -42 -43] ; L = place( A',C',P) '
Ace = [ A-B*K B*K; zer os( size( A) ) ( A-L*C) ] ; Bce = [ B*Nbar ;
zer os( size( B) ) ] ;
Cce = [ Cc zer os( size( Cc) ) ] ; Dce = [ 0;0] ;
T = 0:0.01:5;
U = 0.2*ones( size( T) ) ;
[ Y,X] = lsim( Ace,Bce,Cce,Dce,U,T) ; plot( T,Y)
72
APPENDIX E – KALMAN CODE
#include "math.h" /*
*
* (c) 2003 Trammell Hudson <[email protected]> *
* Converted to Java (c) 2008 Andy Shaw *
* This file is part of the autopilot onboard code package. *
* Autopilot is free software; you can redistribute it and/or modify * it under the terms of the GNU General Public License as published by * the Free Software Foundation; either version 2 of the License, or * (at your option) any later version.
*
* Autopilot is distributed in the hope that it will be useful,
* but WITHOUT ANY WARRANTY; without even the implied warranty of
* MERCHANTABILITY or FITNESS FOR A PARTICULAR PURPOSE. See the * GNU General Public License for more details.
*
* You should have received a copy of the GNU General Public License * along with Autopilot; if not, write to the Free Software
* Foundation, Inc., 59 Temple Place, Suite 330, Boston, MA 02111-1307 USA *
*/
unsigned long nextKCompTime = 0; /*
* Our update rate. This is how often our state is updated with * gyro rate measurements. For now, we do it every time an * 8 bit counter running at CLK/1024 expires. You will have to * change this value if you update at a different rate.
*/
int dtMS = 20; // 50 hz
float dt = ((float)dtMS/1000.0); // 50 hz
/*
* Our covariance matrix. This is updated at every time step to * determine how well the sensors are tracking the actual state. */
float P[2][2] = { {