1
Faculdade
3
COVADONGA CASADO GONZÁLEZ
THESIS
From a big child to a big child ©
5 MASADONGA
Copyright © Covadonga Casado González, Faculdade de Ciências e Tecnologia, Universidade NOVA de Lisboa.
A Faculdade de Ciências e Tecnologia e a Universidade Nova de Lisboa tem o direito, perpétuo e sem limites geográficos, de arquivar e publicar esta dissertação através de exemplares impressos reproduzidos em papel ou de forma digital, ou por qualquer outro meio conhecido ou que venha a ser inventado, e de a divulgar através de repositórios científicos e de admitir a sua cópia e distribuição com objetivos educacionais ou de investigação, não comerciais, desde que seja dado crédito ao autor e editor.
6 ii
7
Resumo
Este projeto enfatiza a ideia de sair da caixa relativamente ao “pensar cientificamente”, experi-mentando diferentes composições e oferecendo soluções para diferentes problemas.
Todos os pequenos trabalhos que me levaram a este ponto são para mim as coisas realmente importantes.
Desobedecendo um pouco as poucas coisas “verdadeiras” que o meu professor me disse no começo do mestrado, comecei a misturar materiais, tentando maneiras alternativas de trabal-har com o vidro, afastando-me da estética convencional deste material. Continuei a tentar jun-tar cerâmica com o vidro, partindo-os e fundindo-os novamente. Existem alguns fatos/ tópicos/ estéticas que foram constantes no meu trabalho.
A mistura de experiências que realizei serviram para questionar, mas também para confirmar muitos fatos conhecidos, como a fraturas das peças devido à incompatibilidade do material. Eu prefiro experimentar o problema, verificar se os materiais fraturam por causa de incompatibili-dade, em vez de evitar fundi-los simplesmente porque me disseram que é provável que resulte em fraturas. Estas são maneiras muito diferentes de “conhecer” para mim.
Desde o início que tenho interesse em misturar vidro e cerâmica, acredito que este material principal que estou desenvolvendo ilustra este interesse, já que estou basicamente a trabalhar com vidro a frio, um modo geralmente reservado para quando se trabalha o barro. Este interes-se rapidamente interes-se difundiu devido ao grande número de características e possibilidades que o meu material “híbrido” começou a apresentar.
Esta tese é o fim, mas ao mesmo tempo o começo de infinitas possibilidades para o desenvol-vimento de novas formas de trabalhar com materiais antigos. Será apresentada uma maneira inovadora de trabalhar com o vidro, como se este fosse uma argila. Diferentes tipos de com-posições de vidro foram testadas para aumentar o número de possíveis aplicações para este material. Em adição foram testadas diferentes temperaturas de fusão de forma a determinar a resposta das misturas a diferentes temperaturas. Uma mistura de vidro em pó com um aglutinante e esmaltes coloridos adicionados, provou ser uma maneira bem-sucedida de trabalhar à mão o vidro enquanto o mesmo está frio e antes de ser fundido.
8 iv
9
Abstract
This project emphasizes the idea of getting out of the box when ‘thinking scientifically’ by experi-menting with different compositions and offering solutions to different problems.
All the little works that drove me to do this, are for me the really important things.
Disobeying a little bit the few “true” things that my professor told me at the beginning, I started mi-xing materials, trying alternative ways of working with glass, moving far from the conventional glass aesthetic. I continued trying to put ceramic and glass together, breaking and refusing them. There are a few facts/topics/aesthetics that were constant in my work.
This mix of experiments I undertook, questioned but also confirmed many known facts, like the fracturing of the pieces because of the material’s incompatibility. I much prefer to experience the problem, verify that the materials will fracture because of incompatibility, rather than avoid trying to fuse them simply because I’ve been told it’s likely to result in fractures. Those are very different ways of “knowing” for me.
I have been interested in mixing glass and ceramics from the beginning, I believe this main mate-rial I’m developing illustrates that it, since I’m basically working with glass in a cold way normally reserved for working with clay. That interest rapidly got diffused due to the large number of charac-teristics and possibilities that my ‘hybrid’ material started to exhibit.
This thesis is the end but at the same time the beginning of endless possibilities for the develop-ment of new ways to work with ancient materials. The capability of working the glass with hands. An innovative way to work with glass as if it was a clay will be presented. Different types of glass compositions were experimented with to increase the number of possible applications. Additionally, a range of temperatures was tested to determine the response of the mixtures to different tempera-tures. A mixture of powdered glass with a binder and coloured enamels proved to be a successful way to hand-form glass while it is cold prior to its firing.
10 vi
11
Table of Contents
Resumo
Abstract
List of Figures
List of Tables
Abbreviations and nomenclature
Prologue
1. Introduction
1.1 Why is this important? 1.2 State of the Art
2. Materials and methods
2.1 Materials from the mixture 2.2 Primary samples composition 2.3 Primary samples firing protocol 2.4 Caracterization of the samples3. Results and Discussion
3.1. Primary samples3.2. Experimental pieces 3.2.1. Kiln pieces
3.2.1.1 Foam glass
3.2.2. Glass blowing experimental pieces
4. Conclusions
5. Bibliography
6. Appendix
iii
v
ix
xi
xiii
xvii
1
11
12
23
14
15
23
49
2
4
6
6
10
31
42
47
29
12 viii
13 1 11 14 15 18 19 20 21 23 24 24 24 25 25 25 26 26 26 27 27 27 28 28 29 29 31 31 31 32 32 33 34 34 34 34 35 35 36 37 38 38 38 38 39 40 40 41 List of Figures
Fig. 01 First piece: Window glass powder & CMC Fig. 02 Graphic of the followed firing protocol Fig. 03 Primary sample components
Fig. 04 Primary samples in visual terms Fig. 05 XRF spectra
A. XRF spectra from the furnace samples fired at 550ºC and 750ºC
B. XRF spectra from the furnace samples with low temperature enamel fired at 550ºC and 750ºC C. XRF spectra from the lead samples fired at 550ºC and 750ºC
D. XRF spectra from the lead samples with low temperature enamel fired at 550ºC and 750ºC E. XRF spectra from the window samples fired at 550ºC and 750ºC
F. XRF spectra from the window samples with low temperature enamel fired at 550ºC and 750ºC Fig. 06 XRD spectra of furnace samples
A. XRD spectra of the furnace samples fired at 550ºC and 750ºC without enamel
B. XRD spectra of the furnace samples fired at 550ºC and 750ºC with low temperature enamel. The cadmium sulphate sprectrum was withdrawn from the online RUFF data base.
Fig. 07. XRD spectra of borosilicate samples
A. XRD spectra of the borosilicate samples fired at 750ºC and 850ºC without enamel
B. XRD spectra of the borosilicate samples fired at 750ºC and 850ºC with low temerature enamel C. XRD spectra of the borosilicate samples fired at 750ºC and 850ºC with high temerature enamel The cristobalite sprectrum was withdrawn from the online RUFF data base.
Fig. 08. XRD spectra of the enamel
A. XRD spectra of the low temperature enamel fired at 550ºC and 750ºC. B. XRD spectra of the high temperature enamel fired at 750ºC and 850ºC. Fig. 09 Piece. Furnace masa with enamel (low)
Fig. 10 Piece. Furnace masa with enamel (low) Fig. 11 Piece. Furnace masa with enamel (low)
Fig. 12 Piece. Window glass sheets trapping some furnace masa with enamel (low) Fig. 13 Piece. Furnace glass sheets trapping some furnace masa with enamel (low)
Fig. 14 Piece. Window glass sheet and ceramic piece joined by some furnace masa with enamel (low) Fig. 15 Piece. Window glass sheets joined by window masa with enamel (low)
Fig. 16 Piece. Glass mouth of a bottle sticked to a glassed tile through some furnace masa with enamel (low)
Fig. 17 Piece. Broken ceramic piece joined by furnace masa with enamel (low) Fig. 18 Piece. Window glass piece & window glass masa
Fig. 19 Piece. Ceramic piece & furnace masa Fig. 20 Piece. Window glass & window glass masa
Fig. 21 Piece. Furnace masa with two different enamel (low) colors before and after fired respectively Fig. 22 Piece. Ceramic piece & borosilicate masa
Fig. 23 Piece. Ceramic piece & borosilicate masa with low temperature enamel Fig. 24 Borosilicate masa with low temperature enamel
Fig. 25 Borosilicate masa & borosilicate masa with low temperature enamel
Fig. 26 Blown piece with pieces of masa in the outside and in the inside respectively Fig. 27 Masa pieces before firing
Fig. 28 Masa pieces after firing
Fig. 29 Fired masa shapes on the marver
Fig. 30 Blownpiece with the picked masa pieces on while blowing Fig. 31 Piece. Moldblown piece with masa on
Fig. 32 Blown piece with masa picked up and blown, remaining on the outside surface
Fig. 33 Blown piece with masa sandwiched between layers, and also masa on the surface layer Fig. 34 Blown piece with the remains of un-pre-fired masa applied on the outside
Fig. 35 Blown piece with un-pre-fired masa balls applied on the outside Fig. 36 Pulling cane with masa that has been gathered over with furnace glass Fig. 37 Pulled canes resultant
Fig. 38 Piece seen through the polariscope
Fig. 39 Pieces without and with stress in the polariscope respectively Fig. 40 Piece. Moldblown piece with masa on
Fig. 41 Piece. Moldblown piece with masa on
Fig. 42 Piece. Moldblown piece with spray on the outside Fig. 43 Piece. Moldblown piece with masa on
Fig. 44 Piece. Ceramic (high temperature) & furnace masa with enamel (low) Fig. 45 Piece. Ceramic (high temperature) & borosilicate masa with enamel (low) Fig. 46 Piece. Ceramic (high temperature) & borosilicate masa with enamel (low)
14 x
15 List of Tables
Table 1: Chemical composition of the glasses used Table 2: Primary samples composition
10 10
16 xii
17 ABBREVIATIONS & NOMENCLATURE
From here on, in order to make things easier and faster, I will use the following terms in the thesis, which I define as follows here:
“Masa”- any of a number of combinations in differing proportions of glass powders and
CMC I’ve tested and used:
“Furnace masa”- a mixture consisting of Vicarte’s furnace glass powder and CMC “Window masa”- a mixture of window glass powder and CMC
In the same way as above, I may use the terms borosilicate masa, lead glass masa, etc. In addition, I’ve experimented with- and will speak of different masa’s where I have also included other additions, for example, enamels.
The enamels I’ve used were sometimes “low temperature enamels”, (fusing normally at 500-600ºC), or at other times, “high temperature enamels”, (fusing normally at 700-800ºC). In the end, perhaps the most elaborate of the nomenclatures I may use, might be some-thing like “furnace masa with enamel (L/H)”.
In short, I’ve made additions of various materials in order to investigate augmenting the color, improving the stability, or bettering the compatibility after fusion of the mixtures I tried.
18 xiv
20 xvi
21
I’m not a scientist, but I’ve always liked Science. Earlier at school, I could very much enjoy it, and even did quite well in science courses. But there are, I think, some very important differences in how a scientist must think and act, and how I do that now as an artist. One thing I experienced as a student at Vicarte, illustrates one of those important differences that I believe there are, very nicely.
One day, one of the researchers in Conservation and Restoration was explaining to me how she goes about reproducing a glass recipe from the past, one she’d found in an antique book. There are two ways of doing this she told me, first, scientifica-lly analyzing a sample of the glass, and then recreating that exact composition and melting it, or, following the recipe instructions precisely as they were written down. At that point, I asked her, “why would you scientifically analyse a sample first, when you already have the exact recipe written down by someone who’d made it?” Her response was, that as is very often the case with antique recipes, following the recipe precisely wouldn’t work, because it has some very strange steps in it. For example, in the case we were speaking about, the recipe required first sacrificing a goat on the roof of the house. So then I asked her, “what happens when you try making this glass by following the exact steps in the recipe, including sacrificing the goat?” The look of surprise on that researcher’s face said it all. And her surprise was mirrored at that moment by my own.
That moment for me, was a point where a scientific mentality and approach, clearly diverges from my own, an ‘artistic approach and mentality. I was thinking about how many valid reasons there could for following that step, and sacrificing the goat. Why doing that might, in fact, be quite an important step to follow if you ever wanted to successfully reproduce that particular antique glass. Why would someone who’d made that glass, write it down as an essential step, if there was no truth to it? Why would you decide never to try sacrificing the goat to find out if it perhaps worked? And if it didn’t work, why wouldn’t you then analyse why it didn’t work, and demonstrate why it very likely never would?
It seemed to me that there are lots of reasons I can imagine, why sacrificing the goat, as strange as that might sound, could in fact be an important step to follow and inves-tigate, e.g.:
“The iron in the goat’s blood dripped onto and through the roof, finding its way into the atmosphere and the kiln in which the glass was being made, maybe somehow provi-ding the right conditions for melting that precise glass we want to reproduce now”, or “The sacrificed goat’s blood on the roof attracted crows. Someone in that house where the glass was being made, happened to be very afraid of crows, so that person imme-diately closed all the doors and windows. The resulting lack of air circulation, had the effect of raising the temperature in the house a quite a bit, and raising the temperature in the furnace just enough.”
22 xviii
1
This piece is the main precursor of this project. At the end of my first year of study, there were fewer people at the university, which meant fewer people were com-peting to use the equipment and facilities. Once I had finished the projects my professors had assigned to me, I was finally free and could start using the kilns for my personal experiments and projects.
For me, the process of making is as important, sometimes even more so, than the final work itself. Likely as a result, I both like and need to try some things that others don’t, like mixing and trying to fuse glasses of differing coefficients of thermal expansion (CTE) with each other, and with other materials also. Trying to fuse different ideas with each other, is also a common activity for me. It was at the end of my first year when, starting with, I started to fire and fuse some of those different ideas I had. I’d come in the next day to find out what magic had happened, and try to figure out how and why.
The results of these first experiments are still my favorite results so far!
Fig. 1. Window glass powder & CMC
1. INTRODUCTION
This piece was window powder glass mixed with Carboxymethyl cellulose (CMC) or cellulo-se gum (fig.1).
This piece is a simple grab of the material, a simple act (gesture), before being fired, before getting hard, before getting glassy. This way of working is common to clay but not glass. A grab of a material that classicly can not be grabed or direcly touched with our own hands because of the high temperstures needed for changing shape.
It can be so wide the amount of experiements that can be done from this standpoint, that at the beginning was a little stressfull to delimit myself to a factible amount of them that could make sense.
I ended up choosing 4 main glasses I had contact with before, to which I added other 5-3 extras I had had contact with this glassworld during this years.
2
The fact that this masa I’ve made can be directly hand-formed and hold that exact shape after firing isn’t entirely new and unique. Some other rather relatively recent products with similar possibilities exist, e.g. Glass Bird starter pack. I believe what I’ve discovered may open new possibilities in glassmaking. This material isn’t new, but the way I’m exploring it is. I’m putting it into different sce-narios, exploring various new ways of using this material, trying to solve various problems with it. In other words, I’m trying to make my own version of such a material, one that is inexpensive, and can be used in many different ways. And doing that, is exactly what has made this exploration increasin-gly interesting for me. Once I started experimenting, the growth of possibilities seemed almost ex-ponential, like a thousand more doors opened for me than were there at the beginning. I believe this happened because I’m neither a scientist, or was I making art with this material. Instead, I honestly saw myself acting like a big child, playing with this material. Of course, I was obliged to observe to some sensible precautions when using dangerous equipment and materials. But that may be the only difference!
The idea of trying to mix glass and clay was important for me because clay is also a material I feel very comfortable working with. Very often, people who work primarily with glass, still work, or have in the past worked with ceramics as well, and the reverse is also true.
The two materials have many characteristics in common such as hardness, high strength, high modulus of elasticity, unusually high chemical resistance, strong electrical and thermal insulating properties and high temperature treatment is needed to achieve permanent form in both materials, etc.
But on the other hand, there are also very important differences between these two materials. Ceramics have a crystalline molecular structure, while glass is characterized by an amorphous molecular structure. The conventional ways we are used to working with these two materials are also very different from each other. And because the way we physically work different materials, greatly influences what we make with them, the working characteristics of this material I was synthesizing, became a very strong focus of my attention.
When we work with clay, we expect to get dirty, we touch the material, we shape and reshape it, we don’t need to be terribly careful or precise. If something goes wrong when we shape clay, we just do it again. But this cannot be done with glass. We cannot touch hot glass directly with our hands, or feel it very sensitively while forming it, as we do with clay.
We need to be far more careful when working with hot glass, we can cut or burn ourselves easily, and we can’t continue to reheat and shape glass while it’s soft, without risking that some of its most desirable properties will be lost, as in devitrification. If things go wrong when we work hot glass, often there is no other sensible option than to just completely discard it, and start again from the beginning. I think that matters! These differences influence enormously the way we think about and use materials. I’m very interested in breaking this barrier!
3
Observing and thinking about this first experiment (fig 1), I had to decide on my next steps for continuing. I needed to make some plan for how I should proceed, that would offer me the best chances for some good results within a relatively short period of time. Very important in first instance, was of course, the composition of my ‘new material’. My first experiment had been made with only ground window glass and CMC as binder. All the information from my following experiments with different compositions will be collected in Table X. Of course, I was also now free to experiment with adding other materials, such as enamels, glass frit and glass powders. In the same way, I should also find out whether replacing CMC with other conventional binders, e.g. a
water-based medium used for applying enamels by brush, might work just as well. Another important variable I needed to investigate, was of course, temperature. Which ones might be the right ones? We ended up establishing a minimum critical temperatu-re of 550 degtemperatu-rees C for all our compositions, and then observe what happens at each of 50 degree increments above 550 degrees, until we reach the upper temperature limit, at which the initial masa form begins to deform, losing its shape..
We ended up with 5 different temperatures for the primary samples.
Additionally, the firing schedule was an important component of our final results. Because the size of the experimental pieces that I started with was small, it was pos-sible to design a fast firing schedule that could be used uniformly and effectively, even though I was experimenting with different glass types, requiring very different annealing temperatures and schedules.
This thesis is based in experimentation as a main driving force. It discusses possible applications of this new material, mixing, firing, ways of handling and shaping, etc. In short, I will discuss here all the various ways I’ve found to date, to formulate, process, and successfully use this material.
4
Others before me, have recently undertaken similar investigations. They have looked for new ways, or invented hybrid methods to formulate and manipulate ceramic and glass in order to arrive at new possibilities. I believe that doing this is necessary, both from the scientific and the artistic point of view.
The following are some interesting examples of what others before me have investigated.
Saïda Bayoucefi began to develop a new procedure for the production of objects in pâte de
verre. Pâte de verre refers to both a glass material, and the various techniques used for forming objects from that material. The material itself, and techniques developed for forming it, was alre-ady being used by glassmakers in ancient Egypt.
In her thesis work, Saïda explored the possibilities and the limitations of that material and techni-que, when the traditional binder component is eliminated. She created what she called “manipu-lated pâte de verre”. Traditional pâte de verre technique implies starting with finely ground glass powder, or glass frit and then mixing it with some adhesive, e.g. gum Arabic, that serves both to stick the particles together and adhere them to a mould form while heating the glass and mould to a sufficient temperature for the glass to take on- and hold that form when cooled. [1]
Monica Ganio, Catherine Schmidt Patterson, Karen Trentelman and Samuel Webb are not
artists, but are instead a group of scientists who studied historical material to understand and describe the influence of various binders on the permanence and/or degradation of smalt. Smalt in historical use, is a deep blue pigment found in paintings and illumination, the coloring compo-nent of which is a finely ground deep blue glass, produced by melting with cobalt.
“Smalt often discolors from a deep blue to a grey-yellow color in oil paintings. In contrast to this visible degradation in oil paint, smalt -containing blue passages in illuminated manuscripts- which typically use glair or gum Arabic as binding medium for pigments-remain a vivid blue”. This study underlines the role of binding media in smalt degradation and I will be using binders and obser-ving the permanence of the shape based mainly on them and some other characteristics on the material in which it influences. [2]
Ekrem Kula talks in one of his several articles about the important role of recycled glass in art.
Glass bottles and other vessels have many colors, enabling the production of colored glass foam as a material for art as well as design. He has developed his own techniques using Glass Foam together with Glass Fiber Techniques. Using common colored and colorless container glass he had developed ways to produce objects that raise interest in both the production and the recy-cling of glass in his country, Turkey. [3]
In another publication, Ekrem Kula speaks about Pâte de Verre and its redevelopment with the use of moulds made of sand, plaster and kaolin by Gabriel Argy-Rousseau. There are no rules described for Pâte de Verre today. An important aspect of this article is the description of the Pâte de Verre technique that relates it to grains of sugar crystal, held/stuck together at points that touch each other, rather than the complete fusion of the grains with each other.[4]
5
Faidra Oikonomopoulou speaks in his text about various manufacturing processes and recipes
that yield differing results. He highlights the lack of any standard to determine the design streng-th of solid cast glass objects for structural applications in architecture. He reminds us streng-that while casting in glass, historically, may have been the first form of glassmaking, it is rarely used in architectural applications. [5]
Mustafa Güden relates to us his experiments with the rheology of some recycled glasses,
among them the creation of foam glass using aluminum powder as a foaming agent and cal-cium hydroxide as an activator. Based on the relative wt% of those two components, the results exhibit Newtonian or non-Newtonian behavior. He highlights the role of CMC, since the apparent viscosities of the slurries increased with the increase of wt% of CMC. [6]
There are very many more people, who like those I’ve listed above, are experimenting with al-ternatives to the classic glass material-qualities and forming techniques. When I started my own experiments, it was not yet clear to me what I wanted to achieve. Starting from my first molda-ble sample, I was searching for the ways I could continue and extend this search. How could I further research and apply these first results I’d gotten, to arrive at the maximum potential those results offered. As a student just starting on an investigation like this one, I was feeling, “I know nothing” about how to research the ‘internal’ and ‘external’ questions of compositions and appli-cations. How to go about finding the best formulations for this new material? And how can I use this material? How does it relate to- and can it be integrated with existing materials? I wanted to play with it, shape it, make it colorful, explore this new material in every possible way. But there were many more possible ways to do that than I could handle! So, it became clear that first, I had to make some clear decisions about how to proceed.
Edward de Bono talks in his book “Serious Creativity” about everything that concerns to “creativi-ty” understood as “lateral thinking”
This paragraph caught my attention:
“if one is not inhibited by the knowledge of restrictions, one feels much more free to suggest a novel approach to any question.
There is a very important practical aspect: that which concerns research. It is normal that when entering a new field we read everything there is to read about it. If we do not, we will not be able to use what is already known, we will lose a lot of time and we will even risk reinventing the whe-el. But if we read it all, we will possibly ruin our chances of being original. Therefore, if what you are looking for knowledge, you must read it all; but if you want to be original you shouldn’t read anything.” [7]
6
2. MATERIALS AND METHODS
For the experiments I conducted, at the beginning, 4 glasses of different types were used: Vicarte’s furnace glass, lead glass, window glass and borosilicate glass. The composition of these glasses will be presented below on Table 1.
In order to arrive at a substance that could be hand-molded when cold, and hold its shape when fired, the different glass compositions were combined with up to 5 additives, in varying propor-tions.
Those additives were: CMC (carboxymethyl cellulose), enamel powder, colored glass powder, colored glass frits and a water-based painting medium. All of the mixtures I tested are listed in Table 2.
With respect to firing protocols, each mixture was fired at 5 different temperatures: 550ºC, 600ºC, 650ºC, 700ºC and 750ºC. The firing protocol is represented in fig. 2 below.
The first results I got, showed me that firing temperatures up to 650º C, didn’t give me the results I wanted. Additionally, I eliminated borosilicate glass from the further experiments. Its much hi-gher softening point than the other glass types I was testing, proved to make it impractical for my purposes.
However, the remaining 3 glass types: Vicarte furnace glass, lead glass and window glass, yiel-ded positive results, beginning at a firing temperature of 650ºC.
WHAT IS CMC?
Carboximetilcelulose (CMC) is an organic compond derivative from celulose, this material has
wide applications, it is used in numerous fields, but mainly used and known for its versatile, cost-effective and easy-to-use thickener and stabilizer properties. CMC is commonly used in food, printing, dyeing... [8]
For me, from my experience CMC is a material that invites to experiment with, as a thickener, many artist have being using it in order to bring its materials to the especific point of thickness for its use.
“Pâte de verre” is an ancient kilncasting method, as we already saw before, that literally means “paste of glass”. This technic is about a mix of frit granules of glass with some sort of binder, after we have the paste, we apply it into the inner surface of a (normally plaster and silica) mold. As in every technic there are some variations from one artist to another, some people do not add a binder to this technic... (as we saw) Normally the use of a binder is required when is needed to help shaping those crushed glasses into the mold, then a sort of a paste made out of this crushed glass and a binder (CMC in our case) is made and carefully placed into the mold with a spoon, spatula etc
PREPARATION:
The CMC I used had a grain size similar to sand. When adding CMC to my mixtures, I was once again faced with many choices. In this case, I refer to the percentage of CMC added to water before mixing with the other constituents. I used 25 g of CMC with 500 ml of water.
7
ENAMEL WHAT IS IT?
It can be defined as a glass that melts at a lower temperature than the glass to which it is applied [9].
It is basically a powder that when it melts, it flows and then hardens when it gets cold giving this vitreous, smooth and durable coating [10].
I started to add enamel to change the color of the mixing. However during the process of experimentation I understood that enamel also changes and contributed to to the mechanical properties of the mixing.
8
For this mixing process, the use of gloves and a respirator is recommended. First the glass needs to ground to the desired grain size and, for that purpo-se I upurpo-sed a ball mill to grind amounts of glass in the range of 500 grams. The preparation of the mixture to be used, after all the constituents are prepared and measured out, requires combining and then mixing them in a way similar to mixing and kneading clay. Kneading is continued until a homogenous mass is arrived at, and depending on the desired consistency, less or more CMC may be required. The ambient temperature and humidi-ty, and our own body heat once we begin to knead that mixture, proved to have some influence on the consistency of the material I made in this way. Because this was a kind of pioneer work, there were no existing guidelines or rules I could follow, so I approached it a bit like a game, to find the limits of the mixtures I could make. Because at one point I discovered that for a number of months, I’d completely forgotten about a quantity of the mixture I’d prepared, I discovered that I could simply break it down again, combine it once again with some CMC, bringing it back to life as material I could then reshape and fire.
In fact, a very large number of factors proved to have an influence on the results I was getting, and as a result, it was far from easy to systematize and record all those factors in tables that would allow exact reproduction and verification of my formulas and processes in a formally scientifically res-ponsible way. Much of my work, and the successes I booked, depended on resorting to common sense and feeling…”a little bit more, or a little bit less CMC should work well here…”
9
Because neither I or anyone else had done this specific work before, knew in advance what would happen, or knew even which of the results I’d get, that would be useful ones for me, I had and felt a great deal of freedom! I could do and try pretty much ANYTHING!
But because I also needed to quantify and record, as much as possible in a scientifically useful way, what I was doing and what resulted, I tried to follow a procedure. For each of the glass types (borosili-cate glass, Vicarte furnace glass, lead glass and window glass) I started with, I added sequentially, or changed, one component/variable at a time. The mixtures and firing temperatures I tested will now be described, and from here on, I will be referring to those mixtures and their concurrent firing tempera-tures using the designations below.
From here on in this text, I will refer to the mixtures I tested as masa, which denotes some combination of glass powders and CMC.
Additionally, the abbreviations I’ve noted above and will use now, will be extended to refer to - and include the 5 different firing temperatures at which I tested the various mixtures.
F_550
A composition of ground Vicarte furnace glass and CMC with a firing temperature of 550ºC F_550_enamel
A composition of ground Vicarte furnace glass, CMC and low temperature enamel (500-600ºC) with a firing temperature of 550ºC
L_550
A composition of ground lead glass and CMC fired at 550ºC L_550_enamel
A composition of ground lead glass, CMC and low temperature enamel (500-600º C) fired at 550ºC W_550
A composition of ground window glass and CMC, fired at 550ºC W_550_enamel
A composition of ground window glass, CMC and low temperature enamel (500-600 ºC) fired at 550ºC B_850
A composition of ground borosilicate glass and CMC, fired at 850 ºC B_850_enamel
A composition of ground borosilicate glass, CMC and low temperature enamel (500-600ºC) fired at 850 ºC B_850_enamel(h)
10
Furnace Glass
Lead Glass
Window Glass
Borosilicate Glass
Sample 1 Furnace glass
powder(8,5g)+
CMC (2,5g)
Lead glass
pow-der(8,5g)+
CMC (2g)
Window glass
poder(8,5g)+
CMC (2,5g)
Borosilicate glass
powder(8,5g)+
CMC (2g)
Sample 2 Furnace glass
powder(10,5g)+
Medium water
based (2,5g)
Lead glass
powder(10,5g)+-Medium water
based (2g)
Window glass
powder(10,5g)+
medium water
based (2,5g)
Borosilicate glass
powder(10,5g)+
Medium water
based (2g)
Sample 3 Furnace glass
powder(8,5g)+
CMC (2,5g)+low
fire enamel (1g)
Lead glass
pow-der(8,5g)+CMC
(2g)+low fire
enamel (1g)
Window glass
powder(8,5g)+
CMC (2,5g)+low
fire enamel (1g)
Borosilicate glass
powder(8,5g)+CMC
(2g)+low fire enamel
(1g)
Sample 4 Furnace glass
powder(8,5g)+
CMC
(2,5g)+co-lor powder (1g)
Lead glass
pow-der(8,5g)+CMC
(2g)+color
pow-der (1g)
Window glass
powder(8,5g)+
CMC
(2,5g)+co-lor powder (1g)
Borosilicate glass
powder(8,5g)+CMC
(2g)+color powder
(1g)
Sample 5 Furnace glass
powder(8,5g)+
CMC (2,5g)+
color frit (1g)
Lead glass
pow-der(8,5g)+CMC
(2g)+ color frit
(1g)
Window glass
powder(8,5g)+
CMC (2,5g)+
color frit (1g)
Borosilicate glass
powder(8,5g)+CMC
(2g)+ color frit (1g)
2.2 PRIMARY SAMPLES COMPOSITION
B2O3 Na2O MgO Al2O3 SiO2 K2O CaO BaO PbO Furnace glass
(mixed alkali composition) 2.0 10.8 0.2 70.2 9.6 3.9 3.3 Window glass (Float glass
– soda-rich composition) 13.9 3.8 0.9 71.8 0.5 9.1 Lead glass (glass from
Atlantis factory) 1.5 55.2 12.6 1.6 29.1
Borosilicate glass 13 2 2 81 2
Table 1: Chemical composition of the glasses used for this work (furnace glass, window glass, lead glass and borosilicate glass), in weight percent of oxides.
Table 2: Summary of the composition for the primary samples. The amount of CMC mentioned is from the previously mentioned mixture of 25g of CMC dissolved in 500ml of water. No more water was added to the mixture of the samples.
11
450ºC ----2H
X ---30 min
X ---30 min
485ºC --- 30 min
485ºC ----30 min
395ºC ----30 min
395ºC ----30 min
30ºC ---1H
2.3 PRIMARY SAMPLES: FIRING PROTOCOL
Fig. 2. Graphic of the followed firing protocol
This shows the firing schedules I followed for all the main test samples. X on this chart corresponds to the 5 different temperatures to which I heated each sample in my tests: 550ºC, 600ºC, 650ºC, 700ºC, and 750ºC.
In this fig. 2 the set points and corresponding time increments for those 5 different firing schedules I tested for each sample is illustrated.
12
2.4 CHARACTERIZATION OF THE SAMPLES
To chemically characterize the samples it was decided to perform some analyses. This characterization will be used to understand the behaviour of masa depending on the different compositions and firing temperatures that were tested. By characterizing the material, it will be possible to tune its properties to my desires.
The first characterization that was made of the samples was with energy dispersive X-ray fluorescence spectroscopy (μ-EDXRF). Comparing the spectrum of each sample with the spectrum of glass standard it will be possible to qualitatively estimate the composition of the masa at the different tested temperatures.
Following this, a set of selected samples was analyzed by X-Ray diffraction (XRD) to evaluate whether the samples were fully amorphous, or if any crystalline structures were appearing at the different temperatures.
To explore the mechanical properties of the different samples one of the important factors is the existence -or not of stresses in the materials. To examine the presence of stresses in the samples themselves, and in the samples when these are attached to different glasses, a polariscope was used.
13
XRD
X-Ray diffraction spectroscopy (XRD) was also conducted to determine to which extent the samples I had produced still contained crystalline structures, or did not, and could be characterized as glassy substances.
X-ray diffraction was applied for the identification of the crystallographic phases. It was performed on a Benchtop X-ray diffractometer RIGAKU model MiniFlex II, using a monochromatic X-ray source (Cu Kα line) operated at 30 kV of acceleration voltage and 15 mA current. The spectra were acquired between 10 and 90° at 2°/min.
POLARISCOPE
The polariscope is the basic instrument of the photoelastic experiment which consists of a light source, two plates of linear polarizers and two plates of wave retarders. The polariscopes are generally em-ployed in one of the two configurations: plane polariscope or circular polariscope. The linear one uses linear or plane polarized light and shows the families of isochromatic and isoclinic fringes (this is the one that we will be using), the circular one is mainly used for projected demostrations. [12]
Glass stresses were observed using a polariscope from the brand Gunt Hamburg, model FL210 Over-head Polariscope.
The observation was made using the equipment on a light table, so the light could go from the bottom to the top passing through both polariscope filters with the sample in between.
Investigation with a polariscope is an important analysis because it shows the incompativility of our material in relation to the others. This analysis will be explained after.
The samples I made were investigated scientifically to determine some aspects of my results, especially how the base glasses used in my masa tests were being affected by the different firing temperatures, and the different compostions I tested.
That characterization was done with energy dispersive X-ray fluorescence spectroscopy (μ-EDXRF), That is a process that measures the wavelength or energy and intensity of the characteristic photons emitted from the sample when the latter is irradiated with a beam of primary X-rays. In this way, we can identify the elements present in our samples and determine their mass or concentration. [11]
Electrons are displaced from their atomic orbital positions, releasing a burst of energy that is characte-ristic of a specific element. This release of energy is then registered by the detector in the XRF instru-ment, which in turn categorizes the energies by element.
µ-EDXRF:
The elementary analysis was made in a portable μ-EDXRF spectrometer ArTAX 800 Bruker ®, equi-pped with a Mo-target X-ray tube and Peltier effect Xflash® Si (Li) detector. Spectra were acquired on the following analytical conditions: potential of 40 kV, 600 μA of current intensity, 360 seconds of acquisition time under a helium atmosphere (with the purpose of purging the atmosphere and facilita-te the defacilita-tection of light elements). Two glass standards from the Corning Museum of Glass CMOG B (sodium-rich glass) and CMOG C (lead glass) were also analysed in order to compare with the samples that were here prepared.
14
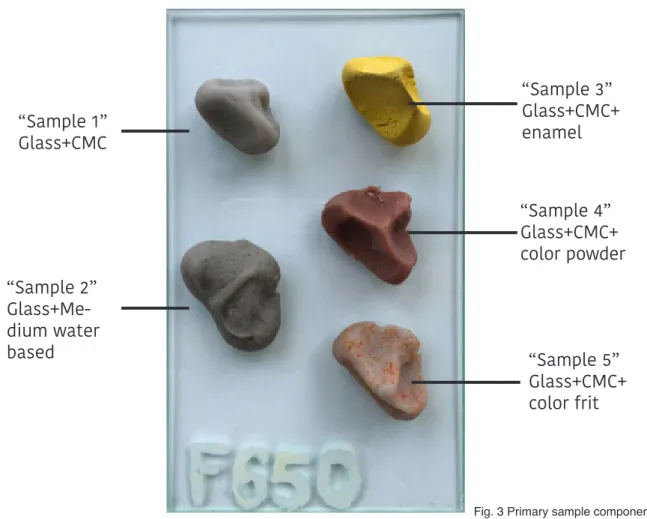
“Sample 1”
Glass+CMC
“Sample 2”
Glass+Me-dium water
based
“Sample 3”
Glass+CMC+
enamel
“Sample 4”
Glass+CMC+
color powder
“Sample 5”
Glass+CMC+
color frit
Fig. 3 Primary sample components
In fig. 2, we see what I will call a ‘block’ showing test results for 5 different compositions. Following the coding system I defined earlier, F_650 indicates that all of these were made with Vicarte furnace glass with different additions, and then fired to 650ºC.
“Sample 1”: The most simple formulation I tested, i.e. [Vicarte furnace glass powder + CMC]
“Sample 2”: In this sample, I tested the addition of a “water based medium”, typically used as a binder for
enamel powder, which enables painting with it. I was hoping that this addition might somehow greatly impro-ve either the handling qualities, or the resultant fired form. Howeimpro-ver, neither of those two desired results was achieve, so after the primary samples shown here, I did not continue with water based medium as consti-tuent of my masa.
“Sample 3”: This sample, consisting of [Vicarte furnace glass + CMC + low temperature firing enamel],
imme-diately showed promise, and will prove useful in further developments. The addition of enamel clearly offers the option to arrive at striking colors in the fired masa.
“Sample 4”: This sample was made with [Vicarte furnace glass + CMC + colored glass powder]. The exact
composition of this glass powder I used is unknown to me. It is a commercially available colored glass powder often used in glassblowing, (e.g. Kugler glass colors). Experience has shown that this glass powder I used is compatible with the soda-lime glass we use in the furnace at Vicarte.
“Sample 5”: This sample has the same constituents as sample 4. The only difference is the grain size of the
colored glass component, the frit. Like the powder used in sample 4, the frit in this sample is a commercially available colored glass. It also has been proven to be compatible with Vicarte furnace glass, but is simply less finely ground than the powder in sample 4.
15 Fig. 4 Primary samples in visual terms
Following the procedures described before and using the compositions and the temperatures from the previous table these are the results obtained in visual terms:
3.1 PRIMARY SAMPLES
Here is what I call “primary samples” which are the first ones to be done in order to mark the next steps to follow, where we saw which were the best mixtures in order to make the decisions that fo-llowed this step. As it was in the beginning to eliminate the borosilicate samples, since at the used temperatures this glass was not offering anything interesting for me.
The samples fired at 550ºC in fig. 5 do not show interesting results for my purposes, that was the reason why I will not be working with those temperatures by now. Following the same line of thou-gh, neither 600ºC or 650ºC showing promising results. Temperatures of 700ºC and 750ºC are the ones that interest me the most due to its glassy aspect that suggest a glassy structure.
At fig. 5, at low temperatures we can observe this sand-like surface that has nothing to do with the classic glassy aspect, but the lower ones release small particles that reveal a significant lack of temperature to change the internal structure of our samples in order to get a proper fired new piece, that’s why I’m not interested on this ones.
16
All of the results I was able to get, and the conclusions I reached based on those results, followed from two separate avenues of exploration I followed.
-Primary samples
These first tests I made, were allowed me to narrow down the variables I started with to only the most useful firing temperatures and compositions. -Experimental pieces (samples)
Once I had found the most useful firing temperatures and compositions, I began to shape the masa more purposefully, and use it in combination with other materials. The scale became a bit larger than my primary sam-ples. I began really trying to find out how useful and flexible the material I was developing could be as a new sculptural material.
17
µ-EDXRF:
The first characterization performed of the samples was µ-EDXRF.
This technic was important in order to study what was happening to the composition of the glass when fired at different temperatures. In this way, we can easily see if there is some kind of anomaly or everything is making sense, as it was in our case.
To evaluate the matrix of glass we had, it was needed to analyze glass standards with a known composition (Appendix 1) . For this effect the glass standards from the Corning Museum Of Glass (CMOG) were used.
Whenever possible the glass used for the samples was compared with a CMOG standard with a composition as close to the one of the sample as possible (Table 1).
The samples were compared with the CMOG standards in a qualitative way to evaluate if after mixing all the ingredients to produce masa, the original composition of the glass used did not suffer strong alterations.
It was possible to observe that the base glasses maintain their type. Lead glass was compared with CMOG C and window and furnace glasses were compared with CMOG B. The spectra for these comparisons and the Table with the standards composition is presented in Appendix I.
What we can observe when comparing the furnace spectra samples without enamel fired at 550ºC and 750ºC (fig. 5 A) seems like a significant decrease of some elements (such as: K, Ca, Fe and Zn) at higher temperatures when there is no enamel involved. The volatilization of the elements with the temperature will need to be further investigated.
When comparing the furnace spectra samples with low temperature enamel fired at 550ºC and 750ºC (fig. 5 B) we can observe the appearance of Pb which is attributable to the enamel composi-tion.
When comparing the lead spectra samples without enamel fired at 550ºC and 750ºC we can only see a difference on Pb. At the high temperature the intensity of the lead picks decreases, which can be related to the volatilization and loss of some of the Pb content.
The lead spectra samples with low temperature enamel fired at 550ºC and 750ºC showed no signi-ficant difference with the previous ones without enamel. This might be due to the fact that Pb is one of the main components already present in the base glass (Table 1).
On the window spectra samples, with the high temperature (750ºC) when there is no enamel mixed in the samples, what we can observe is a general decrease in the intensity of the indentified ele-ments (Si, Ca, Fe). Again, this is due to the increasing temperature that is probably causing the loss of content of these elements.
As stated before for the mixture where enamel is present, we can observe a decreasing intensity only for the Pb peak. This is also true for the mixture of window glass with enamel (fig. 5 F).
18
These scientific characterizations helped me to explore in an informed way. I could then come to a better understanding of the material I was creating, more effectively discover compositions and processes that made my masa most useful to me as an artist.
A. Fig. 5 XRF Spectra B. D. C. E. F. Si K Ca Ba Fe Zn Pb Pb Ca Si Fe Pb Pb Zn K Pb Pb Pb Pb Fig. 5 XRF Spectra:
A. XRF spectra from the furnace samples fired at 550ºC and 750ºC
B. XRF spectra from the furnace samples with low temperature enamel fired at 550ºC and 750ºC C. XRF spectra from the lead samples fired at 550ºC and 750ºC
D. XRF spectra from the lead samples with low temperature enamel fired at 550ºC and 750ºC E. XRF spectra from the window samples fired at 550ºC and 750ºC
19
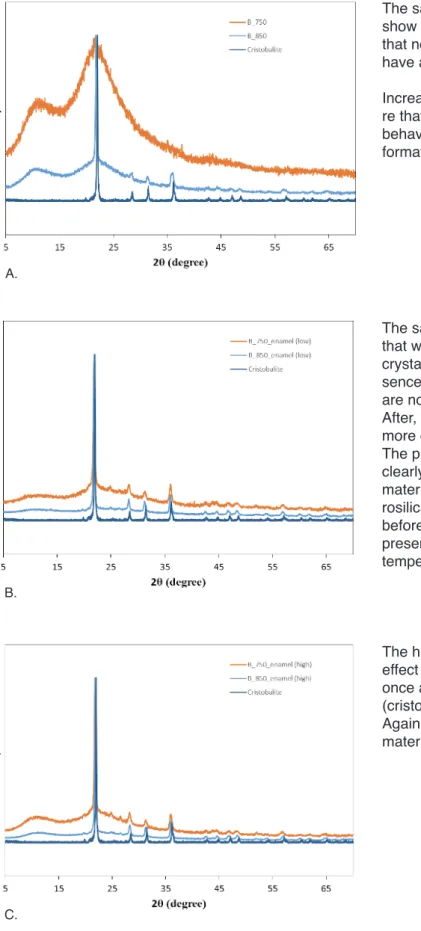
XRD
As mentioned earlier, XRD will allow us to determine the presence or absence of crystalline structu-res in the glass matrix. Since we are mixing different materials and firing at different temperatustructu-res it is probable that some crystaline structures might form in the matrix.
These analyses were performed in two different masa compositions only, i.e furnace- and borosilica-te-based samples. That choice was made based on my personal interest in those two sets. Because those were the two matrixes I thought more interesting to further use in my work.
Concerning sample F_550, fired at 550ºC it shows a completelly amorphous body and no crystalline structures were formed during the melting.
Increasing the temperature by 200º C, the mixture that was fired at 750ºC continues to show no presence of crystalline structure.
Concerning sample F_550_enamel (low), here we can observe already the beginning of the formation of some crystaline structure so it is no longer a completelly amorphous body. This is probably due to the presence of the enamel in the mixture.
The mixture, at 750ºC has a more evident presence of crystalline structures. This is probably the formation of cadmium sulphate (CdS) as we can see in the spectra on fig. 6 B. It is probable that the cadmium sulphate is coming from the enamel, being the one responsible for the yellow color.
FURNACE GLASS
Fig. 6 XRD spectra of furnace samples
A. XRD spectra of the furnace samples fired at 550ºC and 750ºC without enamel
B. XRD spectra of the furnace samples fired at 550ºC and 750ºC with low temperature enamel. The cadmium sulphate sprectrum was withdrawn from the online RUFF data base.
A.
20
The sample B_750 that was fired at 750º C show a completelly amorphous body meaning that no crystalline structure was formed and we have a pure glass form.
Increasing the temperature of 100º C, the mixtu-re that was fimixtu-red at 850º C shows a divitrification behaviour were it was possible to identify the formation of cristobalite (SiO2)[13].
The sample B_750 with low temperature enamel that was fired at 750º C reveals a completelly crystalline structure (cristobalite) showing no pre-sence of amorphous matter. This means that we are no longer working with a glass.
After, at 850ºC we can see the picks are even more defined.
The presence of low temperature enamel is clearly strongly influencing the behaviour of the material. At the lower temperature (750ºC) the bo-rosilicate matrix that was completelly amorphous before, is now showing a crystalline structure in presence of low temperature enamel at this same temperature.
BOROSILICATE GLASS
The hight temperature enamel shows the same effect as the low temperature one, revealing once again a completely crystalline structure (cristobalite), with no amorphous matter. Again, the enamel has a great influence on the material’s behaviour.
Fig. 7. XRD spectra of borosilicate samples
A. XRD spectra of the borosilicate samples fired at 750ºC and 850ºC without enamel
B. XRD spectra of the borosilicate samples fired at 750ºC and 850ºC with low temerature enamel C. XRD spectra of the borosilicate samples fired at 750ºC and 850ºC with high temerature enamel. The cristobalite sprectrum was withdrawn from the online RUFF data base.
B. A.
C.
21 Fig. 8. XRD spectra of the enamel
A. XRD spectra of the low temperature enamel fired at 550ºC and 750ºC. B. XRD spectra of the high temperature enamel fired at 750ºC and 850ºC.
The enamels alone were analyzed by XRD to understand if they were contributing to the formation of some crystalline structures when mixed in the masa. As we saw in fig. 6 B and fig. 7 B there was the appearence of crystalline structures in the mixture with low temperature enamel. As we can see in fig. 6 B, the low tem-perature enamel forms cadmium sulphate when melted and it also has the presence of another crystalline structure when melted in a higher temperature (750ºC) that was not possible to be identified until now. However, when mixed in the masa it is only posible to see the formation of cadmium sulphate with a furnace base glass. When mixed with the borosilicate base glass, only cristobalite is identified which can be attri-buted to the borosilicate matrix alone.
The high temperature enamel XRD spectra is present in fig. 8 B. Again, cadmium sulphate was identified in the matrix.
The structural nature of the high temperature enamel seems to be different when compared with the low temperature enamel. As stated before, the low temperature enamel has the presence of a different crystalline structure when melted at higher temperatures, which is not pos-sible to identify in the high temperature enamel when melted at the same temperature of 750ºC. The high temperature enamel shows the forma-tion of a pure cadmium sulphate structure.
ENAMEL
B. A.
To summarize, the enamels are contrinuting to the matrix of the furnace based samples at the higher temperatures (750ºC) but no presence of crystalline structures coming from the enamel (cadmium sulphate) were identified in the borosilicate based samples. As it was stated before the borosilicate samples at a higher temperature show no longer an amorphous composition and the pure spectrum of cristobalite is present.
22
When I was well into my own experimentation to develop a material which could be moulded rather like clay, I discovered that in fact, there was already a similar product existing on the market that has been in development for some years. Compared to what I was developing, it is a rather expensive one, called Glass Bird Modelling Glass. It is intended to be used with the colored glass powder or frit made by Bullseye Glass, which can be purchased separately from the same company, and is itself also rather ex-pensive. The product when processed results in a glassy substance that can be formed in some different ways, and then fired to hold that shape permanently.
I wasn’t aware that this Glass Bird product existed when I began my own research to develop a material that offered me maximum application flexibility, and also, consistent with my student budget, was at a cost far lower than that products like Glass Bird. Of course, once I found out about the existence of the Glass Bird product I looked into it to find out what I could about it. I discovered some distinctive differences between that product and the material I was developing. If you buy the Glass Bird kit, you get a powdered binder and a liquid medium. You can then mix these with water and glass powder or frit which that company also sells, separately. On the product’s data sheet, it says that the resulting material “has the consistency of clay, is smooth and easy to work with” and that “The binder and liquid medium are food-grade and non-toxic”. Further, we read: “During firing, the binder and medium will burn away, and do not affect the compa-tibility of the glass. It can be used with either COE 90 or 96 glass.” The starter kit makes around 1,3 kg of glass [14].
23
Fig. 9 A piece composed of furnace masa with low temperature enamel. The masa was pressed into a silicone mold and left there until it was a little less soft (dry). After I fired it, I conclu-ded that some of the detail had been lost as a result of the high temperature.
This test showed me that 750ºC was perhaps a little bit too high for furnace masa when I wanted to preserve maximum detail.
Fig. 9 Furnace masa with enamel (low)
As I indicated earlier, experimental pieces or samples have a different intention than the primary sam-ples. Once I had found out with the primary samples I tested, what the best compositions and firing protocols were, I started to explore ways of shaping the masa and using it in combination with other materials. Would it stick and remain intact after firing together with other materials? Was it possible to alter the material so that it could be applied in different consistencies, allowing it to be used in many different ways?
On the following pages are photos of some of the experimental works I made. All of these works are on a relatively small scale. Text accompanying the photos of each object, offers a brief description of the making process, the firing protocol, and in places, some additional comments.
3.2 EXPERIMENTAL PIECES 3.2.1 KILN PIECES
ABOUT THE FIRING PROGRAMS FOLLOWED
Most of the experimental pieces followed our main firing program nº1, with x value corresponding to 750ºC. This is primarily because of their relatively small scale. But in fact, sometimes quite different, but equally successful firing protocols were used. Why? This was quite simply the result of the fact that I wasn’t always able to reserve an oven for myself, and at times, included my experimental pieces in the firings that other colleagues were doing. This was possible because I always checked their firing schedules to verify that the steps in the firing protocol to be followed satisfied the conditions my pieces required. Most of these firings differed from my own preferred protocol in that usually, the steps others needed for their pieces, required only more time in the steps, not very different temperature set points.
24
In this case of fig. 10 we have a piece composed by: Masa made out of furnace powder with low tempera-ture enamel
Fig. 11 had follow pretty much the same procedures as fig.10, it is composed by:
Masa made out of furnace powder and low temperature enamel. Pressed against a silicone mold and left there until the mass was a little less soft. After firing the part in the top got shinny but the bottom keept matte.
Fig. 10. Furnace masa with enamel (low)
Fig. 11. Furnace masa with enamel (low)
This piece was pressed against a silicone mold and left there until the body got a little more dry. After the firing the part in the top got shiny but the bottom keept matte.
700ºC is the ideal temperature for furnace glass masa if wanting to conserve details.
Fig 12. Cut squares of window glass with a furnace masa with enamel (low) sandwiched between. My intention here was to find out if I could ‘glue’ shapes cut from window glass together, fuse them successfully with my masa. The window glass cracked on cooling as a result of the very different thermal expansion characteristics. But although it cracked, it still held very strongly together.
Fig. 12. Window glass sheets trapping some furnace masa with enamel (low)
Firing shedule followed present in Apendix III, fig. I
Firing shedule followed present in Appendix III, fig. I
25 Fig. 13 Furnace glass sheets trapping some
furna-ce masa with enamel (low)
Fig 13. As a consequence of what happened with the sample in fig 9, I wanted to make a second test. This time, I cut shapes from a roundel blown with furnace glass, and combined them with the same masa I used for my previous test. I had learned from my previous tests (discussed in fig. 9) that going to 750º C with furna-ce glass could result in undesirable loss of detail. In addition, the shapes I cut from the roundel were also significantly thinner than the window glass I’d used in fig. 12. Those two considerations brought me to decide that I’d fire this test only to 700º C. This time, the fused shape held together after firing, without cracking. And we can also see that the masa, retains its initial form better, because it did not become as fluid during firing, as in the previous test.
Firing shedule followed present in Appendix III, fig. I
Fig. 14 Cut window glass square with furnace masa with enamel (low) and pre-fired finely-ground low firing clay.
After firing, the sheet glass cracked, ones again because of the incompativility of the window glass with the furnace masa but the ceramic shape remained pretty strongly fixed to the masa. Because this happened, I began to think more about using my masa to fuse glass and clay shapes together that wouldn’t crack after firing.
Fig. 14 Window glass sheet and ceramic piece joined by some furnace masa with enamel (low)
Firing shedule followed present in Appendix III, fig. II
To achieve that, I also needed to support the shape from the inside with silica while firing. Because of that, the final shape has 5 rather than 6 closed sides. It came out fine!
Fig. 15 Window glass sheets joined by window masa with enamel (low)
Fig 15 After assembly, before firing, this shape was first buried in a bowl full of silica in order to retain the shape as much as possible during firing to 750º C.
26
On the other hand, these are 3 very different materials, and I had no idea of the compositions of either the glazed tile, or the fragment of commercial bo-ttle glass. This test seemed to hold together after firing, perhaps because of the relatively small scale of the forms and the small contact surface between them.
Fig. 17 For this piece, I combined an already fired ceramic head I’d made, broken into 3 separate, very closely fitting segments, with a furnace pasa with enamel (low). I decided to decrease the density of the masa by adding a larger relati-ve amount of CMC than previously.
Fig. 16 Glass mouth of a bottle sticked to a glassed tile through some furnace masa with enamel (low). Fig. 16 For this test, I was attempting to fuse a glazed ceramic tile with the
mouth of a glass bottle using a furnace masa with enamel (low). I was ho-ping that the glassiness of all the materials I combined here would perhaps work. I refer here to the glaze on surface of the ceramic tile, the glassiness of my masa on firing, and the fragment of commercial bottle glass might work together successfully.
The yellow enamel I used, as enamel appears in my tests to do, both helped adhe-sion and ensured a very glassy result. Firing schedule followed present in Appendix III, fig. I
Firing shedule followed present in Appendix III, fig. II
Fig. 18
The object shown here is a shape cut from window glass, fused with a masa I made using the same, finely ground window glass. Because both parts have the same window glass base, this test worked even without low firing enamel as a component of my masa.
Fig. 18 Window glass piece & window glass masa
Firing shedule followed present in Appendix III, fig. I
Fig. 17 Broken ceramic piece joined by furna-ce masa with enamel (low).
27
Fig. 19 Because my previous test seemed successful (fig 17), my masa for this test was again formulated with a higher proportion of CMC, to give it a lower density. I used the same masa composition as in the previous test, except this time there was no enamel present in the masa. This resulted in the masa remaining uncolored, and looking more trans-parent after firing, than in my previous test. And, at first, the result looked very good. Except that on handling the fired piece, the masa came loose from the ceramic! I concluded that the addition of the enamel was important for this type of material assembly to be successful
Fig. 19. Ceramic piece & furnace masa
Firing shedule followed present in Appendix III, fig. I
Furnace glass masa with two different colors and two different textu-res are shown in fig.18. This is due to the difference in the amount of CMC added during the making process, where more CMC was used for the dark colored one than for the yellow one.
This piece is a perfert example of the differences in texture that masa is able to show!
Fig. 21. Furnace masa with two different enamel (low) colors before and after fired respectively
Firing shedule followed present in Appendix III, fig. II
Fig. 20 Window glass & window glass masa
Fig. 20 Window glass and window glass masa. This is a piece where I tried to mimic the way bricks are set with cement. I made it by fusing many small fragments I cut from window glass with a masa made with finely ground window glass. Unlike the case with the window glass object in fig. 18, there was no need to support this piece. As the base glass was the same, there were no compatibility issues after fusing. No ena-mel was part of the masa this time, and the object was fine after firing it. But I am convinced that the addition of enamel would bring even more stability to the joints. For me, this experiment indicated once again, very interesting potential applications for this masa.
28
Fig. 23 This piece was made with pre-fired ceramic shapes and borosilicate masa with low firing enamel. What happened was that the density of the masa changed significantly, it took on a foam-like structure, which acted like a pretty good ‘glue’ between the ceramic fragments.
Fig. 23 Ceramic piece & borosilicate masa with low temperature enamel
Firing shedule followed present in Appendix III, fig. III Fig. 22 An experimental piece combining a low-temperature, pre-fired white clay shape, and a borosilicate masa. As the chart shows, this was then fired at a far higher temperature than previous tests, as is appropriate for borosilicate glass. Once again, this time because I wanted to observe how these two materials could be rela-ted, I used no enamel in the masa. After firing, no cracks presenrela-ted, but it’s also true that contact surface between the two materials here is quite small. There is no color added on here but we see it white,
there is a reason for the color (Appendix 2). Fig. 22 Ceramic piece & borosilicate masa
29
I included low firing (lead based) enamels in the masa, and found that it inflates, resulting in a lower density (*‘apparent density’), like foamed materials. This could well be because when the low tem-perature firing enamel (500-600ºC) is subjected to a far higher temtem-perature, the enamel burns out, creating many very small empty spaces throughout the mass.
“Glass Foam”
“It is made by heating a mixture of powdered glass and a chemical foaming agent such as carbon or limestone. (the foaming agent being perhaps low firing enamel in the above case). Near the melting point of the glass, the glass powder turns into a viscous liquid and the blowing agent releases a gas. The gas expands and produces a structure of cells or bubbles which forms the porous body of foam glass” [15].
Fig. 24 Borosilicate masa with low temperature enamel
Fig. 25 Borosilicate masa & boro-silicate masa with low temperatu-re enamel
As we can appreciate in fig. 25
Glass foam made out of borosilicate masa and borosilicate masa are totally posible to combine.
These kind of object suggest me a lot of nice doubts about the limits of this kind of piece...
Glass foam doens’t weight much and floats but borosilicate masa does weigth and doesn’t float. This could be an interesting combination for some nice experiments.
This foam aspect is fragile and easy to break with your own hands. At this point, I once again began testing with masa
with a borosilicate glass base. I wanted to find out what would happen at higher temperatures appro-priate for borosilicate glass. And firing that masa at temperatures starting around 850ºC, produced some interesting results.
3.2.1.1 FOAM GLASS
Borosilicate glass was firstly removed because it disappointed me since it started to crumble during the first experiments (primary samples). But after, when I started to test again, when I saw the foam glass, the glass that disappointed and was removed, proved to be one of the most interesting one.