F
ACULDADEDE
E
NGENHARIADA
U
NIVERSIDADEDO
P
ORTODevelopment of a Build and Deployment
System
João Pedro dos Santos Bernardes
Project Report
Master in Informatics and Computing Engineering
Supervisor: Ana Cristina Ramada Paiva Pimenta (Assistant Professor)Development of a Build and Deployment System
João Pedro dos Santos Bernardes
Project Report
Master in Informatics and Computing Engineering
Approved in oral examination by the committee:
Chair: José António Rodrigues Pereira de Faria (Assistant Professor)
____________________________________________________
External Examiner: Alberto Manuel Rodrigues da Silva (Assistant Professor)
Internal Examiner: Ana Cristina Ramada Paiva Pimenta (Assistant Professor)
Abstract
The build and the deployment of a project is usually considered a secondary activity from the software development process, and is often neglected until it starts to become a time consuming and error prone activity.
The lack of documentation on the build and deployment process is also a common problem found in software projects, and the lack of tools to document it is still a problem for the project teams.
This project intends to create a prototype of a software factory that generates the code required to build an deploy on a windows environment an entire project (with multiple subprojects, implemented in several technologies).
The models created (by the software factory user) can also be used to document the project's build and deployment process and, since the code required to build and deploy the project is generated from the project's build and deployment model, it implies that the model must always be up to date, ensuring also the consistency of the information retrieved from it.
Acknowledgements
There had been some people without whom this project couldn’t have been done. To all of them I would like to express my gratitude. First of all, I would like to thank Fernando Guimarães for all the support and guidance given during my internship at Critical Software. I would also like to express my gratitude to YODA team for the support provided during the project. At FEUP, I would like to thank my supervisor Ana Paiva, for the guidance provided. Finally, I would like to thank my family and friends who have supported me a lot during this time. João BernardesContents
1 Introduction...1 1.1 Context...1 1.2 Objectives...1 1.3 Report Overview...2 2 State Of The Art...3 2.1 Windows Installer...3 2.1.1 Installer Packages...4 2.1.2 Components...4 2.1.3 Features...5 2.1.4 Properties...5 2.1.5 Conditions...6 2.1.6 Custom actions...6 2.1.7 Installation Mechanism...6 2.1.8 Unninstall, Repair and Change Products...7 2.1.9 Installer Service...8 2.1.10 Installer Database...9 2.2 Existing Tools...10 2.2.1 Deployment...10 2.2.2 Build Automation Tools...17 2.3 Conclusions...19 3 Implementation...21 3.1 Metamodel...21 3.1.1 Build Metamodel...21 3.1.2 Deployment Metamodel...26 4 Conclusions and Future Work...29 4.1 Future Work...29 References...30List of Figures
Figure 2.1: Feature selection in Windows Installer...5 Figure 2.2: Modifying, reparing or removing an installation...8 Figure 2.3: View of the tables of an Installer Package (Orca)...9 Figure 2.4: Installer database tables and their relations [MCTG]...10 Figure 2.5: Adding a project output to a visual studio setup project...11 Figure 2.6: Library dependency detection in Visual Studio Setup projects...12 Figure 2.7: Project Assistant in Install Shield...15 Figure 2.8: Install Shield's Installation Designer...16 Figure 2.9: Example of a NMake description file...17 Figure 2.10: Example of a NAnt script...18 Figure 2.11: Example of a MSbuild script...19 Figure 3.1: Build Metamodel Overview...22 Figure 3.2: Build Metamodel (Projects)...23 Figure 3.3: Build Metamodel (dependency between projects)...24 Figure 3.4: Build Metamodel (Properties and build tasks)...25 Figure 3.5: Deployment metamodel overview...26 Figure 3.6: Deployment metamodel (components)...281 Introduction
1.1 Context
This project consists of an implementation of a prototype of a software factory (using Microsoft DSL Tools) for the generation of build (NAnt) and deployment (WiX) code. The developed protype allows the modelling of all the build and deployment process, and from the model defined by the user, generates code capable of building the targets (libraries and executables) by automating the build process and producing Windows Installer Packages able to deploy the project.1.2 Objectives
This project is intended to create a prototype of a software factory that allows the modelling of the build and deployment logic of a project that may consist in multiple subprojects, implemented in multiple technologies. From the model of the project, the software factory's code generation tools must produce most of the code required to build the project. For all the cases for which it is not possible to generate a build script able to build the whole project (because the project build process requires the execution of special actions) the tool must generate code that can be extended in order to implement the required actions. It is also required that the code factory generates most of the code necessary to create Windows Installer Packages that will be used to deploy the projects in a windows environment. The generated deployment code must be extensible in order to allow a manual implementation of the part of the build process that may not be possible to be automatically generated.
Introduction
The main goal for this project is to assess, from the developed tool, the feasibility of the development of a more refined tool for the management of the build and deployment process.
1.3 Report Overview
Besides this chapter, this report has three more chapters.
Capter 2 introduces technologies and concepts necessary to understand the developed project and presents the state of the art of tools developed to deal with the problems that the project aims to solve.
In chapter 3 the implementation details of the project are described.
Finally, the chapter 4 presents the conclusions and describes what can be done in the future to improve the developed tools.
2 State Of The Art
This chapter introduces the technologies and concepts required to understand the project and its implementation. Then, it analyses the existing tools for build and deployment and their limitations.2.1 Windows Installer
Windows Installer is a software system developed to assist and manage the installation of software components on Windows systems, providing a standard way to manage software installation on Windows environments [WI1]. Applications deployed with Windows Installer are distributed as Install Packages (MSI files). These packages contain all the information needed to install the software stored and structured in form of tables. Windows Installer stores the information of the installed software on its database (like, for instance, the location of the installed files and its version or the registry keys) allowing it to detect missing files in an product's installation, to know exactly what files can be removed on uninstall without interfering with other installed software or to know how to upgrade an already installed package. In order to maintain consistent the information in its internal tables, and to avoid situations where the installation of a product damages another product already installed, Windows Installer discourages the use of custom code to perform common installation actions (to copy files or to create registry keys) offering as an alternative a more declarative approach: instead of expecting a description (or code) of how the installation is going to be made, it requires a description on how the system is supposed to be after installation assuming the responsibility of leaving it in the required state. By avoiding the use of custom code, Windows Installer is also allowing the validation of installer packages, the installation of installer packages byState Of The Art unprivileged users (without compromising system security) or to rollback a failed installation (software installers can fail, leaving the system in an undetermined state).
2.1.1 Installer Packages
Installer packages (MSI files) are responsible to carry all files required to the installation of a product, but also all the installation logic (tables stored in COM structured storage format). Those tables include all the information needed to install the product, like the destination path of the product files, graphical interface logic, COM registration information, registry keys or requirements for product installation. Installer Packages rely on GUID's (globally unique identifier) in order to uniquely identify all of “parts” of the installation package (for example, all installer packages' components are identified by a GUID). The installation package itself is identified by a GUID. Each installation package must have a unique package code (if two installer packages are different in any way, either in the files contained or the information in their tables, they must have a different package code). Besides the package code, each package must have a product code and an upgrade code. The product code is used by Windows Installer to identify the product, and, for example, to check before installing if it is already installed on the system. Each major version of a product has a correspondent product code. On the other hand, the upgrade code is used to identify a product family. In conclusion, a product code, identifies a major version of a product and an upgrade code identifies the product itself. When Windows Installer installs a package, it checks if there is a product installed in the system with the same upgrade code. If it exists, it automatically unninstalls the older product and installs the newest. When the upgrade code isn't the same, windows installer keeps both versions of the product installed (because the upgrade code is the constant that links these versions together).2.1.2 Components
A Component is the atomic unit in Windows Installer. A component can contain one or multiple files, registry entries, shortcuts or directories that should be installed as a single unit (the installer service installs or removes a component as a single coherent piece). The installation of a component should never interfere with other components on the target machine, for example, a file with the same name and the same destination path must never be included in more than one component.State Of The Art
The final user has no choice or knowledge on which components are installed on the target system.
2.1.3 Features
A Feature is a hierarchical group of components. Each feature may contain several components (including components present in other features) and other subfeatures. The features are a logical structure of an installer package and are avaliable to the final user permitting to select the ones that shall be installed. When a user selects a feature for installation, the installer determines which components must be installed to provide that feature and installs them on the target system. Figure 2.1 shows an example of a dialog for feature selection in Windows Installer.
2.1.4 Properties
State Of The Art There are three types of properties in Windows Installer: private, public and restricted public. Private properties cannot be changed directly by the user of the installer package. They are used by the package author to control the installation or to store information about the target system. Public properties can be changed by the user (usually by invoking the installer through the command line with the properties as parameters). Finally, restricted public properties are accessible to the user, but only if it meets certain requirements (like, for instance, to have administrative privileges). Some properties are predefined in Windows Installer and store information about the target system (for example, the operating system's version number or the windows installer's version).
2.1.5 Conditions
Conditions are boolean expressions (usually involving one or more properties) that allow the installer package author to change the way the installation is performed. It is possible to define conditions that enable or disable the installation of one component or feature (for instance, a component might not be required if the operating system's version is more recent than a certain version). It is also possible to define launch conditions. Launch conditions are conditions that must be met so that installation may proceed (for example, the user must be an administrator, or the operating system's version must be more recent than a certain version).2.1.6 Custom actions
Although Windows Installer provides builtin support for most of the required actions in an installation, there are some installation activities that require the use of custom code. In order to support those requirements, windows installer allows the definition of custom actions. Custom actions allow the installer author to call an external executable, a DLL file or a script, defined inside the installer package. It is important to notice that whenever a custom action is defined a correspondent rollback action must also be defined in order to maintain the transactional nature of the installation process.2.1.7 Installation Mechanism
State Of The Art
The installation of an installer packages has two phases: the acquisition phase and the execution phase. If the installation fails, windows installer initiates another phase: the rollback phase.
The acquisition phase consists of gathering all of the information needed to install the package: read the installer package tables, run custom actions (defined by the package developer) to gather system information, obtain information from the user (usually through a graphical user interface) on which features to install or the install location. After all the information is collected, windows installer generates a script to perform the installation and another to restore the system's original state, in case an error ocours during the installation (the rollback script). During the acquisition phase, windows installer also saves a copy of all the files that are going to be deleted or replaced during the installation, in order to be able to be able to restore them in case of a failed installation. On the execution phase, windows installer runs the installation script (in a process with administrative privileges). If there's an error during the installation, windows installer initiates the rollback phase, executing the rollback script (inside a process with administrative privileges) and restoring the system to the state it was before the installation started.
2.1.8 Unninstall, Repair and Change Products
Besides installation, windows installer provides mechanisms to safely unninstall, repair or change a product's installation, as illustrated in Figure 2.2.State Of The Art
The modify mechanism allows the selection of a set of features different from the one selected during the installation of the product.
The repair mechanism checks the install information of the installed components and ensures that all the components are properly installed and that all the files are in the correct version. All the mechanisms mentioned earlier have safety features to avoid the corruption of other installed products, avoiding the deletion of shared components and always keeping the latest version of the components on the system.
2.1.9 Installer Service
Every time an installation, a repair or an unninstallation is made (either by invoking the Installer Package file, by Add and Remove Programs on Control Panel or by command line invocation), a process of Msiexec.exe is ran (as a user process) in order to display the user interface and gathering data from the system. After that, it transfers the execution to the Installer Service (running with administrative privileges) that will update the system according to what is defined in the installation package. Figure 2.2: Modifying, reparing or removing an installationState Of The Art In some cases, when the setup requires the execution of a custom action, another process is created to run those actions (ran with the installing user's account) [WI5]. This is an important aspect of windows installer security because, although the installation requires administrative privileges (in order, for example, to update the database of installed programs), it cannot violate security principles by allowing a nonprivileged user to run code with administrative privileges (but it still has to allow regular users to install software).
2.1.10 Installer Database
All the information logic of an installer package is stored in the form of tables that define what is going to be installed and how. Those tables can be viewed with tools like, for example, Microsoft Orca (in Figure 2.3). Figure 2.4 presents a small subset of the installer database tables. The feature table contains all the features of the application and is associated with contions in the condition table that will determine if the feature will be installed. All the components of the application are listed on the Component table, and their location is defined on the correspondent directory (defined in the Directory table). Figure 2.3: View of the tables of an Installer Package (Orca)State Of The Art
The information of which components belong to each feature is represented on the FeatureComponents table and the subfeatures of each feature are sepecified in th Feature_Parent field.
2.2 Existing Tools
2.2.1 Deployment
This section presents two tools that reflect the current state of the art on deployment tools Figure 2.4: Installer database tables and their relations [MCTG]State Of The Art commercial exist, which present similar functionalities. Some of those will be presented in section 2.2.1.3. 2.2.1.1 Visual Studio Setup Project Visual Studio 2005 and 2008 supports the creation of installer packages (through the Setup project type). In order to define how the deployment of the applications is going to be made, the user is presented with five different views on the deployment environment: the filesystem editor, the registry editor, the file types editor, the user interface editor and the launch conditions editor. 2.2.1.1.1 The Filesystem Editor The filesystem editor allows the user to add files to the installer and to define where they will be installed on the target machine. It allows the creation of folders on the target machine, the definition of special folders, the definition of a top level custom folder (defined by the user). It is possible to define conditions for the installation of files [MSVSIC], add shortcuts to the target machine, add (other) projects' outputs (or just part of the outputs of a project, using filters[]) and .NET assemblies. Figure 2.5: Adding a project output to a visual studio setup project
State Of The Art But the unique feature of Visual Studio Setup projects is the integration with the build system and the ability to add to the setup project build outputs of another project. Not only it is possible to add a build output to the installer package (as shown in Figure 2.5) and have the required project built before the building of the installation package, but Visual Studio also detects the dependency on all the libraries used by the project (as shown in Figure 2.6) and adds launch contitions to the installer package in order to verify the existence of the libraries before the installation of the product. It is important to notice that Visual Studio Setup projects do not provide support for building a package containing multiple features. The only way the package author can use to define what gets installed in the target system is associate conditions with components. Figure 2.6: Library dependency detection in Visual Studio Setup projects
State Of The Art
2.2.1.1.2 The Registry Editor
The registry editor presents a tree representation of the target machine's registry, and allows the definition of registry keys and values on the target machine, either manually or by the import of a “*.reg” file [MSVSRe].
2.2.1.1.3 The File Types Editor
The file types editor allows the definition of document extensions and programs and actions related to them [MSVSFt].
2.2.1.1.4 The User Interface Editor
In this editor, it is possible to define the sequence of dialogs presented before, during and after the installation. Although it does not allow the definition of custom dialog boxes [MSVSIm], it allows the addition of some predefined dialogs for user input and output during the installation (for example, it is possible to add a dialog with two combo boxes) [MSVSDb]. The dialog sequence is organized in three groups [MSVSIm]. The start group contains the dialogs displayed before the installation, the progress group can only contain one dialog (used to display installation progress) and the end group contains dialogs designed to display a dialog reporting the end of installation, allowing the user registration or the launching of an application. It is possible to define a different sequence for when a normal user executes the installer or for when a system administrator uploads it to a network location 2.2.1.1.5 The Launch Conditions Editor The Launch Conditions Editor allows the specification of conditions that must be met (a file present in the filesystem, a registry value in the registry or a operating system version) in order to successfully run an installation [MSVSLc]. 2.2.1.2 Install Shield Install shield is a commercial tool to manage the deployment of applications. It supports the creation of Windows Installer compatible packages, but it also allows the creation of setups based on scripts written on InstallScript, an internal scripting language. Install Shield provides support and guidance to most of the windows installer features, like Conditions, Features, User Interface or Custom actions. It also provides other features not present in Windows Installer, but completely integrated and compatible with it, like the support for automatic upgrades of the installed application or implemented custom actions to perform common installation tasks.
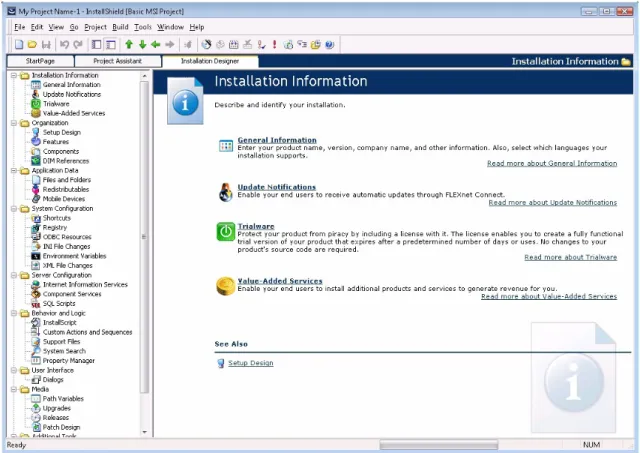
State Of The Art There are two main views on an installation project in Install Shield: the Project Assistant and the Installation Designer. The project assistant (Figure 2.7) is a wizard that provides a simpified view of the setup project. It presents a sequence of steps necessary to create the install package and provides guidance to the process. It has nine steps: ● The application information, where relevant information of the application (like, for instance, the vendor name or the application name) is defined. ● The Installation requirements, where the requirements for the installed application are defined, like the supported operative systems or the required version of .NET Framework. ● The Installation architecture, where the features presented to the user are defined. ● The application files, where the required files for the installation and their location on the target machine are defined. ● The application shortcuts, where the shortcuts to the application components and their locations are defined. ● The application registry, where the required registry keys and values are defined. ● The installation interview, where the installer user interface is defined. ● The installation localization, where is possible to specify which languages are supported by the installation package. ● The installation build, where the installation package is built.
State Of The Art
The installation designer (Figure 2.8) is a complete representation of the installation package that allows a more refined control of the installation process. In the installation designer it is possible to define and view the components to install, their organization in features, or to define the logic and sequence of the installation (for example, define custom actions and their order or to manage the properties in the install package). The installation designer also supports more advanced and specific configurations on the install process and on the target machine like, for example, server specific configurations (Web Server configuration, Database configuration and scripting), mobile devices specific configuration, application upgrade management or environment variables management.
State Of The Art 2.2.1.3 Other tools Besides the tools presented in this chapter, there are other tools that allow the creation of Windows Installer Packages. This section presents some of those tools: InstallAware: InstallAware is a commercial IDE which offers a graphic user interface that, not only allows the creation of installer packages through a graphical user interface, but also presents a view of the installation process in the form of an installation script [DTIA]. MSI Factory: It is a commercial graphical tool that creates installer packages and WiX compatible source projects [DTMF]. Tarma ExpertInstall: Is an IDE that, not only allows the build of Windows Installer packages, but also Tarma Native Installers (executable install script) from the same project (deployment definition) [DTTE]. Symantec Wise: Symantec ships this tool in two different versions: Wise Package Studio (with all the features available) and Wise Installation Express (a more limited version). It provides a plugin to Visual Studio, but it can also be ran in a standalone environment.
State Of The Art It aims to hide the complexities of Windows Installer, simplifying its features and allowing the build of an installation package without requiring the understanding of Windows Installer. The features of WISE include the integration with PROTector from Nalperion,a tool that provides software license enforcement, features to deploy server applications (like, for instance, the configuration of SQL Server, or user management), or mobile device support. It has a validation engine that enforces best practices and that can be configured with custom validation rules. Another interesting feature is the possibility to run the installation packages in a virtualized environment, without making any changes to the hosting machine, making the debugging process easier. [DTWI] Advanced Installer: this tool provides a GUI to guide the creation of installer packages. But what really makes this tool different is the fact that it allows the support for Java applications. It generates, from the same project, a Windows Installer package to deploy on Windows environments and a package to deploy in Mac OS X environments [DTAI].
2.2.2 Build Automation Tools
None of the tools found allows an high level definition and documentation of the build process and support multiple project types (for example, projects from Visual Studio 6 and Visual Studio 2005). There are, altough, a few tools that allow the automation of the build process. A few popular build automation tools are explained below. 2.2.2.1.1 Microsoft NMakeMicrosoft NMake (The Microsoft Program Maintenance Utility) is a tool that builds projects based on commands contained in a description file, commonly known as makefile (an example of a NMake file is presented in Figure 2.9).
State Of The Art
In NMake's description files, the build process and dependencies are expressed by description blocks. A description block consists of a line describing a target and the target's dependencies (in Figure 2.8, line 7, “unit1.obj” is a target, and “unit1.cpp” and “unit1.h” are the targets that it depends on), folowed by the commands required to build the target. When NMake builds a target, it verifies if a file with the target's name does not exist or is older than the targets that it depends on. If that happens, NMake executes the commands to build the target. [BTNM] 2.2.2.1.2 NAnt and MSBuild Both NAnt and MSBuild are XML based tools that allow the automation of the build process. A NAnt or MSBuild script consists of several targets that perform tasks necessary to complete the build process. A target can depend on other targets, which means that, before a target gets to be executed, the targets it depends on must be executed as well.
Another important aspect of NAnt and MSBuild is the concept of task. A Task is a command which is executed in order to complete a Target. There are several tasks shiped with MSBuild and NAnt and several more can be found on the internet. [CCMB][EDNC][BTMR]
State Of The Art
Figure 2.10 and Figure 2.11 present a simple build script in NAnt and MSBuild. Both languages are very similar. Each script has a project element, where the default target of the script is specified, then the targets are defined by a target element and the targets they depend on are specified (in the provided example, the “gui” target depends on the “lib” target). Finally, inside the target element, the tasks necessary to build the targets are specified (to simplify, the example provided does not actually build a project, it just outputs a message, using the echo task in NAnt and the Message task in MSBuild).
2.3 Conclusions
From the analysis of the existing tools, it is possible to state that the tools for the deployment of applications in windows environment are very mature and complete, and do not lack any important features required to create complete installer packages. By another side, the existing build tools are not very sofisticated. They do not allow a high level definition of the build process, describing how the build process is done (an imperative approach) instead of what is done in the build process (a declarative approach). In conclusion, there are missing a few features in the existing tools that may justify the effort required to develop a new tool that supports the integration: ● The integration of the deployment information with the rest of the build process (Visual Studio is the only tool that addresses, in a very limited way, this issue). It is important to notice that the creation of an installer package is not possible if the artifacts to be deployed are not produced properly. In complex projects, with multiple subprojects, there are multiple artifacts involved, that come from multiple sources (with multiple versions). It is important to ensure that, when an artifact is changed (a bug fix, for
State Of The Art
example), those changes are reflected on the deployment environment (the target user's machine) without a manual (and error phrone) process of updating the installer packages.
● The integration with other installed products (and other installed packages): all the installer packages produced in a project must be well integrated. For example, it is possible (in a project with multiple subprojects) to have two packages sharing the same component. If that happens, the component GUID has to be the same in both packages (in order to the windows installer's component management to work correctly).
● A platform that allows the automation of the build process, that supports multiple technologies, that uses a declarative and high level language to define the build process, easy to maintain, self explanatory and that documents the build process and its intervinients.
3 Implementation
3.1 Metamodel
The implemented software factory generates code from a model of the project's build and deployment process. This section explains the metamodel implemented to define the process mentioned above. It is important to notice that, althought there is only one metamodel, it is possible to split it in two major parts: The Build Metamodel and the Deployment Metamodel.3.1.1 Build Metamodel
3.1.1.1 Overview Figure 3.1 presents an high level diagram of the main elements that compose the build metamodel, where all the important elements of the build process are described.Implementation The ProjectGroup class represents the whole project as a set of related subprojects (for example, considering a clientserver application, the ProjectGroup would be the server, the client and all the deployment related information). A model can only contain one instance of ProjectGroup. The subprojects from a project are represented by Project (an abstract class). A Project contains all the code, configuration files, documentation and other artifacts related to the subproject that it represents.
A Project can have BuildOutput's (the files generated after the completion of its build process), Artifact's (for example, source code, configuration files or documentation) and Library's (all the external libraries used in the project). It is important to notice that it is not mandatory to define all the Project's Artifact's in the model (including all the source files in the model would require too much work), but only those that are considered relevant (either because they are required by another model element, like the ones that need to be deployed, or because they are important to the build process, and therefore it is important to document their existence in the model). Finally, in order to add flexibility to the build process, properties (Property class) and custom build tasks (BuildTask class) were added to the metamodel. 3.1.1.2 Projects A Project can be classified by two characteristics: type and purpose. The type of project Figure 3.1: Build Metamodel Overview
Implementation
Concerning the purpose, there are two classifications for a project: it is either a normal project or a test project.
As represented in Figure 3.2, there are four types (subclasses) of Project: MSBuildProject, NantProject, VisualStudio6Project and CustomProject.
An MSBuildProject is a project whose build process is defined in MSBuild, which includes all the project and solution files created by Microsoft Visual Studio 2005, 2008 and 2010. A VisualStudio6Project is a project or workspace created by Microsoft Visual Studio 6. Another type of project is the NAntProject, which is any project whose build logic is defined by a NAnt script. Finally, in order to cover special projects that are not natively supported by the application, a CustomProject type was created. The code generation tools do not generate any code to build this type of project, instead they create an extension point in the (generated) code so the user (of the tool) can create it himself. As shown in Figure 3.2, there is a relationship defined between Project's. This happens because, a project (ProjectGroup) may have subprojects created with the sole purpose of testing other projects. In order to successfully build a Project that has an associated test Project, it is necessary to build the Project, Build the associated test Project and then run (successfully) the tests defined in the test Project. Figure 3.2: Build Metamodel (Projects)
Implementation
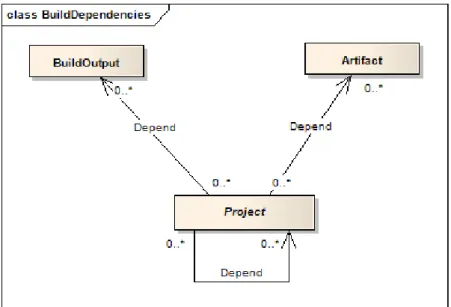
Another important aspect of the build metamodel is the dependency relation which is represented in Figure 3.3.
In the diagram there are three relations represented. The relation between BuildOutput and Project and the relation between Project and Artifact would be enough to define the dependencies between projects since if a Project depends on a BuildOutput/Artifact of another Project, that also implies that the first Project is dependent on the second Project. However, this would imply that all the dependencies to BuildOutput and Artifacts of the Projects from which the Project being modelled depends on had to be included in the model. When testing the tools in a real project, specifying the dependency with this level of detail (defining a dependency of a project to all the BuildOutputs/Artifacts of another Project that it depends on) was proven to be excessive. Besides that, the usefullness of the documentation provided by the model decreases, since it becomes too detailed. On top of that, whenever the BuildOutputs and Artifacts of a project changes, the build model has to be updated, increasing the possibilities of the model to become outdated and stop being used. In order to simplify the model and still provide enough information to generate the code, a Project to Project relation was introduced. 3.1.1.3 Build Tasks and Properties In order to add flexibility to the build process, it was created the concept of the BuildTask. A BuildTask is an action that can be associated with the build of a Project or a ProjectGroup. As shown in Figure 3.4, a Project or a ProjectGroup can be associated with
Implementation multiple build tasks that might have to be executed before or after the build of the Project or ProjectGroup. The BuildTask's associated with ProjectGroup are the tasks that must be executed in order to complete the build of the whole project (ProjectGroup) and are only ran if an order to build the whole ProjectGroup is given to the build script. The BuildTask's associated with Project's are the tasks that need to be ran in order to the project to be considered built. It is possible to have a BuildTask associated with more than one Project/ProjectGroup, altought it will be ran only once in each execution of the build script. It is also important to notice that there are four associations between the BuildTask and Project/ProjectGroup, because some tasks may need to be executed before the build of the Project/ProjectGroup and others must be executed after the build process. Another class in the metamodel that allows the customization of the build process is the Property class. This class allows the definition of variables (in the build script) that can be changed during runtime, or defined when the build script is started. A Property can be associated with a Project, a ProjectGroup or a BuildTask. Altough these properties are accessible from any part of the build script regardless of the element type they are associated with, this association allows the code generators to generate better name variables (like, for instance, <name of the project>.<name of the subproject>.<name of the property>) in order to avoid name collisions and to comply with build scripts' best practices. Another advantage of this type of association is the fact that it improves the value of the model as a documentation artifact.
Implementation A Property can also be used inside the model to define some attributes of a model element like, for instance, a file path (or part of it), CVSRoot or the default value of an InstallerProperty.
3.1.2 Deployment Metamodel
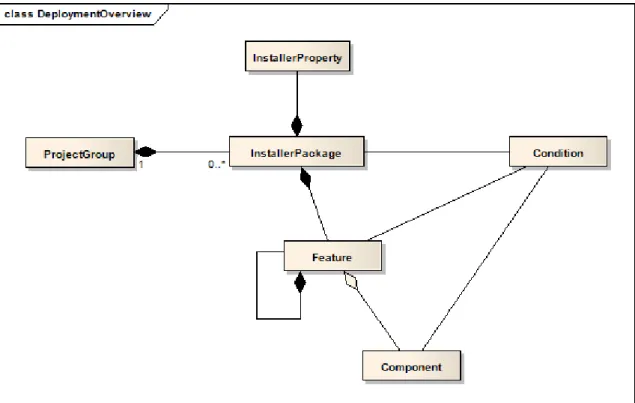
3.1.2.1 Overview The generation of a package or set of packages suitable for deployment of a complex project involve a set of tasks and entities. The inputs for this process are not only the outputs from the buid process, but also third party components, registry keys and values, system checks (for compatibility or dependencies), configuration files among others. Figure 3.5 presents an overview of the deployment metamodel created to deal with those issues.As presented in Figure 3.5, each ProjecGroup can have multiple installer packages. It is important to notice that the number of installer packages in a project (ProjectGroup) have no relation with the number or of subprojects (Project). An InstallerPackage can use files from one or multiple subprojects and the files from a subproject can be used by multiple InstallerPackages.
The InstallerPackage is organized in Feature's. Each feature can contain other features and components. As described by Figure 3.5, the relation between a feature and the component is an aggregation (and not a composition) because it is possible to have a component present in
Implementation several features at the same time (for example, if two features require the same component to work properly and one of the feature is not a subfeature of the other – which means that is possible to have only one of the features installed without the other). Windows Installer allows the definition of properties that can modify the way an installer package is installed on the target system. Those packages are represented in the metamodel by the InstallerProperty class. Another way to change the way an InstallerPackage is installed on the system is through the use of Conditions. A condition can be applied on a Feature or a Component so that it is only installed if the Condition result is true. There is also an association defined between the Condition and the InstallerPackage. This association allows the definition of launch conditions for the InstallerPackage, meaning that, if the conditions associated with the InstallerPackage are not met, the installation will not be allowed. 3.1.2.2 Deployment components Figure 3.6 presents a detailed view of the Component class and the associated classes.
Implementation
Each component can be responsible for several actions in the target computer (for example, install files, registry keys or windows services). Considering the fact that the code generation tools and the metamodel cannot support all the possibilities available for the components, only the most commonly used features were implemented. If more advanced features are required it is possible to supress the code generation for the component, allowing a custom implementation through the extension mechanisms of the generated (deployment) code.
4 Conclusions and Future Work
It is possible to state that the goals of the project were acomplished, considering the fact that the developed tool not only generates build and deployment code suitable to build and deploy simple projects without requiring (manual) implementation of any custom code, but also supports more complex projects through the generated code's extension mechanisms. Despite being a prototype, the tool allowed the definition of an existing project (YODA project) and the generated code (and the code developed to extend it) allowed it's build and deploy.4.1 Future Work
As future work, we intend to improve the usability of the developed prototype. Although the tool can be considered usable, there are a few details that are not acceptable in a production tool: ● It is not possible to create a deployment model from the build metamodel, it is necessary to manually create a deployment model in the Visual Studio Project. ● There are properties that have to be defined in a textual notation. An easyer way (probably trough a GUI) to define them would make the tool much more usable.References
[BTMR] http://msdn.microsoft.com/enus/library/0k6kkbsd.aspx .
[BTNM] http://msdn.microsoft.com/enus/library/dd9y37ha(VS.80).aspx .
[CCMB] Sayed Y. Hashimi, Sayed Ibrahim Hashimi. Deploying .NET Applications:
Learning MSBuild and ClickOnce, Chapter 1, Apress, 2008. [DTAI] http://www.advancedinstaller.com/java.html . [DTMF] http://www.indigorose.com/msifactory/featuresmsifactory/ . [DTTE] http://www.tarma.com/products/tin/index.htm . [DTWI] http://eval.symantec.com/mktginfo/enterprise/fact_sheets/b datasheet_wise_installation_studio.pdf . [EDNC] Marc Holmes, Expert .NET Delivery Using NAnt and CruiseControl.NET, Chapter 2, Apress, 2005. [MCTG] http://msdn.microsoft.com/enus/library/aa368047(VS.85).aspx . [MSVSDb] http://msdn.microsoft.com/enus/library/k1c6kd46.aspx . [MSVSFt] http://msdn.microsoft.com/enus/library/s3a0ddk6.aspx . [MSVSIC] http://msdn.microsoft.com/enus/library/e7e70ac3.aspx . [MSVSIm] http://msdn.microsoft.com/enus/library/ecaca8zb.aspx . [MSVSLc] http://msdn.microsoft.com/enus/library/ay12wede.aspx . [MSVSRe] http://msdn.microsoft.com/enus/library/w4dsy50b.aspx . [WI1] Phil Wilson. The Definitive Guide to Windows Installer, Chapter 1, Apress, 2004. [WI5] Phil Wilson. The Definitive Guide to Windows Installer, Chapter 5, Apress , 2004. [DTIA] www.installaware.com .