José Miguel Morais Morgado
Minium Recorder
Browser interaction recording
Master dissertation
Master Degree in Computing Engineering
Dissertation supervised by
José Francisco Creissac Campos
A
BSTRACT
Minium is a framework for automating testing of web applications. It provides an API for automating tests that combines the capabilities of the Selenium WebDriver API for automating interactions with the browser with the convenience of the jQuery API for identifying web elements.
The goal of this dissertation was to develop a plugin for Minium that could generate automation scripts by recording user interactions with the browser. The main requirement was that it should be capable of generating a list of expressions, ordered by ease of understandability, to identify each of the elements upon which an interaction is performed.
Prior to the development of the solution, a research work was conducted. This research work focused on the study of the algorithms for generating expressions to identify web elements and of the techniques and tools for recording interactions with web pages.
The developed solution, which will be described in detail, was tested in some web applications with good results.
Keywords: browser interaction recording, web elements identification, web applications testing, test automation, Minium
R
ESUMO
O Minium é uma ferramenta para automatizar testes de aplicações web. Esta ferramenta disponibiliza uma API que combina as capacidades da API do Selenium WebDriver para automatizar interações com o browser com a conveniência da API do jQuery para identificar elementos em páginas web.
O objetivo desta dissertação era desenvolver um plugin para o Minium que fosse capaz de gerar scripts de automação a partir do registo das interações de um utilizador com o browser. O principal requisito era que fosse capaz gerar uma lista de expressões, ordenada por facilidade de compreensibilidade, para identificar cada um dos elementos sobre os quais uma interação é realizada.
Antes do desenvolvimento da solução, foi realizado um trabalho de pesquisa que se focou no estudo dos algoritmos de geração de expressões para identificar elementos e sobre as técnicas e ferramentas existentes para registo de interações com páginas web.
A solução desenvolvida, que será descrita em detalhe, foi testada em algumas aplicações web com bons resultados.
Palavras-Chave: registo de interações com o browser, identificação de elementos web, teste de aplicações web, automatização de testes, Minium
TABLE OF CONTENTS Abstract ... iii Resumo ... v List of figures ... ix List of tables ... xi Glossary ... xii 1. Introduction ... 1 1.1 Context ... 1 1.2 Motivation ... 2 1.3 Goals ... 3
1.4 Structure of the document ... 3
2. Minium ... 5
2.1 Testing web applications ... 6
2.2 Overview ... 8
2.3 Test automation API ... 11
2.4 Conclusions ... 16
3. Generation of expressions to identify web elements ... 17
3.1 Algorithm for generating expressions ... 18
3.2 Optimization of expressions ... 20
3.3 Discussion and conclusions ... 21
4. Interaction recording ... 22
4.1 Capturing DOM events ... 22
4.1.1 The DOM Event Model ... 22
4.1.2 A technique for capturing DOM events ... 24
4.2 Challenges ... 24
4.3 Tools ... 25
4.3.1 Selenium Builder ... 26
4.3.2 DoDOM ... 27
4.4 Discussion and conclusions ... 28
5. The developed solution ... 30
5.2 Architecture ... 33
5.3 Generation of expressions ... 35
5.3.1 The module’s design ... 35
5.3.2 Algorithm ... 36
5.3.3 Sorting expressions by ease of understandability ... 38
5.4 Discussion and conclusions ... 40
6. Experimental analysis ... 42
6.1 Facebook ... 42
6.2 Twitter ... 44
6.3 Discussion and conclusions ... 47
7. Conclusion ... 48
7.1 Achieved goals and limitations ... 48
7.2 Future work ... 48
References ... 50
Appendix I – Usage examples of Minium Recorder ... 54
L
IST OF FIGURES
Figure 1 - Architecture of a web application (source: [15]) ... 6
Figure 2 - Test pyramid ... 7
Figure 3 – Minium Developer: test scenarios ... 9
Figure 4 – Minium Developer: step definitions ... 9
Figure 5 - Minium Developer: running a test scenario in Chrome ... 10
Figure 6 - Minium Manager: overview of the test results ... 10
Figure 7 - Minium Manager: results of a test scenario ... 11
Figure 8 – Generation of a CSS selector (base image’s source: [22]) ... 20
Figure 9 – DOM event flow (source: [25]) ... 23
Figure 10 - Selenium Builder ... 26
Figure 11 - Selenium Builder: editing the expression that identifies an element ... 26
Figure 12 - Selenium Builder: enabling the recording of “mouse over” interactions ... 27
Figure 13 – DoDOM’s architecture (adapted from [27]) ... 28
Figure 14 – Launching Chrome through Minium Developer with Minium Recorder included ... 30
Figure 15 - Minium Recorder ... 31
Figure 16 - Minium Recorder recording user interactions ... 31
Figure 17 - Choosing an alternative expression in Minium Recorder ... 32
Figure 18 - Importing recorded scripts in Minium Developer ... 33
Figure 19 - Minium Recorder's architecture ... 34
Figure 20 - Architecture of the module responsible for generating expressions ... 35
Figure 21 - Algorithm for generating expressions ... 37
Figure 22 - Minium Recorder identifying elements in a Facebook page ... 43
Figure 23 - Alternative expressions generated by Minium Recorder (Facebook) ... 44
Figure 24 - Minium Recorder identifying elements in a Twitter profile page ... 45
L
IST OF TABLES
Table 1 – Pseudo-classes supported by the Minium API ... 12
Table 2 – Methods for transforming a set of elements implemented by the Minium API ... 14
Table 3 - Interaction methods available in the Minium API ... 16
Table 4 - Calculation of the expressions' weights (Facebook) ... 44
G
LOSSARY
API – Application Programming Interface CSS – Cascading Style Sheets
DOM – Document Object Model DSL - Domain Specific Language GUI – Graphical User Interface
HTML - Hyper Text Markup Language IDE - Integrated Development Environment JS - JavaScript
JSON – JavaScript Object Notation SUT – System Under Test
URL - Uniform Resource Locator XUL - XML User Interface Language
1. I
NTRODUCTION
1.1 Context
Throughout the last decades we have witnessed a great amount of technological progress. Most of this progress has been possible only because of the appearance of computers, controlled by software. Nowadays, software is everywhere: in smartphones, cars, medical devices, drones, and so on. As a consequence of this strong dependency of ours on software, and as history has shown us, software defects can have a tremendous impact in terms of economic and social costs. For example, in 1995 Intel spent around 475 million dollars due to the floating point unit bug that affected the early Pentium processors [1]; and, between 1985 and 1987, the Therac-25 medical linear accelerator gave massive overdoses of radiation to six patients, resulting in serious injuries and deaths [2]. That being so, we have become aware of the importance of establishing quality metrics and practices to enable us to assure the quality of software.
In 1991, the ISO/IEC 9126 Software engineering — Product quality [3] was issued as a standard to evaluate the quality of software. According to that standard, the quality of software should be evaluated based on six sets of characteristics: functionality, reliability, usability, efficiency, maintainability and portability. Meanwhile, the ISO/IEC 9126 has been replaced by the ISO/IEC 25010:2011 Systems and software engineering -- Systems and
software Quality Requirements and Evaluation (SQuaRE) -- System and software quality models [4], which added security and compatibility as main characteristics. These standards
can serve as a common agreement on the different types of requirements that shall be taken into account when we define the specification of a software system, which will support the quality assurance process.
One of the software engineering practices that contributes to the development of high-quality software is the use of testing techniques [5]. Testing consists of the dynamic verification that a program provides expected behaviors on a finite set of test cases, suitably selected from the usually infinite execution domain [6]. A test case is a specification of a set of inputs, execution conditions and expected outputs [7]. One can distinguish between different levels of testing, based on the purpose of the test: unit, integration and system (also known as end-to-end). A unit test tests a single component, an integration test tests several
components as a group and an end-to-end test tests the system as a whole. Tests should not be performed only after developing new features, but should be continuously conducted over time in order to guarantee that bugs are not introduced due to changes (regression testing).
In a typical commercial development organization, the cost of providing the assurance that a program will perform satisfactorily in terms of its functional and nonfunctional specifications via appropriate debugging, verification and testing activities can easily range from 50% to 75% of the total development cost [8]. Due to this high cost, most organizations have been moving away from a mainly manual testing process towards a more automated one, using techniques such as capture-replay or model-based testing.
1.2 Motivation
There are several commercial tools for automating test execution, but the same does not apply to test creation, since the complexity associated with the development of these is much higher (see, e.g., [9]). Minium1 fits in the first category, the creation of tests is still a completely manual task.
Minium is a framework for automating tests for web applications. The test specifications are written as scenarios, in natural language. Each test scenario consists of a sequence of steps, which are then implemented programmatically (programmable testing).
An alternative approach to programmable testing is capture-replay testing. This testing technique relies on interaction recording tools to generate the test automation scripts (e.g., [10]). Which one is preferable depends on the circumstances. In the long term, the cumulative cost of capture-replay testing might tend to become higher than the cost of programmable testing, due to the usually lower maintenance cost involved in the latter [11]. That happens when tests are well designed, in a way that promotes reusability and reduces the test evolution effort. Such design is typically achieved through the adoption of the page object pattern [12]. However, the lower effort required to create tests using capture-replay testing makes it a viable option to reduce the costs associated with testing in projects with tight time and money constraints [13]. Another advantage is that no special programming skills are required to write automated tests.
Due to their potential advantages, the lack of capture-replay capabilities is seen as a current limitation of Minium and the goal of this dissertation is to address it.
1.3 Goals
The objective of this thesis is to develop a plugin for Minium that records interactions with a browser and generates a Minium automation script containing the instructions that replicate that behavior.
In the case of an interaction with a web element, a Minium instruction consists of two parts: an expression that identifies the target element of the interaction, which returns a reference to an object representing that element, and a call to the method that corresponds to the interaction (e.g., a click). The expressions are formed from a combination of filtering methods provided by the Minium API that take into account the properties of the element and its relations with other elements. Typically, there is more than one possible expression for identifying an element and one of the requirements is that a list of alternative expressions must be generated for each interaction, so that the tester can choose the best expression for each element. By default, the list must be, as approximately as possible, ordered by how easy it is to associate the expression with the corresponding element. The last functional requirement is that the recorder must be able to handle page reloads and redirects, without losing the state of the script recorded until then.
In terms of non-functional requirements, the logic responsible for generating the expressions shall be isolated in one module and its architecture shall have a degree of modularity that allows to easily change the filters that must be used to form the expressions and the formula for calculating the weight of an expression (i.e., the metric used for ordering the expressions).
1.4 Structure of the document
The rest of this document consists of the following chapters:
2. Minium starts with an overview of Minium and then describes in detail its API for identifying elements in a web page and interacting with them.
3. Identification of web elements presents a commonly used algorithm for generating expressions that identify elements in a web page, based on the hierarchical relationships of the nodes in the DOM tree.
4. Interaction recording describes the event model implemented by browsers, a technique for capturing DOM events and some of the challenges that commonly arise
when trying to record automation scripts. Closes with the analysis of some existing interaction recording tools.
5. The developed solution presents the developed plugin for Minium and describes the developed algorithm for generating multiple expressions for a web element.
6. Experimental analysis tests the solution in some existing websites and checks that it meets the requirements.
2. M
INIUM
Minium was originally created in 2011 as a Java library on top of Selenium WebDriver2, an API for automating web applications testing, with the purpose of enhancing it. The main goal was to improve the mechanisms supported by Selenium WebDriver for locating elements in a web page by replacing them with the jQuery3 API. jQuery is a widely used JavaScript library that can simplify the task of identifying web elements. It allows the usage of CSS selectors in conjunction with several useful methods, which can be chained together, for filtering/traversing the DOM tree. The term “DOM tree” refers to the tree-like representation of a HTML document defined by the Document Object Model (DOM) specification [14]. The DOM is an API which allows us to access and manipulate the elements of a web page. Another important advantage of jQuery is that it works across most browsers.
By that time, the WebDriver support for CSS selectors was very poor under most browsers. At first, the developers tried to replicate the jQuery API using WebDriver API calls. This approach was very inefficient, because it required a communication to be established with the browser for each method in a chain. So, a different approach needed to be adopted. The solution was to instead obtain the element references by sending JavaScript instructions to the browser through Selenium WebDriver. This was how Minium managed to combine the capabilities of Selenium WebDriver with the capabilities of jQuery into a single API.
But Minium also brought other improvements over Selenium WebDriver. Sometimes, the dynamic nature of modern web applications’ interfaces can be a source of troubles for
Selenium WebDriver. It may lead to exceptions like
StaleElementReferenceException4, which is caused by modifications in the
HTML code of the page between the time of getting a reference to an element and the time when an action is performed upon that element. Unlike Selenium WebDriver, the Minium API is lazy, meaning that it only evaluates the JavaScript code for obtaining the reference to an element when it needs to interact with it. By performing the two operations almost atomically, the probability of getting such exception is substantially reduced.
Since those early days, Minium has evolved a lot. This chapter is dedicated to present Minium as it is today. It starts by presenting the particulars of testing web applications, in
2 http://www.seleniumhq.org/projects/webdriver/ [Accessed June 2016] 3 http://jquery.com/ [Accessed June 2016]
order to understand the role played by Minium in the testing process. The second section presents the different components that constitute Minium, Minium Developer and Minium Manager, and how they work together in the same testing workflow process. The last section is dedicated to explore the Minium API for automating interactions with a web page.
2.1 Testing web applications
Today’s web applications may consist of a large number of interconnected components and be accessed through a wide range of devices. Therefore, testing modern web applications can be a complex and expensive task. In Figure 1 we can see an example of a common architecture. It is structured in three tiers: the presentation tier provides the graphical user interface, the business layer models the business processes and the data layer stores the data used by the application.
Figure 1 - Architecture of a web application (source: [15])
Web applications with such a large number of interdependent components will also have, inevitably, more points of failure which must be taken into account when designing a test approach. Particularly, we have to be aware of the large and varied user base. We have to keep in mind that our web application will be used by users with different skills, which might use different web browsers, operating systems and devices. Another significant challenge is setting up a test environment that properly simulates the production environment. Doing it
involves considerable costs in terms of hardware and labor time not only in the beginning but also in the long term to keep the setup consistent with future versions of the application. In each of the layers that compose a web application, there are many other testing challenges that need to be handled: testing the system performance, testing the data integrity, etc.
In order to establish a testing strategy and design the tests, we need to have a specification that describes the expected functionality and performance of the system. Once we have a well-defined specification, we can start to think about the different types of tests that need to be performed. As mentioned earlier, tests can be performed at different levels. A test suite should be constituted by tests at each of those levels because they serve different purposes, being complementary between them. The pyramid in Figure 2 illustrates the relation between the amount of tests that should be performed at each level [16]. Most automated tests should be unit tests, followed by a lower amount of tests for the service layer and an even lower amount of tests for the GUI. This means that the number of tests should be inversely proportional to their granularity. On one end, we have, at the base of the pyramid, unit tests, which allow to easily detect the source of an error and are easier to create. On the other end, at the top of the pyramid, we have tests that run end-to-end through the GUI, which can detect more errors but creating them is not so easy and takes more time. In the case of a three-tier architecture, this GUI-level tests would include not only the end-to-end tests but also the tests for the presentation layer; the tests for the service layer would include the tests for the interfaces exposed by the components that are part of both the business and data layers.
Figure 2 - Test pyramid 5
2.2 Overview
Minium is a framework for automated testing of web applications. More specifically, it is targeted at automating the tests at the top layer of the pyramid represented in Figure 2, at the GUI-level. The test specifications are written as scenarios, using the Gherkin6 language. Each scenario consists of series of steps, written in natural language. Each step starts with a keyword, depending on its type: Given steps are used to describe the initial state of the system, When steps are used to describe actions performed on the GUI and Then steps are used to describe an expected outcome.
A Minium project contains the test scenarios relative to a single system under test (SUT) and all the resources needed to run them automatically. Minium projects can be created and edited using a dedicated IDE, Minium Developer. They consist of the following types of files:
Feature files contain the test scenarios, grouped by feature.
Step files contain the JavaScript code that automate the steps that compose the test scenarios.
Modules are used to encapsulate code that can then be reused in different step files (e.g., page objects).
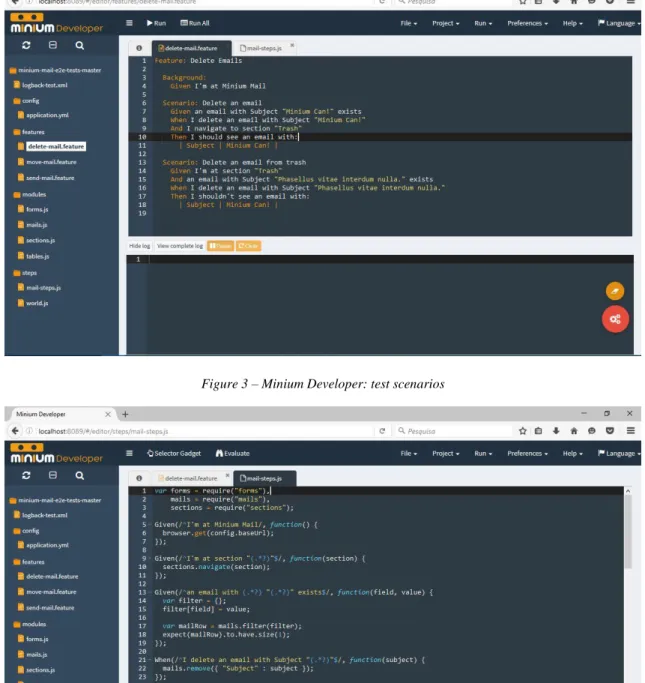
Configuration files are used to define global configuration properties.
Figure 3 shows an example of a feature file containing test scenarios for a web-based email client. The scenarios aim to test if the application behaves correctly when a user deletes an email. In Figure 4 we can see the implementation of some of their steps. The API for simulating user actions will be presented in the next section. In the definition of the step
Given I’m at Minium Mail (lines 5-7), which instructs the browser to navigate to a page, we
can see a global configuration property being used, config.baseUrl, the base URL of the SUT. In the same figure is also possible to see usage examples of modules. They are assigned to variables in the first three lines. The mails module provides an interface to interact with the mailbox. It is used, for example, in the definition of the step that deletes an email with a given subject (line 22).
Figure 3 – Minium Developer: test scenarios
Figure 4 – Minium Developer: step definitions
While editing test scenarios or steps, we can test them against one of the available browsers (at the present time, Chrome, Firefox and Internet Explorer are supported). In case we are creating a scenario, we can execute its steps and verify at runtime which ones succeed or fail (see Figure 5). When we are editing a step, we can evaluate any piece of code to check that it is correct. For example, we can test which elements are matched by an expression or if an instruction performs the desired action.
Figure 5 - Minium Developer: running a test scenario in Chrome
Once we have created a project in Minium Developer, we can use Minium Manager to execute the respective tests and obtain detailed reports. An execution can be triggered explicitly, triggered implicitly (e.g., when code is pushed to a repository) or scheduled to run on a regular basis. After an execution, the results of the tests can also be visualized through the web interface of Minium Manager. We can see the overall results of an execution of the tests for the email client in Figure 6 and the results for a specific scenario in Figure 7. Minium Manager keeps an history of the previous test executions, so that we can find out when and which changes introduced regressions.
Figure 7 - Minium Manager: results of a test scenario
2.3 Test automation API
The Minium API for automating tests allows us to simulate different types of interactions with the browser. We can, for example, program the browser to navigate to an URL or to resize its window. But most of the instructions that compose test scripts are interactions with web elements, like clicking or filling a text input field. These instructions have two parts: the first one is an expression that identifies the target element and the second is a call to a method that performs the intended interaction.
A Minium expression that selects elements in a web page is based on jQuery. In jQuery, expressions are formed by a sequence of chained filtering methods. Each method takes the previous selection and produces a new selection either by traversing the document tree from the elements contained in that selection or by applying a filtering function. The initial selection is obtained through the jQuery(selector) function (or, alternatively, just $(selector)), which returns the set of elements that match a given CSS selector. Selectors are patterns that can be used to select elements nodes in a HTML document [17]. They consist of a chain of one or more sequences of simple selectors separated by
combinators. Conversely, a sequence of simple selectors is a chain of simple selectors that are
not separated by a combinator. The following simple selectors exist:
Universal selector: selects all the elements in a web page and is written with an asterisk (*).
Type selector: selects the elements with a given HTML tag. For example, $(“div”) selects all the elements with the div tag.
Attribute selector: selects elements based on an attribute and the corresponding value. To select the elements with an att attribute, we can use one of four variants: [att] ignores the value of the attribute; [att=val] represents the elements whose value is exactly val; [att~=val] represents the elements whose value is a whitespace-separated list of words, one of which is exactly val; [att|=val] represents the elements whose value is either exactly val or val immediately followed by a hyphen.
Class selector: allows to use the “period” notation as an alternative to the ~= notation when representing the class attribute. For instance, $(“.nav”) and $(“[class~=’nav’]”) return the same set of elements.
ID selector: selects an element by its ID attribute, which is supposed to be unique in the page. It is written as a “number sign” immediately followed by the ID value (e.g., $(“#searchBtn”) selects the element with the ID searchBtn).
Pseudo-class: selects elements based on information that lies outside of the document tree or that cannot be expressed using the other simple selectors. A pseudo-class always consists of a "colon" (:) followed by the name of the pseudo-class. Table 1 lists some of the pseudo-classes supported by Minium.
A sequence of simple selectors must start with a type selector or universal selector. $(“input:text#someId[someAttribute].someClass”) is an example of an expression that filters elements using a sequence of simple selectors.
Table 1 – Pseudo-classes supported by the Minium API
Pattern Elements selected From jQuery7
:button Selects all button elements and elements of type button. :checkbox Selects all elements of type checkbox.
:file Selects all elements of type file.
:header Selects all elements that are headers, like h1, h2, h3 and so on. :image Selects all elements of type image.
:input Selects all input, textarea, select and button elements.
:password Selects all elements of type password. :radio Selects all elements of type radio. :reset Selects all elements of type reset. :submit Selects all elements of type submit. From the CSS selectors specification
:root Selects the root of the document. :nth-child(n) Selects the n-th child of its parent. :nth-of-type(n) Selects the n-th sibling of its type. :link
Selects all elements being the source anchor of a hyperlink of which the target is not yet visited.
:enabled
:disabled Selects all user interface elements which are enabled or disabled. :checked
Selects all user interface elements which are checked (for instance a radio-button or checkbox).
More complex selectors can be built from sequences of simple selectors using the following combinators:
Descendant combinator: describes an element that is descendant of another element in the document tree and is represented by a whitespace. For example, $(“form input”) selects all input elements that are descendants of a form element.
Child combinator: describes an element that is a child of another element and is represented by the “greater-than sign” character. For example, $(“body > p”) selects all p elements that are a child of the body element.
Adjacent sibling combinator: describes an element in relation to the sibling that immediately precedes it and is represented using the “plus sign” character. For example, $(“label + input”) selects all input elements that immediately follow label elements.
General sibling combinator: describes an element in relation to one of the siblings that precede it and is represented by the “tilde” character. For example, $(“md-1 ~ md-2”) selects all the elements with class .col-md-2 that follow an element with class .col-md-1.
If filtering elements using a selector is not enough to obtain the desired set of elements, we can further reduce the selection by chaining other traversing and filtering methods. Apart from the methods from the jQuery API, the Minium API also provides some additional ones8. Table 2 lists some of the most used. Besides allowing to obtain a subset of elements, these methods are also useful for building more descriptive expressions, that make it easier to associate them with the corresponding elements. Sometimes the selectors are not easy to understand, especially when they are long. In those cases, it is usually preferable to simplify the selector and use filtering methods.
Table 2 – Methods for transforming a set of elements implemented by the Minium API
Method Description
From jQuery9
eq(index) Reduce the set of matched elements to the one at the specified index.
find() Get the descendants of each element in the current set of matched elements, filtered by a selector, jQuery object, or element.
not() Remove elements from the set of matched elements.
Extensions to jQuery
above(element) Reduce the set of matched elements to those that are above the specified element.
below(element) Reduce the set of matched elements to those that are below the specified element.
containingText(text) Reduce the set of matched elements to those whose text contains the specified text as a substring.
leftOf(element) Reduce the set of matched elements to those that are at the left of the specified element.
overlaps(element) Reduce the set of matched elements to those that overlap the specified element.
rightOf(element) Reduce the set of matched elements to those that are at
8 http://minium.vilt.io/docs/core/api/web-elements/ [Accessed July 2016] 9 https://api.jquery.com/category/traversing/ [Accessed July 2016]
the right of the specified element.
visible() Reduce the set of matched elements to those that are visible.
withAttr(name, value) Reduce the set of matched elements to those that have the specified attribute and value.
withLabel(label) Reduce the set of matched elements to those that have a label with the specified text.
withName(name) Reduce the set of matched elements to those that have a
name attribute with the specified value.
withProp(name) Reduce the set of matched elements to those that have the specified property.
withText(text) Reduce the set of matched elements to those that have the specified text.
withValue(value) Reduce the set of matched elements to those that have a
value attribute with the specified value.
Once we have narrowed down a selection to a set that contains just the intended element, we can perform actions on it by adding a call to one of the interaction methods that are capable of simulating user input, from both the mouse and the keyboard, including all those defined in the WebDriver API specification [18] . Table 3 lists some of the most used10.
Most of these are convenience methods built on top of other lower-level commands. For example, an instruction that uses the select method to select an option from a drop-down list could actually be split into two different instructions, one that performs a click to display the list and another that performs a click on the option to select. Just like the extension methods for selecting elements, these convenience methods also bring the added benefit of building instructions that are easier to understand.
Table 3 - Interaction methods available in the Minium API
Method Description
From Selenium WebDriver11
click() Clicks in the middle of the first matched element.
contextClick() Performs a context-click at middle of the first matched element.
doubleClick() Performs a double-click at middle of the first matched element.
dragAndDrop(target) A convenience method that performs click-and-hold at the location of the first matched source element, moves to the location of the first matched target element, then releases the mouse.
moveTo() Moves the mouse to the middle of the first matched element. Extensions to Selenium WebDriver
check() uncheck()
Checks/unchecks the corresponding input field. fill(text) Fills the text input field with the given text.
select(text) Selects the option with the corresponding text in a drop-down list.
2.4 Conclusions
This chapter was dedicated to present Minium, in order to provide the required background to better understand the problem addressed in this thesis and the choices made in the design of the developed solution. Since the solution aims to assist in the test creation process, we can conclude that its integration in Minium has to be done through Minium Developer, in a way that allows to easily import the recorded scripts into the definitions of the steps that compose the test scenarios. We also became familiar with the test automation API, so that we now know the different available methods to build expressions for identifying web elements (including the ones that extend both the jQuery API and the WebDriver API and that can help to improve the understandability of the instructions) and to perform interactions with them.
11 https://seleniumhq.github.io/selenium/docs/api/java/org/openqa/selenium/interactions/Actions.html [Accessed
3. G
ENERATION OF EXPRESSIONS TO IDENTIFY WEB
ELEMENTS
The problem of identifying elements in a web page has been studied before in different research fields, like web automation, and different types of techniques have been developed to address it, such as image recognition [19], machine learning [20] [21] and expression-based approaches. As seen in the last chapter, the technique currently supported by Minium for identifying web elements fits in the last category.
Algorithms for generating expressions to identify web elements can be found in open source projects as well as academic papers. Some of those algorithms have been analyzed12, 13, 14 [22]. The analysis has not been restricted only to algorithms that generate CSS selectors, algorithms that generate XPath [23] expressions also have been considered. Conceptually, XPath expressions and CSS selectors are identical: both select DOM elements by filtering them based on their properties and on their hierarchical relationships with other elements. So, the same reasoning that is used to generate XPath expression can be, in most cases, applied to generate CSS selectors, with very few exceptions. For example, unlike CSS selectors, XPath expressions can select elements based on their text.
A trivial way for obtaining a valid expression would be to just generate an expression containing the whole path from the element up to the root of the DOM tree, where each element is identified using the nth-child selector (e.g., html > body > :nth-child(1) > :nth-child(3) > :nth-child(2)) [24]. This can lead to very long expressions that can easily break due to a change in one of the elements that are part of the path. Instead, we can, as the analyzed algorithms, try to generate less specific expressions, which are more resilient to changes in the page [22]. It was noticed that the logic behind those algorithms is in its essence the same and that there are only minor differences between them. From this observation, a generic description of an algorithm to generate expressions was defined. It will be detailed in the first section of this chapter. In the second section will be presented some heuristics that can be used to optimize the generated expressions.
12 https://raw.githubusercontent.com/fczbkk/css-selector-generator/master/src/css-selector-generator.coffee
[Accessed September 2016]
13 https://raw.githubusercontent.com/Autarc/optimal-select/master/src/select.js [Accessed September 2016] 14 https://raw.githubusercontent.com/ngs/jquery-selectorator/master/src/selectorator.coffee [Accessed September
3.1 Algorithm for generating expressions
To generate an expression as less specific as possible, we start by attempting to identify the element according to its properties. When they do not uniquely identify the element, then its ancestors are recursively used to form more complex expressions. We stop when an expression selects only the target element.
Throughout the execution of the algorithm, we need to keep track of three variables: a reference to the element currently being evaluated (Elem), a string containing an expression that identifies the element referenced by Elem (SubExpr) and a string containing the current value of the expression that will be returned (Expr). Given a target element as parameter, the following steps are executed:
1) Initialize the variables: Expr is initially an empty string and Elem references the target element, received as parameter.
2) Set the value of SubExpr to an expression that produces the minimal set of elements where all of its elements contain a subset of the properties of the element referenced by Elem.
3) If SubExpr also identifies at least one of the siblings of the element referenced by
Elem, replace the value of SubExpr with an expression that identifies it as the nth
child of its parent.
4) Use the value of SubExpr to update Expr:
1) If Expr is empty, it takes the value of SubExpr.
2) Else, Expr gets the value that results from combining Expr with SubExpr in a way that expresses the parenting relation between the element referenced by Elem and the element referenced by Elem in the previous iteration. 5) If Expr does not select only the target element:
1) Change the Elem reference to point to the parent of the element referenced by Elem.
2) Go to step 2. 6) Return Expr.
This is an abstract description of the algorithm. There is some variance in the way in which some of the steps are implemented, mainly in step 2. In that step, most implementations start by checking if the element has an ID attribute because that attribute is supposed to have a value that is unique in the page. On the other hand, if the element does not have an ID attribute, the way of testing the possible combinations of the remaining intrinsic
properties of the element (text, attributes and tag) is usually more variable and is also where there is room for optimizing the performance of the algorithm. The performance may be improved if we start by evaluating the properties that contribute more to narrow the selection, by considering its estimated selectivity [22]. For instance, we may consider the name attribute highly selective for form elements and the href attribute highly selective for link elements. Regarding the other steps, there are differences in the steps that produce expressions (3 and 4), which depend on the language used to generate the expressions.
In order to better understand the algorithm, consider the example where the algorithm is used to find a CSS selector for the greyed element in the DOM tree depicted in Figure 8. Three iterations are required to generate an expression (the state of each iteration in Figure 8 corresponds to the state at the end of that iteration):
1) There are two elements in the DOM with the properties of the target element, so the minimal set contains those two elements. A sub-expression that produces that set is “.c1”, which does not select any of the (nonexistent) siblings of the element referenced by Elem. Expr is currently empty, so it takes the value of
SubExpr. Since Expr identifies two elements, Elem is set to point to the parent of
the element referenced by Elem and another iteration takes place.
2) There are two elements in the DOM with the properties of the element referenced by Elem, so the minimal set contains those two elements. A sub-expression that produces that set is “a”, which does not select any of the siblings of the element referenced by Elem. Expr is not empty, so we combine it with SubExpr using the child combinator (“a > .c1”). Since Expr identifies two elements, Elem is set to point to the parent of the element referenced by Elem and another iteration takes place.
3) The element referenced by Elem has an id attribute whose value is unique in the whole DOM, so SubExpr takes the value “#id1”. Expr is not empty, so we combine it with SubExpr using the child combinator (“#id1 > a > .c1”). Since Expr selects only the target element, it is returned.
Figure 8 – Generation of a CSS selector (base image’s source: [22])
3.2 Optimization of expressions
After generating an expression using the algorithm described in the previous section, it is possible to improve its resiliency, i.e., the likelihood of the expression staying valid after structural changes in the HTML code of the page. To do so, we try to find an equivalent expression that reduces the specificity of the sub-expressions and hierarchical relationships contained in it15 [10]. These heuristics are based on the assumption that a more generic expression has less probabilities of becoming invalid because it comprises less restrictions that can be broken by changes in the page.
To reduce the specificity of a sub-expression, we calculate the partial permutations of the properties used to select the corresponding element and choose the minimal set that keeps the expression valid. For example, if the expression contains a sub-expression “input[placeholder=’E-mail’]” and we find out that the expression remains valid if this sub-expression is replaced by “input[placeholder]”, then this new expression will not be affected if, for instance, the value of the placeholder attribute changes to Email.
The specificity of a hierarchal relationship can be reduced through the usage of
descendant relations in place of child relations. This may allow the expression to stay valid if
new elements are added between the parent and the child. For example, if the expression “.title > .article” can be replaced with “.title .article”, it will stay valid if, for instance, an element with class sub-title is added between the element with the class title and the element with the class article.
3.3 Discussion and conclusions
In this chapter has been presented an algorithm that generates expressions, as less specific as possible, to identify web elements. Less specific expressions have the advantage of being more resilient to changes in the page.
In order to generate several expressions, we need to generate and combine different possibilities for each of the sub-expressions. To do so, we check which properties the element identified by a sub-expression possesses and then generate expressions that filter elements through those properties, discarding the ones that also identify siblings of that element.
The presented algorithm can be used to generate valid expressions for Minium, but it does not cover all the possibilities. It does not take advantage of the methods available in the Minium API for filtering elements through the spatial relations between elements (e.g., select elements that are below a specific element), only taking into consideration the DOM hierarchical relations.
Through the research work there were also found heuristics for optimizing the quality of expressions, but only for improving their resiliency. Since the quality attribute that needs to be prioritized is the understandability, it means that new heuristics for improving and evaluating it need to be defined.
4. I
NTERACTION RECORDING
As noted before, in order to produce a script with the instructions that reproduce the actions performed by a user, we need to identify the elements with which the user interacted and the interactions themselves. In the previous chapter we have seen how to handle the first part. Now, we will see how we can intercept the DOM events triggered by the user actions and obtain the contextual information required to represent that interaction as an automated instruction. In this chapter will also be presented some of the challenges that may lead to the production of invalid scripts and some existing tools, with different architectures.
4.1 Capturing DOM events
In order to understand how we can capture DOM events, we need to first understand the event model implemented by browsers. The event model specifies a generic event system which allows registration of event handlers, describes event flow through the DOM tree, and provides basic contextual information for each event [25]. These concepts will be introduced in the first part of this section, before explaining the technique for capturing events.
4.1.1 The DOM Event Model
Every time a DOM event is fired, an event flow takes place. Event flow is the process through which an event originates and propagates through the DOM. When an event is triggered, the target element is not the only one which can react to the event. The ancestors of the target element may also be notified. This happens due to the event dispatch process, which comprises three phases (see Figure 9):
1) Capture phase. The event propagates from the Window and Document objects to the target’s parent element.
2) Target phase. The event is handed to the element that generated it.
3) Bubbling phase. The event object propagates through the target's ancestors in reverse order, going back from the target's parent element until reaching the Window object again.
Figure 9 – DOM event flow (source: [25])
Each element in the DOM can register event handler functions to be invoked when an event passes by. To do so, we need to call the addEventListener method on the element. This method takes three parameters: the type of event16, the event handler function, and a flag indicating if the handler shall be called during the capture phase (if the flag is true), or in the
bubble phase (if the flag is false). The event handler function receives a unique parameter, an
Event17 object containing the contextual information of the event. It can also be used to
cancel the event propagation and prevent the event from flowing further through its natural course.
16 https://developer.mozilla.org/en-US/docs/Web/Events [Accessed August 2016] 17 https://developer.mozilla.org/en-US/docs/Web/API/Event [Accessed August 2016]
4.1.2 A technique for capturing DOM events
In [24] a possible approach for logging DOM events is described. It consists in attaching capturing logging handlers to the Window object. Since the Window object is the highest ancestor in the DOM event hierarchy, the logging code is guaranteed to catch every event before it has an opportunity to be canceled by other nodes. Once an event is caught, the information needed to identify the interaction can be obtained from the Event object received as argument.
As an example, consider that we want to intercept clicks and generate Minium instructions that replicate them. To do it we would need to register an event listener on the Window object for the click event type: window.addEventListener(“click”, function(event) {…}, true). In the event handler function, we would obtain a reference to the target element, through the target18 property of the Event object, and generate an expression for it.
If we also want to record the interactions with the elements contained in frames [26], then the code that records the interactions has to be injected into each frame.
4.2 Challenges
Combining the technique presented in the previous section with the algorithm described in the previous chapter already allows us to develop the core logic of a solution for recording automation scripts. But there are some known issues that may arise and lead to the production of scripts containing invalid instructions. An instruction may fail to replicate the corresponding action because the target element19, 20:
Has a random id attribute. For an instruction representing an interaction with an element to be valid, the element needs to be identified through its persistent properties. Sometimes the id attribute of an element is not a persistent property, being different each time we access a page.
Is not yet visible, clickable or enabled. This may happen because the target element changes its state dynamically and the test execution does not wait for it to
18 https://developer.mozilla.org/en-US/docs/Web/API/Event/target [Accessed September 2016]
19
http://www.webperformance.com/load-testing/blog/real-browser-manual/building-a-testcase/how-locate-element-the-page/ [Accessed August 2016]
20 O. Rubin, “Why Building Record/Playback Tools Is So Hard,” Selenium Conf 2015. [Presentation]. Available:
attain the required state for interacting with it. For example, some form submit buttons only become clickable after validating all the values entered in the form fields. If this operation needs to perform server-side validations, it may take some time to complete. In case the script does not wait for the validations to finish, the button will not be clickable when it tries to perform the click.
Does not exist. Another action, which was not recorded, needs to happen on the page to trigger the creation of the element. A common case is clicking on an item in a menu that is only created when the mouse is moved over a certain element. When these problems arise, they have to be solved by the user. Some interaction recording tools provide assistance for dealing with these situations, as we will see in the next section.
4.3 Tools
A large number of capture-replay tools for web applications exists these days. These tools do not consist of just a JavaScript piece of code that intercepts events and logs them. They also comprise other components that are responsible for injecting that JavaScript code into every page loaded by the browser and persisting the state relative to the recorded interactions. A common way to implement a solution that fulfills these requirements is to take advantage of the extension mechanisms supported by browsers and develop a browser plugin. Considering the example of Chrome extensions, we can easily inject JavaScript modules into web pages through content scripts and maintain state through background pages21. Selenium IDE22, Selenium Builder23 and Testim24 are examples of tools implemented as browser plugins. Another possible, less common and more complex way to attain the same goals is to develop a proxy-based solution. The proxy is responsible for intercepting the browser requests and injecting the JavaScript code for recording the interactions into the web pages before forwarding them to the browser. This type of tool is more commonly found in academia. Mugshot [24], DoDOM [27] and UsaProxy [28] are some examples.
21 https://developer.chrome.com/extensions/overview#arch [Accessed August 2016] 22 http://www.seleniumhq.org/projects/ide/ [Accessed August 2016]
23 http://seleniumbuilder.github.io/se-builder/ [Accessed August 2016] 24 http://testim.io/ [Accessed August 2016]
4.3.1 Selenium Builder
Selenium Builder is an open source extension for Firefox that can record Selenium WebDriver automation scripts. Through its interface, we can edit the script before exporting it (Figure 10). This is useful for correcting eventual user mistakes during recording or to overcome some of the problems identified in the previous section. If an element has a random
id attribute, we can edit the corresponding expression or, when available, choose an
alternative expression (Figure 11). When the script is supposed to wait before attempting to interact with an element, we can add a step before that waits for the required pre-condition to become true. In case a step needs to be preceded of a movement of the mouse, we can either manually add such step or select a checkbox to indicate that the mouse over events shall be recorded (Figure 12).
Figure 10 - Selenium Builder
Figure 12 - Selenium Builder: enabling the recording of “mouse over” interactions
One particularity of this tool is that it provides some extension mechanisms. Through them, we can add new:
User interface elements. New user interface elements, and the corresponding behavior, can be created using HTML and JavaScript. This is one of the main reasons that lead to the development of Selenium Builder as an alternative to Selenium IDE. Selenium Builder is actually built on top of Selenium IDE but, unlike the latter, the extensions to its interface do not need be coded in XUL25. Script instructions. New actions, assertions and locator-strategies can be added
by providing a JavaScript file with their implementation.
Script exporters. To make Selenium Builder capable of exporting an automation script in a different language, all that we need to do is provide a file containing the syntax of that language.
4.3.2 DoDOM
The DoDOM tool, whose architecture is depicted in Figure 13, consists of two components: a JavaScript module (JS logger) and a proxy server. The proxy is written as a plugin in the Fiddler web application testing framework26. Its main purpose is to inject the JS logger code into every page loaded by the browser. The JS logger then registers the interactions performed by the user, composes a message with that information and sends it to the proxy, which records it.
25 https://developer.mozilla.org/en-US/docs/Mozilla/Tech/XUL [Accessed August 2016] 26 http://www.telerik.com/fiddler [Accessed August 2016]
Figure 13 – DoDOM’s architecture (adapted from [27])
4.4 Discussion and conclusions
In this chapter was presented a technique that allows us to record user interactions with a web page. With this information, implementing it is straightforward. We just need to identify the type of events that correspond to the interactions that we want to record, register event handlers for those events and obtain the contextual information from the Event object. In case we want to record the events that happen in frames, we also need to inject the code into each of the frames contained within the topmost page.
There are some known issues that may lead to the recording of invalid automation scripts. When these problems arise, they have to be solved by the user. But in some of those cases, we can help the user overcome them. One such case is when an element has a random
id attribute. If multiple expressions for an element are available, the user can choose an
alternative one which identifies the element through its persistent properties. Time-consuming operations may delay the responsiveness of the page to an extent that script is not prepared to deal with it. In Minium, these situations can be handled through the usage of interaction listeners27. Interaction listeners are global configurations that allows us to define extended expected waiting times for when the page meets a certain state. So, when recording an automation script for Minium, we may assume that it is not necessary to add explicit waiting instructions because those edge cases are supposed to be handled outside of the script’s scope.
The last problematic case is the absence of instructions corresponding to interactions that should have been recorded (usually, mouse over interactions) to put the page in the expected state for a subsequent instruction to be executed. Selenium Builder tries to help solve this problem by letting the user enable the recording of mouse over interactions. Although, this solution is hardly a satisfactory one because to reach the target element the mouse might need to move over a lot of elements, meaning that also a lot of unwanted mouse over instructions will be added to the script.
User interaction recording tools are commonly implemented as browser plugins. Although, there are also tools that are based on a proxy. The former have the advantage of being easier to develop, while the latter have the advantage of not requiring modifications to the web browser. We have seen an example of each type of tool. Selenium Builder, an extension to Firefox, provides extension mechanisms which could have been used to make it record and export Minium automation scripts. That option has been considered risky and was abandoned, in favor of developing a new solution from scratch. The documentation of Selenium Builder, including the part about the extensions mechanisms, is somewhat incomplete and outdated. Besides that, the project has currently just one active maintainer and has become a bit unstable since the beginning of this thesis. The project has been forked due to incompatibilities with the version 40 of Firefox28 and the toolset currently used by
Selenium Builder will be deprecated by 201729. Developing a new solution, specifically built
to suit our own needs, was considered a preferable option. The conducted research work provided the knowledge required to develop the code to identify web elements and to record interactions with web pages. To have a solution capable of fulfilling the requirements, all that was left was to find out how to inject that code into every page loaded by the browser and how to persist the state relative to the recorded interactions. Doing it, as we will see in the next chapter, was relatively easy.
28 https://github.com/SeleniumBuilder/selenium-builder [Accessed September 2016]
5. T
HE DEVELOPED SOLUTION
The developed solution in the context of this thesis is now part of Minium and has been given the name Minium Recorder30. This chapter starts by presenting its user interface and its features. The rest of the chapter provides a technical perspective of Minium Recorder. We will see the how its architecture is structured and take a closer look at the implementation of the module responsible for generating expressions.
5.1 User interface
Minium Recorder is an extension for the Chrome browser. It has been integrated in Minium Developer. Now, when an instance of Chrome is launched in Minium Developer, it comes with Minium Recorder included (Figure 14).
Figure 14 – Launching Chrome through Minium Developer with Minium Recorder included
Minium Recorder is available in the Developer Tools (DevTools for short) of Chrome31 (Figure 15). To start recording interactions, we need to click the button in the top-right corner. Next to it is a button to pause recording and an indicator of the current mode (paused/ recording).
30 http://minium.vilt.io/docs/recorder/user-manual/ [Accessed September 2016] 31 https://developer.chrome.com/devtools [Accessed August 2016]
Figure 15 - Minium Recorder
If we interact with the browser when the recording mode is active, instructions that replicate our actions are generated (Figure 16). Interactions with elements inside frames and popup windows are also recorded.
Next to each instruction, is a button to delete it. We can also delete the entire script by clicking in “erase script”. Currently, the following types of interactions are supported (Figure 16 shows an example of each one, in the same order):
Navigation to the URLs entered in the address bar of the browser. Filling of text input fields.
Selection of values from drop-down lists. Clicking in web elements.
When we click on an instruction, a list of alternative expressions is displayed (Figure 17). To select one of the alternative expressions, we just need to click on it.
Figure 17 - Choosing an alternative expression in Minium Recorder
The same script that appears in Minium Recorder is also always available in Minium Developer. It can be imported by right-clicking in the code editor, where we want to put the script, and choosing the option “Import recorded script” (Figure 18).
Figure 18 - Importing recorded scripts in Minium Developer
5.2 Architecture
As seen in the previous section, Minium Recorder is an extension to the DevTools of Chrome. An extension of this kind always has the following structure32:
Background page: is used to manage long-running tasks and maintain state throughout the lifetime of the extension.
Contents scripts: contain the code that is injected into every page (including, optionally, every frame) loaded by the browser.
DevTools page: manages the DevTools panel of the extension, its main purpose is to establish the communication between the user interface and the other components of the extension.
The architecture of Minium Recorder is diagrammed in Figure 19. A description of each component follows:
Interaction capturer: intercepts the events that are triggered when the user interacts with the web page and sends the information needed to identify the interaction to the Background page. In the case of an interaction with a web element, that information contains a list of expressions that identify the target element. The technique used to capture events is the one that was described in 4.1.2.
Generator of expressions: contains the logic for generating expressions. Exposes a method that takes a web element and returns a list of expressions that identify it. This module will be detailed in the next section.
Background page: manages the recorded script and provides an interface (RecorderController) whose methods correspond to the actions that can performed through the user interface (start recording, delete instructions, etc.). Every time the script changes, it sends the new script to the DevTools page, through the ScriptObserver interface, and to Minium Developer, through a HTTP request.
DevTools page: acts as a mediator between the User Interface and the Background page. When the user performs an action through the GUI, it forwards the corresponding request to the Background page, through the RecorderController interface. Conversely, when it receives an updated version of the script from the Background page, it forwards it to the User Interface. All the behavior of this component had to be programmed.
User Interface: is the GUI shown in the previous section, which displays the current script. It is coded in HTML and JavaScript, just like typical web pages.
5.3 Generation of expressions
Most of the requirements of the desired solution were related to the identification of the elements in the scripts: the logic for generating expressions should be isolated in one module and the user should have the possibility to choose, for each interaction with a web element, an expression from a list of alternatives, which should be approximately ordered by ease of understandability. In this section we will see how the developed solution was built in order to fulfill these requirements.
5.3.1 The module’s design
The logic for generating expressions is isolated in one module. Its core components are represented in Figure 20. Be aware that some of the concepts introduced in this subsection will only be completely understood in 5.3.2, where the algorithm for generating expressions is explained.
Figure 20 - Architecture of the module responsible for generating expressions
The GeneratorOfExpressions class is the façade of this module. Since it implements the Generator interface, it exposes one method which returns a list of expressions for a given element. It can also take, optionally, a list of expressions to be used as the base of the generated expressions (i.e., an initial selection that contains the element but needs to be reduced in order to identify it). This method does not contain all the logic for generating expressions. It depends on other implementations of the Generator interface for generating sub-parts of the expressions. The expressions are represented by an Expression object which stores a string with the expression and a float with the weight of the expression. The weight is the metric used for ordering the expressions.
![Figure 1 - Architecture of a web application (source: [15])](https://thumb-eu.123doks.com/thumbv2/123dok_br/17560932.817385/18.892.139.803.542.860/figure-architecture-web-application-source.webp)


![Figure 8 – Generation of a CSS selector (base image’s source: [22])](https://thumb-eu.123doks.com/thumbv2/123dok_br/17560932.817385/32.892.219.676.103.479/figure-generation-css-selector-base-image-s-source.webp)
![Figure 9 – DOM event flow (source: [25])](https://thumb-eu.123doks.com/thumbv2/123dok_br/17560932.817385/35.892.199.701.113.675/figure-dom-event-flow-source.webp)
