The far-lateral craniotomy: tips and tricks
A craniotomia extremo-lateral: dicas e truques
Feres Chaddad-Neto1,2,3, Hugo Leonardo Doria-Netto2,3,4, José Maria de Campos-Filho2,3, Mateus Reghin-Neto2,3, Albert L Rothon-Jr5, Evandro de Oliveira2,6
ABSTRACT
This article intends to describe in a didactical and practical manner the suboccipital far-lateral craniotomy. This is then basically a descriptive text, divided according to the main stages involved in this procedure, and that describes with details how the authors currently perform this craniotomy.
Keywords:neurosurgery, craniotomy, microsurgery, far-lateral approach.
RESUMO
O presente artigo visa descrever de forma didática e prática a realização da craniotomia suboccipital extremo-lateral. Trata-se, portanto, de um texto fundamentalmente descritivo, dividido conforme as principais etapas da realização dessa craniotomia, e que descreve com detalhes a técnica com que o presente grupo de autores evolutivamente veio a realizá-la.
Palavras-chave:neurocirurgia, craniotomia, extremo-lateral, microcirurgia.
Approaching lesions located in the lower clivus and at the anterior edge of foramen magnum have always presented as a challenge to the neurosurgeon. The majority of these lesions have been approached posteriorly by suboc-cipital or retrosigmoid craniotomies and anteriorly by trans-oral and through the paranasal sinus approaches. Nevertheless all of then have disadvantages including a great depth of surgical field and an extremely limited lateral exposure1.
Once the high morbidity and mortality of lesions located at so an important anatomic region, the improvement of these posterior approaches is imperative, in order to increase the surgical exposure and reduce the retraction of neurovas-cular structures.
The far lateral approach is the one composed by the dis-section of occipital-cervical muscles with the exposition of suboccipital triangle, the lateral suboccipital craniotomy and finally the exposure of vertebral artery since its entrance into the dura mater2.
When the intention is reaching anterior and lateral medulla regions as in lower clivus tumors, inferior third
basilar artery and vertebral basilar junction aneurysms the best choice is performing a far lateral craniotomy3.
METHOD
Since 2002 to 2011 we have performed 87 far lateral approaches to patients admitted at Beneficência Portuguesa of São Paulo Hospital.
Among these patients, 42 (48.2%) had vascular lesions and forty five (52.8%) suffered for posterior fossa tumors.
The vascular lesions varied from cavernous angiomas (9-21.4%) inside the brainstem, posterior inferior artery aneurysms (13-30.9%), vertebral junction aneurysms (3-7.1%), low third basilar artery aneurysms (2-4.7%), verteb-ral artery aneurysms (7-16.6%), to arteriovenous malforma-tions placed beside the brainstem (8-19.04%).
Posterior fossa tumors varied from (3-6.6%) dermoid tumors, (2-4.4%) epidermoid tumors, (22-48.8%) vestibular schwannomas, (4-8.8%) trigeminal neurinomas, to (14-31.1%) petroclival meningeomas.
All the patients were operated by the same surgical team.
1Departamento de Neurocirurgia Vascular, Universidade Federal de São Paulo, Sao Paulo SP Brazil;
2Laboratório de Microcirurgia, Instituto de Ciências Neurológicas, Hospital Real e Benemérita Sociedade Portuguesa de Beneficência, Sao Paulo SP, Brazil; 3Departamento de Neurocirurgia Vascular, Sociedade Brasileira de Neurocirurgia, Sao Paulo SP, Brazil;
4Departamento de Neurocirurgia Vascular, Hospital Brigadeiro, Sao Paulo SP, Brazil;
5Department of Neurosurgery, University of Florida, Gainesville USA, United States of America;
6Departamento de Neurologia, Faculdade de Ciências Médicas, Universidade Estadual de Campinas, Campinas SP, Brazil.
Correspondence:Hugo Leonardo Dória-Netto; Praça Amadeu Amaral, 27 - 5° andar; 01327-010 São Paulo SP, Brasil; E-mail: [email protected] Conflict of interest:There is no conflict of interest to declare.
Received 29 January 2014; Received in final form 19 June 2014; Accepted 09 July 2014. DOI:10.1590/0004-282X20140130
Description of the procedure
Positioning
Certainly, the main step to a successful procedure is the accurate patient positioning.
The patient should be placed in a semi-sitting position. Initially, when the patient is in supine position on the operative table, its legs should be dressed with anti-throm-botic socks. The articular body edges should be protected, specially the knees, hips, elbows and ankles (Figure 1A).
Head should be supported by a (three or four pin) skull fixation device (Mayfield or Sugita). The pins should be placed both sides on superior temporal line, always avoiding to place then through temporal muscles.
While moving up the table headboard, the neurosurgeon should support the skull fixation device in order to place the head as looking straightly forward, the shoulders must be at the same level parallel to each other and the head inflected until the chin reaches a one finger distance, approximately 3 cm, from the chest.
The neurosurgeon should pay great attention to the jugular veins in order to avoid compression of then, what would cause a venous return impairment and brain swelling, therefore.
To achieve semi-sitting position the headboard should betilted up until maximum sixty degrees. The operative table main body may be in trendelenburg and legs may be elevated in order to place the knees semi-flected. Nonetheless, a total sitting position may be avoided once long time procedures on this position might cause sciatic and fibular nerves palsy.
The head flexion objective is aim a better exposition of the cerebellum tent and a better anatomical exposition of the occi-pital-cervical muscles, which may be tense at this position.
Trichotomy
After the patient has been induced general anesthesia and has been properly catheterized, the hair should be combed with a brush used for washing the hands, soaked in detergent solution (chlorhexidine or polyvinyl-pyrroli-done), so as to facilitate the shaving that should be per-formed up to 2 cm from the region of the surgical incision (Figure 1B). The shaving just prior to surgery allows the bet-ter fixating of fields, the reduction of infection risks and a better fixation of the bandage after surgery. Once the area has been shaved, it is treated with ether-soaked gauze to remove the fat of the scalp and facilitate the fixation of fields and the marking of the incision area with methylene blue. Shaving can also be performed following only the incision line, with a width of about 2 cm.
Marking, antisepsis and scalp incision
After the positioning and trichotomy, the marking of the skin incision is done, so that its two endings form an imagin-ary straight line that adequately simulate the separation of the skin flap and the consequent bone exposure4,5,6.
Initially, inion, asterion, C2 spinous process and mastoid apex should be marked. By then, they should be linked in an arched “horse shoe” skin incision with its edges about 5 cm below mastoid process, laterally, and at the C2 spinous process, medially.
The antisepsis should be carried out with povidone. Afterwards, benzoin should be applied to better guarantee the area adhesivity.
Operative TechniqueThe scalp incision should be made in a horse shoe fashion (Figure 2).
The incision begins in the midline, approximately 5 cm below the inion and goes straight upward until 3 cm above the external occipital protuberance. Then it turns the incision laterally to the asterion and finally it turns down-ward and laterally over the sternocleidomastoid muscle pos-terior edge, approximately 5 cm below de mastoid apex. The use of bipolar coagulation helps to avoid bleeding of scalp arteries. The placement of wet gauze while applying traction of the scalp flap can spare the use of hemostatic clips and specific staples for this purpose.
Abundant irrigation of operative field with physiological solution is imperative for all long the procedure in order to avoid gaseous embolization.
Once it has been finished the scalp opening we can didactically divide the approach into three stages. There could be the muscular stage, vertebral artery exposition and craniotomy.
Muscular Stage
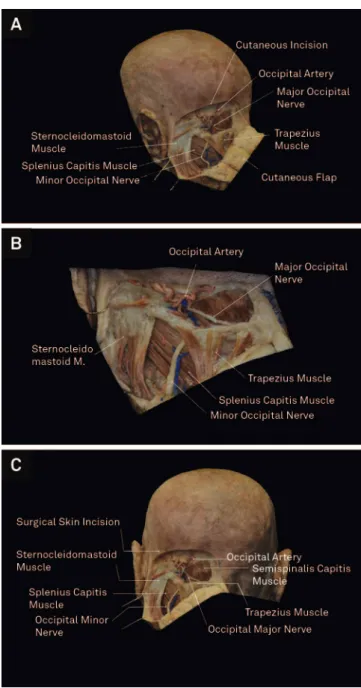
Afterwards cutaneous incision, the scalp flap should be reflected downward and medially showing the most super-ficial muscle layers formed by sternocleidomastoid and tra-pezius (Figure 3).
The sternocleidomastoid source is the superior nuchal line and the mastoid process running downward and medi-ally across the lateral aspect of neck until attaching to the clavicle and sternum. It covers partially the splenius capitis muscle.
The trapezius attaches to the medial superior nuchal line and external occipital protuberance, as well as the spinous processes of cervical and thoracic vertebrae. Laterally it attaches to the shoulder on the scapula and the lateral third of clavicle, covering the semispinalis capitis.
Dividing the sternocleidomastoid muscle preserving its superior attachment for closure and reflecting it laterally exposes the upper extension of the splenius capitis just below the lateral third of superior nuchal line and mastoid process. Care should be taken to avoid damage to accessory nerve as it is placed at the posterior side of this muscle. Its
Figure 2.(A) Cadaverous specimen in a posterior view showing the appropriate cutaneous incision mark. (B) the same cadaverous specimen, in a lateral view, showing the cutaneous incision mark.
inferior attachment is on the lower cervical e three upper spinous processes.
Detaching the trapezius and splenius capitis muscle and reflecting then medially and inferiorly exposes the longissi-mus capitis longissi-muscle, the deep lamina of deep cervical fascia and the occipital artery. The longissimus capitis muscle is attached to the posterior edge of mastoid process, deeply to the splenius capitis and sternocleidomastoid muscles. After that it extends inferiorly and medially inserting on the transverse process of the upper thoracic vertebrae (Figures 4 and 5).
Reflecting the longissimus capitis downward exposes the semispinalis capitis and the superior and inferior oblique muscles as well as the transverse process of atlas, which has a proeminent apex palpable through the skin between the mastoid process and the jaw angle.
The semispinalis capitis has its source in between the superior and inferior nuchal lines, beginning in the midline, at the external occipital crest, and extending laterally to the occipitomastoid suture. The semispinalis capitis muscle is reflected medially to expose the suboccipital triangle which is composed by three muscles; rectus capitis posterior major, superiorly and medially; superior oblique, superiorly and laterally; and inferior oblique, laterally and inferiorly (Figure 6). Reflecting the muscles medially instead of laterally and inferiorly is quite better once it avoids the presence of a muscular bulb between the surgeon’s hands and the dura mater, fact that really increases the depth of the exposure.
Summarizing, we can divide the muscular stage into two steps. Firstly, we detach laterally the sternocleidomastoid muscle. By then, we detach all the other occipital-cervical muscles medially and inferiorly, until we can identify the suboccipital triangle1,2.
Vertebral Artery Exposition
The suboccipital triangle is composed by the rectus capi-tis posterior major muscle, above and medially, by the super-ior oblique muscle above and laterally, and by the infersuper-ior oblique muscle below and laterally. It is covered by the semi-spinalis capitis muscle medially and the splenius capitis muscle laterally. Its floor is formed by the posterior atlan-tooccipital membrane.
Inside the triangle we can find the terminal extradural ver-tebral artery and first and second cervical neural root (Figure 7). Afterwards identifying the suboccipital triangle under semispinalis muscle, the main idea is to perform a thorough dissection of vertebral artery. The superior and inferior oblique muscles are detached from the transverse process of C1 and then reflected medially.
Figure 4.Detaching the trapezius and sternocleidomastoid muscles, as the most superficial muscle layer, we can find the second muscle layer composed by the semispinialis capitis muscle, medially, and the splenius capitis muscle, laterally. The semispinalis capitis has its source in between the superior and inferior nuchal lines, beginning in the midline, at the external occipital crest, and extending laterally to the occipitomastoid suture.
Figure 5.Detaching the trapezius and splenius capitis muscle and reflecting then medially and inferiorly exposes the long-issimus capitis muscle, the deep lamina of deep cervical fascia and the occipital artery. The longissimus capitis muscle is attached to the posterior edge of mastoid process, deeply to the splenius capitis and sternocleidomastoid muscles.
A good strategy is reaching C1 posterior arch medially and go laterally by its superior edge in order to find safely the vertebral artery. By then, we should carefully perform the dissection of vertebral venous plexus surrounding the artery and expose clearly the arterial entrance into the dura mater7,8
(Figure 8).
Craniotomy
A retromastoid craniotomy is performed with complete exposure of transverse and sigmoid sinus as the superior and lateral limits. Inferiorly, the craniotomy should be extended until the edges of foramen magnum and the pos-terior arch of C1 should be resected.
As big as the size of the lesion to be approached and the need of cerebellum medial retraction, as more medial is the
craniotomy performed. Sometimes, we should even cross over the midline in order to avoid a great retraction against the bone edge and also an impairment of cerebellum par-enchymal tissue.
The far lateral approach starts performing trepanations in the lower portion of occipital bone, one medial and another laterally close to the mastoid. After that, we should perform two trepanations near the inion (external occipital protuberance) medially and other two trepanations at the asterion, both at the superior and inferior edges of transverse sinus. These points should be connected to conclude a lat-eral suboccipital craniotomy1,2.
The second step is drilling the inferior portion of the occipital bone (jugular process) as the posterior margin of the jugular foramen, lateral to the condyle. The bone
Figure 7.(A) The suboccipital triangle is composed by the rectus capitis posterior major muscle, above and medially, by the superior oblique muscle above and laterally, and by the inferior oblique muscle below and laterally. (B) Cadaverous specimen after the dissection and detachment of suboccipital triangle muscles, in order to show closely the neurovascular structures inside the triangle. We can find the terminal extradural vertebral artery, its muscle branches and first and second cervical neural root.
resection should be performed anteriorly until the jugular foramen2. By then, it should be carried on laterally following
the entire sigmoid and transverse sinuses, performing a mastoidectomy. Care should be taken to avoid damage to the bridge venous between the sinus and the mastoid. Medially the bone may be resected in order to open the mag-num foramen9,10
.
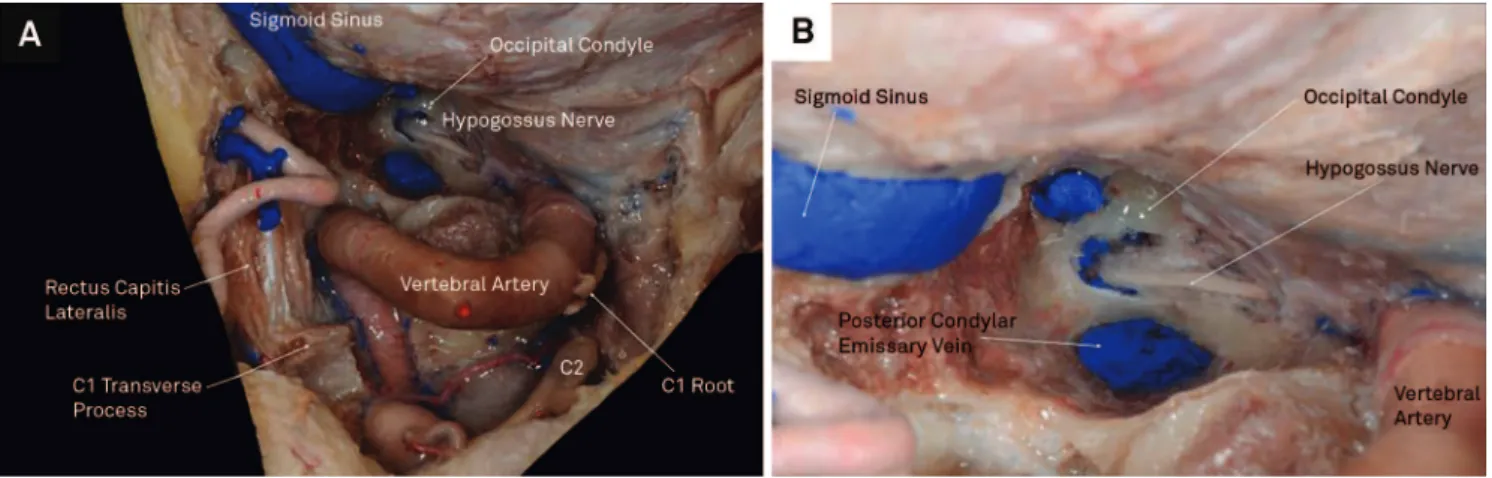
Depending on the target of the approach, varying from para condylar, supracondylar and transcondylar, resecting the condyle should be performed. The condylar resection is performed by drilling its inner portion, firstly, until finding out the cortical bone of hypoglossal canal. Theoretically, the posterior two thirds of the condyle should be drilled. Nevertheless, in practical surgery, the condyle should be drilled until the limit of hypoglossal canal2 (Figure 9A).
Finally, after exposing the hypoglossal canal above the occipital condyle, the bone of the jugular tubercle, situated above the hypoglossal canal may be removed extradurally to gain additional exposure (Figure 9B).
The jugular tubercle is a rounded proeminence located at the junction of the basilar and condylar parts of the occipital bone. The glossopharyngeal, vagus and accessory nerves cross the posterior portion of jugular tubercle going from the brainstem to the jugular foramen. The jugular tubercle blocks access to basal cisterns and inferior clivus, anterior to the lower nerves11.
Draping the operative field over the bony ridge After the positioning and arrangement of rectangular cot-ton blocks on the free bony ridge, blue drapes are placed on the pieces of cotton, aiming to cover the superficial cranial
wraps and minimize the further reflection of light from the surgical microscope.
Opening of the dura mater and brain exposure The opening of the dura mater should be made in a way that, it rounds the transverse and sigmoid sinuses as a“C”
at its superior part. Inferiorly, dural opening goes downward over the medulla and C1.
The dural incision should be initiated using a scalpel blade #11, and continued with Metzenbaum scissors4,5,6.
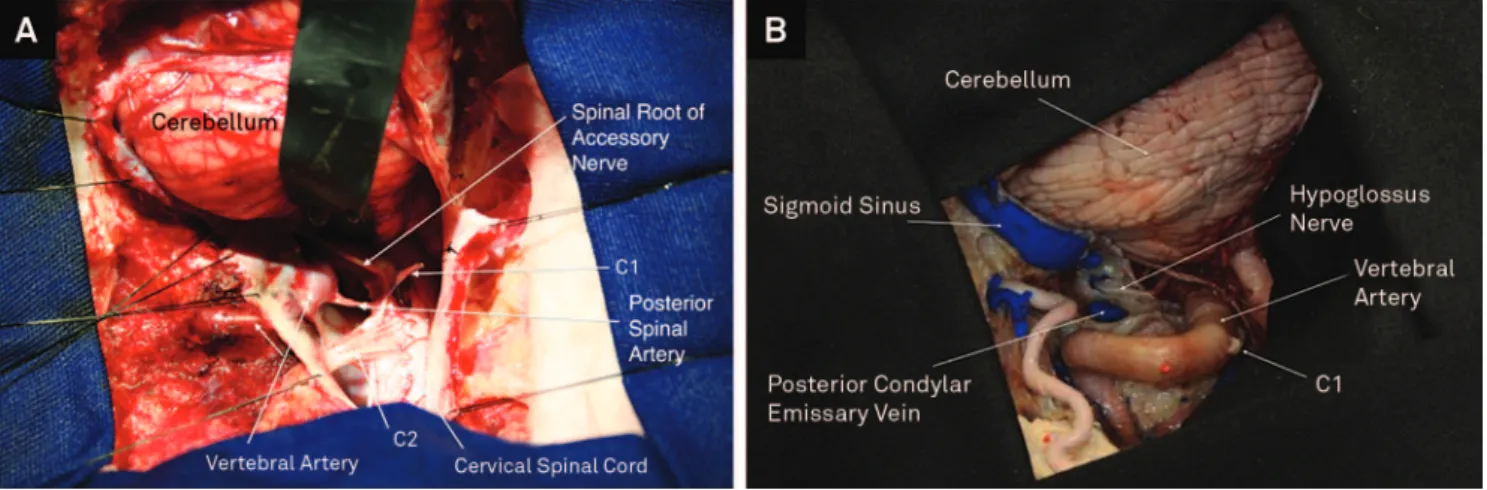
With these opening procedures, the dural flap can be reflected medially. The dural edges should be repaired by nylon 4.0 wires against the transverse sinus superiorly, the sigmoid sinus laterally and the occipital bone medially and inferiorly. The dural flap repaired should be kept tightly held to improve the exposure (Figure 10A).
DISCUSSION
Altough the lateral suboccipital approach associated to resection of posterior arch of C1 is considered feasible, defi-nitely, it is not the best way to achieve an adequate exposure of vertebral artery, anterior and lateral medulla regions1,3,12,13.
In order to perform a perfect exposure with minimal retraction of neural structures there have been purposed, adding to the lateral suboccipital approach, a partial mastoi-dectomy with lateral exposure of sigmoid sinus as well as the resection of the posterior arch of atlas and exposition of its transverse foramen beyond the neural and vascular struc-tures inside the suboccipital triangle2.
The far lateral approach, therefore, consists into three steps. Performing a lateral suboccipital craniotomy, includ-ing the resection of atlas posterior arch, as the first step. Dissecting the muscles along the posterolateral aspect of the craniocervical junction to permit an adequate exposure of C1 transverse process and the suboccipital triangle, and, finally, perform and early identification of the vertebral artery into the suboccipital triangle.
A standard far lateral craniotomy provides access to the paracondylar or supracondylar approaches. The paracondy-lar approach includes drilling of the juguparacondy-lar process in order to reach the region lateral to the condyle and jugular fora-men. When there is an intention to reach the medial aspect
of the hypoglossal canal and jugular tubercle, the supracon-dylar approach is the most adequate choice.
A transcondylar far lateral craniotomy takes place once there is the intention to reach an even more lateral view, providing access to the lower clivus and pre-medullary area. Its difference to the standard far-lateral approach is the need to drill the posterior half or posterior two thirds of the occi-pital condyle2,13,14.
In fact, the steps followed to perform appropriately the far lateral approach in these 87 patients who underwent sur-gery from 2002 to 2011 have been of exquisite importance to achieve success not only on the surgery but also in patients outcome (Figure 10B).
References
1. Rhoton AL. The posterior cranial fossa: microsurgical anatomy and surgical approaches. Neurosurgery 2001;48:1196.
2. HT Wen, AL Rhoton Jr, T Katsuta, E Oliveira. Microsurgical anatomy of transcondylar, supracondylar and paracondylar extensions of the far lateral approach. J Neurosurg 1997;87:555-585.
3. Day J D, Fukushima T, Giannotta S L. Cranial base approaches to posterior circulation aneurysms. J Neurosurg 1997;87:544-554.
4. Chaddad-Neto F, Campos-Filho JM, Doria-Netto HL, Faria MH, Ribas GC, De Oliveira E. The pterional craniotomy: tips and tricks. Arq Neuropsiquiatr 2012;70:727-732.
5. Chaddad-Neto F, Carvalhal Ribas G, de Oliveira E. A Craniotomia pte-rional, descrição passo a passo. Arq. Neuropsiquiatr 2007;65:101-106.
6. Chaddad-Neto F, Doria-Netto HL, Campos-Filho JM, Reghin-Neto M, Oliveira E. Pretemporal Craniotomy. Arq Neuropsiquiatr 2014;72 (2):145-151.
7. E Oliveira, H Tedeschi, AL Rhoton Jr, DA Peace. Microsurgical anatomy of the posterior circulation: vertebral and basilar arteries. In: LP Carter, RF Spetzler (Eds). Neurovascular surgery. New York: McGraw Hill, Inc., 1995:25-34.
8. Sanai N, Tarapore P, Lee AC, Lawton MT. The current role of microsurgery for posterior circulation aneurysms: a selective approach in the endovascular era. Neurosurgery 2008;62:1236-1249.
9. Seifert V, Stolke D. Posterior Transpetrosal approach to aneurysms of the basilar trunk and vertebrobasilar junction. J Neurosurg 1996;85:373-379.
10. Gross B A, Tavanaiepour D, Du R, Al-MefTy O, Dunn I F. Petrosal approaches to posterior circulation aneurysms. Neurosurg Focus 2012;33:E9.
11. Oliveira E, Rothon Jr AL, Peace D. Microsurgical anatomy of the foramen magnum. Surg Neurol 1985;24:293-352.
12. Gonzalez L F, Amin-Hanjani S, Bambakidis N C, Spetzler R F. Skull base approaches to the basilar artery. Neurosurg Focus 2005;19:E3.
13. Ferreira MAT, Tedeschi H, Wen HT, E Oliveira. Posterior circulation aneurysms: guideline to management. Op Tech Neurosurg 2000;3:169-178.
14. Drake CG. The surgical treatment of aneurysms of basilar artery. J Neurosurg 1968;29:436-446.