CINTAL - Centro de Investiga¸
c˜
ao Tecnol´
ogica do Algarve
Universidade do Algarve
UAN - Mooring Equipment - Releasers
(User Manual)
M´
ario Saleiro
Rep 04/09 - SiPLAB January 10th 2009
University of Algarve tel: +351-289244422
Campus de Gambelas fax: +351-289864258
8005-139, Faro [email protected]
Work requested by CINTAL
Universidade do Algarve, Campus de Gambelas, 8005-139 Faro, Portugal
tel: +351-289244422, [email protected], www.cintal.ualg.pt
Laboratory performing Signal Processing Laboratory (SiPLAB)
the work Universidade do Algarve, Campus de Gambelas, 8005-139 Faro, Portugal
tel: +351-289800949
Project UAN
Title UAN - Mooring Equipment - Releasers (User Manual)
Authors Mario Saleiro Date January 10th, 2009 Reference 04/09 - SiPLAB Number of pages 26 (twenty-six)
Abstract This is quick guide on how to use and maintain the Releasers used in the UAN project.
Clearance level SiPLAB/CINTAL eyes only Distribution list SiPLAB (2), CINTAL (1) Total number of copies 3 (three)
Copyright Cintal@2009
Approved for publication
Sergio Jesus
Contents
List of Figures III
1 Introduction 7
2 Components description 9
2.1 Model 111 Acoustic Release . . . 9
2.1.1 Specifications . . . 9
2.2 Acoustic Command & Ranging Unit Model 1100E . . . 9
2.2.1 Specifications . . . 10
2.2.2 Operation Selectors . . . 11
3 Procedures to use the release system 12 3.1 Gathering the necessary equipment . . . 12
3.1.1 Necessary equipment for the Acoustic Command Unit . . . 12
3.1.2 Necessary equipment for the Acoustic Releasers . . . 12
3.2 Equipment preparation to be done before the deployment day . . . 13
3.2.1 Preparation of the Acoustic Command Unit . . . 13
3.2.2 Preparation of the Releaser . . . 13
3.3 Equipment preparation to be done before deployment . . . 14
3.4 Test procedure . . . 14
3.4.1 Test Procedure for activating the Transponder and Ranging Functions 16 3.5 Deployment Procedure . . . 16
3.5.1 Procedure for activating the Transponder and Ranging Functions . 19 3.6 Recovery Procedure . . . 20
3.7 Storage Procedure . . . 20 III
IV CONTENTS
3.7.1 Preparation of the Acoustic Command Unit for storage . . . 20
3.7.2 Preparation of the Releasers for storage . . . 21
3.8 Maintenance Procedure . . . 21
3.9 What to do in case of any malfunction . . . 21
4 Additional Information and Configurations 22
List of Figures
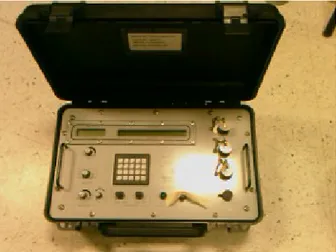
1.1 Surface unit: Model 1100E Acoustic Command Transmitter . . . 7
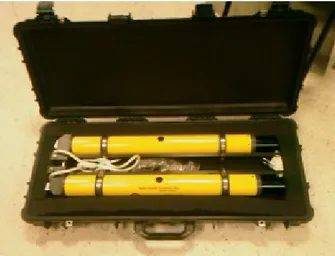
1.2 Subsurface unit: Model 111 Acoustic Release System (the picture shows 2 releasers in parallel) . . . 8
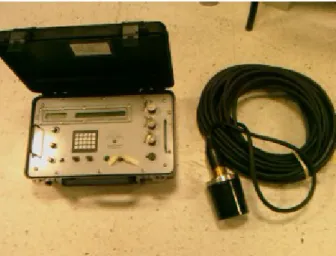
2.1 Acoustic Command & Ranging Unit Model 1100E and the transponder . . 10
2.2 Operation selectors location in the Command Unit’s panel . . . 11
3.1 Drawing showing the location of the hook and the release pivot . . . 15
3.2 Location of the hook and the release pivot in a releaser . . . 15
3.3 Generic setup for deployment . . . 17
3.4 Detail of the anchor ring . . . 17
3.5 Two releasers in parallel . . . 18
3.6 Using two Releasers in parallel . . . 19
Abstract
This document describes the use of the acoustic releasers and the respective command unit that will be used in the UAN project. It contains instructions on how to use both equipments and also instructions on how to maintain and deploy them. The releasers can be used to easily recover equipment which may be deployed at depths. The releaser model described in this document has also a transponder function which allows us for measuring the depth at which the releaser is deployed. Some procedures to test and use the releasers with safety are also referred. This manual is for both advanced and non-advanced users, containing all the necessary information to operate the described equipment.
Chapter 1
Introduction
This short report describes the use of the InterOcean Model 111 Acoustic Release System and the 1100E Acoustic Command Transducer and their safety procedures to be carried on before and after mooring.
The equipment described in this manual is used with the purpose of remotely recovering subsurface equipment by sending acoustic signals. Each basic release system consists of a surface and a subsurface unit. The surface unit consists of a Model 1100E Acoustic Command transmitter which generates the appropriate coded acoustic command signals, and a Model 1120 Command Transducer which couples the acoustic command signals into the water. The subsurface unit consists of the Model 111 Acoustic Release. The subsurface unit consists of a Model 111 Acoustic Release System. Figure 1.1 shows the surface unit and Figure 2.2 shows the subsurface unit.
Figure 1.1: Surface unit: Model 1100E Acoustic Command Transmitter
This equipment is required in the UAN project in order to recover the Subsurface Telemetry Unit (STU) Equipment. The following manual should be read carefully because any small misuse of the Release equipment can result in the impossibility of recovering essential and expensive equipment for the UAN project.
8 CHAPTER 1. INTRODUCTION
Figure 1.2: Subsurface unit: Model 111 Acoustic Release System (the picture shows 2 releasers in parallel)
Chapter 2
Components description
2.1
Model 111 Acoustic Release
The InterOcean Model 111 Acoustic Release System provides a reliable and secure acous-tic link permitting the recovery of instrument packages or other items from underwater locations up to 300 meters deep. The Release receives coded acoustic signals and pro-cesses them. If the received code matches the release command code programmed into the release, the microprocessor activates the release mechanism. The Model 111 Acoustic Release also has Transponder to perform functions such as ranging.
2.1.1
Specifications
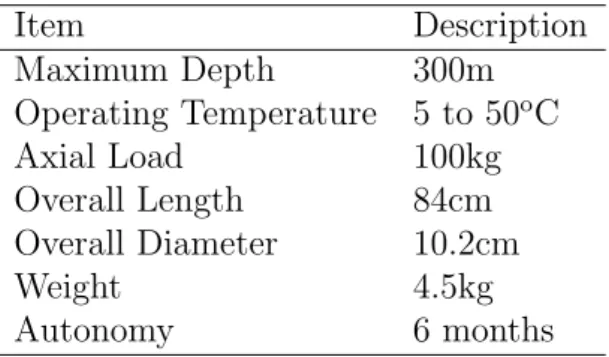
System specifications are summarized in Table 2.1
Table 2.1: System Specifications Item Description Maximum Depth 300m Operating Temperature 5 to 50oC Axial Load 100kg Overall Length 84cm Overall Diameter 10.2cm Weight 4.5kg Autonomy 6 months
2.2
Acoustic Command & Ranging Unit Model 1100E
In addition to generating the coded command signals, as referred before, the Acoustic Command & Ranging Unit 1100E generates the transpond interrogation signal and in-cludes an acoustic receiver with range measurement and display functions. Command
10 CHAPTER 2. COMPONENTS DESCRIPTION
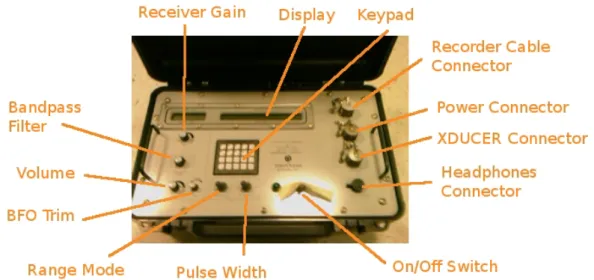
codes, Transmit and Transpond commands are inserted in the Command Unit using it’s keypad, located in the center of the top panel. For ranging purposes the sound velocity may also be entered from the keypad. A sealed, backlighted, 2 line by 40 character LCD display displays the entered codes, status and range data when transponding. The acous-tic receiver includes front panel controls for gain, head phone volume, BFO trim, and a bandpass filter selector switch for 8 frequencies. All front panel controls incorporate waterproof seals. A dual-bar LCD display provides visual indication of relative signal level and logic pulse output. The relative signal level bar graph is logarithmic and has a 60 dB dynamic range. The 1100E provides range data outputted via a 300 baud RS232C port for logging on an external printer or computer. However, no software is provided by the manufacturer.
Filtered and unfiltered receiver outputs as well as the detected output pulse are also provided for remote recording. All output signals are optically or transformer isolated to preclude ground-loop noise.
Figure 2.1: Acoustic Command & Ranging Unit Model 1100E and the transponder
2.2.1
Specifications
System specifications are summarized in Table 2.2
Table 2.2: System Specifications Item Description
Data logging Available via RS232C output Operating Temperature 5 to 50oC
Axial Load 100kg
Size 45.7×
Weight 6.8kg
Autonomy up to 24 hours (with backlights off)
2.2. ACOUSTIC COMMAND & RANGING UNIT MODEL 1100E 11
2.2.2
Operation Selectors
Figure 2.2: Operation selectors location in the Command Unit’s panel
• Pulse Width – used to choose the interrogation pulse duration of the transponder. • Receiver Gain – it is used to adjust the background noise. It’s usually set so that
the receiver display shows 75
• Band Pass Filter – Selects one of 8 center frequencies to discriminate between transponder replies.
• Volume – Controls volume level to headphones.
• BFO Trim – Provides minor trim adjustment (1 to 3 KHz) for the BFO oscillator to optimize audible acuity when using the headphones to listen to the reply pulse. • Range Mode – can be used to change the range mode between manual and automatic
mode.
• Recorder cable pins:
– A – Range Data Output – B – TxD – C – Logic Out+ – D – Common – – E – Logic In + – F – RCVR out (unfiltered) – G – RCVR common – H – RCVR out (filtered)
A description of the functions of the keypad keys can be read in the last chapter of this document.
Chapter 3
Procedures to use the release system
3.1
Gathering the necessary equipment
This section describes the necessary equipment to deploy the release system.
3.1.1
Necessary equipment for the Acoustic Command Unit
1. Rope to tie the transducer to the boat. The rope must be longer than the depth at the transducer will be deployed (10 to 15 meters should be enough in most cases). 2. Headphones to listen for signals.
3. If a very long use is expected, get two 12V supplies or external batteries capable of providing at least 12A, in order to have a backup external power supply.
4. 220 VAC charging cable
3.1.2
Necessary equipment for the Acoustic Releasers
1. 2 meters of rope to hold the releaser to the anchor.
2. 2 meters of rope to hold the releaser to the equipment that must be recovered. 3. 2 magnetic elements to re-arm the releasers.
4. Lubricating Silicon for O-rings.
5. Spare O-rings (O-ring 2-142 BUNA N-70)
6. if the batteries of the releasers are not full, get replacement batteries. The Acoustic Releasers require two separate batteries:
• The battery for the electronics part consists of two (or four for extended life) Lithium C cell providing 7 amp-hr capacity (BATTERY, LITHIUM, C SIZE, 3.6V, 8.5Amp-Hr, TL5920).
3.2. EQUIPMENT PREPARATION TO BE DONE BEFORE THE DEPLOYMENT
DAY 13
• the Motor/Transponder Transmitter battery consists of six Lithium 3V CR123A cells (LITHIUM BATTERY 3V 2/3A, GOLD PEAK # GPCR123A, MOUSER # 573-CR123A).
3.2
Equipment preparation to be done before the
de-ployment day
3.2.1
Preparation of the Acoustic Command Unit
1. Charge the Acoustic Command Unit by connecting the 220 VAC cable to the power connector. Leave it charging from 6 to 24 hours. The switch must be in the OFF position. It can only be charged with AC power, not DC.
2. After charging turn the Acoustic Command Unit to make sure that everything is ok.
3.2.2
Preparation of the Releaser
1. Remove the four screws placed near the transducer. Be carefull not to lose them! 2. Grab the transducer and very gently keep pulling until the printed circuit board is
visible.
3. If the batteries are not full, replace them with new ones. The Acoustic Releasers require two separate batteries:
• The battery for the electronics part consists of two (or four for extended life) Lithium C cell providing 7 amp-hr capacity (BATTERY, LITHIUM, C SIZE, 3.6V, 8.5Amp-Hr, TL5920).
• the Motor/Transponder Transmitter battery consists of six Lithium 3V CR123A cells (LITHIUM BATTERY 3V 2/3A, GOLD PEAK # GPCR123A, MOUSER # 573-CR123A).
4. Connect the two battery connectors to their sockets. 5. Replace desiccant or flush with dry gas.
6. Very carefully in order to prevent any kind of damage to the o-ring place the printed circuit board inside the Releaser tube. If the o-ring is damaged, replace it with a new one (O-ring 2-142 BUNA N-70).
7. apply lubricating silicon to the o-ring.
8. Screw the four screws on their places. Notice that they can only be screwed when the interior part of the Releaser is in the correct position.
9. Perform the test procedure to make sure that the releaser is working as desired.
14 CHAPTER 3. PROCEDURES TO USE THE RELEASE SYSTEM
3.3
Equipment preparation to be done before
deploy-ment
1. Place the Acoustic Command Unit in a stable position. 2. Turn it on just to make sure that it is working as desired.
3. Perform the test procedure to make sure that all components of the release system are working.
3.4
Test procedure
The Acoustic Release used for this example is the 09731760, which has the following codes (each Releaser has different codes that can be seen in the middle of its external surface):
• Release Code: ABCH;
• Transponder Enable Code: BCG; • Disable Code: BCGH.
Not that if a different releaser is used, the codes must be replaced with the codes of the releaser under test.
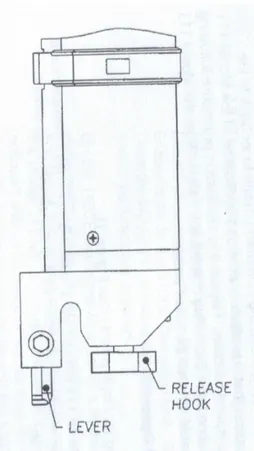
1. Place some tape on the release pivot (or lever) in a way that it will not be blocking the rotation of the hook, in order to avoid permanent damage to the release motor. Figure 3.1 shows a drawing of the location of the hook and the release pivot and Figure 3.2 shows the same thing in a real image.
2. Reset the Releaser, placing the magnetic elements over the black dots on the middle of the external surface of the Releaser. Monitor the rotation of the hook and remove the magnetic elements when the hook is in line with the release pivot (the black dots are visible in Figure 2.2). WARNING: Be extremely careful to prevent the hook from jamming into the release pivot. This may cause irreversible damage to the Releaser. It is highly recommended to put some tape in the release pivot so that it remains in a safe position.
3. Connect the transducer to the XDUCER connector of the Command Unit. 4. Place the transducer in a bucket of water.
5. Place the Releaser about a half meter of distance.
6. Turn on the Command Unit by placing the power switch in the ON position. 7. Insert Release Code by pressing <CLR><A><B><C><H><ENTER>. 8. Press <XMIT>and keeping it pressed and press <XPOND>.
9. The Releaser should send the acknowledge which consists in a sequence of 30 pings at a rate of 1 ping per second.
3.4. TEST PROCEDURE 15
Figure 3.1: Drawing showing the location of the hook and the release pivot
Figure 3.2: Location of the hook and the release pivot in a releaser
16 CHAPTER 3. PROCEDURES TO USE THE RELEASE SYSTEM
10. Reset the Releaser again following the procedure described in step 2. 11. Remove the tape that was holding the Release Pivot.
12. Place the Power Switch of the Command Unit in the OFF position.
3.4.1
Test Procedure for activating the Transponder and
Rang-ing Functions
1. Connect the transducer to the XDUCER connector of the Command Unit. 2. Place the transducer in a bucket of water.
3. Place the Releaser about a half meter of distance.
4. Turn on the Command Unit by placing the power switch in the ON position.
5. Insert the Transponder Enable Code by pressing <CLR><B><C><G><ENTER>. 6. Press <XMIT>and keeping it pressed and press <XPOND>.
7. Place the Range Mode selector in the MAN position. 8. Select a signal with 2ms Pulse Width.
9. Press the button XPOND. A 12 KHz signal should be heard and the Releaser should respond with a signal of 8.084 KHz. If necessary increase the distance between the Command Unit and the Releaser to 5 meters. Sometimes it may be hard to distinguish the signals, which occur simultaneously. The response signal can be felt in the surface of the Releaser.
10. Observe the LCD to see the result.
11. Insert the Transponder Disable Code by pressing <CLR><B><C><G><H> <ENTER>.
12. Place the Power Switch of the Command Unit in the OFF position.
3.5
Deployment Procedure
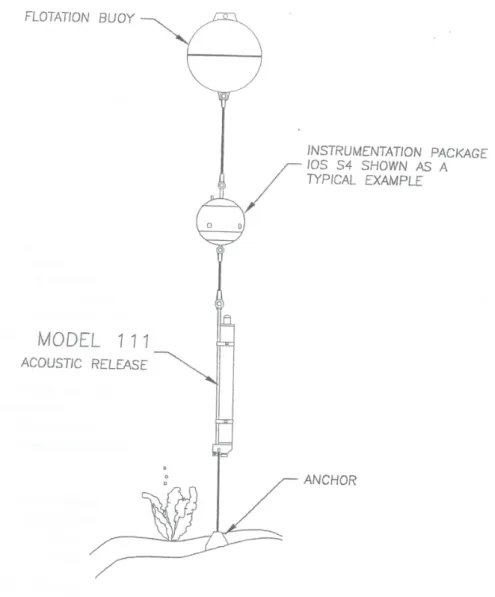
The deployment of the whole equipment must follow a generic setup, like the one shown in figure 3.3.
1. Write in a paper all the codes of the releasers that will be used and be careful not to lose it.
2. Use a rope with at least 2 meters to tie the equipment that will have to be recovered to the anchor ring. Figure 3.4 shows the achor ring.
3. Use another piece of rope with at least 2 meters to tie the release pivot to the anchor.
3.5. DEPLOYMENT PROCEDURE 17
Figure 3.3: Generic setup for deployment
Figure 3.4: Detail of the anchor ring
18 CHAPTER 3. PROCEDURES TO USE THE RELEASE SYSTEM
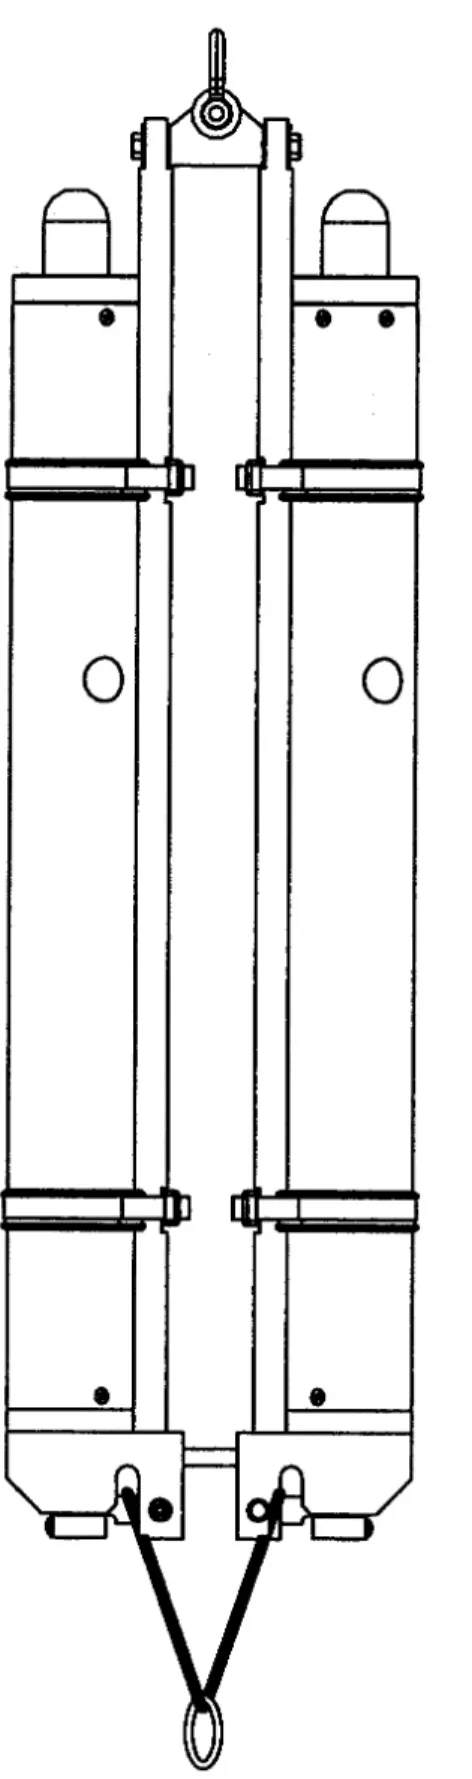
Figure 3.5: Two releasers in parallel
3.5. DEPLOYMENT PROCEDURE 19
Figure 3.6: Using two Releasers in parallel
4. If you are using two releasers in parallel use the setup shown in figure 3.5 instead of the one shown in Figure 3.3. This setup requires that the rope is tied to the release pivots of both releasers, having a metal ring in the middle to attach the equipment to the anchor. Figure 3.6 shows the setup in a real image.
5. Carefully place all the equipment in the water and let it sink.
3.5.1
Procedure for activating the Transponder and Ranging
Functions
1. Use a rope with 10 to 15 meters to tie the transponder to the boat.
2. Connect the transducer to the XDUCER connector of the Command Unit. 3. Turn on the Command Unit by placing the power switch in the ON position.
4. Insert the Transponder Enable Code by pressing <CLR><X><X><X><ENTER>(replace the X codes with the appropriate ones).
5. Press <XMIT>and keeping it pressed and press <XPOND>. 6. Place the Range Mode selector in the MAN position.
7. Select a signal with 2ms Pulse Width.
8. Press the button XPOND. A 12 KHz signal should be heard and the Releaser should respond with a signal of 8.084 KHz. If necessary increase the distance between the Command Unit and the Releaser to 5 meters. Sometimes it may be hard to distinguish the signals, which occur simultaneously. The response signal can be felt in the surface of the Releaser.
9. Observe the LCD to see the result.
10. Insert the Transponder Disable Code by pressing <CLR><X><X><X><X> <ENTER>(replace the X codes with the appropriate ones).
11. Place the Power Switch of the Command Unit in the OFF position.
20 CHAPTER 3. PROCEDURES TO USE THE RELEASE SYSTEM
3.6
Recovery Procedure
1. Use a rope with 10 to 15 meters to tie the transponder to the boat. 2. Connect the transponder to the XDUCER connector.
3. Turn on the Command Unit by placing the power switch in the ON position.
4. Insert the Release Code of the releaser in use by pressing <CLR><X><X><X><X> <ENTER>(replace each X with the approppriate code).
5. Press <XMIT>and keeping it pressed and press <XPOND>.
6. The Releaser should send the acknowledge which consists in a sequence of 30 pings at a rate of 1 ping per second.
7. If the release action ocurred successfully, the equipment will come to the surface. 8. If the equipment doesn’t come to surface, it means that the release action failed.
Repeat the procedure from the beginning.
9. If you are using two releasers in parallel and the first one fails to release the equip-ment, repeat the procedure using the codes of the second releaser.
10. When the equipment comes to surface, recover it.
11. Remove the rope from the anchor ring of the releaser and from the release pivots, if there is still any rope.
12. Clean the equipment with fresh water and let it dry.
13. Reset the Releaser, placing the magnetic elements over the black dots on the middle of the external surface of the Releaser. Monitor the rotation of the hook and remove the magnetic elements when the hook is in line with the release pivot (the black dots are visible in Figure 2.2). WARNING: Be extremely careful to prevent the hook from jamming into the release pivot. This may cause irreversible damage to the Releaser. It is highly recommended to put some tape in the release pivot so that it remains in a safe position.
14. Place the Power Switch of the Command Unit in the OFF position.
3.7
Storage Procedure
3.7.1
Preparation of the Acoustic Command Unit for storage
1. Clean the transducer with fresh water and let it dry.
2. Clean the panel of the Acoustic Command Unit with some dry cloth. Let it dry. 3. Make sure it’s turned off.
4. close the box and store it in the bigger InterOcean Systems Box together with the transducer.
3.8. MAINTENANCE PROCEDURE 21
3.7.2
Preparation of the Releasers for storage
1. Clean the releasers’ tubes with fresh water and let them dry.
2. Remove the four screws placed near the transducer. Be carefull not to lose them! 3. Grab the transducer and very gently keep pulling until the printed circuit board is
visible.
4. Disconnect the two battery connectors from their sockets. 5. Replace desiccant.
6. Very carefully in order to prevent any kind of damage to the o-ring place the printed circuit board inside the Releaser tube. If the o-ring is damaged, replace it with a new one (O-ring 2-142 BUNA N-70).
7. apply lubricating silicon to the o-ring.
8. Screw the four screws on their places. Notice that they can only be screwed when the interior part of the Releaser is in the correct position.
3.8
Maintenance Procedure
1. If the Acoustic Command Unit is not used for a long time, periodically check if the battery is low. If so, give it a full charge.
2. Make sure that all the components are not stored in an environment with humidity.
3.9
What to do in case of any malfunction
1. Verify that all the steps described in the procedures referred above where followed. 2. If the problem persists, try disconnecting the batteries, wait some time before
re-connecting them and try again.
3. If the problem still persists read the detailed user manual originally provided with the equipment.
4. If no solution is found contact InterOcean Systems by phone (858 565-8400) or by email ([email protected])
Chapter 4
Additional Information and
Configurations
• When turned on the display should show the values 12000 Hz for the interrogation frequency of the transponder and 1500 m/s for sound velocity.
• To change the interrogation frequency proceed as shown in the following example: to change the frequency to 11 KHz press <CLR><ENTER><XPOND><1><1><0> <0><ENTER>. If <ENTER>is pressed one more time the frequency is stored and will only be removed when a command similar to the one described is entered. • To change the sound velocity proceed as shown in the following example: to change
the sound velocity to 1600 m/s press <CLR><ENTER><SV><1><6><0><0> <ENTER>.
• To insert a command code just press <CLR>followed by 3 or 4 alphanumeric codes and terminate the command with the <ENTER>key as shown in the following ex-ample: to insert the command 7ABC press <CLR><SHIFT><7><A><B><C> <ENTER>.
• To transmit the Release, Re-Arm and Transpond Enable codes the key <XMIT>must be pressed and keeping this key pressed press the key <XPOND>. If the Command Unit is transmitting, pressing the <CLR>key during transmission cancels the cur-rent transmission. Pressing the <CLR>key while not in transmission will clear the screen.
• To perform normal ranging operations the 10 ms pulse width should be used. How-ever, to distances superior to 5000 m the 20 ms pulse width is more adequate. The 2 ms pulse width should only be used for short distances.
• To test the Ranging functions use the manual mode MAN.
• To start ranging press <XPOND>. In case no response is received, a timeout happens and the message ”OVER” is shown in the screen. Otherwise the distance will be shown in meters.
• To connect the Acoustic Command Unit to a printer or computer connect pin A from the Recorder cable to signal common pin of the printer and connect pin B from the Recorder connector to the received data pin on the printer/computer.
23
• To turn the Acoustic Command Unit off just place the power switch in the OFF position.
Chapter 5
Command Unit’s Keypad keys
description
• <CLR>- it is used to start command entry sequences, to clear the display, terminate ranging and to force early termination of command transmissions;
• <SHIFT>- it is used to select keys 4-7. When pressed, the signal ”ˆ” is shown in the
LCD. To check the firmware version of the Command Unit press <CLR><SHIFT><ENTER>; • <ENTER>- to terminate or entry of command codes, interrogate frequency, or
sound velocity data;
• <SV>- used to configure the sound velocity according to the following example: to 1400 m/s send <CLR><ENTER><SV><1><4><0><0><ENTER>
• <STO>- used with keys <ENA>, <ARM>, <REL>to save command codes for repeated recall operations. To save a command code for instant recall, after the <ENTER>key has been pressed to complete a command code entry, press the <STO>key, followed by a number 0-9, followed by the <ENA>, <ARM>or <REL>key as shown in the following examples: to store the Release Code ABCD in memory position 5 press 9 <CLR><A><B><C><D><ENTER><STO><5><REL>; to store the ReArm code CDFG in memory position 5 press <CLR><C><D><F><G> <STO><5><ARM>; to store the XPOND Enable code CDF in memory position 5 press <CLR><C><D><F><ENTER><STO><5><ENA>. In case the mem-ory position is not specified, the memmem-ory position 0 is used.
• <ENA>- used to store and recall XPOND Enable codes. To recall the XPOND Enable code in memory position 3 press <CLR><ENA><3><ENTER>. In case the memory position is not specified the position 0 will be used.
• <ARM>- used to store and recall ReArm codes. To recall the ReArm code in memory position 3 press <CLR><ARM><3><ENTER>. In case the memory position is not specified the position 0 will be used.
• <REL>- used to store and recall Release codes. To recall the Release code in memory position 3 press <CLR><REL><3><ENTER>. In case the memory position is not specified the position 0 will be used.
• <XPOND>- initiates transpond pulse output and starts ranging mode. If Auto/Man switch is in ”MAN” position will transmit one pulse and wait for reply from the
25
transponder. When the reply is received range will be calculated and displayed on the lower line of readout. If no reply is received in 15 seconds the word ”OVER” will be displayed to indicate over range. During ranging the word ”XPOND” will appear in the topline of the display while waiting for a reply. Ranging may be termi-nated by pressing the <CLR>key. If the ”AUTO/MAN” switch is in the ”AUTO” position, the interrogate pulse will be transmitted one second after a reply is re-ceived or a timeout occurs and the sequence is repeated. The <XPOND>key is also used in the entry sequence to indicate interrogate frequency input data to follow, as shown in the following example: to enter an interrogate frequency of 11 KHz press <CLR><ENTER><XPOND><1><1><0><0><0><ENTER>.
• <XMIT>- it is used to start the transmission of codes. The duration of each transmission is approximately 12.5 seconds. The transmission may be canceled using the key <CLR>as referred above.
Bibliography
[1] Model 111 Acoustic Release User Manual, InterOcean Systems, inc.
[2] Acoustic Command & Ranging Unit Model 1100E User Manual, InterOcean Systems, inc.