Licenciado em Engenharia Informática
ClearPhoto - Augmented Photography
Dissertação para obtenção do Grau de Mestre em Engenharia Informática
Orientador :
Nuno Manuel Robalo Correia,
Prof. Catedrático, Universidade Nova de Lisboa
Júri:
Presidente: Prof. Doutor Luís Manuel Marques da Costa Caires
Arguente: Prof. Doutor Maria Teresa Caeiro Chambel
ClearPhoto - Augmented Photography
Copyright cHélder Filipe Gouveia Gregório, Faculdade de Ciências e Tecnologia, Uni-versidade Nova de Lisboa
Acknowledgements
The contributions of several people and entities have made this thesis possible and I would like to extend my appreciation especially to the following.
First and foremost, I would like to express my gratitude to my advisor Prof. Nuno Correia for the opportunity of letting me work and explore this project, and for his guid-ance and support.
Furthermore, I would like to thank the Departamento de Informática da Faculdade de Ciências e Tecnologia da Universidade Nova de Lisboa (DI - FCT/UNL) for being my second home during these five years and financially support me during the second semester and giving me the opportunity to gain experience as a teaching assistant.
Special thanks to my family, who have supported me through this hard path, in partic-ular my parents and girlfriend, for their immense patience, encouragement and endless love.
Abstract
The widespread use of mobile devices has made known to the general public new areas that were hitherto confined to specialized devices. In general, the smartphone came to give all users the ability to execute multiple tasks, and among them, take photographs using the integrated cameras.
Although these devices are continuously receiving improved cameras, their manu-facturers do not take advantage of their full potential, since the operating systems nor-mally offer simple APIs and applications for shooting. Therefore, taking advantage of this environment for mobile devices, we find ourselves in the best scenario to develop applications that help the user obtaining a good result when shooting.
In an attempt to provide a set of techniques and tools more applied to the task, this dissertation presents, as a contribution, a set of tools for mobile devices that provides information in real-time on the composition of the scene before capturing an image.
Thus, the proposed solution gives support to a user while capturing a scene with a mobile device. The user will be able to receive multiple suggestions on the composi-tion of the scene, which will be based on rules of photography or other useful tools for photographers. The tools include horizon detection and graphical visualization of the color palette presented on the scenario being photographed. These tools were evaluated regarding the mobile device implementation and how users assess their usefulness.
Resumo
A massificação de dispositivos móveis, deu a conhecer ao público em geral novas áreas que estavam confinadas a dispositivos especializados. De uma forma geral, osmartphone veio dar a todos os seus utilizadores a capacidade de realizar múltiplas tarefas, e entre elas, fotografar com recurso a câmaras integradas.
Embora estes dispositivos venham com câmaras cada vez melhores, o seu potencial não é totalmente aproveitado uma vez que os sistemas operativos oferecem APIs sim-plificadas e aplicações fotográficas com capacidades reduzidas ao utilizador. Aprovei-tando este ambiente propício ao crescimento do computador de bolso, encontramo-nos no melhor cenário para desenvolver aplicações que ajudem o utilizador a obter um bom resultado.
Com o objectivo de fornecer um conjunto de técnicas e ferramentas aplicadas à tarefa em questão, surge esta dissertação, que apresenta como contribuição um conjunto de técnicas para dispositivos móveis capaz de fornecer informações em tempo real sobre o cenário a ser capturado.
Assim, a solução proposta visa o desenvolvimento de uma ferramenta que dá suporte a um utilizador durante a captura de uma cena com um dispositivo móvel. O utilizador será capaz de receber várias sugestões sobre a composição da cena, baseadas em regras de fotografia ou outras ferramentas úteis para os fotógrafos. Esta ferramenta inclui de-tecção do horizonte e visualização gráfica de uma paleta de cores presentes no cenário. A avaliação foi feita sobre a implementação num dispositivo móvel e sobre a forma como os utilizadores avaliam a sua utilidade.
Contents
1 Introduction 1
1.1 Problem Description and Objectives . . . 2
1.2 Presented Solution . . . 2
1.3 Contributions . . . 3
1.4 Document Organization . . . 3
2 Related Work 5 2.1 Fundamental Concepts of Photography . . . 5
2.1.1 Light . . . 5
2.1.2 Exposure . . . 6
2.1.3 Shutter . . . 6
2.1.4 Aperture . . . 6
2.1.5 Depth of Field . . . 7
2.1.6 ISO . . . 7
2.1.7 White Balance . . . 7
2.2 Processing Techniques for Photography . . . 8
2.2.1 Long-Exposure Photography . . . 8
2.2.2 High Dynamic Range Imaging . . . 9
2.2.3 Panoramic Photography . . . 10
2.3 Image Capture and Processing Applications . . . 12
2.3.1 Image Capture Applications . . . 12
2.3.2 Image Processing Applications . . . 16
2.4 Image Evaluation . . . 18
2.4.1 Composition Rules . . . 19
2.4.2 Evaluation of Aesthetic Features . . . 23
2.4.3 Practical Application of Aesthetic Evaluation Systems . . . 24
2.5 Computer Vision Algorithms . . . 25
xiv CONTENTS
2.5.2 Colour Features . . . 28
2.5.3 Texture Features . . . 28
2.5.4 Discussion . . . 28
3 System Description and Features 31 3.1 System Description . . . 31
3.1.1 Concept . . . 31
3.1.2 Architecture . . . 32
3.2 Features . . . 34
3.2.1 Colour Histograms and Average Saturation . . . 34
3.2.2 Colour Templates and Hue Counting . . . 39
3.2.3 Face Detection and Composition Guidelines . . . 42
3.2.4 Object Segmentation . . . 46
3.2.5 Image Simplicity . . . 49
3.2.6 Main Line Detection . . . 53
3.2.7 Horizon Detection . . . 57
3.2.8 Image Balance . . . 61
3.3 Discussion . . . 67
4 Results and Evaluation 69 4.1 Algorithm Comparison . . . 69
4.2 Algorithm Execution Time . . . 70
4.2.1 Testing tool . . . 71
4.2.2 Results . . . 72
4.3 Users Testing . . . 73
4.3.1 Participants . . . 73
4.3.2 Questionnaire . . . 73
5 Conclusions and Future Work 77 5.1 Conclusion . . . 77
5.2 Future Work . . . 78
A Algorithms Execution Times 85
B Object Segmentation Results Comparison 91
C Colour Template Detection Results Comparison 95
D Horizon Detection Results 97
E Users Questionnaires 99
List of Figures
2.1 Difference between a shallow depth of field (a) and a wider depth of field
(b) [Kam12]. . . 7
2.2 Difference between an image with ISO value of 200 (a) and 3200 (b). . . 8
2.3 Three examples of white balance applied to a photograph [Kam12]. . . 8
2.4 Examples of Long-Exposure Photography [Kam12]. . . 9
2.5 Example of a picture taken with (a) Standard Dynamic Range versus (b) the same picture with High Dynamic Range. . . 10
2.6 Image of attachable lens for iPhone, GoPano micro (a), and panorama made by the second algorithm described at Szeliski and Shum [SS97] with distortion at the north pole. . . 11
2.7 Camera FV5 interface (a) and indicators (b) of aperture, exposure time, ISO, etc [Vaz]. . . 14
2.8 Screenshot of Camera51 interface showing the best framing suggestion. . 15
2.9 Image (a) before and (b) after applying the auto enhancing tool. It is possi-ble to see that the red-eye remover only darkens the red area and does not take in account the real colour of the eye. . . 17
2.10 Image of two complementary colours balanced in a frame [San10]. . . 19
2.11 Guidelines formed from dividing the (a) golden section in 1.6 to 1 parts and from (b) the golden spiral. . . 20
2.12 Guidelines of the rule of thirds with nine equal rectangles and respective power points at the intersection between horizontal an vertical guidelines. 21 2.13 Guidelines obtained by the golden triangles rule. . . 21
xvi LIST OF FIGURES
2.15 Example images of element balancing and corresponding schematic. (a-d) Static balance normally associated with symmetry. (b-e) Dynamic balance where the left side has a larger subject that is being balanced by a smaller but brighter subject on the right side. (c-f) Unbalanced picture where the subject is positioned on the left side, leaving the right side with a negative
space. . . 23
2.16 Spatial composition template used in [KV12]. . . 24
2.17 (a) The frontpage of the ACQUINE system, where the users could upload photos. The list of top users on the right side and photos with high AC-QUINE aesthetics scores randomly selected at the bottom. (b) Screenshot of the ratings page after a photo upload. [DW10] . . . 26
2.18 (a) Re-ranking photographs by adjusting the feature weighting and (b) by selecting a few photographs as example [Yeh+10]. . . 27
3.1 Architecture of the system. . . 33
3.2 Class diagram of the Presentation stage in Figure 3.1. . . 33
3.3 Menu to select each feature. . . 33
3.4 "Fishing in Spring, the Pont de Clichy" by Vincent van Gogh (a) and the corresponding labelled linear histogram representation. . . 35
3.5 Linear histograms representations of “The Funeral of the Anarchist Galli” by Carlo Carrà (top) and “Speed+Sound” by Giacomo Balla (bottom) (a) with a labelled stacked line graph representation comparing the amount of each colour in both paintings (b) [HLC11]. . . 35
3.6 Visual cue chosen for the first implementation of the histogram being ap-plied to a real-time scenario (a) and a reconstruction of the histogram made for the green channel that indicates de colour range in use and the amount of pixels near the limits (b). . . 37
3.7 Visual cue chosen for the second implementation of the histogram being applied to a real-time scenario (a) and the resulting histogram isolated (b). 37 3.8 Frame detected as containing low saturation. Indicator is shown on the bottom right corner, which is the input frame converted into grayscale and in a reduced scale. . . 38
3.9 Illustrative figure of the problem found in our histogram representation (b) compared to the corresponding regular histogram (a). . . 39
3.10 Harmonic templates on the hue wheel. Colours that fall into gray areas are considered to be harmonic. Size and rotation of the gray areas may vary. . 41
3.11 Type of convolution kernels used to extract features [Its]. . . 44
3.13 Example of object segmentation interface. The resulting mask of the algo-rithm is then displayed as a green overlay in the camera live feed. . . 48 3.14 Steps taken when segmenting an object. a) Input image. b) Saliency map
generated by the algorithm in [Che+11]. c) Binary mask. d) Probable back-ground pixels. e) Probable foreback-ground pixels. f) Bounding rectangle and center of mass point. g) Cropped mask containing the probable foreground area filled in with probable background pixels. h) Segmentation applied to the input image. . . 49 3.15 Examples of visual cues given to the user. We experimented showing the
results of the three implemented methods (a, b), versus using a graphical representation such as a fixed scale with an indicator showing the current score (c, d). . . 52 3.16 a) Sinusoid formed by family of lines that pass throughx0 = 8andy0 = 6
in plane θr b) Plot of three sinusoids that pass through the points x0 =
8, y0 = 6, x1 = 9, y1 = 4, x2 = 12, y2 = 3 with an intersection point in
(0.925.9.6). This intersection point with parameters (θ, ρ)defines the line in which(x0, y0),(x1, y1)and(x2, y2)lay [Its]. . . 54
3.17 a) Source image. b) Canny edge detection method applied to the source image. c) Visual representation of the accumulator. Darker areas represent a larger number of intersections in those(θ, ρ)coordinates. d) Lines drawn in red that represent the main lines detected in the source image. . . 55 3.18 Main lines detection interface with threshold of 130 (a), 60 (b) and 65 (c). . 56 3.19 Main line detection with regular Hough Transform (a) and with
progres-sive probabilistic Hough Transform (b). . . 57 3.20 a) Input image. b) Smoothed image. c) Binary segmentation. d) Result
from erosion and dilation. e) Border between sky and non-sky areas. f) Horizon and obstacle found. . . 58 3.21 Exemple of horizon detection where the green and blue line are the result
of the edge and color detector respectively. The red line represents the result of combining both methods. . . 61 3.22 Angles used in weight calculations. Arrows represent the image gradient
direction at the edge pixels. [LK06] . . . 64 3.23 Example of the visual cue to inform the user about the scenario balance. . 65 3.24 Examples of an image obviously unbalanced that is considered as balanced
due to the symmetry line calculated (a) and the averaging of two symmetry lines detected on two different objects (b). The blue and red lines represent two of the peaks found in the Hough map and the yellow line the resulting of averaging them both. . . 66 3.25 Examples of an unbalanced image with objects of different sizes where one
xviii LIST OF FIGURES
4.1 Graphical diagram generated from a trace log file. . . 71
B.1 Example of correct object segmentation of the implemented algorithm (c) only using the pixels considered as foreground in comparison to the origi-nal algorithm (b) [Che+11]. . . 92
B.2 Example of failed object segmentation of the implemented algorithm (c) only using the pixels considered as foreground in comparison to the origi-nal algorithm (b) [Che+11]. . . 93
B.3 Example of correct object segmentation of the implemented algorithm (c) using the pixels considered as foreground and background in comparison to the original algorithm (b) [Che+11]. . . 94
C.1 Source images (a, d, g, j) and templates detected by the original algorithm implemented by Cohen-Or et al. [CO+06] (b, e, h, k) in comparison to the templates detected by our algorithm (c, f, i, l). . . 96
F.1 Results to the question Q6. . . 104
F.2 Results to the question Q7 (a), Q8 (b), Q9 (c), Q10 (d). . . 105
F.3 Results to the question Q11 (a), Q12 (b), Q13 (c), Q14 (d). . . 106
F.4 Results to the question Q15 (a), Q16 (b). . . 107
F.5 Results to the question Q17 (a), Q18 (b), Q19 (c), Q20 (d). . . 108
F.6 Results to the question Q21 (a), Q22 (b), Q23 (c), Q24 (d). . . 109
F.7 Results to the question Q25 (a), Q26 (b), Q27 (c), Q28 (d), Q29 (e), Q30 (f). . 110
F.8 Results to the question Q31 (a), Q32 (b), Q33 (c). . . 111
F.9 Results to the question Q34 (a), Q35 (b), Q36 (c). . . 111
F.10 Results to the question Q37 (a), Q38 (b). . . 112
F.11 Results to the question Q39 (a), Q40 (b), Q41 (c), Q42 (d), Q43 (e), Q44 (f). . 113
List of Tables
A.1 Total time spent processing a frame and displaying the result, and execu-tion times of the saturaexecu-tion detecexecu-tion algorithm in cases where the scenario is/isn’t saturated. . . 85 A.2 Total time spent processing a frame and displaying the result, and
execu-tion time of calculating the colour histograms using theRGBchannels and grayscale. . . 86 A.3 Total time spent processing a frame and displaying the result, and
execu-tion time of calculating the histograms using the hue channel. . . 86 A.4 Total time spent processing a frame and displaying the result, and
execu-tion time of calculating the colour templates. . . 87 A.5 Total time spent processing a frame and displaying the result, and
execu-tion time of calculating the score based on the number of colours being used from the Hue channel. . . 87 A.6 Total time spent processing a frame and displaying the result, and
execu-tion time of finding one or three faces while using or not the composiexecu-tion rules. . . 88 A.7 Total time spent processing a frame and displaying the result, and
execu-tion time of calculating the saliency map and segmenting the object. . . 88 A.8 Total time spent processing a frame and displaying the result, and
execu-tion time of calculating the simplicity with each one of the tested methods. 89 A.9 Total time spent processing a frame and displaying the result, and
exe-cution time of finding the most relevant lines in a scenario with different thresholds (T). . . 89 A.10 Total time spent processing a frame and displaying the result, and
execu-tion time of finding the horizon line. . . 90 A.11 Total time spent processing a frame and displaying the result, and
xx LIST OF TABLES
D.1 Detection results of the implemented algorithm for each of the test images labelled as landscape. Absolute error indicates the absolute difference be-tween each parameter and the manually-annotated horizon line. Relative error is the absolute error normalized to the corresponding parameter of the manually-annotated horizon line. . . 97 D.2 Detection results of the implemented algorithm for each of the test
im-ages labelled as seacape. Absolute error indicates the absolute difference between each parameter and the manually-annotated horizon line. Rela-tive error is the absolute error normalized to the corresponding parameter of the manually-annotated horizon line. . . 98 D.3 Detection results of the implemented algorithm for each of the test images
1
Introduction
Decades before photography was created La Roche (1729 - 1778) described, in his imagi-nary taleGiphantiethe possibility to permanently capture images from nature, on a can-vas which had been coated with a sticky substance. Following La Roche prediction, Thomas Wedgwood succeeded in capturing the first silhouettes temporarily, culminat-ing in the first successful picture by Joseph Niépce in 1826 [LR87].
Since that time, photography has evolved from revealing pictures in photographic paper to its digitization. The development of digital cameras and its commercialization through the last 20 years enabled photographers to explore and master new techniques. Aided by the invention of photo editing software and the evolution of the industry, there was a mass popularization of multi-function mobile systems with the capability of taking high quality photos. Taking advantage of these systems and creating software that can facilitate a photographer’s job or improve the learning conditions of such a task, is the next logical step to take.
It was predicted that by the end of 2013, 1.4 billion smartphones would be in use, where one in every five people in a world population of 7 billion would own one [Leo13]. While these handheld devices might not have cameras so powerful as the latest digital single-lens reflex (DSLR) cameras, manufacturers are taking a different approach by cre-ating lenses for these devices [Bol13], making them a reliable tool for high quality pho-tography.
1. INTRODUCTION 1.1. Problem Description and Objectives
1.1
Problem Description and Objectives
Digital photography is tightly related to computational photography. Although the con-cept is increasingly being adopted, it refers broadly to sensing strategies and algorithmic techniques that enhance or extend the capabilities of digital photography [Sze12], creat-ing a new kind of images that cannot be captured with a traditional camera [Pul+09].
Taking full advantage of multi purpose handheld devices, applications centred in ob-taining the best aesthetic results, is something that is not yet well explored. Of the many devices that make part of our daily life, the smartphone might be the most widely dis-seminated one. Although, for many professionals it might not replace high-end cameras, we can not deny the fact that many smartphone owners use the embedded camera and have taken photography in a different perspective since the device popularization. A major problem is that the manufacturers do not take advantage of the embedded camera capabilities on their default mobile operating systems, due to the lack of control offered through their APIs.
There is a lot of work done in terms of improving a photo by using editing software (e.g, Adobe Photoshop), but the main purpose of these tools is to edit the result after a photo session. For instance, if we imagine that a photographer is trying to take a photo of a mountain scenery. Unless the individual is experienced and takes many photographs of the same scenery in different angles and different focal lengths, for an amateur, the more common option will be to photograph with the mountain centred in the viewfinder, since this is the subject. Completely unaware of the aesthetic difference between a mountain centred and a dislocated one, this kind of photograph would be impossible to edit with-out reducing its size, or relocate the subject including some degree of distortion.
Even though the APIs lack of support, using this type of systems to reduce the gap in knowledge between professional and amateur photographers, and enriching the users experience by offering options beyond the standard ones is the approach considered in this dissertation.
Therefore, the objective of this thesis is to present a set of tools and techniques where the user can get a better understanding of the scenery and provide ways to obtain a photograph with a better aesthetic result.
1.2
Presented Solution
The aim is to provide a more enriching experience for the smartphone owner that uses the camera application frequently. The final purpose is to obtain the best aesthetic results by offering a capture system able to interpret a scene, in a semi-automatic way.
Before capturing an image, the user will be able to access a set of tools that show information about the scenery through simple visual cues.
is being photographed, the suggestions will consist in a visual cue or a rating calculated from the scene that is being captured. Being colour an important part of an image, some of these suggestions are related to the colourfulness of the scenery, where the user can get a better understanding of the colours being used and which colours are complementary through simplified histograms or color wheels.
Another type of suggestions are related to composition of the image. Some features have been implemented to help a user understand what is the subject in the scenery through object segmentation, the detection of prominent lines and detection of the hori-zon line for sceneries of landscape or seascape.
The technology used to develop this solution is a smartphone with an Android op-erating system. Currently we are using the Samsung Galaxy Note with Android 4.1. The system was developed in Java and C++ using both Software Development Kit (SDK) [Goob] and Native Development Kit (NDK) [Gooa] available for Android. Along with the NDK, the OpenCV (Open Source Computer Vision) [Its] library was used for image processing.
1.3
Contributions
The main contributions of this thesis are:
1. Photography tool for mobile devices: Introduces a novel approach, incorporating the knowledge of how to obtain pleasant aesthetic results. Since not all users with mobile devices have enoughknow-howwhen taking photographs, the main objec-tive of this dissertation is to make functionalities and knowledge in photo com-position available to the most casual photographer. This results in a thinner gap between amateur and professional photographers;
2. Library for image processing: Contribute with a modular library with a set of calls for later use in other applications;
3. Guidelines for computational photography analysis: The application will provide guidelines to create the computational equivalent to some of the techniques used in photography, exploring the technological advancements of image processing in mobile devices. The purpose is not to just make them computationally possible but also inspire the implementation of new and improved methods for the field of computational photography in this type of devices.
1.4
Document Organization
1. INTRODUCTION 1.4. Document Organization
2
Related Work
This chapter will describe concepts, systems, techniques and algorithms related to the theme proposed by this thesis. This chapter is divided into five sections. In the first sec-tion we explain some of the fundamental concepts that are directly related to the camera and its properties. In the second section, we enumerate techniques used to produce high quality images obtained from photography. Since there are many mobile applications related to image capturing and processing, the third section presents a summary of some of those applications during and after the capture. The fourth section, refers to the state of the art related to computational aesthetics and applications of related concepts for im-age evaluation and classification. The last chapter, describes algorithms for extraction of features in an image.
2.1
Fundamental Concepts of Photography
In the world of photography, there are many technical concepts and properties that are fundamental. It is the photographer’s job to use those concepts and properties in order to explore creativity and capture the moment with the best possible result. For a better understanding of this proposal, a brief description of some concepts and properties are enumerated in the following sections.
2.1.1 Light
2. RELATEDWORK 2.1. Fundamental Concepts of Photography
the chrominance information.
In photography, it is necessary to understand light, since there are multiple types of light [San10]. Natural light is easily interpreted as something that emits its own light, and not just reflects it (e.g., the Sun). This light can vary with the seasons, weather con-ditions and through out the day. Although the source is the same, depending on the season and the time of day, the angle at which the light falls on the subject may vary. An-other aspect is the amount of light available that can also vary with the time of day and weather conditions. Another type of light, is the artificial light, which can be generated by the photographer. It can be manipulated at free will including the number of sources, direction and colour of the light.
2.1.2 Exposure
Exposure is the amount of light that reaches the camera sensor and is controlled by choos-ing the shutter-speed, aperture of the lens and ISO value, although ISO doesn’t necessar-ily affect the amount of light that goes through [Kam12; San10]. All of these variables are independent and the same result can be obtained by different permutations. The correct combination can have an important part on the end result. Each of these variables will be described later.
2.1.3 Shutter
Shutter is a mechanic or electronic component that allows the light to pass for deter-mined period of time, and reach the light-sensitive electronic sensor to capture a perma-nent image of the scene. The velocity the shutter takes to perform an action is called shutter-speed and can vary from milliseconds to seconds, depending on the technique the photographer intends to use to capture the scenery. Lower shutter-speeds allow to create long exposure images, while faster shutter-speeds tend to avoid shaken or blurred images, allowing perfectly sharp images of objects or people in movement [San10].
2.1.4 Aperture
2.1.5 Depth of Field
Depth of field represents the portion of the image in front of and behind the focused plan that comes with obvious clarity [Kam12; San10]. This effect can vary with the lens aper-ture (Section 2.1.4). The larger the lens aperaper-ture, the smaller the depth of field which will result in a larger f/ value and a greater amount of light that passes through. The differ-ence between a shallow depth of field and a wider depth of field can be viewed in Figure 2.1. The depth of field can be used in a creative manner, leaving to the photographer’s criteria, the amount of sharpness she wants from the nearest object to the farthest object.
(a) (b)
Figure 2.1: Difference between a shallow depth of field (a) and a wider depth of field (b) [Kam12].
2.1.6 ISO
This is the measure that defines the camera sensor sensitivity to the light [Kam12]. Digital cameras tend to behave better in low light conditions with higher ISO values, which means that for higher ISO values, the camera’s sensor becomes more sensible to light rays. In digital cameras and mobile devices, the sensitivity can be adjusted if necessary. However, increasing the camera’s sensitivity to the light might ruin a photograph by introducing some digital noise in the image, as shown in Figure 2.21. To reduce this negative effect on the image, the use of high ISO values can be compensated with fast shutter speeds and low aperture values.
2.1.7 White Balance
It is a known fact that the human eye is more sensible to light variations than colour variations, therefore, when we see an object reflecting light, our brain instantly interprets the colour. This means that in areas of different brightness, our eyes adapt and interpret the same colour, although, to the camera they are not equal. Since cameras are not capable of simulating the human brain, that is why white balance is used in photography, in order to match the captured ambience light to what our brain would read [Kam12]. Figure
2. RELATEDWORK 2.2. Processing Techniques for Photography
(a) (b)
Figure 2.2: Difference between an image with ISO value of 200 (a) and 3200 (b).
2.3 illustrates various examples of the same image with different tonalities that can be corrected adjusting the white balance.
(a) Too cold (b) Well balanced (c) Too warm
Figure 2.3: Three examples of white balance applied to a photograph [Kam12].
2.2
Processing Techniques for Photography
To render seascapes showing both the sky and the sea it was a hard task before digital photography, due to luminosity range being too extreme. Photographers overcame these difficulties by exploring concepts such as the ones described in Section 2.1. Exploring such concepts led to a development of new techniques, resulting in photographies with different properties. This chapter will describe some of these techniques and how they can be achieved.
2.2.1 Long-Exposure Photography
shutter is open. With such long speeds the sensor cannot record moving objects, result-ing in perfectly sharp capture of stationary objects and blurrresult-ing or obscurresult-ing of movresult-ing elements. This technique is more successful under low light conditions due to the time that the sensor is exposed to light, but this can be suppressed by using special filters for the lenses. By taking so long to close the shutter, the sensor keeps absorbing light creating a brighter photograph, producing a near daytime effect. This technique made easier for professionals to photograph at night, and gave form to new types of photography such as light painting, where a person with a light source can draw paths in the air. Being more sensitive to light, while the shutter is open, the sensor records all the paths drawn resulting in an image where the paths form a continuous line and the person or object moving the light source is obscured, as shown in Figure 2.42. Long-exposure can also be simulated by manually blurring specific areas of a photo, using image editing software.
(a) (b)
Figure 2.4: Examples of Long-Exposure Photography [Kam12].
2.2.2 High Dynamic Range Imaging
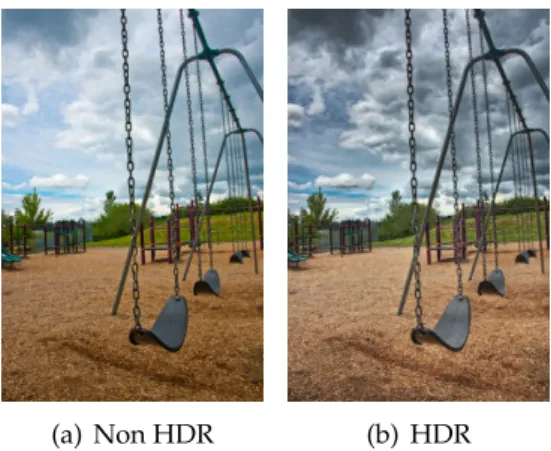
Although there is a big improvement in the technologies related to photography, cameras still have a problem of not being able to perceive colours the same way as the human eye. Due to the inability of digital cameras to correctly perceive a scene luminosity, it is possible to incorrectly record colours and lose information in lighter or darker areas accordingly to the exposure. High Dynamic Range Imaging is based on a capture that can represent more accurately a range of intensity levels found in scenes, compensating this problem. In photography, this technique can be achieved by taking multiple Standard Dynamic Range (SDR) photographs of the same scenario with different exposure values that can vary depending on the device. After taking all the samples, the process consists in combining all the raw data of over-exposed and under-exposed areas in one image. By doing this, the image will result in a photograph with a broader tonal range, as shown in Figure 2.53.
2
Source: (a)http://www.hongkiat.com/blog/light-painting-artworks/, (b)http://www. flickr.com/photos/awfulsara/35403447
2. RELATEDWORK 2.2. Processing Techniques for Photography
Although cameras already have enough computational power to perform these tech-niques, Debevec and Malik [DM08] also proposed a method of recovering high dynamic range radiance in photographs taken with conventional image equipment. As expected, multiple photographs are taken with different values of exposure. Using these pho-tographs as samples, they recover the response function of the imaging process using the assumption of reciprocity, which can be defined by a sensor response to the total ex-posure (i.e. itensity ×timecontrolled by the aperture and shutter-speed (Section 2.1)). Having obtained a response function, the luminosity value of each pixel is computed us-ing all the available exposures, in which its value is closer to the middle of the response function.
Another approach [VJ11] involves three cameras, side by side, in the same optical axis. Each of these cameras takes a photograph with different exposure values, taking a first picture underexposed, a second picture with the normal exposure, and a third picture overexposed. These three images are overlapped and merged, reconstructing information lost in overexposed and underexposed areas.
(a) Non HDR (b) HDR
Figure 2.5: Example of a picture taken with (a) Standard Dynamic Range versus (b) the same picture with High Dynamic Range.
2.2.3 Panoramic Photography
There are also methods to generate panoramas by stitching multiple horizontal im-ages through software. Brown and Lowe [BL07] described an algorithm that would gen-erate a graph to recognize individual panoramas by finding all pairwise image overlaps using feature-based methods. After finding all images with matching features, it would readjust the rotation of the images to generate a panoramic image. This method would be insensitive to the ordering, orientation, scale and illumination of the input images.
Szeliski and Shum [SS97] describe methods to create full view panoramic mosaics. First they describe a method of generation of cylindrical panoramas with a sequence of images taken by a camera mounted on a levelled tripod. This algorithm consists in es-timating consecutive horizontal and vertical translations for each image. To recover the translational motion, the incremental translation is estimated by maximizing the corre-sponding points between them. It would be possible to convert an image to 2D spherical or cylindrical coordinates for a known tilting angle but it would not minimize the er-ror between two images, therefore, this method can only handle the simple case of pure panning motion.
Secondly, Szeliski and Shum [SS97] introduced an algorithm that does not need a set of pure horizontal images. Instead, as long as there is no strong motion between sampled images, there are no constraints on how images are taken. This makes photographs taken by handheld devices without a tripod a reliable source for creating panoramas. Accord-ing to Szeliski and Shum, the center point of the sampled images can be described in 3D by a set of matrices which correspond to the image plane translation, the focal length scal-ing and a 3D rotation matrix. After estimatscal-ing the mean focal length of the images and rotation matrix, they can stitch the images in a 3D dimensional space. Since it is made by stitching multiple images, the final product presents distortions at the north pole. This is because of a necessary warp to cylindrical or spherical coordinates (Figure 2.6(b)) to have a full view of the panorama without using a specialized viewer.
(a) (b)
2. RELATEDWORK 2.3. Image Capture and Processing Applications
2.3
Image Capture and Processing Applications
Since the first attempts to capture a scenery, to its popularization in the XIX century, the world of photography has suffered improvements, that still shock many professionals in the business. Since the upgrade of analogue cameras to the digital world, the use of neg-atives and dark rooms to new techniques like HDR (High Dynamic Range) imaging, the current market has been increasingly overwhelmed by mobile devices and their ability to easily dethrone today’s digital cameras. Proof of this fact is the wide range of appli-cations related to photography available in mobile devices application stores like Play Store and App Store, some with a more professional objective than others. Throughout this chapter it will be discussed some of those applications for image capturing and pro-cessing. Along with these applications, research that has been done in this field will also be discussed.
2.3.1 Image Capture Applications
The advancements in mobile devices created a new type of market. Due to this virtual markets available for any Android or iOS user, the number of mobile applications are constantly increasing. Camera related applications are no exception to this rule. In both markets there are many applications fully capable of capturing images that were de-signed for social networks or include special features. We will start by presenting the default applications in both Android and iOS systems, and other applications found on both of those markets, ending with a discussion comparing all of them.
2.3.1.1 Android and iOS Native Applications
By default, the newest mobile operating systems already have an incorporated applica-tion to take photos. For example, on iOS the default applicaapplica-tion is rather simple. It has very few customization options for a user that has more knowledge in the area, although it is possible to record videos and choose between full screen photos or photos with a squared format, using one of the two cameras available, with or without flash. Besides these, the iOS native application offers a shortcut to access the device’s gallery.
2.3.1.2 Photoshop Express (iOS)
The tool developed by Adobe [Ado] has a shooting mode with some extra features in comparison with the native application. Having a preview of the image taken is an inter-esting feature to be used in a more professional context, allowing the user to decide if it is a usable photo before saving it in the gallery. Although in most of the available appli-cations the zoom feature is already a given, in Photoshop Express it can be controlled by an horizontal slider. The fact that it is always visible, the user understands how to make zoom more easily compared with default applications, where the zoom can be done by performing a pinching action on the screen. The pinching action might not be very clear for someone using the application for the first time, therefore, an horizontal slider as the one presented in Photoshop Express might be a good alternative.
2.3.1.3 Photosynth (iOS)
Photosynth, developed by Microsoft [Mic], was created to support a social network cen-tred in creating and sharing panoramic photos. The social features will not be described since they are not the main topic of this thesis. Regarding the image capturing abili-ties, this application allows the user to create a software generated panoramic image. The device displays a 3-dimensional spherical space that rotates with the user’s move-ment. As soon as the capture starts, Photosynth automatically captures the initial scene and all the adjacent scenes while the user is rotating. After the capture, this application identifies specific features in one photograph and matches them with others previously taken. Photographs are then paired by analysing the position of their matching features. To visualize the panoramic image, the stitched images are displayed in a 3-dimensional spherical space similar to the one presented on the capture display, with the particularity that the user must scroll to see the final result. Outside the application, when previewing the image in the gallery, it presents some deformations due to spherical transformations applied to the sampled photos.
2.3.1.4 Camera FV-5 (Android)
2. RELATEDWORK 2.3. Image Capture and Processing Applications
the indicators in the viewfinder that display values of exposure time, aperture, ISO, bat-tery remaining and how many photos are in buffer (Figure 2.7(b)). Camera FV-5 allows control over the available parameters, recreating some photographic techniques. Due to hardware issues, these recreations are the result of software emulation and not from lens adjustments thus reflecting in the quality of image taken.
(a) (b)
Figure 2.7: Camera FV5 interface (a) and indicators (b) of aperture, exposure time, ISO, etc [Vaz].
2.3.1.5 SketchCam
SketchCam [LM07] is a research project that uses a different approach towards mobile devices in photography. With a touch screen, it enables children to capture images by sketching the area of interest on the display. Using this approach, it allows the user to become more selective towards the scenario in front of her. It enables creativity in a way that the user may be able to create different frames for the picture that is being taken. After selecting the point of interest in the view display, it creates an object that can be used for future collages. This may help teaching the basic concepts of composition and photo editing by using a different display.
2.3.1.6 Frankencamera
Although there are many mobile devices with capabilities to take photos, most of them do not take full advantage of the imaging hardware and offer a highly simplified API. The programmer cannot control the camera exposure time or retrieval of raw sensor data. Motivated by these problems, Frankencamera [Ada+10] is an open-source archi-tecture with a custom-built camera based on Linux and gives full control of the hardware to the programmer through C++ language. This architecture consists in an application processor, a set of photographic devices such as flashes and lenses, and one or more im-age sensors, each with a specialized imim-age processor, forming a tightly coupled pipeline to coordinate all elements. All sensors, devices and parameters that describe the cap-ture and post-processing of a single output image, can be programmed through its API allowing a mechanism to precisely manipulate the hardware state over time.
Using an embedded gyroscope, the camera will stream full-resolution raw frames that will be stored, only if their gyroscope tags indicate low motion when the frame was taken. Another useful application is the creation of panoramic photos with extended dynamic range. In most devices, the user has to take various individual photographs and stitch them together on a computer, but with this system it is possible to individually set the exposure time of each shot creating a panorama with extended dynamic range and previewing the result instantly.
2.3.1.7 Camera51
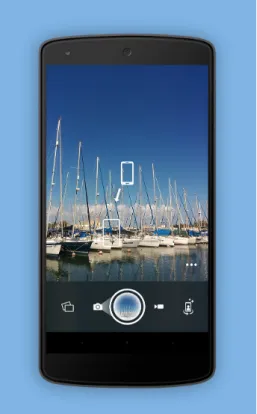
Camera51 is another recent application for the Android operating system which does not only set exposure and white balance automatically, but also aims to help optimize how a shot is framed which has similarities with the objective of this thesis. This application analyzes the scene looking for objects, faces, shapes, lines and other criteria, and suggests the best framing based on composition rules, such as the “Rule of Thirds”. It also pro-vides the option to manually select up to three objects in the scene by tapping on them, which will also be used to determine the best framing, focus and exposure. Since all the suggestions are calculated automatically the application has a simple interface (Fig-ure 2.8) which only allows to change between the rear and frontal camera, and change the flash options. It is not clear what kind of algorithms are being used to calculate the best placement. Besides the final result, there is not any kind of visual hint if the best placement is being calculated based on the scenarios composition or colour information.
2. RELATEDWORK 2.3. Image Capture and Processing Applications
2.3.1.8 Discussion
All commercial applications and research projects share the most basic features that should come embedded in any system capable of taking photos. These features include access to a gallery, control over flash, control between frontal or rear camera, an auxiliary grid and control over zoom. Android applications, comparatively to iOS, offer more control over the device’s hardware, such as shooting mode, resolution and image quality, aper-ture and ISO values. Allowing almost full control of the hardware to the user, is a very important feature that must be taken in consideration when developing an application to take photos. Given this fact, Android became a more reliable platform for users that want to use their mobile device for something more than casual photos.
With some interesting features, Camera FV5 is one of those applications for amateur photographers that presents a similar interface to a digital camera. It enables the possibil-ity of adjusting some photographic parameters and introduces the emulation of photog-raphy techniques. Interesting features that should be noted on Photosynth is the way the application handles the creation and preview of panoramas, where it detects and stitches in real-time, a sequence of consecutive photos by matching features on a 3-dimensional spherical space.
As research projects, SketchCam and FrankenCamera can go beyond what is available on standard systems. Although designed for kids, Sketchcam presents a system with a very different way to interact with the user in how she takes a photo. Selecting the point of interest by sketching a continuous path and giving form to different shapes of frames in a display with a live video feed, can be handy when a user only wants to emphasize a region or object in the viewfinder. Frankencamera allows computational photography to go a step further. It is the perfect example of what is possible by taking full advantage of a device capabilities. It allows to take long-exposure photos using the available gyroscope proving that better photos can be taken using available information from multiple sensors.
2.3.2 Image Processing Applications
2.3.2.1 Android and iOS Native Applications
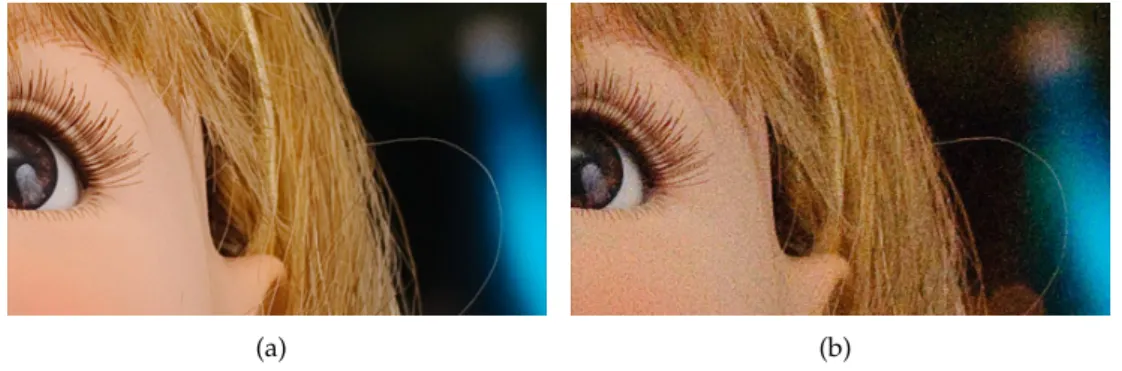
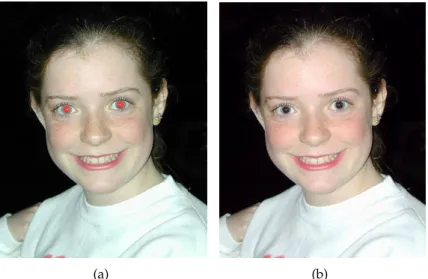
iOS already brings functionalities for image editing and since it is a system supported by all Apple devices, automatically all these devices have the same basic tools that can be used in photographs. These basic tools include image rotating and image cropping where a user can define which part to crop and select the proportion of the rectangle where the crop will be applied. Since iOS does not have an option to remove the red-eye effect while shooting, a user can later remove it by editing the photo and selecting the eye affected. More related to image effects, iOS offers a set of filters that can be applied to a photo including an option of auto enhance, where it readjusts the images white balance and automatically detects and removes the red-eye effect (Figure 2.94).
Android, on the other hand, comparing with previous versions, has a full set of tools available for image processing. Besides sharing the same options as iOS, it has a a group of advanced adjustments that can be applied to a photo [Sha13]. With these, a user can readjust exposure levels, contrast, hue, etc. In cases where only a specific part of a photo needs to be adjusted, Android allows local fine-tuning where a user applies corrections to multiple selected areas. At any point within the editor, a user can drag down from the top to view the original photo and save the edited image specifying the desired size and quality.
(a) (b)
Figure 2.9: Image (a) before and (b) after applying the auto enhancing tool. It is possible to see that the red-eye remover only darkens the red area and does not take in account the real colour of the eye.
2.3.2.2 PixelNote
PixelNote [Lin+13] is an iPad application for photo editing that works through a mul-timodal interface combining voice recognition and direct user interaction to manipulate images. It uses natural language to express how to modify an image and sketching to
2. RELATEDWORK 2.4. Image Evaluation
localize these changes to specific regions. Using the two inputs, a user can select and tag an object with a voice command that can be used for future identification through voice recognition.
The speech recognition technology converts the voice into character strings that Pix-elNote can process. First the strings pass through a local speech recognition engine that is trained for a specific set of words selected from a user study. When the system encounters words out of the expected vocabulary, the recorded voice data is sent to a remote speech recognition server. When all else fails, PixelNote shows a gallery with options that may be appropriate . Thus, this fallback system allows the user to also learn the vocabulary of the system while editing the image successfully.
2.3.2.3 Discussion
iOS and Android default applications represent two extremes of what is possible in terms of image editing on a mobile device. Other applications such as Photoshop Express (An-droid and iOS), Photo Editor (An(An-droid) or Camera Awesome (iOS) have similar func-tionalities as Android’s default application. Being relatively advanced in photo editing, Android introduces the notion of local fine-tuning to an image where a user can apply different corrections to localized areas of an image. As a research project, PixelNote ex-plores different ways of interacting with mobile devices. Using voice recognition with sketching on localized areas, PixelNote enables object selection and tagging, and correc-tion of specific areas in an image by recognizing specific voice commands. This project shows that is possible to extend an application capabilities for photo editing, exploring different types of interaction and reducing the difficulties of such a task on a small and portable screen.
Both multimodal interfaces and localized corrections, are features that should be taken in consideration when thinking of how to apply effects and interact with small screens as the ones in mobile devices.
2.4
Image Evaluation
2.4.1 Composition Rules
To obtain aesthetic results, photographers follow certain rules of composition that are the result of past artistic development. These rules are now considered as rules of thumb and serve as guidelines. Following these guidelines helps obtaining pleasant results but they are not absolute. Professional photographers also criticize them and defend that one must know when to break them. Being such a subjective topic, there is no recipe for a good composition and photographers always have the final call when taking a photo. This section describes some of the rules that capture the viewers attention and can be used in computational aesthetics.
2.4.1.1 Colour Balance
Although a good photograph is dependent on the subject that is being captured, colour has a major impact in creating a certain mood and empathy with the viewer.
It is rare for a colour to be isolated in a photo shoot, and depending on the colour palette, a different relation between them will be established. These relations can cate similar or different emotions that can be explored in a composition [San10]. A re-lation created by two complementary colours gives a sensation of balance, but if both colours have different luminosity values, the less luminous colour must be present in a greater amount comparing to its complement (Figure 2.10). To evoke a mood and arouse emotions, each colour has its own meaning that can be interpreted in different ways by different cultures. For the western civilization, yellow symbolizes cheerfulness, joy and optimism, but for the eastern civilization, it is related to the imperial kingdom and sym-bolizes something sacred. On the other hand, in Egypt, it is a colour for mourning.
2. RELATEDWORK 2.4. Image Evaluation
2.4.1.2 Rule of the Golden Section and Golden Spiral
There are rules used by many photographers, artists, and architects, considered to ob-tain very appealing results. The golden section rule is based on the golden ratio. This value can be achieved from a division between two consecutive numbers in a Fibonacci sequence. For example, defining the sequence [8,13,21] as a subsequence of the original Fibonacci, dividing 13 by 8, and 21 by 13 will result in a ratio, that in the limit will be equal to the golden number (i.e. ≈ 1.6180339). This golden number is what defines a golden section [San10].
This section, which is believed to be aesthetically pleasing, consists of a group of rectangles in which the ratio of the longer side to the shorter is equal to the golden ratio. It is possible to draw a logarithmic spiral whose growth factor is equal to this ratio, called the golden spiral, which converges to the smallest rectangle in the section.
Using this golden ratio, one can form a grid dividing the golden section in 1.6 to 1 parts. Applying this division to a golden section, we obtain a grid as in Figure 2.11(a), where the intersection of the lines indicate imaginary points where the main subject should be located. From this point onward, these imaginary points will be treated as power points.
(a) (b)
Figure 2.11: Guidelines formed from dividing the (a) golden section in 1.6 to 1 parts and from (b) the golden spiral.
2.4.1.3 Rule of Thirds
Figure 2.12: Guidelines of the rule of thirds with nine equal rectangles and respective power points at the intersection between horizontal an vertical guidelines.
2.4.1.4 Triangles and Golden Triangles Rule
The most common shape of composition in a portrait is that of a triangle, imagining a portrait with the head being the peak and the width of the body being the base [Cle04]. This enhances the subject and boosts the composition.
The golden triangles rule uses a group of triangles that follow the proportions de-scribed by the golden section. Using a golden section, we draw a diagonal line between two corners of the rectangle and connect a perpendicular line to each of the remaining corners. In some cases, this can be simplified to only one perpendicular, having only one power point in the intersection with the diagonal line and a suggestive region in the frame to place the elements [San10].
Figure 2.13: Guidelines obtained by the golden triangles rule.
2.4.1.5 Usage of leading lines
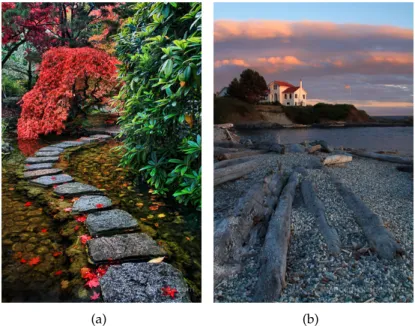
Lines can be used implicitly by creating an imaginary line between two subjects in a picture, or explicitly, like the edges of a building. In the perspective of Kamps [Kam12] vertical, horizontal, diagonal or curved lines can be formed of just about anything and have the purpose of leading the viewer to a specific area, giving emphasis to the subject being photographed (Figure 2.145).
Horizontal lines are easier to interpret and give a sensation of stability and safety.
2. RELATEDWORK 2.4. Image Evaluation
Vertical lines can delimit the begin and the end of a scene, and work as an enforcement for horizontal lines. Diagonal lines are responsible for creating perspective in a photo. If the photo does not have a specific subject to photograph, diagonals can direct a viewer to outside of the frame, but on the other hand, the viewer eyes can be imprisoned by using straight angles. Curved lines can have a number of curves, and for that reason, they can give a sensation of movement. Although, depending on the subject and depth of field, the same curves might have different results. It is important to refer that these interpretations can depend on the viewer.
(a) (b)
Figure 2.14: Examples of a curved line (a) that redirects the viewer’s eye to the maple tree, and vertical lines (b) that redirects to the subject in the photo.
2.4.1.6 Balance of elements
Unconsciously, the human mind evaluates a photo and checks if there exists any balance or unbalance between the elements [San10]. To judge the balance between the elements of a composition, we must imagine a frame divided by two and a scale that will measure the weight of the left side with the right side (Figure 2.156). When the scale is perfectly balanced which is very common in symmetrical images, it means that both sides have the same weight visually, creating what is called static balance. In dynamic balance, it is possible to create a balance in the image between two imbalanced sides. This can be achieved if one of the sides has a larger element and the remaining side has a smaller but brighter object. The scale does not have to be perfectly balanced and a strong composition can be created with unbalanced sceneries. This way, the viewers attention will lie over the same side, empowering the subject in the frame.
6Source: (a) http://joelsantos.net/, (b) http://www.flickr.com/photos/
(a) (b) (c)
(d) (e) (f)
Figure 2.15: Example images of element balancing and corresponding schematic. (a-d) Static balance normally associated with symmetry. (b-e) Dynamic balance where the left side has a larger subject that is being balanced by a smaller but brighter subject on the right side. (c-f) Unbalanced picture where the subject is positioned on the left side, leaving the right side with a negative space.
2.4.2 Evaluation of Aesthetic Features
Some authors have used some of the rules described in Section 2.4 as a basis for classifier training or score attribution on extracted features. Rules like Rule of Thirds (Section 2.4.1.3) and spatial distribution of a subject have already been topics of research.
Bhattacharya, Sukthankar, and Shah [BSS10] attempted to associate a users’ notions of aesthetics by formulating photographic quality assessment measures in a machine learn-ing context. One of these measures consists in the relative foreground position which is defined as the normalized Euclidean distance between the foregrounds center of mass and one of the four power-points, that although it works for images with single-subject compositions, it is not viable for landscape or seascape scenarios.
Liu et al. [Liu+10] use a similar approach to generate a score. Instead of just using the Rule of Thirds, the authors also use a saliency map and the prominent lines in a photo. The final score is calculated by Eq. 2.1, where Epoint represents the sum of the
mass of each salient region multiplied by its minimum distance to a power-pointin the rule of thirds, andElinerepresents the sum of each saliency of value of a prominent line
multiplied by the minimum distance to a rule of thirds line. γpointandγline are weights
given to each of the components. The author that defined the line based in the Rule of Thirds is a better predictor than its point-based counter part, so the weights in Eq. 2.1 are
γpoint = 1/3andγline= 2/3.
2. RELATEDWORK 2.4. Image Evaluation
Although it is more oriented for assessing human portraits, Khan and Vogel [KV12] present an approach that explores a photos’ spatial composition, by computing a score given the location of a face centroid in a specific template (Figure 2.16). This template gives higher scores on lighter areas, and good scores on blur locations around those lighter areas.
Figure 2.16: Spatial composition template used in [KV12].
Extracting features related to colour have also been explored when trying to identify a photograph with a good aesthetic score.
Khan and Vogel [KV12] proposes a set of features extracted from an area where a face is recognized. This set of features include the illumination of a face by calculating the absolute difference between mean Value (in HSV) of left and right side of face bounding box; the background contrast, calculating absolute difference between mean value of face bounding box and image without face bounding box; and brightness of an image by calculating its mean value.
Other more elaborated methods were presented by Luo, Wang, and Tang [LWT11] exploring the lightning and color arrangement in a photograph. After identifying the subject area, the author explores the colourfulness, clarity contrast and lightning contrast between the subject area and the background.
2.4.3 Practical Application of Aesthetic Evaluation Systems
As mentioned in Section 2.4, computational aesthetics can be described as aesthetic deci-sions made by computational methods. Increasing aesthetic awareness, researchers de-veloped systems and algorithms that extract and evaluate features of an image based in rules such as the ones described in Section 2.4.1.
Defining aesthetics as a "concern with beauty and art and understanding of beautiful thing", Datta et al. [Dat+06] described a system capable of extracting visual properties and automatically tell the difference between aesthetically pleasing and displeasing im-ages. Based on data extracted from an on-line photo sharing community, a set of images and associated aesthetic ratings given by the community were used to train a classifier.
are obtained. A total of 56 candidate features related to the image properties (e.g. ex-posure, hue, saturation, size and aspect ratio) and composition (e.g. rule of thirds, use of texture and shape convexity) are extracted from those matrices. These features were chosen to study patterns that could lead to higher or lower aesthetic ratings. By using a segmentation method based on clustering, information relevant to some features was extracted from objects within the photographs. From all the candidate features, 15 vi-sual features were selected and establishing a significant correlation between the vivi-sual properties of photographic images and their aesthetics ratings given by the community. The selected features would later be used by the classifier to attribute a rating to an im-age. Later, a publicly accessible system calledACQUINE[DW10] was developed. A user could upload their photographs and have them rated automatically for aesthetic quality. Compromising on a subset of the features previously presented,ACQUINEwas able to generate quick responses through a simple interface (Figure 2.17(a)) that kept the under-lying classifier hidden. A user would then submit an image and wait for the classifiers prediction of aesthetic value. The user could also give a rating on a 7-star scale (Figure 2.17(b)) (similar to Photo.net’s rating scale) that would be stored for future validation and improvements on the classifier.
Following the same methodology, Yeh et al. [Yeh+10] described a ranking system. This system listed 1000 ranked photographs ordered from the highest rank to the lowest. The score of each photograph was considered as a linear combination of each feature and its corresponding optimal weighting factor, that was found after the extraction of fea-tures. However, since the optimal weights might not combine with the users preferences, it allows them to combine personal taste with a trained model, and rearrange the ordered list of ranked photographs. The weighting adjustments can be feature-based where the user can personally select the weight of each feature (Figure 2.18(a)), or an example-based approach (Figure 2.18(b)), where the user selects a photograph of their liking and the sys-tem updates the weighting based on the example chosen. The features chosen to extract are quite similar to the ones used in [Dat+06], but introduce an interesting composition rule. They extract the subject region and assess the simplicity of a photograph by the colour distribution of the remaining region that corresponds to the background.
2.5
Computer Vision Algorithms
2. RELATEDWORK 2.5. Computer Vision Algorithms
(a)
(b)
(a) (b)
Figure 2.18: (a) Re-ranking photographs by adjusting the feature weighting and (b) by selecting a few photographs as example [Yeh+10].
2.5.1 Keypoint Detection
Keypoint detection is based on specific locations in the images that can be easily distin-guished. These local features are often described by the appearance of patches of pixels surrounding the point location [Sze11]. There are several feature detectors of this type. In this section, we will describe three: SIFT [Low99], SURF [BTVG06], and FAST [RD06].
2.5.1.1 SIFT
Scale Invariant Feature Transform (SIFT) [Low99], is an algorithm used for object recogni-tion. This algorithm uses a set of features that are invariant to image scaling, translation, and rotation, and partially invariant to illumination changes, noise and minor variations in the viewpoint. The algorithm starts by identifying stable points that remain invariant to scale transformations. After extracting the first keypoints, it eliminates the ones that have low contrast and are badly localized alongside an edge, narrowing the total number of keypoints, ensuring that the keypoints are more stable for matching and recognition. Dominant orientations are assigned to each keypoint based on local image gradient di-rection. A descriptor vector for each of the remaining keypoints is computed in the final stage.
2.5.1.2 SURF
2. RELATEDWORK 2.5. Computer Vision Algorithms
2.5.1.3 FAST
Features from Accelerated Segment Test (FAST) [RD06] is a fast algorithm capable of detecting feature points in real-time frame-rate applications. FAST is a corner detector algorithm that detects a candidate point and tests if it is a corner through its adjacent points inside a perimeter of 16 pixels. Although it is faster than both SIFT (Section 2.5.1.1) and SURF (Section 2.5.1.2), FAST is not as robust. The reduced ability to average out noise is why the results are not as good as the other algorithms, but can be used to process image features in real-time.
2.5.2 Colour Features
Colour also provides valuable information for object description and matching. How-ever, there can be large variations in lighting and viewing conditions, complicating the description of images. Therefore, the properties of colour features extracted must be in-variant. SIFT (Section 2.5.1.1) has proven to be a very robust and precise feature descrip-tor, but properties such as light color changes have no effect because the image is con-verted to gray-scale [SGS08]. Abdel-Hakim and Farag [AHF06] extends this algorithm by proposing Coloured SIFT (CSIFT), building the SIFT descriptor in a colour invariant space.
2.5.3 Texture Features
Texture is considered an important component of human visual perception. Texture can be defined by its coarseness, contrast and direction, and has properties such as periodic-ity and scale [HR04]. Manjunath and Ma [MM96] presented a method for extraction of texture information for browsing and retrieval of large image data. This method uses a Gabor function that results in the mathematical representation of a sinusoidal wave. This function is then applied multiple times over the image with different parameters, chang-ing both the scale and orientation of the sinusoidal. Workchang-ing as a filter, the remainchang-ing pixels are then eligible as candidate features. The values of scale and orientation ap-plied on the Gabor function to obtain each candidate feature are then used as its feature descriptors.
2.5.4 Discussion
Of the three algorithms described for keypoint feature detection, SIFT is the most robust one. SIFT provides better results and SURF and FAST are faster, sacrificing its robustness. For the context of this dissertation, FAST might be the most appropriate as it claims to be able of detecting features on real-time frame-rate applications.
that use different color spaces to explore such invariances.
3
System Description and Features
This chapter describes the most relevant aspects related to the development of the system such as the concept behind the application, the architecture and general structure. It includes a detailed explanation about the functionalities implemented with the proposed technologies and the preliminary user interfaces.
3.1
System Description
Photo aesthetic quality assessment aims to classify the photographs into high or low qual-ity automatically. Tong et al. [Ton+05] attempted to classify photographs taken by profes-sionals or casual users using low-level features derived from computer vision techniques. As already mentioned in Section 2.4.2, techniques for training classifiers to automatically assess the quality of an image, have already been devised. Since mobile devices are con-stantly used in photography nowadays, it is only logical that improving photography in such devices is the next step to take.
3.1.1 Concept
The development of this set of features started by thinking of useful information that could be extracted from a real-time camera feed. The purpose of extracting this informa-tion is to give a user a different insight of the photo that is being taken and help to attain better results without resorting to any photo manipulation techniques or tools. It results in an application that demonstrates a set of tools and techniques that process real-time images and responds with visual cues overlaid on the processed data.
![Figure 2.1: Difference between a shallow depth of field (a) and a wider depth of field (b) [Kam12].](https://thumb-eu.123doks.com/thumbv2/123dok_br/16526620.736016/27.892.206.724.362.561/figure-difference-shallow-depth-field-wider-depth-field.webp)
![Figure 2.4: Examples of Long-Exposure Photography [Kam12].](https://thumb-eu.123doks.com/thumbv2/123dok_br/16526620.736016/29.892.175.767.444.673/figure-examples-of-long-exposure-photography-kam.webp)
![Figure 2.6: Image of attachable lens for iPhone, GoPano micro (a), and panorama made by the second algorithm described at Szeliski and Shum [SS97] with distortion at the north pole.](https://thumb-eu.123doks.com/thumbv2/123dok_br/16526620.736016/31.892.174.772.826.1032/figure-attachable-gopano-panorama-algorithm-described-szeliski-distortion.webp)
![Figure 2.10: Image of two complementary colours balanced in a frame [San10].](https://thumb-eu.123doks.com/thumbv2/123dok_br/16526620.736016/39.892.219.717.742.1081/figure-image-complementary-colours-balanced-frame-san.webp)