VIEWS AND REVIEWS
The pterional craniotomy: tips and tricks
A craniotomia pterional: dicas e truques
Feres Chaddad-Neto1-3, José Maria Campos Filho2,3, Hugo Leonardo Dória-Netto2,3, Mario H. Faria2, Guilherme Carvalhal Ribas4, Evandro Oliveira5
he frontotemporosphenoidal craniotomy, usually de-nominated pterional craniotomy, was irst described by Yasargil in 1975 and is one of the earliest landmarks of the ad-vents of microneurosurgery1-3. his approach enables,
specii-cally, the exposure of the entire frontoparietal operculum4,5,
the opening of the entire sylvian issure6,7 and all anterior
cis-terns of the encephalon base2,5, which makes both the
pteri-onal craniotomy and the transylvian approach the widest used techniques in today’s neurosurgery practice.
Over the past decades, the pterional craniotomy has un-dergone a systematization modiied by several authors, what also gave rise to more extended types of craniotomies8,9.
Among then, the supraorbital craniotomy10 and the
orbito-frontozygomatic craniotomy10-13 stands out.
his review ofered a detailed description of the technique we use nowadays for this procedure, with modiications aris-ing from its extensive use since its initial proposal, seekaris-ing to optimize all its stages, the access and opening of the cisterns, as well as minimize brain retraction.
DESCRIPTION OF PROCEDURE
Positioning — the patient should be placed supine, with the shoulder at the edge of the surgical table in a neutral position, and head and neck remain suspended after removal of the head support. he head should be secured by a three-pin skull ixa-tion devise (Mayield or Sugita model) and must be maintained above the level of the right atrium to facilitate venous return. In order to avoid the head holder position to hinder the surgeon’s procedure, the ipsilateral pin of the operative ield should be set on the mastoid region, while the two contralateral pins should be on the contralateral superior temporal line, above the tempo-ral muscle, that should not be transixed. he pin corresponding to the ipsilateral mastoid and the most anterior one correspond-ing to the contralateral superior temporal line must be in parallel position to prevent any head movement, especially during future traction of cranial wraps made with the aid of ish-hooks.
here is a sequence of ive movements for the positioning of the head: traction, lifting, delection, rotation and torsion.
1Neurosurgery Assistant Professor, Discipline of Neurosurgery, Department of Neurology, Faculty of Medical Sciences, Universidade Estadual de Campinas
(Unicamp), Campinas SP, Brazil;
2Neurosurgeon of Instituto de Ciências Neurológicas (ICNE), São Paulo SP, Brazil;
3Neurosurgeon of Hospital Beneficência Portuguesa, São Paulo SP, Brazil;
4Lecturer and Coordinator of the Applied Neuroanatomy Section, Discipline of Human Structural Topography, Department of Surgery, Faculty of Medicine,
Universidade de São Paulo (USP), São Paulo SP, Brazil;
5Professor and Head of the Discipline of Neurosurgery, Department of Neurology, Faculty of Medical Sciences, Unicamp, Campinas SP, Brazil. Coordinator of
the Microneurosurgery Laboratory, ICNE, Hospital Beneficência Portuguesa, São Paulo SP, Brazil.
Correspondence: Feres Chaddad-Neto; Praça Amadeu Amaral 27 / 5º andar; 01327-010 São Paulo SP - Brasil; E-mail: [email protected]
Conflict of interest: There is no conflict of interest to declare.
Received 21 February 2012; Received in final form 07 March 2012; Accepted 14 March 2012.
ABSTRACT
This review intended to describe in a didactic and practical manner the frontotemporosphenoidal craniotomy, which is usually known as pteri-onal craniotomy and constitute the cranial approach mostly utilized in the modern neurosurgery. This is, then, basically a descriptive text, divided according to the main stages involved in this procedure, and describes with details how the authors currently perform this craniotomy.
Key words: craniotomy, microsurgery, neurosurgery.
RESUMO
A presente revisão visou descrever de forma didática e prática a realização da craniotomia frontotemporoesfenoidal, usualmente denomina-da pterional, que constitui a craniotomia mais utilizadenomina-da na prática neurocirúrgica atual. Trata-se, portanto, de um texto fundenomina-damentalmente descritivo, dividido conforme as principais etapas envolvidas na realização desse procedimento, que mostra com detalhes a técnica utilizada atualmente pelo presente grupo de autores.
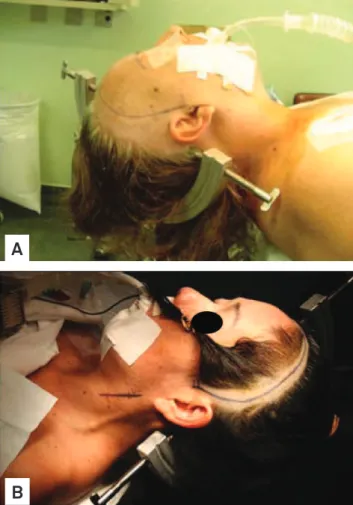
In the traction, the head is moved along with the head holder toward the surgeon; in the lifting stage, the region to be op-erated is positioned at the level above the right atrium; the delection and rotation depend on the condition being oper-ated; and, in the torsion, the angle formed by the head, neck and shoulder should increase so as to allow a closer lateral position of the surgeon regarding the surgical area (Fig 1).
More basal pathologic conditions, such as carotid-ophthal-mic, posterior-communicating and choroidal segments aneu-rysms, and pathologies of the cavernous sinus region require little delection and greater rotation, leaving the orbital ridge in the superior plane. On the other hand, other conditions, as an-eurysms of the middle cerebral artery, of the carotid bifurcation, of the anterior cerebral and anterior communicating complex, and suprasellar tumors with more superior extension require a positioning with greater delection and little head rotation, leav-ing the malar prominence in the superior plane.
Trichotomy — after the patient has been induced gen-eral anesthesia and has been properly catheterized, the hair should be combed with a brush used for washing the hands, soaked in detergent solution (chlorhexidine or polyvinyl-pyrrolidone), so as to facilitate the shaving that should be
performed up to 2 cm from the region of the surgical incision (Fig 1A). he shaving just prior to surgery allows the better ixating of ields, the reduction of infection risks and the bet-ter ixation of the bandage afbet-ter surgery. Once the area has been shaved, it is treated with ether-soaked gauze to remove the fat of the scalp and facilitate the ixation of ields and the marking of the incision area with methylene blue. he shav-ing can also be performed followshav-ing only the incision line, with a width of about 2 cm (Fig 1B).
Marking, antisepsis and scalp incision — after the position-ing and trichotomy, the markposition-ing of the skin incision is done, so that its two endings form an imaginary straight line that ade-quately simulate the separation of the skin lap and the conse-quent bone exposure. he marking should be arcuate, starting at the superior rim of the zygomatic arch anterior to the tragus, and extend up to the midline of the skull in the frontal region, re-specting the hairline whenever possible (Fig 1). he marked area anterior to the tragus should not be much anterior in order to prevent any section of the supericial temporal artery and of the frontal branch of the facial nerve located anterior to that artery.
At this moment, the arch of the surgical table that will serve as support for the tractions of the cutaneous, muscular and facial laps must be properly positioned at a height that does not allow the simultaneous compression of the eyeball. he ocular compression can cause blindness by thrombosis of the central retinal vein, especially in patients with shallow orbits, which is more common among yellow race people. A measuring device for determining the central venous pres-sure, positioned between the nasion and the arch of the surgi-cal table allows, by triangulation, estimate the angle degree of future tractions in relation to the surface of the eyeball.
he antisepsis should be carried out with povidone and, afterwards, benzoin should be applied to better guarantee the area adhesivity.
he scalp incision should be made with a scalpel, and the use of bipolar coagulation helps avoid bleeding of scalp arter-ies. he placement of wet gauze and the later traction of the scalp lap can spare the use of haemostatic clips and speciic staples for this purpose.
Interfacial dissection, section and displacement of the temporalis muscle —the interfacial dissection of the tem-poralis muscle, as originally described by Yasargil1, is
specii-cally intended to preserve the frontotemporal branch of the facial nerve and reduce postoperative cosmetic changes re-sulting from the surgical wound.
he temporalis muscle is made up of two parts: an outer part which originates in the superior temporal line and in-serts onto the coronoid process of the jawbone; and a deeper part that has its origin along the surface of the temporal squa-ma and inserts onto the temporal crest of the jawbone. he temporalis muscle is covered by a supericial fascia, which in turn consists of two layers (supericial and deep layers) sepa-rated in their anterior portion by a pad of adipose tissue and
Fig 1. Positioning, trichotomy and marking of the incision: (A) trichotomy performed up to 2 cm behind the incision area; (B) trichotomy performed only along the incision area.
A
by a deep fascia more attached to the skull and that protects
its vasculature (anterior, intermediate and posterior deep temporal arteries, branches of the maxillary artery) and its innervations (temporal branches of the mandible branches of the trigeminal nerve).
he dissection of the supericial fascia should be made vertically starting from the superior temporal line, from 1.5 to 2 cm from the superior rim of the orbit to the posterior root of the zygomatic arch, with the aid of a cold scalpel #13 and Metzenbaum scissors (Fig 2A). he removal of the sur-face layer of the supericial temporal fascia and its underly-ing fat pad with the use of a hook placed at its center point
facilitates the completion of the dissection, whose basal layer is hindered by the presence of temporal nerves and vessels. With a most basal removal of the surface layer and the fat pad, the deep muscular portion becomes well visualized.
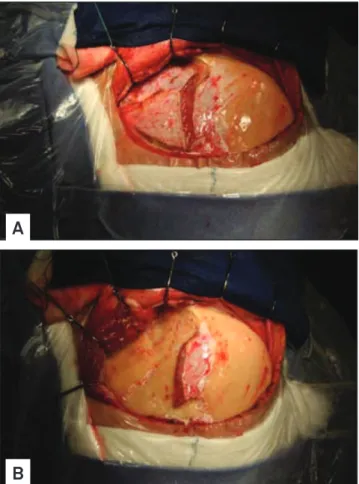
hen, dissection and detachment of the temporalis muscle are performed in two stages. Initially, we use the monopolar electrosurgery pencil (in the coagulation mode, and not for cutting, in order to avoid much bleeding) for the transversal section of the upper portion of the temporal muscle. We use the scalpel in a parallel position and about 1.5 cm inferior to the superior temporal line, moving from anterior to posterior, and leaving a top lap of temporal muscle attached to the skull surface for later suture of the inferior part that will be detached and that during closure will come to cover mainly the anterior burr hole (Fig 2A). he second stage consists of performing the detachment of the deep muscular fascia of the skull, a procedure that should be carried out with the aid of a Cushing’s elevator. he detachment of the deep temporal fascia is facilitated when started on its posterior superior portion and using horizontal movements made with the tip of the elevator. After completing the detachment, the temporal muscles must be moved away towards the posterior inferior section with the help of three hooks (Fig 2B).
Craniotomy — the main objective of the pterional crani-otomy is to provide a basal and wide exposure of the lateral issure or Sylvian issure14,15. herefore, the inferior frontal
gy-rus and part of the middle frontal gygy-rus, as well as the supe-rior temporal gyrus and the upper part of the middle tem-poral gyrus, should be exposed, allowing the microsurgical
separation of the inferior frontal gyrus and superior temporal gyrus without their compression against the bony rim.
he pterional craniotomy should be performed starting from three points of trepanation. he irst trepanation must be set between the superior temporal line and the frontozy-gomatic suture of the external orbital process; the second trepanation is performed on the most posterior extension of the superior temporal line; and the third one should be made on the inferior portion of the squamous part of the temporal bone (Fig 3A). Since the lesser wing of the sphenoid bone is
Fig 2. Incisions and detachment of the temporalis muscle: (A) vertical muscle incision performed perpendicularly to the zygoma for the interfacial dissection and transverse incision parallel to the superior temporal line, leaving a superior strap of the temporal muscle attached to the skull; (B) removing of the temporal muscle with three hooks after detachment using a thin Cushing’s elevator.
A
B
Fig 3. Trepanation, craniotomy and basal drilling: (A) the three trepanations and osteotomy lines of the craniotomy, with the most anterior one interrupted at the level of the external projection of the greater wing of the sphenoid bone; (B) drilling of the external projection of the greater wing of the sphenoid for further removal of the bone flap; (C) initial drilling details of the orbital roof; (D) view of the dural cuff that contains the meningo-orbital artery, shown at the superolateral level of the superior orbital fissure.
C
D
internally between the irst and third trepanations, and this bone rim will be properly removed through its drilling, the third trepanation should not be performed very close to the base to facilitate future bone cut between these two trepana-tions. In cases of prominent sphenoid wing, the osteotomy of that segment should be complemented with the use of drill-ing, as described below. After the trepanations, the dura must be properly detached from the internal bone surface with the aid of dissectors suitable for this purpose.
he craniotomy can be done using a Gigli saw or a cra-niotome, always making the cut at the level of the outer edge of each trepanation. In the cases in which the lesser sphenoid wing is too prominent to the point that it pre-vents the complete osteotomy between the irst and third trepanations, the bone lap should be removed only after performing a supericial drilling of approximately 1 cm of the lateral surface of the greater wing of the sphenoid bone, as mentioned above (Fig 3B).
After its proper hemostasis with bipolar electrosurgical forceps already at low power in order to avoid further retrac-tions, the dura must be anchored with 4.0 nylon or prolene through perforations made along the bone ridge, aiming thereby to prevent the formation of extradural blood collec-tions, both trans and postsurgery.
Basal drilling — the purpose of the drilling of the lesser wing of the sphenoid bone, of the orbital roof and of what re-mains of the temporal squama is to achieve bone lattening to facilitate the basal access with minimal brain retraction, which will be further optimized with cisternal opening and the aspiration of cerebrospinal luid.
Firstly, the dura is detached of the orbital roof and of what remains of the lesser wing of the sphenoid with the use of appropriate dissectors, in order to attain a better exposure of these bone surfaces and for the eventual placement of the spatula ixed to the orthostatic retractor that, if necessary, can also be used as a protective element of the dural surface. he drilling should be initiated on the outermost section of the orbital roof with the use of cylindrical or round drill, seek-ing the removal of its bony prominences (Fig 3C). hen, the basis of the remaining temporal squama must be drilled so
as to leave projected the lesser wing of the sphenoid between the orbital roof and the temporal base already drilled. he lesser wing of the sphenoid bone should then be drilled after the repositioning of the spatula on the dural impression of the sphenoid, until we get visibility of the dural cuf that con-tains the meningo-orbital artery located at the superolateral level of the superior orbital issure (Fig 3D and 4). After its identiication, the meningo-orbital artery should be isolated, coagulated and sectioned with a cold blade scalpel #11, with its cutting side facing the lesser wing of the sphenoid, and the concomitant posterior traction of the dura. he most delicate drillings must be made with the use of match-shaped drills or diamond drills, whenever possible. When the dural resis-tance is intense, a small incision of the dura at the projection of the lateral issure level can be made, in order to enable ce-rebrospinal luid drainage and subsequent dural relaxation.
It is important to point out that the dural detachment should not exceed the limits of the drilling, preventing this way the creation of dead extradural spaces. Along the tempo-ral bone ridge, the dutempo-ral anchoring should be complemented after the completion of the drilling.
Draping the operative field over the bony ridge — af-ter the positioning and arrangement of rectangular cotton blocks on the free bony ridge, blue drapes are placed on
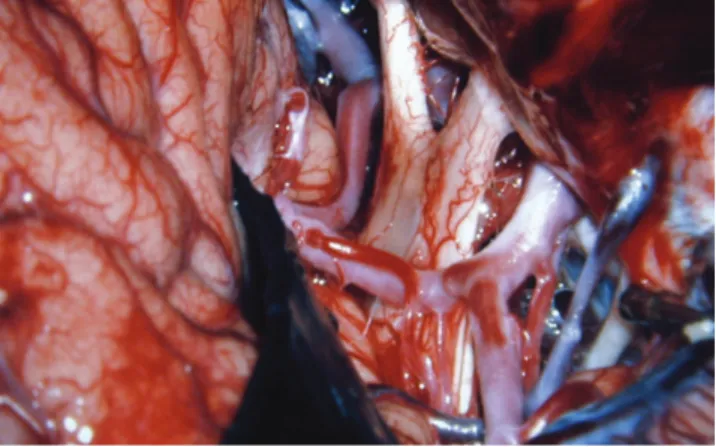
Fig 4. The meningo-orbital artery located at the superolateral level of the superior orbital fissure.
Fig 5. Opening of the dura mater and brain exposure: (A) initial frontal dural incision, from the most posterior to the most anterior superior portion of the dural exposure; (B) complementation of the frontal flap with the second incision along the lateral fissure and reflection of the frontal dural flap on the orbital roof; (C) temporal incision, inferior and parallel to the lateral fissure, and reflection of the temporal flap on the sphenoid base, characterizing the dural opening in the form of a large “C” with an anterior concavity; (D) the complementation of temporal exposure should be attained with vertical incisions perpendicular to the margins of the craniotomy, as needed for each case.
C
D
Fig 6. The sylvian fissure is open and the middle cerebral artery is exposed. The superficial sylvian vein is attached to the superficial part of the temporal lobe.
the pieces of cotton, aiming to cover the superficial crani-al wraps and minimize the further reflection of light from the surgical microscope.
Opening of the dura mater and brain exposure — the opening of the dura mater should be made in a way that, when folded back, the external dural surface adapts itself to the bone surface without the formation of wrinkles or folds that might obstruct the microneurosurgical ield.
he dural opening should take the inal form of a big “C”, with its free concavity facing the orbital roof and the sphe-noid base already drilled.
The dural incision should be initiated near the second trepanation; so, it should be initiated at the level of the most frontoparietal aspect of the dural exposure, using a scalpel blade #11, and continued in frontal superior direc-tion, at this point with the use of Metzenbaum scissors (Fig 5A). A second incision should be made on and along the Sylvian fissure, in order to characterize the frontal flap of the dural opening, which is soon to be anchored with 4.0 nylon or prolene thread and pulled back in order to lift up the dural edges (Fig 5B). The “C” opening must be complemented with the third dural incision that should also be made from posterior to anterior, inferior now, but also parallel to the lateral fissure, in direction and up to about 1.5 cm from the superior orbital fissure, character-izing this way, the temporal flap (Fig 5C).
With these opening procedures, the frontal dural lap can be relected and pulled on the orbital roof without causing roughness or superposition of the dura mater, and the tem-poral lap can be relected in the same way on the sphenoid base, thus exposing the lateral issure and the frontal opercu-lum formed by the inferior frontal gyrus.
he basal extension of the dura opening through vertical incisions and the resulting magnitude of the temporal expo-sure depend on the condition being operated. For the real-ization of the common transylvian procedures, it suices the exposure of the temporal operculum, which is composed of the superior temporal gyrus (Fig 5D).
Opening of the sylvian fissure — the sylvian fissure is composed of a superficial and a deep part. The superfi-cial part presents a stem and three branches; the stem ex-tends medially from the semilunar gyrus of the uncus, be-tween the basal surface of the frontal lobe and the pole of the temporal lobe to the lateral end of the sphenoid ridge, where the stem divides itself into anterior horizon-tal, anterior ascending and posterior branches. The deep part is divided in an anterior part, sphenoidal compart-ment and a posterior part, operculoinsular compartcompart-ment. The sphenoidal compartment arises in the region of the limen insulae, at the lateral margin of the anterior perfo-rated substance. The sphenoidal compartment is a narrow space posterior to the sphenoid ridge, between the frontal and the temporal lobes, that communicates medially with
the carotid cistern. The operculoinsular compartment is formed by two narrow clefts, the opercula cleft between the opposing lips of the frontoparietal and the temporal opercula and the insular cleft. The insular cleft has a su-perior limb, located between the insula and the frontopa-rietal opercula, and an inferior limb between the insula and the temporal operculum. The opercular cleft is com-posed of the frontal and parietal opercula superiorly and the temporal operculum inferiorly.
When the lips of the sylvian issure are separated widely, we can see the insula. he insula connects the temporal lobe to the posterior orbital gyrus via the limen insulae. he limen insulae serves as threshold between the carotid cistern (also called sylvian vallecula) medially and the sylvian issure later-ally. From microsurgical and radiologic viewpoints, the insu-la represents the external covering of a mass constituted by the extreme, external and internal capsules, claustrum, basal ganglia and thalamus.
he pterional approach proceeds with the opening of the sylvian issure and the basal cisterns. We usually open the basal cisterns before the sylvian issure to drain the cerebro-spinal luid relaxing the brain, what makes the split of the syl-vian issure easier. his splitting usually begins at the level of the pars triangularis, where the space between the frontal and the temporal lobes is wider.
he supericial part of the sylvian issure is opened using a scalpel blade number 11 and microscissors. he dissection is usually done on the frontal side of the supericial sylvian vein, leaving its supericial part to the temporal side (Fig 6). he supericial sylvian vein commonly courses laterally to-ward the tip of the temporal lobe to empty into the sphe-noparietal sinus16. Sometimes, the supericial sylvian vein
1. Yasargil MG, Fox JL, Ray MW. The operative approach to aneurysms of the anterior communicating artery. In Krayenbül H (Ed). Advances and technical standards in neurosurgery. Wien: Springer-Verlag; 1975. p.114-17.
2. Yasargil MG, Kasdaglis K, Jain KK, Weber HP. Anatomical observations of the subarachnoid cisterns of the brain during surgery. J Neurosurg 1976;44:298-302.
3. Yasargil MG. Legacy of microneurosurgery: memoirs, lessons, and axioms. Neurosurgery 1999;45:1025-1091.
4. Chaddad-Neto F, Carvalhal Ribas G, de Oliveira E. A Craniotomia Pterional, descrição passo a passo. Arq. Neuropsiquiatr 2007;65:101-106.
5. Yasargil MG. Microneurosurgery. Stuttgart: Georg Thieme; 1984.
6. Yasargil MG, Krisht AF, Türe U, Al-Mefty O, Yasargil DCH. Microsurgery of insular gliomas: Part I. Surgical anatomy of the Sylvian cistern. Contemporary Neurosurgery 2002;24:1-8.
7. Yasargil MG, Krisht AF, Türe U, Al-Mefty O, Yasargil DCH. Microsurgery of insular gliomas: Part II. Opening of the sylvian fissure. Contemporary Neurosurgery 2002;24:1-5.
8. Figueiredo EG, Oliveira AM, Plese JP, Teixeira MJ. Perspective of the frontolateral craniotomies. Arq Neuropsiquiatr 2010;68:430-432.
9. Kim E, Delashaw JB Jr. Osteoplastic pterional craniotomy revisited. Neurosurgery 2011;68:S125-S129.
10. Jane JA, Park TS, Pobereskin LH, Winn HR, Butler AB. The supraorbital approach: technical note. Neurosurgery 1982;11:537-542.
11. Fujitsu K, Kiwabara T. Zygomatic approach for lesions in the interpenducular cistern. J Neurosurg 1985;62:340-343.
12. Pitelli SD, Almeida GG, Nakagawa EJ, Marchese AJT, Cabral ND. Basilar aneurysm surgery: the subtemporal approach with section of the zygomatic arch. Neurosurgery 1986;18:125-128.
13. Sekhar LN, Raso JL. Orbitozygomatic approach. In: Sekhar LN, Oliveira E (Eds). Cranial microsurgery: approaches and techniques. New York: Thieme; 1999:130-133.
14. De Oliveira E, Siqueira M, Tedeschi H, Peace DA. Techinical aspects of the fronto-temporo-sphenoidal approach craniotomy. In: Matsushima T (Ed). Surgical anatomy for microneurosurgery VI: cerebral aneurysm and skull base lesions. Fukuoka City: Sci Med Publications; 1993:3-8.
15. De Oliveira E, Tedeschi H. Pterional and pretemporal approaches. In: Sekhar LN, De Oliveira E (Eds). Cranial microsurgery approaches and techiniques. New York: Thieme; 1999:124-129.
16. Oka K, Rhoton AL Jr, Barry M, Rodriguez R. Microsurgical anatomy of the superficial veins of the cerebrum. Neurosurgery 1985;17:711-748.
17. Wen HT, Oliveira E, Tedeschi H, Andrade FC, Rhoton AL. The pterional approach: Surgical anatomy, operative technique, and rationale. Operat TechNeurosurgery 2001;4:60-72.
References
When the supericial part of the frontal and the temporal lobes are extremely adherent, it is advisable to deepen the dissection into the operculoinsular compartment of the syl-vian issure to identify the branches of the middle cerebral artery. After that, we dig a tunnel along the deep part of the sylvian issure coming back to the surface splitting the super-icial part of the sylvian issure17.
he basal cisterns — the pterional craniotomy ables the surgeon to reach the olfactory cistern, the carotid cistern, the chiasmatic cistern, the sphenoid compartment of the sylvian issure, the lamina terminalis cistern, the interpe-duncular cistern, the ambient cistern and the crural cistern, that can reach after the removal of the anteromedial seg-ment of the uncus2,5 (Fig 7).