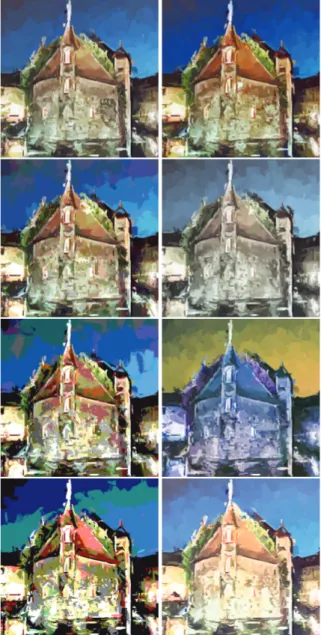
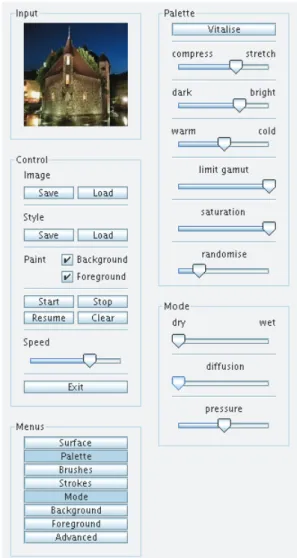
Perception-based painterly rendering: funcionality and interface design
Texto
Imagem

Documentos relacionados
Sendo para os árbitros, a capacidade de percorrer curtas distâncias num menor tempo possível, e as constantes mudanças de direção numa partida de futebol,
Neste sentido, para contextualizarmos e compreendermos o funcionamento normativo-legal dos estabelecimentos do ensino secundário de STP e também conhecer as atividades e as
A finalidade deste projeto é assim, conceber um protótipo de um sistema Big Data, capaz de suportar todos os dados recebidos, armazená-los e processá-los, bem como obter dados
Corporal punishment in early childhood (which sometimes kills or leaves permanent aftereffects), violence in schools (widespread among students who usually harass one another and
as considerações acima, podemos dizer que a transfiguração do sujeito em obra de.. arte, apresenta em si mesmo a qualidade mundana do artifício. Encontra-se nessa divisão
O alto percentual de estudantes homens agrupados em torno da cor negra, que trabalham, contribui para reforçar análises já realizadas de que os jovens homens negros e pobres são
Universal mobile wallet: This solution consists on developing an independent app (M-Pay), which would be available to all potential clients including non-Mbcp’s customers. All
O artigo científico “Depoimento especial de crianças e adolescentes vítimas de violência sexual: a experiência do estado do Mato Grosso do Sul” foi escrito
