Remote monitoring system of
environment variables based on
evaluation board
Shamil Pchenushai
Final Report
Escola Superior de Tecnologia e Gestão
Instituto
Politécnico de Bragança
Supervisor(s): Paulo Jorge Teixeira Matos and Nikolai Barakin
Master degree in Information Systems
i
Abstract
In this project work, a framework for remote monitoring of environment variables is presented. The remote access is based on the GSM (Global System for Mobile Communication) network. The framework allows to collect data from local systems, including environmental parameters and others, and send them by SMS (Short Message Service) to mobile devices.
The framework was designed to be easily adapted and expanded to any kind of sensor, allowing to collect parameters like temperature, humidity, and others, from analog and digital sensors. It was also implemented based on the GSM network, using SMS, allowing to access the local systems from any kind of mobile device, and supporting long distances among the local systems and the users that want to monitor them.
The design and implementation were also done to assure high energetic autonomy, high reliability and low production cost.
With such versatility, the framework can be used in a wide range of contexts and problems, whenever is necessary to monitor systems or environments located on remote areas or simply whenever is necessary to have access, in almost real time, to the conditions of these systems/environments.
Besides the advantage of access, in almost real time, to data that is located on remote systems or environments, the solutions that can be developed over the proposed framework can reduce maintenance costs, traveling costs, working time and, contribute to more safer system and healthy environments.
ii
Forewords
I would like to express my sincere thanks to IPB for my education and to the professors of this university for a permission to define the work. The knowledge and the skills that I acquired throughout the whole period of education are an indispensable component of my future career.
Especially thanks to my supervisor professor Paulo Jorge Teixeira Matos for his support, companionship, calmness, professionalism, and competence during my work. He shared his experience with me and I have learned a lot of new things. Also, deep gratitude to the staff of IPB, mainly professor Jose Eduardo Fernandes for his support, kindness and help in different situations.
Special thanks to international relation office in IPB, whose employees showed their professionalism and responsiveness to me during the period of education.
iii
Table of contents
Abstract ...i
Forewords...ii
Table of contents ...iii
List of tables... v
List of figures ... vi
List of abbreviations... viii
1. Introduction...1
1.1 Context and motivation ... 1
1.2 Main goals ... 1
1.3 Document description ... 2
2. Architecture...3
2.1 Methodology... 3
2.2 Contest of the system ... 3
2.2.1 Microcontroller unit ... 4
2.2.2 Temperature and humidity sensor ... 5
2.2.3 GSM/GPRS module ... 5
3. Technologies ...7
3.1 Arduino UNO evaluation board... 7
3.1.1 Comparative characteristics between several evaluation boards ... 7
3.1.2 Programming the Arduino ... 9
3.1.3 Arduino IDE programming environment. Language of Arduino ... 10
3.2 ATmega328 microcontroller ... 11
3.2.1 Features of ATmega382 ... 11
3.2.2 Block diagram of ATmega328 microcontroller... 13
3.3 DHT digital sensor ... 15
3.3.1 Master and Slave connection... 17
3.4 GSM/GPRS module SIM900A... 18
3.4.1 Comparative characteristics of several GSM/GPRS modules ... 19
iv
3.4.3 Pins characteristics and types of connection... 21
3.5 I2C bus, interface and protocol... 24
3.5.1 Addressing in I2C bus ... 25
3.5.2 Synchronization ... 26
4. Stages of work, implementation and process description ...28
4.1 Programming code and connection of DHT11 ... 28
4.1.1 Connection and circuit diagrams ... 28
4.1.2 Test program of DHT11 ... 29
4.2 Programming code and connection of SIMA900A ... 30
4.2.1 Process of firmware... 32
4.2.2 Connection and circuit diagrams... 33
4.2.3 Test program of SIM900A ... 34
4.3 Process of the working system ... 35
4.3.1 Set up and connection diagrams ... 35
4.3.2 Description of the work ... 37
4.3.3 System test and results ... 40
5. Conclusion and future work...44
v
List of tables
Table 1. Comparison between platforms ... 8
Table 2. The main characteristics of module ... 19
Table 3. Description of connection between DHT11 and Arduino UNO ... 29
Table 4. List of SIM900A supported countries and its mobile code (MCC) ... 30
Table 5. Connection SIM900A with converter ... 32
vi
List of figures
Figure 1. Remote monitoring and collecting system ... 2
Figure 2. The architecture of remote monitoring and collecting data system... 4
Figure 3. Structure of ATmega328 ... 5
Figure 4. Arduino IDE Development Environment workspace ... 10
Figure 5. AVR CPU ATmega328 block diagram ... 13
Figure 6. Top view of DHT11 sensor... 15
Figure 7. Application circuits of DHT11 ... 17
Figure 8. Start signal of DHT11 ... 17
Figure 9. Receiving and sending the signals of DHT11... 18
Figure 10. Structure of GSM module workflow ... 19
Figure 11. Top and bottom views of shield ... 21
Figure 12. Top view and pins designations of SIM900A... 22
Figure 13. Connection of the serial interfaces... 23
Figure 14. Connection of RXD and TXD ... 24
Figure 15. I2C`s buses, master and slave modules... 25
Figure 16. Arduino`s pins for I2C protocol transfer. ... 26
Figure 17. Timing diagram of I2C ... 26
Figure 18. Circuit diagram of DHT11 sensor connected with Arduino Uno... 28
Figure 19. Connection scheme of DHT11 sensor connected with Arduino Uno ... 29
Figure 20. Top and bottom views of PL2303 ... 32
Figure 21. Serial download Tool Developer ... 33
Figure 22. Circuit diagram of SIM900A module connected with Arduino Uno ... 33
Figure 23. Connection scheme of SIM900A module connected with Arduino Uno ... 34
Figure 24. The components of remote monitoring system ... 35
Figure 25. Circuit diagram of SIM900A module connected with Arduino Uno ... 36
Figure 26. Connection scheme of system ... 36
Figure 27. Systems request after connection... 37
Figure 28. Sending messages process - block diagram ... 38
vii
Figure 30. Systems request after high threshold of temperature ... 39
viii
List of abbreviations
ADC - Advanced Direct Connect;
AT – Attention;
AVR - Advanced Virtual RISC;
CPU - Central Processing Unit;
DHT - Digital Humidity and Temperature (sensor);
EEPROM - Electrically Erasable Programmable Read-Only Memory;
GPRS - General Packet Radio Service;
GSM - Global System for Mobile;
I/O – Input/output signals;
I2C - Inter-Integrated Circuit;
IDE - Integrated Development Environment;
IoT – Internet of Things;
LED - Light-emitting diode;
MC - Microcontroller;
MIPS - Million Instructions Per Second;
OS – Operation System;
RAM - Random Access Memory;
RISC - Reduced instruction set computer;
RX – Receive Data;
SCL – Serial CLock;
SDA – Serial DAta;
SIM - Subscriber Identification Module;
SMS - Short Message Service;
SPI - Serial Peripheral Interface;
SRAM - Static Random-Access Memory;
TX – Transmit Data;
USB - Universal Serial Bus;
Introduction
_____________________________________________________________________________________1
1. Introduction
1.1 Context and motivation
In the age of development of high-precision devices and digital signal processing, wireless
technology undoubtedly provides people with a convenient, fast and effective method for
receiving necessary data. It is widely used in industrial production and in people's lives, especially
creating a new situation of data collection and transmission for some complex conditions. With
the development of wireless communication, the wireless data transceiver emerged slowly
because it is simple to use and flexible to distribute. This becomes an important new development
direction of data transceiver [2].
For example, the measurement and control of environment variables is widely used in an
agrarian sector. The temperature in greenhouses should average from +16 to 25 degrees, and at
night it should not drop more than 5-8 degrees. Below the normal threshold, the temperature will
slow down the growth rate of plants, the higher temperature is also unfavorable because it
stimulates the growth of the green mass, which immediately affects the yield of plants and the
quality of the fruits themselves in the greenhouse. Depending on factors, such as season of the
year, the temperature during the day, daily rains and other factors, the system should be in normal
condition. Whenever parameters go out of the limits, the responsible employee receives a
notification, which tells about current temperature in the greenhouse. Notification can be delivered
as an SMS or view in an internet website [1].
In this case the intelligent monitoring and control systems will help to prevent trouble. The
remote monitoring system is a set of technologies that allows remote collection of information for
providing to user. Usually, the Internet, GPRS, e-mail, MMS or SMS messages, or satellite
communications are used for data transmission.
1.2 Main goals
Remote data monitoring is a major step to maintain electrical devices in the required
conditions, particularly when the observed parameters have effect on operations of equipment
and electric values such as humidity, temperature, voltage, current, and others.
The goal of this work is to conceive an implement a framework for remote monitoring of
environment variables like temperature and humidity, accessing them via GSM technologies like
SMS. The system should allow the user to easily get data in different placements. Depending on
Introduction
_____________________________________________________________________________________2
The choice of programming processor or central processing unit (CPU), which will perform
the main functions of the system (program code) is one of the most important part of entire
development. CPU can be simple designated by microprocessor or microcontroller. A CPU is the
electronic circuitry within a computer that carries out the instructions of a computer program by
performing the basic arithmetic, logical, control and input/output (I/O) operations specified by the
instructions.
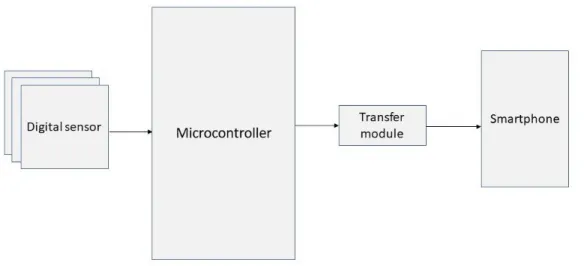
Figure 1. Remote monitoring and collecting system
This framework example includes elements such as the main CPU for responsibility of all
functions, temperature and humidity sensor for maintaining of inside environment, transfer
module for data exchange, light indicators for signal, smartphone and another equipment. Also,
from a functional point of view, a method for transferring data was necessary to define. A working
program code also was developed.
1.3 Document description
The first chapter describes the introduction, general view about the system and goals.
The second chapter is about architect of the system, choice of the necessary sensors and
modules.
The third chapter is about technologies and way of realization of transfer the data in the
system, the positive and negative aspects of chosen technologies, their role in complete system.
The fourth chapter is the developing and implementation part. Creating the code for each
module and the system in general, making programming software for realization, showing the
results of the work.
Architecture
_____________________________________________________________________________________3
2. Architecture
2.1 Methodology
Currently, different environment variables monitoring systems are produced serially, from
a simple thermometer to a fully computerized system. The choice of a system depends on the
conditions where this system will be applied, the amount of information that the user needs and
the cost of obtaining this information. If the monitoring system should provide detailed information
about the operations, there might be the necessity more sophisticated and complex system, which
will require more sensors for implementation. The system can also contain sensors for obtaining
other information - for example, pressure, energy consumption, a sensor of movement and others.
Presented system can be connected to alarm system or to a smartphone. On the other hand, if
only needs to check the temperature and humidity condition of the room in a certain range, the
number of sensors and information collected will be lower.
The design of remote monitoring system involves various steps, namely selection of
proper sensors to acquire the required physical parameters. In accordance with the conditions in
which the system will be applied, it must be chosen the adequate equipment (temperature and
humidity sensor, CPU, debugging board). Also, to analyze the difference between the most
popular and functional debugging boards to determine the most suitable for the system, compare
electrical indexes, size and price of boards. Make the set-up configuration of equipment for its
normal working.
To select the protocol, it is necessary to find out what are the possible methods of data
transfer between sensors and debugging boards. Usually the datasheet of every module declares
the description, parameters, product characteristics, type of protocols for information transfer,
typical schemes, etc. In accordance with the characteristics of equipment, determine the method
of data transmission.
This system assumes the use of GSM / GPRS module as the transfer unit for exchanging
information between the selected temperature and humidity sensor and the device to which the
SMS message will send with the data sensor. The system designs in such a way that an SMS
message sends in those cases when the temperature goes out of the normal functionality. The
temperature mode of system sets according to requirements of the operating conditions.
2.2 Contest of the system
The system consists of one or set of sensors. All electronics operations are controlled by
a microcontroller unit, which is programmed to define the behavior of all peripherals, like our main
Architecture
_____________________________________________________________________________________4
transceiver module – the SIM900A, used to send the acquire data to the smartphone as SMS.
Allowing to supply the information almost at real-time. Structurally the system is composed by the
elements shown in figure 2 [2] .
Figure 2. The architecture of remote monitoring and collecting data system
2.2.1
Microcontroller unitA microcontroller behaves as a small capacity computer on electronic hardware
architecture. The microcontroller determines how the electronics peripherals that attached to it
operate and act as an integrated system. The microcontroller has a Flash Memory here is saved
the software program and a RAM memory, used at the execution time to maintain the
computational resources, like variables. The communication between the electronic peripherals
and the microcontroller is done via serial communication protocols like I2C or SPI.
ATmega328 is a low-power 8-bit microcontroller based on the AVR enhanced RISC
architecture. By executing powerful instructions in a single clock cycle, the ATmega328 achieves
throughputs close to 1MIPS per MHz. This allows system developers to optimize the device for
power consumption and processing speed. It has 14 digital I/O pins, of which 6 can be used as
pulse-width modulation PWM outputs and 6 analog input pins. These I/O pins account for 20 of
Architecture
_____________________________________________________________________________________5
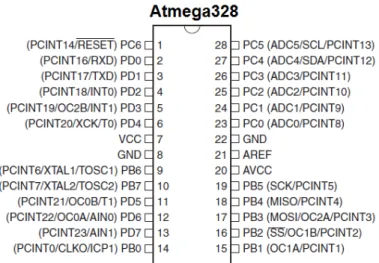
Figure 3. Structure of ATmega328
Pin description:
PC6 – reset;
PD0 - digital pin (RX);
PD1 - digital pin (TX);
PD2, PD4, PD7, PB0, PB4, PB5 - digital pins;
VCC - positive voltage (power);
GND- ground;
XTAL 1, XTAL 2 - crystal oscillator;
PD3,PD5, PD6, PB1, PB2, PB3 - digital pins (PWM);
AVCC - positive voltage for ADC (power);
AREF - reference voltage;
PC0- PC5 - analog input;
2.2.2
Temperature and humidity sensorThe DHT11 sensor is a digital temperature and humidity sensor that calibrates the digital
output signal. It consists of a capacitive humidity sensor and a thermistor. Also, the sensor
contains an ADC for converting analog values of humidity and temperature which outputs digital
signal and reads by microcontroller, DHT11 uses a simplified single-bus communication for data
exchange [4].
2.2.3 GSM/GPRS module
The SIM900A is a complete dual-band GSM/GPRS solution in a SMT module which can
be embedded in the customer applications. Featuring an industry-standard interface, the
SIM900A delivers GSM/GPRS 900/1800MHz performance for voice, SMS, Data, and Fax in a
Architecture
_____________________________________________________________________________________6
SIM900A can fit in almost all the space requirements in user applications, especially for slim and
Technologies
_____________________________________________________________________________________7
3. Technologies
3.1 Arduino UNO evaluation board
Arduino board is an open-source platform used to make electronics projects. It consists of
a microcontroller and there is also an Integrated Development Environment (IDE) software that
runs on PC, used to write and upload computer code to the physical board [6].
Arduino board was designed in the Ivrea Interaction Design Institute, Italia for students
with low experience and background knowledge in electronics and programming concept. This
board started to change for adapting to new requirements and challenges, separating it from
8-bit boards to products for IoT (Internet of Things) applications. All boards are open-source which
allow users build them separately and finally adapt them to their exact needs. Over the years the
Arduino boards have been used to build thousands of projects, from daily objects to compound
scientific instruments [7].
Additionally, there are in the market shields with complementary features. These shields
are pre-built circuit boards that fit on the top of Arduino compatible boards, to provide additional
capabilities, like connecting to the internet, motor controlling, wireless communication, LCD
screen controlling, etc. Examples of Arduino shields are:
• Wireless Shields;
• The GSM Shield;
• The Ethernet Shield;
• The Proto Shields [8];
3.1.1
Comparative characteristics between several evaluation boardsIn addition to Arduino, there are other alternative boards. A comparison was carried out,
considering the next boards:
1. The basic debugging board of the Arduino family: Arduino Uno R3 [9];
2. Raspberry Pi boards is a single-board computer [10];
3. Platforms BeagleBone is a powerful Linux computer of compact size [11];
These boards were chosen because they have compatible features and characteristics to
Technologies
_____________________________________________________________________________________8
Table 1. Comparison between platforms
Platform Arduino Uno Raspberry PI BeagleBone
Approximate price 20€ 44 € 56 €
Size 7.5 × 5.3 sm 8.5 × 5.4 sm 8.6 × 5.3 sm
Microcontroller ATmega328 ARM11 ARM Cortex-A8
Frequency 16 Mhz 700 Mhz 700 Mhz
RAM 2 KB 256 KB 256 KB
Flash-memory 32 KB SD card 4 GB (SD card)
EEPROM 1 KB - -
Voltage 7 – 12 V 5 V 5 V
Minimal power consumption 42 mA (0.3 W) 700 mA (3.5 W) 170 mA (0.85 W)
Digital I/O 14 8 66
Analog I/O 6 - 7
PWM 6 - 8
Development tools Arduino IDE, Scratch
IDLE, Scratch, Squeak/Linux
Phyton, Scratch, Squeak, Cloud9/Linux
Port Ethernet - 10/100 10/100
USB Master interface - 2 USB 2.0 USB 2.0
Arduino UNO is the most budget option with currently costs only 20€. Meanwhile other
motherboard of this family cost from 14 € to 80 € depending on functionality and size of a card.
In addition, to work with Raspberry PI it is necessary to purchase an SD card separately, which
increases the cost by 10 to 40 €.
Development of applications on all the boards is possible with visual block language
Scratch [12]. Firstly, it was designed for teaching programming and not for solving problems,
which is why professionals usually do not use it, even though it can solve complex technical
problems.
The program code for Arduino is C and C++. The C/C++ compiler integrates the Arduino
IDE, which is a handy editor with a basic set of features required to the development.
The main difference between compared evaluation boards is that the Raspberry PI and
BeagleBone works and operates in Linux operation system, while Arduino can also function in
Technologies
_____________________________________________________________________________________9
multitude of users, an enormous number of training materials, solutions and projects that can be
used in any developments.
Arduino Uno is a small-size board, which makes it more convenient to use in smaller
projects. For instance, when installing the SD card in Rapsberry Pi it exceeds the board
dimensions, which makes it more impractical even in small devices.
BeagleBone and Raspberry Pi are more practical for developing applications that require
Internet connection. Both devices have Ethernet and USB ports. Through USB, it is possible to
connect wireless data transmitters, implement wireless data transfer functions and connect to
Internet.
On the Arduino platform it can be also implement applications that support Ethernet
communication with the help of expansion cards (shield), but the network functionality of
applications will be very limited. Connection can be also done by Wi-Fi module for wireless data transmission. Thus, if the content of job doesn’t require high network functionality, Arduino quietly allows to do the task of exchanging data over Ethernet.
The BeagleBone platform combines the flexibility of Arduino with the performance of
Raspberry Pi processor (in fact, the performance is higher than the Raspberry Pi, which was
established by several tests). Having a sufficient number of I/O, BeagleBone provides a simple
connection to network and even allows to implement a web server.
3.1.2
Programming the ArduinoLike other microcontrollers, the ATmega328 installed on the Arduino Uno should be
programmed to perform the specified task. The most common programming languages for
Arduino are the visually-block Scratch language and the C/C++.
The Scratch language allows to control different sensors, modules, manages multiple
objects. Also, Scratch permits easily to understand the basics of programming and algorithms,
creates a simple sensor management programs like remote control system, or more complex, for
example a robot with rotating camera.
The development of programs for interrogating analog sensors, controlling servo drives,
creating melodies and creating computer applications in Arduino IDE environment has been
examined in detail by Jeremy Bloom [13]. Bloom shows that with the help of programming different
boards of Arduino family and using multiple sensors, it is possible to build a smart control system
by yourself. Also, it is possible to create different robots: a conveyor, a robot that travels along a
Technologies
_____________________________________________________________________________________10
There is a need to select the programming language for the temperature measuring
device. In this research we will use the Arduino IDE, as it is the most optimal programming
environment for solution several problems.
3.1.3
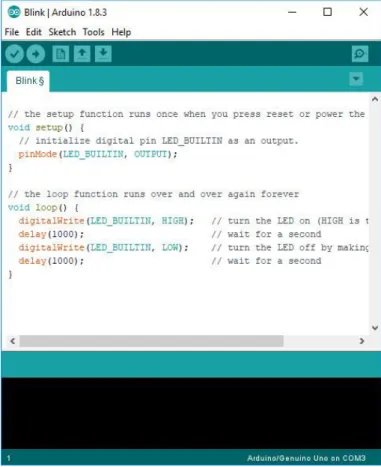
Arduino IDE programming environment. Language of ArduinoArduino development environment consists of text editor for program code, message area
(output of errors), text output window, toolbars and menu bar (figure 4). To run programs and
communication, the development environment connects to the Arduino debug card.
The Arduino IDE allows to select a port for board connecting, compiles and loads the
sketch (program) into the microcontroller installed on the board. In free access there is many
educational materials, examples of sketches with step-by-step comments. There are also many
different libraries that allow to work with different sensors, modules and expansion cards. This
greatly simplifies the process of creating a sketch and reduces its size, accordingly increases the
speed. The drivers for the boards were created by one company and work not only on different
versions of Windows operating system, but also on Linux and Mac OS. Connection with desktop
computer or laptop for debugging is via the USB cable that comes with board without additional
cables or buses [14].
Technologies
_____________________________________________________________________________________11
Programming language of Arduino devices is based on C / C ++, which makes it easy to
learn and the most convenient for programming devices based on microcontrollers [15].
3.2 ATmega328 microcontroller
ATmega328 microcontroller belongs to megaAVR family of microcontrollers which are
equipped with high-capacity program memory and data at a speed of up to 20 million operations per second, therefore, it’s an ideal for applications with a significant amount of code. All megaAVR devices support self-programming, which allows performing in-circuit upgrade quickly, safely andat no extra cost. A flash memory can be updated without stopping the system. Also, they have
Harvard architecture, where program and data are stored in separate physical memory systems
that appear in different address spaces but having the ability to read data items from program
memory using special instructions.
The core of microprocessor integrates a set of instructions with 32 general purpose
working registers. All 32 registers are connected to the Arithmetic Logic Block (ALU), which allows
access to two independent registers in one command executed in one clock cycle. Following this,
the architecture is the most efficient in terms of code, while the bandwidth is ten times higher than
conventional CISC microcontrollers.
3.2.1 Features of ATmega382
1. High Performance, Low Power;2. Advanced RISC architecture:
• 131 Powerful Instructions – most single clock cycle execution;
• 32 x 8 general purpose working registers;
• Fully static operation;
• Up to 20 MIPS Throughput at 20MHz;
• On-chip 2-cycle multiplier;
3. High Endurance Non-volatile Memory Segments:
• 32KBytes of In-System self-programmable Flash program memory;
• 1KBytes EEPROM;
• 2KBytes Internal SRAM;
• Quantity of write/Erase cycles: 10,000 Flash/100,000 EEPROM;
• Data retention: 20 years at 85°C/100 years at 25°C;
• Optional boot code section with independent lock bits;
• In-System Programming by On-chip Boot Program;
• True Read-While-Write operation;
Technologies
_____________________________________________________________________________________12 4. Peripheral Features:
• Two 8-bit Timer/Counters with separate prescaler and compare mode;
• One 16-bit Timer/Counter with separate prescaler, compare and capture mode;
• Real Time Counter with separate oscillator;
• Six PWM channels;
• 8-channel 10-bit ADC in TQFP and QFN/MLF package;
• Temperature Measurement;
• 6-channel 10-bit ADC in PDIP Package;
• Temperature Measurement;
• Two Master/Slave SPI Serial Interface;
• One Programmable Serial USART;
• One Byte-oriented 2-wire Serial Interface (Philips I2C compatible);
• Programmable Watchdog Timer with separate On-chip oscillator;
• One On-chip analog comparator;
• Interrupt and Wake-up on Pin Change;
5. Special Microcontroller Features:
• Power-on Reset and programmable Brown-out Detection;
• Internal calibrated oscillator;
• External and internal interrupt sources;
• Six sleep modes: Idle, ADC Noise Reduction, Power-save, Power-down, Standby, and Extended Standby;
6. I/O and Packages:
• 23 Programmable I/O Lines;
• 28-pin PDIP, 32-lead TQFP, 28-pad QFN/MLF and 32-pad QFN/MLF;
7. Operating Voltage: • 1.8 - 5.5V;
8. Temperature Range: • 40°C to 105°C;
9. Speed Grade:
• 0 - 4MHz @ 1.8 - 5.5V;
• 0 - 10MHz @ 2.7 - 5.5V;
Technologies
_____________________________________________________________________________________13 10. Power Consumption at 1MHz, 1.8V, 25°C:
• Active mode: 0.2mA;
• Power-down mode: 0.1μA;
• Power-save mode: 0.75μA (Including 32kHz RTC) [16].
3.2.2 Block diagram of ATmega328 microcontroller
Description:Flash (erasable memory, non-volatile storage used for program storage. Program runs
from the flash memory);
SRAM (Static RAM is used for transient program state (such as variables) as well as the
program stack and any allocations made by the program);
EEPROM (electrically erasable, programmable, read-only memory, uses for non-volatile
persistent storage. Accessing EEPROM memory requires special instructions and is quite slow
compared to SRAM, and can be risky if the device loses power);
Fuses (additional memory to the Flash, SRAM, and EEPROM, AVR and used to store “fuse bytes”, which are boot-time configuration values used to initialize the microcontroller itself) [17].
Technologies
_____________________________________________________________________________________14
Port B (PB[7:0]) XTAL1/XTAL2/TOSC1/TOSC2
Port B is an 8-bit bi-directional I/O port with internal pull-up resistors. The Port B output
buffers have symmetrical drive characteristics with both high sink and source capability. As inputs,
Port B pins that are externally pulled low will source current if the pull-up resistors are activated.
The Port B pins are tri-stated when a reset condition becomes active, even if the clock is not
running.
Port C (PC[5:0])
Port C is a 7-bit bi-directional I/O port with internal pull-up resistors (selected for each bit).
The PC[5:0] output buffers have symmetrical drive characteristics with both high sink and source
capability. As inputs, Port C pins that are externally pulled low will source current if the pull-up
resistors are activated. The Port C pins are tri-stated when a reset condition becomes active,
even if the clock is not running.
Port D (PD[7:0])
Port D is an 8-bit bi-directional I/O port with internal pull-up resistors (selected for each
bit). The Port D output buffers have symmetrical drive characteristics with both high sink and
source capability. As inputs, Port D pins that are externally pulled low will source current if the
pull-up resistors are activated. The Port D pins are tri-stated when a reset condition becomes
active, even if the clock is not running.
AVCC
AVCC is the supply voltage pin for the A/D Converter, PC[3:0], and PE[3:2]. It should be
externally connected to VCC, even if the ADC is not used. If the ADC is used, it should be
connected to VCC through a low-pass filter. Note that PC[6:4] use digital supply voltage, VCC.
AREF
AREF is the analog reference pin for the A/D Converter
The Atmel ATmega328 has several power modes that can be activated to enable/disable
some features of the processor, controlling the energy consumption of the processor.
The Idle mode stops the CPU while allowing the SRAM, Timer/Counters, SPI port, and
interrupt system to continue functioning. The Power-down mode saves the register contents but
freezes the Oscillator, disabling all other chip functions until the next interrupt or hardware reset.
In Power-save mode, the asynchronous timer continues to run, allowing the user to maintain a
timer base while the rest of the device is sleeping. The ADC Noise Reduction mode stops the
CPU and all I/O modules except asynchronous timer and ADC to minimize switching noise during
Technologies
_____________________________________________________________________________________15
the device is sleeping. This allows very fast start-up combined with low power consumption. In
Extended Standby mode, both the main oscillator and the asynchronous timer continue to run.
The Atmel ATmega328 is a powerful microcontroller that provides a highly flexible and
cost-effective solution for embedded control applications. This device is manufactured using
Atmel’s high density non-volatile memory technology. The On-chip ISP Flash allows the program
memory to be reprogrammed In-System through an SPI serial interface, by a conventional
nonvolatile memory programmer, or by an On-chip Boot program running on the AVR core. The
Boot program can use any interface to download the application program in the Application Flash
memory. Software in the Boot Flash section will continue to run while the Application Flash section
is updated, providing true Read-While-Write operation. By combining an 8-bit RISC CPU with
In-System Self-Programmable Flash on a monolithic chip [18].
3.3
DHT11 digital sensor
The DHT11 digital sensor is multipurpose and can measure environment variables. It has
high reliability and excellent long-term stability of operation. In our project, this sensor is
programmed for both measurements.
DHT11 is suitable only for monitoring the temperature and humidity in small areas.
According to the limits of measuring, the sensor DHT11 was created to solve this problem. It
cannot be used in weather stations as a street sensor.
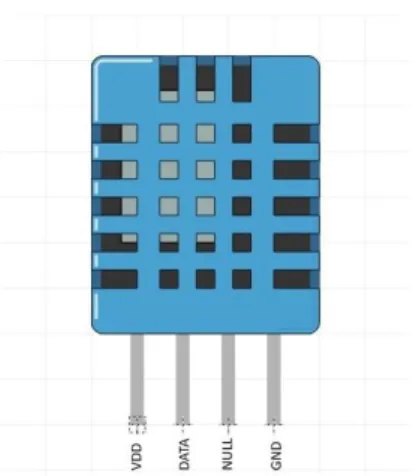
Figure 6. Top view of DHT11 sensor
Pin description:
• VDD power supply 3.5~5.5V DC;
• DATA serial data, a single bus;
• NULL empty pin;
Technologies
_____________________________________________________________________________________16 Characteristics:
• Low power consumption;
• Measurement of humidity in the range of 20% - 90% (error ± 5%);
• Power supply 3 - 5,5V;
• The maximum current consumption is 2.5mA;
• Standby current consumption: 150nA;
• Resolution: 16Bit;
• Humidity repeatability: ±1% RH;
• Temperature repeatability ±0.2℃;
• Temperature range at 25℃±2℃;
• Interchangeability: fully interchangeable;
• Accuracy: At 25℃±5% RH;
• Hysteresis: < ± 0.3% RH;
• Long-term stability: < ± 0.5% RH;
Electrical Characteristics:
• Power supply: DC 3.5~5.5V;
• Supply Current: measurement 0.3mA standby 60μ A;
• Sampling period: more than 2 seconds;
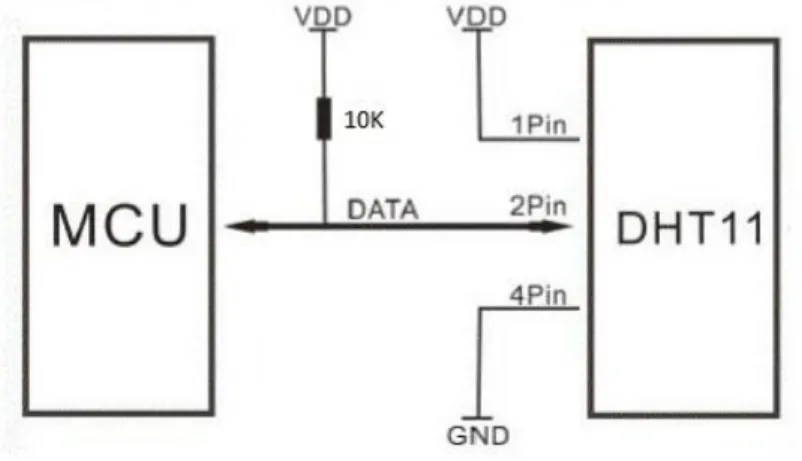
The connection of DHT11 and MCU are shown in figure 7. For communication there
should be combined with external pull-up resistor of 10kΩ, so that when the bus is idle, its status
is high. Temperature and humidity sensor DHT11 has a 3-5.5V power supply voltage. When
DHT11 is powered on, the factors of instability by 1s waiting time can be ruled out, as in this
period, system does not need to send any instruction information. MCU and DHT11 selection of
single bus data format for communication and synchronization, each communication time is about
4ms. As the DHT11 has master-slave structure the slave can answer only when the host calls.
The host access devices must strictly follow the single-bus sequence if there is a chaotic
Technologies
_____________________________________________________________________________________17
Figure 7. Application circuits of DHT11
3.3.1 Master and Slave connection
Communication between the master and slave can be done through the following steps:
Reading data
After turning on the power and before the first access to the sensor, it should take at least
1 second. The microcontroller must establish the output connected to sensor in the output mode.
Then at the output of the microcontroller a logical 0 is generated with duration of not less than 18
milliseconds.
After, the output of microcontroller turns into the logical 1 for the time not less than 50
microseconds. Next the microcontroller changes the contact in input mode for being ready to get
the data.
Figure 8. Start signal of DHT11
Humidity sensor DHT11 comes out from waiting mode and after 25…45 microseconds the sensor answers to microcontroller, at the same time changes line for 80 microseconds into the
logical 0 and after for 80 microseconds in logical 1. Microcontroller should detect this level
Technologies
_____________________________________________________________________________________18
Figure 9. Receiving and sending the signals of DHT11
The sensor starts transmitting data. Here used the coding of the bit value by the duration
of the logical 1 level.
Transmission of each bit starts at the logical 0 level duration of 50 microseconds, and then
if the logical 1 with a duration of 26 ... 28 microseconds, this is transmitted to logical 0, if the
duration is 70 microseconds, this is logical 1.
Beginning of transmitting
At the end of data packet transmitting, the DHT11 sensor sets in the output the logical 0
for the time 50 microseconds and transfers its contact into the input state. After that, the sensor
starts to analyze the humidity level, waiting the next request and goes into the low consumption
mode.
Packet consist of five bytes: 4 bytes are data and one the control sum. The integer part
transfers in the beginning of packet, after the decimal fractional. In the fractional part zeros are
always transmitted, because the sensor is eight-bit. To calculate the checksum, all information
bytes are added.
3.4
GSM/GPRS module SIM900A
Many applications need to transfer information about status of object, monitoring via
wireless communication channels. One of the most common and convenient for this facility is
GSM module, which provides a main services of a short message speech.
The typical GSM module consists of a radio block (transceiver, amplifier and external radio
interface), the processor, memory and number of interfaces for integration in devices. The
structure of GSM/GPRS module presented in figure 10. GSM modules can transmit and receive
Technologies
_____________________________________________________________________________________19
Figure 10. Structure of GSM module workflow
Most GSM modules can be managed via AT commands. One of the important think for
choosing the GSM module is the type of object. This determines the choice of the model with
specific technical characteristics. Also, it is important to not forget about the operating temperature
range.
3.4.1 Comparative characteristics of several GSM/GPRS modules
Among the main manufacturers of GSM modules there are companies like Sierra
Wireless, Telit, Cinterion, SIM. In the table below, there is an example of several modules and
differences between them [5].
Table 2. The main characteristics of module
Model SIM900A (SIM) Q2686 (Sierra Wireless) GE864-QUAD (Telit) MC55i (Cinterion M2M) Data transmission and reception channels GSM, GPRS GSM, GPRS
GSM, GPRS, GPS
GSM, GPRS
GSM ranges, MHz 900, 1800 850, 900, 1800, 1900 850, 900, 1800,1900 850, 900, 1800, 1900 Сontrol commands AT
commands AT commands AT commands AT commands
Energy consumption of sleeping mode,
mA
1,5 0,4 1,5 2,5
Size, mm 24×24×3 32×40×4 30×30×2,8 35×32,5×2,95
Weight, g 3,4 9 6 5,5
Operating temperature
range, °C
- 40…85 - 40…85 - 40…85 - 40…85
Technologies
_____________________________________________________________________________________20
One of the tasks of this project is to create an economically profitable system for data
transmission. Comparing the models of these four companies, we see that the characteristics are
almost similar. However, it is worth emphasizing that the SIM900A module is less expensive with
a financial viewpoint and satisfies the size and weight parameters [21].
3.4.2 Characteristic of SIM900A
The SIM900A GSM module can send SMS messages and connect to the internet and
send data. In this project, it's used to send the temperature and humidity data. The advantages
of the module:
• Possibility of making phone calls; • Simple operation;
• Connectors for external antenna, microphone, headphone; • Built-in antenna;
• Low price;
A GSM modem expose an interface that allows applications such as SMS to send
message over the interface. The mobile operator charges for this message sending as if it was
performed directly on a mobile phone. SMS is a technology that allows to receive and send short
text messages using smartphone or devices which support the sim card.
Remote monitoring solutions over GSM technologies are great enhancements for digital
industrial control systems. Short message makes the wireless communication module more
popular to be used.
Benefits of GSM technologies:
• System can be monitored from anywhere. Even if there will be no connection between device and network, later when the connection will be, the smartphone will receive SMS;
• SMS is also suitable for transmitting data in the large-scale measurement;
• Permit an easier interface to data and reduce the necessity of human role in a workplace;
• SMS can reach the speed of 9.6Kbps data communication service; • Low price for implementation;
Technologies
_____________________________________________________________________________________21
Figure 11. Top and bottom views of shield
Pin description:
1. 5 V power supply; 2. Vbta (3.5 – 4.5 V);
3. GND ground, the negative power; 4. GND ground, the negative power;
5. GND ground, the negative power; 6. SPKN speaker negative (-);
7. TXD transmit data; 8. SPKN positive negative (+);
9. RXD receive data; 10.Microphone negative (-);
11. MCU multipoint control unit; 12. microphone positive (+);
13. POWN connection with Pin 1 or Pin 2; 14. DTR Data Terminal Ready;
15. Stat model status; 16. RST restart;
3.4.3 Pins characteristics and types of connection
SIM900A has 68 pads, and provides all hardware interfaces between the module and customers’ boards:
• Serial port and debug port can help user easily develop user’s applications;
• Audio channel which includes a microphone input and a receiver output;
• Programmable general-purpose input and output;
Technologies
_____________________________________________________________________________________22
Figure 12. Top view and pins designations of SIM900A
Pin description:
1. PWRKEY should be pulled low at least 1 second and then released to power on/down the module;
2,6. NC non connection;
3. DTR Data terminal ready;
4. RI Ring indicator;
5. DCD Data carrier detect;
7. CTS Clear to send;
8. RTS Request to send;
9. TXD Transmit data;
10. RXD Receive data;
11. DISP_CLK Display interface;
12. DIS_DATA Display interface;
13. DIS _D/C Display interface;
14. DISP_CS Display interface;
15. VDD_EXT 2.8V output power supply;
16. NRESET Reset input(Active low);
17,18,29,39,45,46,53,54, 58,59,61,62, 63,64,65. GND Ground;
30. SIM_VDD Voltage supply for SIM card. Support 1.8V or 3V SIM card;
31. SIM_DATA SIM data input/output;
32 SIM_CLK SIM clock;
33. SIM_RST SIM reset;
34. SIM_PRESEN SIM card detection;
35. PWM1 PWM;
36. PWM2 PWM;
37. SDA I2C serial bus data;
38. SCL I2C serial bus clock;
40. GPIO1/KBR4 GPIO1/keypad row 4;
41. GPIO2/KBR3 GPIO2/keypad row 3;
42. GPIO3/KBR2 GPIO3/keypad row 2;
43. GPIO4/KBR1 GPIO4/keypad row 1;
44. GPIO5/KBR0 GPIO5/keypad row 0;
47. GPIO6/KBC4 GPIO6/keypad column 4;
48. GPIO7/KBC3 GPIO7/keypad column 3;
Technologies
_____________________________________________________________________________________23 19. MIC_P Differential audio input;
20. MIC_N Differential audio output;
21. SPK_P Differential audio output;
22. SPK_N Differential audio output;
23. LINEIN_R Line-in input;
24. LINEIN_L Line-in input;
25. ADC Input voltage range: 0V ~ 2.8V;
26. VRTC Power supply for RTC;
27. DBG_TXD For debugging and upgrading firmware
28. DBG_RXD For debugging and upgrading firmware;
50. GPIO9/KBC1 GPIO9/keypad column 1;
51. GPIO10 GPIO10;
52. NETLIGHT Network status;
55,56,57. VBAT Power supply;
60. RF_ANT Radio antenna connection;
66. STATUS Power on status;
67. GPIO11 GPIO11;
68. GPIO12 GPIO12;
SIM900A provides two unbalanced asynchronous serial ports. One is the serial port and
the other is the debug port. The module is designed as a DCE (Data Communication Equipment).
The following figure shows the connection between module and client (DTE).
Figure 13. Connection of the serial interfaces
Depending on the purpose of realization, some pins of serial port can be not necessary. If only RXD and TXD are used in user’s application, other serial pins should be kept open. According to pin specification, debug ports DBG_TX and DBG_RX intended for upgrading firmware. In this
Technologies
_____________________________________________________________________________________24
Figure 14. Connection of RXD and TXD
General Features:
• High Quality Product (Not hobby grade);
• Dual-Band GSM/GPRS 900/ 1800 MHz;
• 3V3 & 5V interface for direct communication with MCU kit;
• Configurable baud rate;
• SMA connector with GSM Antenna;
• SIM Card holder;
• Built in Network Status LED;
• Inbuilt Powerful TCP/IP protocol stack for internet data transfer over GPRS;
• Audio interface Connector;
• Normal operation temperature: -20 °C to +55 °C;
• Input Voltage: 4.5V-12V DC;
3.5 I2C bus, interface and protocol
I2С is usually used to communicate between components on motherboards in cameras
and in any embedded electronic system. It uses for data transmission two bi-directional
communication lines, Serial Data line (SDA) to transfer data and Serial Clock Line (SCL) to keep
the clock, power through the resistors. Each I2C connection can have one master and multiple
slaves. A master can write to slaves and request the slaves to give data, but no slave can directly
write to the master or to another slave.
Advantages:
• Bus consist of two conductors;
Technologies
_____________________________________________________________________________________25
• It is possible to connect devices to the bus during operation, i.e. it supports
hot-plugging;
Disadvantages:
• Addition to limited capacity;
• Complexity of programming;
• Difficulty of determining a fault in a low-level situation;
Figure 15. I2C`s buses, master and slave modules.
3.5.1 Addressing in I2C bus
Each device connected to bus can be programmed to a unique address. To select the
message receiver, master uses unique address component in the send format. In normal mode,
the 7-bit addressing is used. After the address sent, each device in system compares the first
seven bits after START signal with its address. On coincidence, the device assumes itself to be
selected as a slave receiver or as a slave transmitter, depending on the direction bit [22].
Each slave device has unique address, by which the master communicates to it. Address
of the device is indicated in the passport (datasheet). I2C for Arduino supports 127 attached
devices via pins Analog A4 (SDA) and Analog A5 (SCL).
Using one I2C device, the pull-up resistors are not required, as the ATmega328
microcontroller in our Arduino has them built-in. But for more protection of some critical and
Technologies
_____________________________________________________________________________________26
Figure 16. Arduino`s pins for I2C protocol transfer.
In normal state, both lines (SCL and SDA) are high. The communication is initiated by the
master device. It generates the
Start condition
(S) followed by the address of the slave device (B1). If the bit 0 of the address byte is set to 0, the master device will write to the slave device(B2). Otherwise, the next byte will be read from the slave device. Once all bytes are read or written
(Bn) the master device generates
Stop condition (P). This signals to other devices on the bus
that the communication has ended, and another device may use the bus.Most I2C devices support repeated start condition. This means that before the
communication ends with a stop condition, master device can repeat start condition with address
byte and change the mode from writing to reading [24].
Figure 17. Timing diagram of I2C
If the master only writes to the slave device, the data transfer direction is not changed.
If the master needs only to read from the slave device, it sends the I2C address with the
R/W bit set to read. After this the master device starts reading the data.
3.5.2 Synchronization
Each master must generate its own clock signal and the data can change only when the
clock is low. For successful bus arbitration a synchronized clock is needed. Once a master pulls
Technologies
_____________________________________________________________________________________27
high state until the first master pulls it low. This way by observing the SCL signal, master devices
Stages of work, implementation and process description
_____________________________________________________________________________________28
4. Stages of work, implementation and process description
4.1 Programming code and connection of DHT11
Power comes from another separate 5V and ground wires. There are two several types of
the DHT11. One type has four pins, and the other type has three pins, but it is based on a small PCB. Using the second type become easier because it already includes 10kΩ pull up resistor for the signal line. In our case it has used the first type of sensor, that’s why there is necessity to include the 10kΩ pull up resistor line between the signal line and 5 to make sure the signal level stays high by default [25].
4.1.1
Connection and circuit diagrams
To create a connection and circuit diagrams, it was used the Fritzing program. This is an
open source software for virtual simulation of electrical circuits, schemes and electronic
equipment. Fritzing is initially portable, there is no installer for it. Need to download the archive
package, unpack it to any folder on the disk and the system is immediately ready for use. In
addition, the system automatically determines the language of the operating system, and itself
switches to the necessary menu interface [26].
Stages of work, implementation and process description
_____________________________________________________________________________________29
The DHT11 sensor is connected as it shown in the following figure:
Figure 19. Connection scheme of DHT11 sensor connected with Arduino Uno
Table 3. Description of connection between DHT11 and Arduino UNO
DHT11 Arduino UNO
Contact 1 5V (10 k Ohm pull up resistor)
Contact 2 Pin 7 (10 k Ohm pull up resistor)
Contact 3 -
Contact 4 GND
Before using the DHT11 on Arduino, we need to install the DHTLib library. It has all the
functions needed to get the temperature and humidity readings from the sensor.
4.1.2
Test program of DHT11
#include "dht11.h" // Add the DHT11 library
dht11 DHT; // Declaring a variable of class dht11
#define DHT11_PIN 7 // DHT11 sensor connected with digital pin 7
void setup(){
Serial.begin(9600); // Port speed
Serial.println("Checking the humidity"); // Print the text
Serial.println(); // Line
}
void loop(){
int chk;
// Errors
Stages of work, implementation and process description
_____________________________________________________________________________________30 switch (chk){
case DHTLIB_OK: break;
case DHTLIB_ERROR_CHECKSUM:
Serial.println("Checksum error, \t");
break;
case DHTLIB_ERROR_TIMEOUT:
Serial.println("Time out error, \t");
break;
default:
Serial.println("Unknown error, \t");
break;
}
// show the humidity
Serial.print("Humidity = ");
Serial.print(DHT.humidity, 1);
Serial.print("%");
Serial.println(); // Line
delay(1000); } //Time of new measurement
4.2
Programming code and connection of SIMA900A
Using SIM900A, it was encountered a problem that did not allow for normal functionality.
As it turned out, this module is analog of sim900 intended for use in Asian region [27]. Generally,
SIM900A is a cheaper version of SIM900 with the same pinout/functions and 2-band instead of
4-band GSM radio, just to stumble on logging to network, does not work with European SIM
operators (letter A in the label means the module belongs to Asian region).
Table 4. List of SIM900A supported countries and its mobile code (MCC)
Country MCC
China 460
India 404/405
Singapore 525
Malaysia 502
Thailand 520
Indonesia 510
Stages of work, implementation and process description
_____________________________________________________________________________________31
Vietnam 452
Laos 457
Burma 414
Brunei 528
Philippines 515
East Timor 514
Visual observation showed that the module has MAX232 signal converter, which allows
quick connection of the module to the COM port of the computer for detailed investigation. Also,
the module has outputs with a TTL level, which makes it possible to use it with Arduino. From the
scheme features, it was noticed that there is no software control on the module which allows to
turn it on/off, but it's easy to fix.
From the foregoing, it becomes necessary to make the SIM900A module operating at
European frequencies, therefore to upgrade to a full-fledged SIM900 using the next equipment:
• USB UART TTL converter;
• SIM900A module;
• “female-female” wires;
Before starting the firmware, it is necessary to prepare software such as SIM900 Series
download Tools Develop, a firmware file and a serial port monitor (the Terminal program was
used to test the connection of the module to the network).
For this project, the PL2303 converter used, allows to connect microcontrollers to a PC
through the UART port. The converter is used for programming microcircuits and microcontrollers
that support TTL signal levels (0 - 5V).
USB PL2303 converter has two interfaces for connecting to a computer and for connecting
programmable devices:
• A standard USB interface for connection the device with computer;
• A 5-pin male interface for connection with programmable devices: 3.3V - powered devices
with a TTL level of 3.3V; 5.0V - powering devices with signal level of TTL 5V; RXD - data
Stages of work, implementation and process description
_____________________________________________________________________________________32
Figure 20. Top and bottom views of PL2303
For uploading the new firmware, it was necessary to connect SIM900A with converter for
pre-configure the GSM module.
Table 5. Connection SIM900A with converter
SIM900A USB TTL PL2303
GND GND
5 V 5 V
TXD RXD
RXD TXD
Also, according to pin characteristics (figure 11) on the SIM900A module, pin POWN
connects to Vbta, the male-to-female wire is also connected to the RST closure, which makes
restart during the firmware process.
Install the Terminal allows to configure the SIM900A and checking connection. By default,
it runs at 9600 bps.
This module is fully controlled by AT commands. After sending an "AT" message, the
module should answer "OK", which means of clear connection. Changing the speed by command
"AT + IPR = 115200", the firmware should take approximately six minutes [28]
The SIM900 Series download Tools Develop is used for firmware process itself. Specify
the path to firmware, which can be downloaded in free access. In our case, the firmware is
1137B02SIM900M64_ST.
4.2.1 Process of firmware
1. Supply power to the device;
2. Connect it with computer through the converter;
Stages of work, implementation and process description
_____________________________________________________________________________________33
4. Open “SIM900 Series download Tools Develop” and click on "Start Download";
5. Wait three seconds and disconnect the RST;
6. Wait for end of firmware;
Figure 21. Serial download Tool Developer
4.2.2 Connection and circuit diagrams
To create a connection and circuit diagrams it was used the Fritzing program.
Stages of work, implementation and process description
_____________________________________________________________________________________34
The SIM900A module is connected as it shown in the following figure:
Figure 23. Connection scheme of SIM900A module connected with Arduino Uno
Table 6. Description of connection between SIM900A and Arduino UNO
SIM900A Arduino UNO
Pin 1 5 V
Pin 2 connected with Pin 13 -
Pin 3 GND
Pin 7 A4
Pin 9 A5
Pin 13 connected with Pin 2 -
4.2.3 Test program of SIM900A
Before using the SIM900A on Arduino, it was necessary to install the SoftwareSerial library
that provides serial data transfer through other digital outputs of Arduino.
#include <SoftwareSerial.h>// SoftwareSerial library
SoftwareSerial gsm(A4,A5); //TXD and RXD pins
int p = A0;
int n = A2;
void setup() {
pinMode(p,OUTPUT);
Stages of work, implementation and process description
_____________________________________________________________________________________35 digitalWrite(p,1);
digitalWrite(n,0);
Serial.begin(9600);
gsm.begin(9600);//gsm speed
}
void loop() {
gsm.println("AT+CMGF=1");
delay(1000);
gsm.println("AT+CMGS=\"935829625\"\r"); // Mobile phone number
delay(1000);
gsm.println("Hello world");// SMS text
delay(100);
gsm.println((char)26); // ASCII code of CTRL+Z
delay(1000);}
4.3 Process of the working system
4.3.1
Set up and connection diagrams
As it was said earlier, the GSM alert circuit setup consists of 3 main parts: the sensor, the
Arduino, which is the brain of the project and GSM modem, which sends SMS alert. Also, the system consists of 4 LEDs, 5 resistors of 1kΩ, 1 breaboard 8.5 x 5.5 cm, “male-male”, “male -female” and “female-female” wires.
Stages of work, implementation and process description
_____________________________________________________________________________________36
As it was determined in chapter 3.6, I2C protocol is used. The TX pin of the GSM was
connected to pin #A4 of Arduino and the RX pin of the GSM was connected to pin #A5, GND with
GND. The power and data connection of the sensor is optimized for reduced wiring congestion.
Four LEDs connected with the pins 4, 5, 6, 7. The DATA pin of DHT11 connected with the pin
#A1. There is a circuit and connection diagrams in a figure 25 which were created in Fritzing
program.
Figure 25. Circuit diagram of SIM900A module connected with Arduino Uno
Stages of work, implementation and process description
_____________________________________________________________________________________37
4.3.2
Description of the work
Depending on the required conditions in the room, considering all components, it is
necessary to set parameters, especially the upper and the lower thresholds. When the system turns on, smartphone receives the SMS message like “System is ready”, in parallel the green indicator lights up and flashes during the next status signal, which means that the whole setup is
completed, and system is ready for working.
Figure 27. Systems request after connection
DHT11 continuously monitors temperature and humidity conditions, sends to Arduino. In
turn, Arduino receives, processing and output the information on the Arduino serial monitor. In a
figure 28 there is a system block diagram, which graphically allows to understand the monitoring
Stages of work, implementation and process description
_____________________________________________________________________________________38
Figure 28. Sending messages process - block diagram
If the sensor failed or the sensor gets disconnected from Arduino, the information sent to user, via SMS, says “No data from sensor. Please, check theconnection “, the red light turns on and the green light stopes blinking periodically.
Figure 29. Systems request after mistake in connection
When the temperature rises above the preset threshold value in the program (within 0 to 50), it sends SMS alert saying “Hight temperature: 25 C” (for example). 25 degrees Celsius is the temperature of the room during sending SMS; the temperature would rise beyond 100 degrees
Stages of work, implementation and process description
_____________________________________________________________________________________39
Figure 30. Systems request after high threshold of temperature
When the temperature drops belong the preset threshold value in the program it sends
SMS alert with “Low temperature: 22 C” message (for example). 22 degrees Celsius is the
temperature of the room during sending SMS.
Figure 31. Systems request after low threshold of temperature
The program comes to halt for 10 minutes after sending SMS alert for fire or sensor
disconnection. It checks again for abnormality in room temperature and sensor wire connection
after 10 minutes, if any exist, it sends SMS alert again and waits for another 10 minutes.
The threshold temperature must be set high, greater than usual temperature fluctuation of
the room. For example: DHT11 has maximum measuring capacity of 50 degree Celsius, so
threshold temperature can be set from 45 to 47. High threshold value is set so that it won’t send