Abstract
Residual stresses are present in materials or structural component in the absence of external loads or changes in temperatures. The most common causes of residual stresses being present are the manufacturing or assembling processes. All manufacturing pro-cesses, such as casting, welding, machining, moulding, heat treat-ment, etc, introduces residual stresses into the manufactured ob-ject. The residual stresses effects could be beneficial or detri-mental, depending on its distribution related to the component or structure, its load service and if they are compressive or tensile. In order to do the studies of residual stresses inside pipes, where the fatigue cracks normally initiate, an equipment that allows apply-ing the Hole-Drillapply-ing Method was developed. The equipment effi-cacy was confirmed in this work by using it to detect residual strains inside a Mock-up that simulates the relief and security nozzle of Angra 1 Nuclear Power Plant (NPP) pressuriser.
Keywords
Residual stresses, hole-drilling method, measuring equipment, pressuriser security nozzle.
Development and Test of an Equipment to Measure Residual
Strain Inside Pipes Using the Hole-Drilling Method
Luiz Leite da Silva a Vladimir S. Ribeiro b
Denis H. Bianchi Scaldaferri c Emerson Giovanni Rabello d Wagner R. C. Campos e Tanius R. Mansur f
a Centro de Desenvolvimento da
Tecnologia Nuclear – CDTN/CNEN Av. Presidente Antônio Carlos, 6627 – Campus UFMG – Pampulha, Belo Horizonte, MG, Brazil CEP 31.270901. silall@cdtn.br
b Centro de Desenvolvimento da
Tecnologia Nuclear da Comissão Nacio-nal de Energia Nuclear – CDTN/CNEN vladimirsoler@hotmail.com
c Centro de Desenvolvimento da
Tecnologia Nuclear – CDTN/CNEN dhbs@cdtn.br
d Centro de Desenvolvimento da
Tecnologia Nuclear – CDTN/CNEN egr@cdtn.br
e Centro de Desenvolvimento da
Tecnologia Nuclear – CDTN/CNEN wrcc@cdtn.br
f Centro de Desenvolvimento da
Tecnologia Nuclear– CDTN/CNEN tanius@cdtn.br
http://dx.doi.org/10.1590/1679-78253126
1 INTRODUCTION
Residual stresses are present in materials or structural components even though external loads and changes in temperature do not exist. Residual stresses normally appear during manufacturing or assembling processes.
It is very common residual stresses appear after the cooling process of welded components, be-cause materials have different thermal expansion coefficients. During the welding process, the mate-rial already deposited and cooled does not allow the subsequent melted matemate-rial to contract, induc-ing tensile stresses on it.
Material phase transformations during the welding process induce residual stresses because of their volumetric change (for example austenite transforms into ferrite, bainite, pearlite or marten-site). Therefore, the material in the melted zone and in the heat affected zone that are under phase transformation, try to expand and are constrained by the whole cool metal inducing residual stress-es Rakin et al (2008), Withers and Bhadstress-eshia (2001, part I), Withers and Bhadstress-eshia (2001, part II), Francis (2007).
The residual stresses magnitude in the bead weld is related to the constraint level the mechani-cal structure could impose on it. In this case, the residual stress value may reach the metal yield limit. In components like pipelines and nozzles, the difference in diameters, wall thickness and mate-rials used are great constraint factors to the final welded structure.
The residual stresses effects may be beneficial or detrimental depending mainly on their mag-nitude, if they are compressive or tensile and their distribution related to the structural compo-nent loads. Normally the residual stresses are detrimental and there are many documented cases where those stresses were the predominant structural failure factors ASTM E837- 13a (2013). In such cases the unknown residual stresses already present in the structure were added to the load stresses causing the failure. A particularly dangerous aspect of the residual stresses is that they are not noticed. Knowing the superficial residual stresses is important to predict structural failure when they are under working loads, mainly in corrosive environments when the problem is in-creased.
Nowadays the technique most used to measure residual stress is the Hole-Drilling Method. This is a semi destructive method and may be considered in some cases as non destructive ASTM E837- 13a (2013). To perform this method, at first, appropriated strain gage rosettes are installed in the studied component surface. After that, a hole is drilled step by step at the geometric centre of the rosette. During the hole drilling, strains are detected close to it by the strain gage rosettes and the stresses are calculated based on those detected strains.
2 INSIDE PIPE RESIDUAL STRAIN MEASURING EQUIPMENT
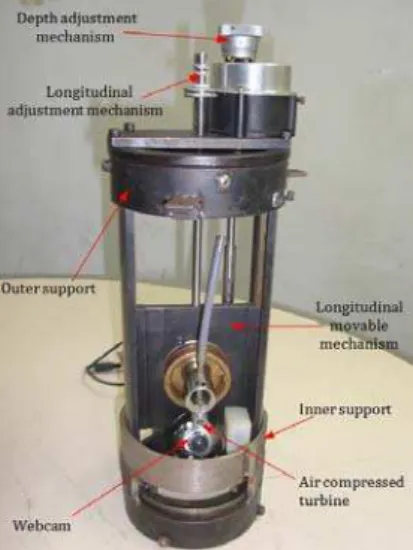
A special equipment to measure strains in the inside surface of wall pipes using the technique of Hole-Drilling Method was designed and built. By means of characteristic shape, the equipment could be positioned concentrically with the inside pipe diameter. The equipment has mechanisms that allow positioning the drill exactly in the rosette centre. A web-cam connected to the equipment is used to align the drill with the rosette centre and to measure the hole diameter. The hole diame-ter is measured calibrating the webcam pictures with the diamediame-ter of the gage circle.
The drill is rotated by an air compressed turbine with rotation around 300,000rpm. Connected to the air compressed turbine there is a micrometer that allows the operator to control precisely the drill feed and the hole depth. The developed equipment is shown in Figure 1.
Figure 1: Developed equipment to assist measuring residual stresses inside wall pipes.
The webcam and the air compressed turbine are shown in Figure 2. The webcam is used to ad-just the drill position in the strain gage rosette centre and to measure the hole diameter (Campos et al, 2013). The air compressed turbine is used to fasten and rotate the drill and then make the hole.
In Figure 3 the depth adjustment mechanism could be seen in detail. The mechanism is provid-ed with a micrometer by means of each hole step could be precisely controllprovid-ed. The mechanism to adjust longitudinally the drill position could be seen too in Figure 3. This mechanism has a screw shaft fixed in a small movable part that can move forward and backward, when the mechanism is turned.
Figure 3: Depth and longitudinal adjustment mechanisms
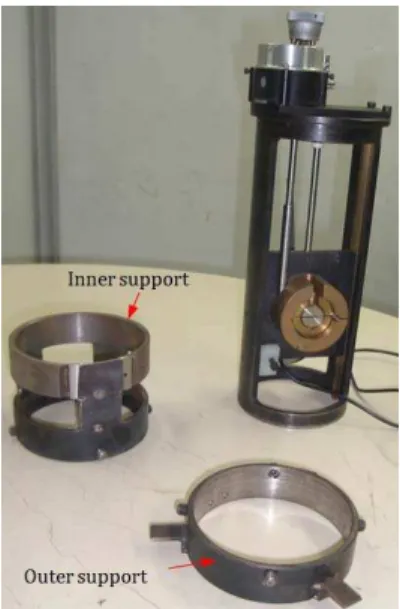
In Figure 4 the two supports could be seen. One of them is assembled in the equipment end that will stay inside the pipe. The other support is assembled along the equipment body and will touch the pipe flat surface to maintain the drill in the right position. The inside diameter of both supports are precisely adjusted to the equipment diameter. This adjust allows positioning correctly the drill in the strain gage rosette centre and make a precise hole.
3 TEST METHODOLOGY
3.1 Mock-Up Used to Measure Inside Residual Strain
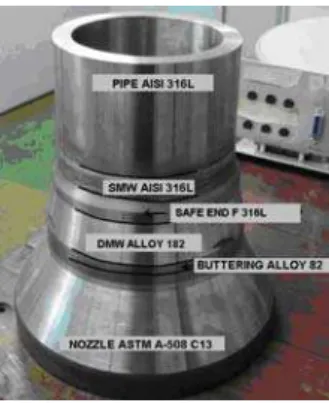
The mock-up was composed of three parts: a SA508 class 3 forged nozzle machined from a ferritic carbon steel plate with thickness of 130mm, an ASTM A276 F316L intermediate ring (safe end) machined from a forging disc with diameter of 220mm and wall thickness of 70mm, and an austen-itic stainless steel pipe 316L schedule 160 with diameter of 168.2mm and 18.3mm of wall thickness. As could be seen, all these Mock-up parts were made of different metals and were welded using nickel alloys as filler material. The Mock-up fabrication process and its different materials induce residual stresses on it. Using the developed equipment these residual stresses were measured inside the Mock-up using the Hole Drilling Method. The Mock-up that simulates the relief and security nozzle of Angra 1 NPP pressuriser could be seen in Figure 5.
Figure 5: Mock-up that simulates Angra 1 NPP nozzle.
3.2 Strain Gage Arrayed Inside the Mock-Up
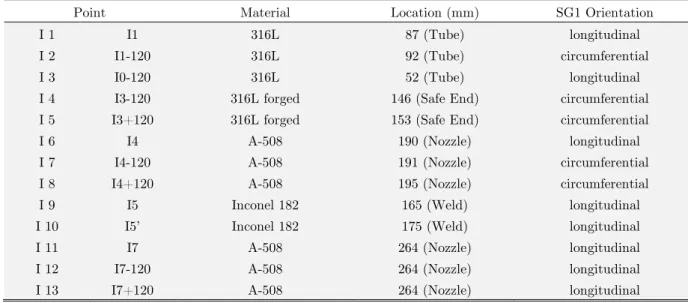
The circumference of the inside Mock-up diameter was divided by three radial lines in order to posi-tion the studied points. One of these lines is defined as the origin and was nominated as 00. A sec-ond line was positioned 1200 clockwise from the origin line (+1200). A third line was positioned 1200 counter clockwise from the origin line (-1200). Figure 6 shows these division lines and the strain gages positions could be seen in Table 1.
Point Material Location (mm) SG1 Orientation
I 1 I1 316L 87 (Tube) longitudinal
I 2 I1-120 316L 92 (Tube) circumferential
I 3 I0-120 316L 52 (Tube) longitudinal
I 4 I3-120 316L forged 146 (Safe End) circumferential
I 5 I3+120 316L forged 153 (Safe End) circumferential
I 6 I4 A-508 190 (Nozzle) longitudinal
I 7 I4-120 A-508 191 (Nozzle) circumferential
I 8 I4+120 A-508 195 (Nozzle) circumferential
I 9 I5 Inconel 182 165 (Weld) longitudinal
I 10 I5’ Inconel 182 175 (Weld) longitudinal
I 11 I7 A-508 264 (Nozzle) longitudinal
I 12 I7-120 A-508 264 (Nozzle) longitudinal
I 13 I7+120 A-508 264 (Nozzle) longitudinal
Table 1: Positions of studied points in the Mock-up and the respective materials.
3.3 Performing the Hole-Drilling Method
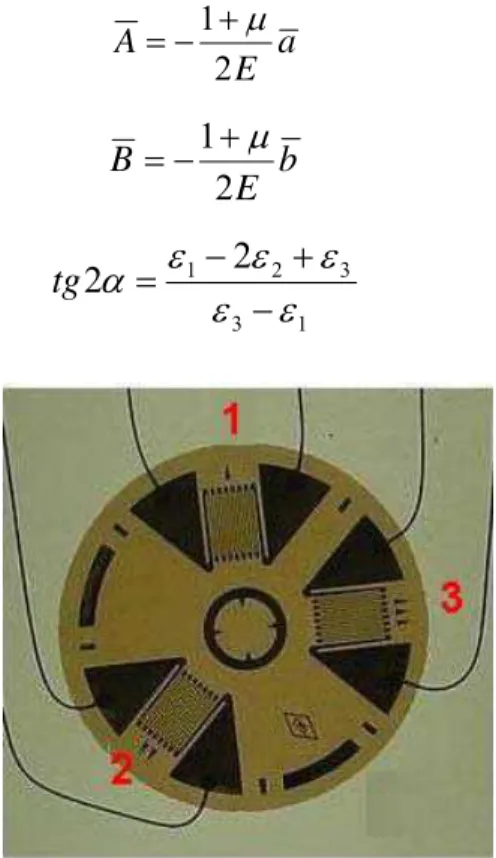
The hole-drilling method was used to measure the residual stresses in the Mock-up inside wall. In this method, appropriate rosettes to detect residual strain must be used. In this work rosettes of type A were used and a picture of one of them could be seen in Figure 7 ASTM E837- 13a (2013). The rosettes were installed in the inside component surface and then small and shallow hole is drilled in the rosette centre. The hole is drilled step by step and the strain changes in its neigh-bourhood were detected by the strain gages rosette. Using these measured strains the residual stresses could be calculated. The relief strains or the changes in strain are calculated using Equation (1) (Tec Note TN-503, 2010).
K R R (1)
In Equation (1) ε is the measured strain,
R
R
f
R
i(Ohm) for each drilled step;R
i is the strain gage resistance value before begin drilling the hole andR
f is the strain gage resistance valuefor each drilled step and K is the gage factor. The principal residual stresses are calculated by Equations (2) and (3). The constants ̅ and are conform Tech Note TN-503 (2010). The principal strain orientation related to the ε1 is done by Equation (6).
22 1 3 2 1 3 3 1
max
4
4
1
2
B
A
(2)
22 1 3 2 1 3 3 1
min
4
4
1
2
B
a
E
A
2
1
(4)b
E
B
2
1
(5)1 3
3 2
1
2
2
tg
(6)Figure 7: Typical rosette for residual stress (TML Pam E-101N, 2006).
The developed equipment mounted inside the Mock-up could be seen in Figure 8.
Figure 8: Developed equipment mounted inside the Mock-up.
(a) (b)
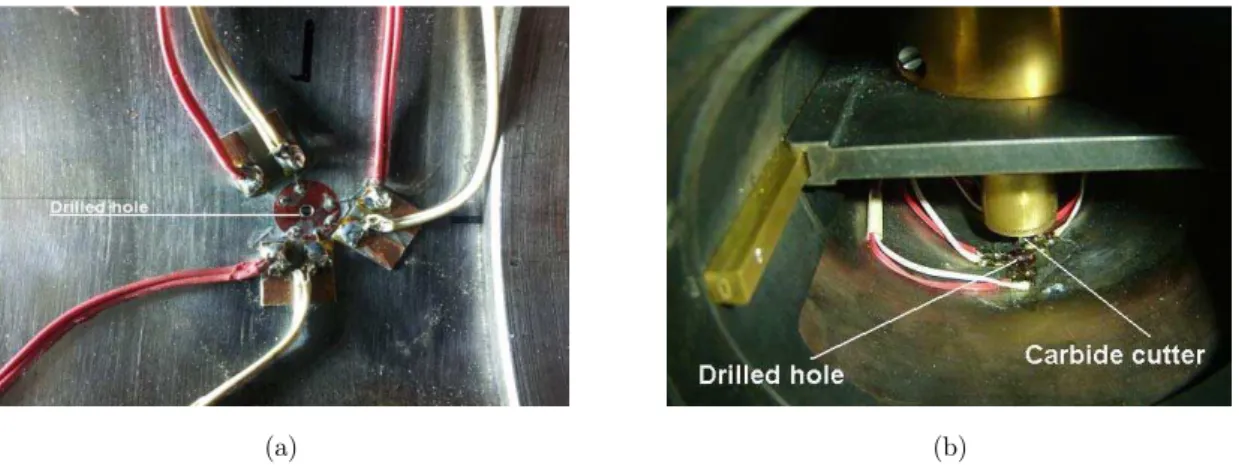
Figure 9: a) Rosette with the drilled hole; b) Drilling a hole in the inside wall Mock-up.
After calculating the relieved strains, it must be verified if the residual stresses field is uniform or non uniform. If the stresses field is uniform, the principal residual stresses values and their orien-tations are calculated following the recommendations contained in item 9 of the ASTM E837 - 13a code (2013) and in the manufacturer technical notes (Hoffmann, 1989, Tec Note-503, 2010). On the other hand, if the stresses field is non uniform, the residual stresses and its orientations are calculat-ed following the item 10 in the ASTM E837- 13a (2013) code recommendations and in the manufac-turer technical notes (Hoffmann, 1989, Tec Note-503, 2010).
The residual strains were measured using the materials and equipments listed below:
Strain Gages: FRS-2-11 TML.
Adhesive: Loctite 496.
Protector Cover: Mcoat MM.
Shielded Cables with 4 Wires: KMP/AF/Pirelli.
Terminals: Kratos.
Commutator and Data Acquisition Unit 34970A Model / Agilent.
Multimeter PM2000 Model.
4 RESULTS
The inside residual strains were obtained in the thirteen measuring points indicated in Table 1. The residual stresses were calculated using these measured strains.
In order to compare the values of the Equivalents Uniforms Principal Residual Stresses with the tensile stress of the materials, the equivalent uniaxial stress was determined using Tresca and von Mises criteria.
Depth Strain Gages measurements
Z (mm) Z/D R1 (ohms) R2 (ohms) R3 (ohms)
0.00 0.00 119.54 120.21 120.15
0.26 0.05 119.55 120.21 120.15
0.51 0.10 119.57 120.22 120.17
0.77 0.15 119.59 120.24 120.18
1.03 0.20 119.59 120.25 120.20
1.28 0.25 119.59 120.25 120.20
1.54 0.30 119.59 120.25 120.20
1.80 0.35 119.59 120.25 120.20
2.06 0.40 119.59 120.25 120.20
Table 2: Typical result for a measuring point, D is the drill diameter.
Figure 10: Normalized numerical relieved strains of point I3+120o compared using ASTM E837- 13a (2013).
Depth
Measured strain
(με)
Relieved strain
Coefficients A and B
(x10-6) α(
0)
Equivalent uniform principal stress (MPa)
Z Z/D ε3+ε1 ε3-ε1 ε3+ε1-2ε2
(mm) (με)/% (με)/% (με)/% σmin σmax
0.000 0.00
ε1 0 0 0 0 a b
ε 0 / / / A B
ε 0 0 0 0 4A 4B
0.260 0.05
ε1 40 56 -24 16 a 0.032 b 0.061
73 -218 -102
ε 20 / / / A -0.088 B -0.126
ε 16 15 142 39 4A -0.353 4B -0.506
0.510 0.10
ε1 105 169 -41 49 a 0.071 b 0.140
65 -274 -165
ε 60 / / / A -0.193 B -0.292
ε 64 45 238 118 4A -0.773 4B -1.167
0.770 0.15
ε1 166 294 -37 61 a 0.101 b 0.212
61 -307 -226
ε 117 / / / A -0.276 B -0.442
ε 129 78 217 148 4A -1.105 4B -1.766
1.030 0.20
ε1 198 379 -17 41 a 0.120 b 0.266
56 -309 -268
ε 169 / / / A -0.328 B -0.554
ε 181 100 100 100 4A -1.313 4B -2.217
1.280 0.25
ε1 198 379 -17 41 a 0.130 b 0.303
56 -284 -249
ε 169 / / / A -0.355 B -0.630
ε 181 100 100 100 4A -1.421 4B -2.522
1.540 0.30
ε1 198 379 -17 41 a 0.134 b 0.325
56 -276 -243
ε 169 / / / A -0.365 B -0.678
ε 181 100 100 100 4A -1.460 4B -2.711
1.800 0.35
ε1 198 379 -17 41 a 0.134 b 0.340
56 -275 -244
ε 169 / / / A -0.365 B -0.708
ε 181 100 100 100 4A -1.460 4B -2.831
2.060 0.40
ε1 198 379 -17 41 a 0.132 b 0.346
56 -279 -248
ε 169 / / / A -0.359 B -0.721
ε 181 100 100 100 4A -1.436 4B -2.886
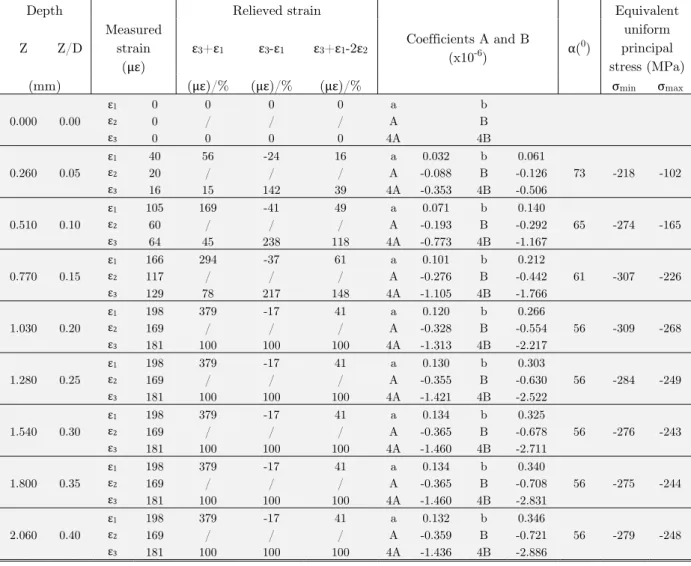
Table 3: Measurement of Residual Stresses by the Hole Drilling Strain Gage Method of point I5’.
It could be observed that the inside residual stresses change in the direction from the pipe to the nozzle. At first there are relatively elevated tensile stresses in the pipe, what could be seen in results at positions I1, I2. Then the stresses change to compression in the safe-end and in the nozzle as could be seen from results at positions I4 and I13.
Near the heat affected zone, in the direction from the safe-end to the nozzle, there are high re-sidual stresses in compression.
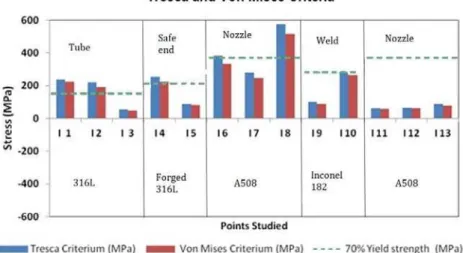
In some points the measured values were above the limit of 70% of the yield stress of the material. The comparison between the values using the Tresca and von Mises uniaxial criteria was proposed to evaluate this stress behaviour. In Figure 12, could be seen the results from Tresca and von Mises criteria.
Tresca and von Mises criteria showed that the residual stresses at the measuring points I1, I2, I4, I6 and I8 are beyond the limit of the Hole-Drilling Method. However the strains measured at those points could be considered as qualitative values for residual stresses studies.
Figure 12: Tresca and von Mises criteria in Equivalent and Uniform Residual Principal Stresses.
5 CONCLUSIONS
It was possible determine the inside residual stresses in a Mock-up that simulates the security and relieve nozzle of the Angra 1 NPP, using the developed measuring equipment that allows applying the hole-drilling method inside pipes.
With the developed measuring equipment the drill could be precisely positioned at the strain gage rosette centre, the hole depth accurately controlled and the hole diameter correctly measured.
The residual stresses values obtained in the test of the measuring equipment are in accordance with Hole-Drilling Strain-Gage Method.
Many residual stresses in the Mock-up inside wall used to test the measuring equipment are in compression.
Acknowledgements
The authors would like to thank CDTN’s staff of the Weld Laboratory and also the Stress Analysis Laboratory for their significant contribution to this work. The authors would like to thank also the institutions Fundação de Ampa-ra à Pesquisa do Estado de Minas GeAmpa-rais – FAPEMIG and Conselho Nacional de Desenvolvimento Científico e Tec-nológico – CNPq for the financial support.
References
ASTM E 837-13a, Standard Test Method for Determining Residual Stresses by the Hole-Drilling Strain-Gage Meth-od. October 2013.
Campos, W. R. C., Rabello E. G., Mansur, T. R., Scaldaferri, D. H. B., Paula, R. G. Souto, J. P. R. S. and Carvalho Júnior I. T., Residual Stress Measurements in the Dissimilar Metal Weld in Pressurizer Safety Nozzle of Nuclear Power Plant, International Nuclear Atlantic Conference - INAC 2013 Recife, PE, Brazil, November 24-29, 2013 Associação Brasileira de Energia Nuclear - ABEN ISBN: 978-85-99141-05-2 INAC 2013.
Francis, J. A., Bhadeshia, H. K. D. H. and Withers, P. J., "Welding Residual Stresses in Ferritic Power Plant Steels", Materials Sci. and Tech., Vol. 23 2007, pp. 1009-1020.
Hoffmann, Karl, “An Introduction to Measurements using Strain Gages. Publisher: Hottinger Baldwin Messtechnik GmbH, 1989.
Rakin, M., Gubeljak, N., Dobrojević, M. and Sedmak, A. Modelling of ductile fracture initiation in strength mis-matched welded joint. Engineering Fracture Mechanics, 75(11), pp.3499–3510 (2008).
Tech Note TN-503, Measurement of Residual Stresses by the Hole-Drilling Strain Gage Method. Vishay Micro-Measurements, Revision 01 November 2010.
Tokyo Sokki Kenkyujo Co. LTD. Precise & Flexible Strain Gauges, TML Pam E-101N, 2006.
Withers, P. J. and Bhadeshia, H. K. D. H. “Residual stress Part 1 – Measurement techniques”, Materials Sci. and Tech., April 2001, Vol. 17 2001, pp. 355-355.
