Implementation of a low cost data acquisition board
for photovoltaic arrays analysis and diagnostic
Sérgio Sousa
* д, Maicon Onofre
*,Tiago Antunes
*,Cláudio Branco
*,José Maia
*д,Jose-Inacio Rocha
*♦,V. Fernão Pires
* д * Escola Superior Tecnologia Setúbal / Instituto Politécnico Setúbal, Setúbal, Portugalд
INESC-ID Lisboa, Lisbon, Portugal
♦
CTS/UNINOVA and FCT/UNL, Lisbon, Portugal
Abstract— Testing PV modules are one of the important procedures to ensure the conformity with the standards and quality of this equipment’s. To implement some of the PV modules tests a data acquisition system is required. This paper presents the design and implementation of a data acquisition system for photovoltaic systems. The developed system is characterized by a low cost board based on a microcontroller. The description of the hardware as well an application to test its performance is presented. The developed system can be used for reading, storing and analyzing information from several photovoltaic systems. Experimental tests are presented to confirm the characteristics of the developed data acquisition board.
Keywords— photovoltaic arrays, signal acquisition and processing, power electronics, HMI
I. INTRODUCTION
In the last years, renewable energy sources became extremely important, especially due to environmental benefits and energy security. Among them, photovoltaic systems become one of the most important. These systems consist of solar cells for energy extraction from the sun and power converters for load or grid interface [1-5]. The power converter connected to the solar cells is also used to generate maximum power from the PV array [6-11]. PV panels are also characterized by nonlinear voltage–current characteristics, and the insolation and ambient temperature are unpredictable.
The use of photovoltaic panels for energy harvesting is becoming an increasing trend, even in the actual state of economic affairs. As the energy harvest through the use of central or de-centralized means increases, also the need for evaluation, diagnostic and analysis becomes more and more necessary for several ends, from academic and industrial investigators to the everyday installation technician. There are already several types of diagnostic systems for photovoltaic, for all the price ranges, from the extremely cheapest, that try to obtain the maximum number of values from a reduced number of measures, mostly by interpolation to extremely expensive systems that analyze each cell with microscopic detail. In order to obtain data about a solar panel, it used a data logging system that measures all the important values using a well known hardware [12-14] or a microprocessor based system [15]. Although this philosophy can yield, over time, a lot of interesting and useful data, it takes time to provide
answers as far as speed is concerned. And the data has to be collated and analyzed over time, and all the conditions in which it is obtained have to be taken into consideration. The purpose of the prototype shown in this article is to obtain data from the solar panel, automatically, in such a way that might be usable in order to set it up for an MPPT or a regulator in a straightforward and usable way, in a short period of time. Instead of gathering data over a period of days or weeks, and making an in-depth analysis for every situation, the necessary values are obtained through a dc-dc converter, used like an MPPT over a nominal load. As such, as the duty cycle is changed from minimum to maximum, the voltage and current is recorded, allowing for the calculation of several important parameters, such as efficiency, power and current data over the existing voltage range, for set values of temperature and radiation.
II. CONCEPT
This system is arranged in several blocks, as seen fig 1. In the upper block we have the power topology, in this case a non-isolated buck converter, set up as an MPPT (Maximum Point Power Tracker). This power topology is controlled by a microcontroller, which has to measure the panel’s output voltage and current and change the converter’s duty cycle as needed, put the data into an EEPROM, and send the data to the PC through the usb link, i.e. the human-machine interface, which is based on the popular Matlab simulation software.
The architecture has been implemented the panel voltage and current as well solar irradiation and temperature measurements. A dc/dc power converter is also integrated in order to automatically obtain the several characteristics of the solar panel. This design can be quite compact, as the power topology, the bulky part of it, mainly due to power components, i.e. mosfet, heat dissipation, and other elements, can be allocated in the same PCB. In the lower block we can see the command and acquisition system, which is based on a microcontroller.
In this system it is used a Microchip PIC 18F4550 microcontroller. This microcontroller has several interesting interfaces, such as usb 2.0, SPI, analog inputs and PWM outputs, among others. The usb is mainly used to convey the information to and from the PC, via usb, using the Matlab-programmed interface. The PC (bottom rightmost block) is used to read the data from microcontroller as needed, make the necessary calculations and outputs, and power up the command and acquisition system via the usb port.
In the most simple application, the user can check if the photovoltaic panel, for a given amount of temperature and/or radiation conforms to the factory specification, and, in a more elaboration fashion, can be used to set up an harvesting system, in such a way as to get an MMPT or regulator that can enhance the energy obtained through the collect.
The overall principle of the system is the following: if it is applied an variable resistor-based load to a solar array, with a value ranging between 0 and infinity, it is possible to produce the usual characteristic curves, such as power as function of voltage, and/or as current as function of voltage. In the same way, if a dc-dc converter with a fixed load is connected to a photovoltaic array, by changing the cycle factor it is possible to modify, from the panel’s point of view, the load, thereby making the gathering of the characteristic curves possible.
In this way, we can quickly obtain the characteristic curves of a photovoltaic array, and, at the same time, allowing for a pre-set test for a future implementation with a simulated load, cutting on development and installation time.
III. SIMULATION
Before implementing the system, a simulation was made in order to see if there were some details that were overlooked in the concept. In the simulation it was used the data supplied from a 5W Intertek photovoltaic array, and used in a straightforward simulation, using several values for radiation and ambient temperature. The simulation yielded several results, namely the character curve of the output panel’s current as a function of its voltage (as seen in figure 2) and output power as a function of voltage (as seen in figure 3).
The results obtained with the simulation were similar, given a set tolerance, with the values obtained through experimental data gathering for different values of ambient temperature and radiation with a variable resistor load. As such, the model was deemed useful for further experiments together with the power electronic circuit employed. Some
elements were not taken into account, such as variations in radiation and temperature smaller than a set time.
0 5 10 15 20 25
0 0.05 0.1 0.15 0.2 0.25 0.3 0.35 0.4
Voltage [V]
C
u
rr
e
n
t
[A
]
1000 W/m2
750 W/m2
500 W/m2
250 W/m2
Fig.3 – Output current as a function of voltage
0 5 10 15 20
0 1 2 3 4 5 6
Voltage [V]
P
o
w
e
r
[W
]
1000 W/m2
750 W/m2
500 W/m2
250 W/m2
Fig.4 – Output power as a function of voltage
IV. IMPLEMENTATION
The implementation was divided into three sections, such as the power topology, microcontroller, and PC’s software.
A schematic of the power topology is visible in figure 5.
The power topology is a dc-dc buck converter, used with a nominal load, similar to the panel’s maximum power attainable in the best conditions possible. In order to obtain a more lightweight device, a mosfet was used, thereby allowing for an increase of frequency compatible with a smaller LC output filter. The topology was chosen for the sake of simplicity, though some other non-isolated dc-dc converter topologies could be employed instead.
The command and interface system (as seen in figure 6) is based on a Microchip PIC 18F4550 microcontroller, and through the use of a simple voltage and current acquisition electronic system, the signals are sent to the analog inputs. The voltage was sampled with a voltage divider, and the current was measured through an 0,1 Ω resistor shunt with the necessary power dissipation. The system also has available analog inputs in order to use a thermo resistor or peltier device for temperature sampling and/or a pyrometer for radiation measurements.
Almost at the same time, the PWM signal output changes from a set value to its maximum. As the duty cycle changes, the voltage and current measured are sent to an EEPROM (could be changed to an SD card for ease of use or similar).
The system an optoisolation security system separating the microcontroller and the power topology, in order to avoid potential over voltage and over current problems with the commutation device, i.e. the mosfet used.
The use of an adequate size EEPROM or a similar storage device is necessary due to need to use the system for an adequate number of sets of measurements, without losing time with the USB link unnecessarily for each set of samples made.
PIC 18F4550
Current
Voltage Temperature
Radiation PC
PWM
USB
data
power
Fig 6 – Acquisition and command structure
The choice between gathering data and sending it to the usb link is made on the HMI software interface, thereby enabling it to make a sample, or a set of samples, in order to check the data for changes in temperature, radiation, or load.
The system was designed for portability, and as such, the system is powered by the USB bus, as the calculations showed that the controller system has a small current load due to the choice of the microcontroller’s oscillator. It was also studied the possibility of using a battery powered by the solar panel’s energy through the use of an adequate dc-dc converter. It could be also interesting in the future to use the system off-line, that is, without a PC, and obtaining a programmable
number of samples, within a set time, and retrieving them with the help of removable storage devices, such as an USB pen disk or an SD card.
The system was assembled in a double-sided PCB (see fig 7) including power topology, control and interface.
Fig 7 – PCB layout (component side)
In the right upper position of the figure 7 it is visible the PIC microcontroller, and on the left upper position is the power topology. The optoisolation system is in the middle. The usb is set up on the lower side of the system, so as to avoid commutation noise from the dc-dc converter. The programming interface is also located in the lower part, for the same reason. The measuring circuits are located on the left part of the board (voltage divider and resistor shunt).
The overall strategy for the system was planned using the HMI software as the topmost controller of the system, and the microcontroller as a subordinate of the HMI. As such, the program used in the microcontroller has to attend to the control data sent from the Matlab software via the usb link.
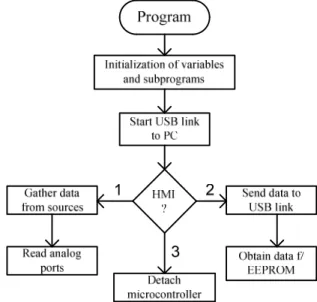
The microcontroller program structure is outlined in fig 6.
After the initial power up status and tests, the program creates an usb the link to the PC, and to the Matlab HMI.
If the link is healthy, then the program awaits for one of three calls: start the data gathering, send all available data from the EEPROM to the HMI, or detach the USB device from the network.
In the first option, an order is given internally to change the PWM signal from 0% to 100%, and roughly at the same time the array’s output current and voltage are read within a set time interval, as outlined in the concept chapter. The data is sent to the EEPROM via serial link, in order to free the microcontroller to another set of samples, for example.
In the second option, the data inside the EEPROM is sent via the microcontroller and the USB link to the PC, and therefore to the Matlab HMI, where it is presented to the final user. The fact that the hardware is subordinate to the software, allows for a more flexible system, in line with many systems available commercially.
In the third and last option, the usb device is ejected from the system, and in order to continue the system has to plugged in again, like any normal usb device.
V. EXPERIMENTAL RESULTS
A photo of the finalized system is visible in figure 9, where most of the components are visible, as explained in the implementation chapter.
Fig 9 – PCB of the completed system
The experimental setup was designed for a small photovoltaic device, hence the lack of ventilation or other means of heat dissipation, making the system lightweight. In addition to the USB interface, there also several waring led lights so as to add to the ease of use of the final system.
The system was tested with the same photovoltaic array used in the simulation (an Intertek 5W photovoltaic array). The tests were made with different temperature and radiation conditions, in order to check their robustness and stability facing external disturbances.
The speed of the tests was adjusted in order to account for the slow dynamics of the photovoltaic array, and it is possible to obtain both output power and current curves in less than a
minute (not measuring the speed of the data sent through the usb link).
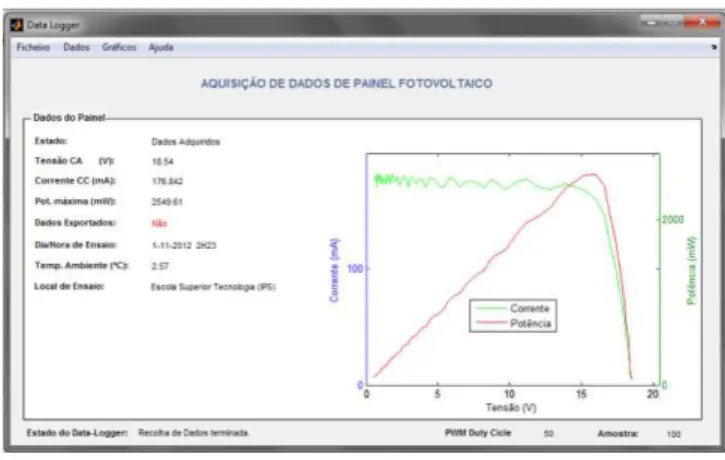
The HMI is visible on the figure 10, where several measurements are visible on the right side of the window.
Fig 10 – Sample of the HMI interface
Along with the output power and current curves, the system can collate several auxiliary data, such as open voltage current, short circuit current, and a date and time stamp for later study and analysis. The temperature is shown on the left side of the screen, along with a location stamp for ease of use.
VI. CONCLUSIONS
Due to the fast evaluation of the renewable energy sources during the last decades resulted in many installations of many of these systems. Among them, photovoltaic systems are one of the most important. Thus, data acquisition boards to collect and process data from photovoltaic systems are now a requirement.
Under this context, in this work a low cost data acquisition board for photovoltaic arrays analysis and diagnostic. This system allows to collect information from PV modules that can be processed or stored by a computer to document or analyze these modules. In order to automatically obtain the PV characteristic a dc/dc power converter was used. This converter is controlled by a Microchip PIC 18F4550 microcontroller.
The control interface has been developed thru the Matlab software. From the experimental obtained results it was possible to verify that this system is practicable and effective.
ACKNOWLEDGEMENTS
This work was supported by national funds through FCT – Fundação para a Ciência e a Tecnologia, under project PEst-OE/EEI/UI4064/2011.
REFERENCES
[1] TJ Liang, YC Kuo, JF Chen. Single-stage photovoltaic energy conversion system. IEE Proceedings - Electric Power Applications, vol. 148, issue 4, pp. 339-344, 2001.
Journal of Power Electronics Electronics, vol. 12, no 1, pp. 172-180, 2012.
[3] V. F. Pires, J. F. Martins, Chen Hao, “Dual-Inverter for Grid Connected Photovoltaic System: Modelling and Sliding Mode Control” Solar Energy, vol. 86, no. 7, pp. 2106–2115, 2012
[4] Hamidreza Ghoddami, Amirnaser Yazdani. A Bipolar Two-Stage Photovoltaic System Based on Three-Level Neutral-Point Clamped Converter. IEEE Power and Energy Society General Meeting, pp. 1-8, 2012.
[5] V. Fernão Pires, António Roque, Duarte M. Sousa, Gil Marques, “Photovoltaic Electric Vehicle Chargers as a Support for Reactive Power Compensation”, International Conference on Renewable Energy Research and Applications (ICRERA), pp 1-6, November 11-14, 2012. [6] D. Petreuş, S. Daraban, I. Ciocan, T. Patarau, C. Morel, M. Machmoum,
“Low cost single stage micro-inverter with MPPT for grid connected applications,” Solar Energy, vol. 92, pp. 241-245, 2013.
[7] S.-K. Ji, D.-H. Jang, S.-S. Hong, “Analog Control Algorithm for Maximum Power Trackers Employed in Photovoltaic Applications”, International Journal of Power Electronics Electronics, vol. 12, no 3, pp. 503-508, 2012.
[8] V. Fernão Pires, J. F. Martins, J. Fernando Silva, “A Control Structure for a Photovoltaic Supply System with Power Compensation Characteristics Suitable for Smart Grid Topologies”, 8th International Conference-Workshop Compatibility and Power Electronics (CPE2013), pp 40-45, June 5-7, 2013.
[9] S Jain, VA Agarwal, “New Algorithm for Rapid Tracking of Approximate Maximum Power Point in Photovoltaic Systems”, IEEE Transactions on Power Electronics Letters, vol. 2, no. 1, pp. 16-19, 2004.
[10] X. Gao, S. Li, R. Gong, “Maximum power point tracking control strategies with variable weather parameters for photovoltaic generation systems,” Solar Energy, vol. 93, pp. 357-367, 2013.
[11] M. A. S. Masoum, H. Dehbonei, E. F. Fuchs, “Theoretical and experimental analyses of photovoltaic systems with voltage and current based maximum power-point tracking,” IEEE Transactions on Energy Conversion, vol. 17, no. 4, pp. 514-522, 2002.
[12] E. Koutroulis, K. Kalaitzakis, “Development of an integrated data-acquisition system for renewable energy sources systems monitoring”, Renewable Energy, vol. 28, Issue 1, pp. 139-152, January 2003 [13] A. Mahjoubi, R. F. Mechlouch, A. B. Brahim, “A Low Cost Wireless
Data Acquisition System for a Remote Photovoltaic (PV) Water Pumping System”, Energies, vol. 4, Issue 1, pp. 68-89, 2011.
[14] V. D. Ulieru, C. Cepisca, T. D. Ivanovici, “Data Acquisition in Photovoltaic Systems”, Proceedings of the 13th WSEAS International Conference on CIRCUITS, pp. 191-196, 2009.